Always be on the lookout for the presence of wonder.
—E. B. White
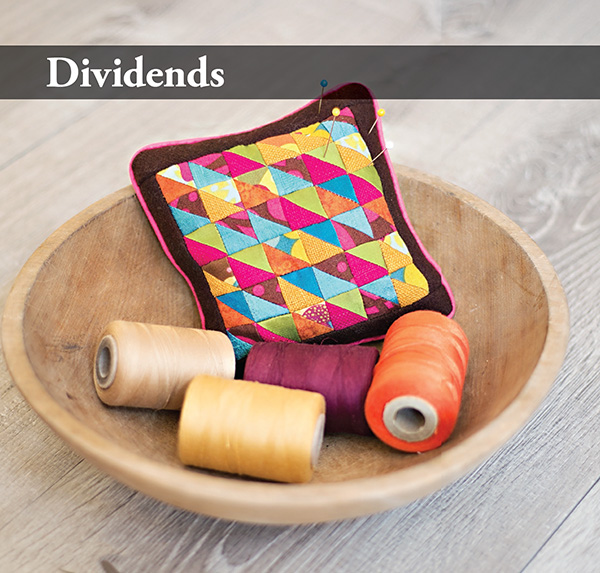
Dividends Pincushion
Finished pincushion: 6˝ × 6˝
A dividend, by definition, is the profit earned on owned shares. The projects here represent the same kind of idea but in quilting terms. When you create a half-square triangle unit by stitching a diagonal line from corner to corner on a square, the next instruction traditionally would be to trim the fabric ¼˝ away and discard it. Since I work with costly higher-end fabrics, this seemed an incredible waste.
I used a connecting-corner construction in Bohemian Dance, but rather than trimming out the fabric beneath and disposing of it, I sewed an additional parallel line of stitching ½˝ away from the first stitched line and cut between the two lines. What results is an additional half-square triangle unit—a dividend! The sizes may be a bit irregular, but they can be trimmed. Bohemian Dance yielded two sizes of dividends: a half-square triangle unit that could be trimmed to finish at 2˝ × 2˝ and another smaller unit that, when trimmed, finished at ¾˝ × ¾˝. You can construct the half-square triangle units featured in these projects in any number of ways, but I used the leftovers from Bohemian Dance.
Read Exploring New Textiles: Eclectic Fabric Guidelines before beginning.
Note: Note: Interface all the silk dupioni before cutting. Also test any loose weaves to determine whether they would benefit from interfacing before you begin.


Materials
Mixed eclectic blend of textile scraps: Silk dupioni, silk matka, silk/cotton blends, batiks, and mixed cottons for half-square triangle units or 36 smaller dividend units
Brown wool flannel: 1 fat eighth (9˝ × 21˝) or ¼ yard for borders and pincushion back
Decorative ribbon (1½˝ wide): 8˝ length
Bias-covered small cording with seam allowance: 1 yard
Crushed walnut shells and lavender or material of your choice to fill pincushion
Cutting
ECLECTIC SCRAPS
• Trim 36 of the smaller dividend units into 1¼˝ × 1¼˝ half-square triangle units or cut 36 squares 1⅝˝ × 1⅝˝.
BROWN WOOL FLANNEL
• Cut 2 strips 1¼˝ × 5˝.
• Cut 2 strips 1¼˝ × 6½˝.
• Cut 1 square 6½˝ × 6½˝.
Construction
If you do not have dividend units, construct the half-square triangle units as instructed below.
HALF-SQUARE TRIANGLE UNITS
1. Draw a diagonal line from corner to corner on the wrong side of 18 eclectic scrap squares.
2. Being mindful of the textile weights, pair these squares with the remaining 18 squares, right sides together. Keep the fabric pairs scrappy.
3. Sew a scant ¼˝ seam on either side of each drawn line. Cut on the drawn lines. Each pairing yields 2 half-square triangle units, which will measure 1¼˝ × 1¼˝.

Half-square triangle units
Assembly
1. Organize the 36 half-square triangle units into 6 rows of 6 units each.
2. Sew the rows. Press the rows in alternating directions.
3. Join the rows together. Press in one direction or press the seams open. The top will measure 4½˝ × 4½˝.
4. Add the 1¼˝ × 5˝ wool flannel borders to the sides. Press the seams open.
5. Add the 1¼˝ × 6½˝ wool flannel borders to the top and bottom. Press the seams open. The front will measure 6½˝ × 6½˝.
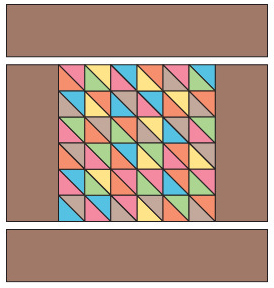
Front assembly
6. Position the length of ribbon on the 6½˝ wool flannel square. (I chose to mark a parallel line 1¾˝ down from one edge of the back with a chalk marker and to align one edge of the ribbon with this drawn line.) Topstitch the ribbon in place along both long edges.
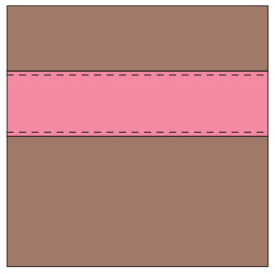
Pincushion back
7. Add the cording. Cut a length approximately 30˝ long. Pin it to the pincushion top, aligning the raw edges.
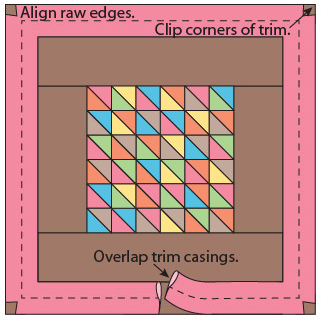
Cord trim
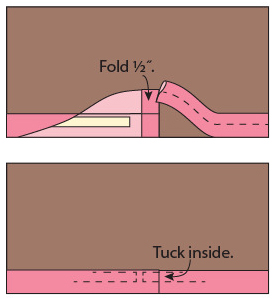
8. Bring the ends together so that they overlap in the middle of one of the sides. Mark the point where they overlap. On one of the ends, open the cording fabric and cut just the cord at the point where they meet. Trim the fabric of the cut end approximately 1˝ longer than where you cut the cord.
9. Fold under the edge of the fabric ½˝ on the trimmed end. Align the 2 ends so the interior cords meet but the fabric from the cut end extends beyond the untrimmed end. Wrap the fabric of the cut end around the uncut end, encasing and finishing both edges. Stitch the cording to the pincushion top all the way around using a zipper foot.
10. Layer the finished top and the back of the pincushion, right sides together. Using a zipper foot, stitch around the entire edge, leaving an opening through which to turn the pincushion right side out.

11. Turn the pincushion right side out.
12. Using a funnel, fill the pincushion with the fill of your choice. I used a 70/30 mix of crushed walnut shells and lavender. The walnut shells give it weight, and the lavender lends its lovely scent.
13. Stitch the opening closed by hand.
