Dividends Bolster
Finished bolster: 19½˝ × 31½˝
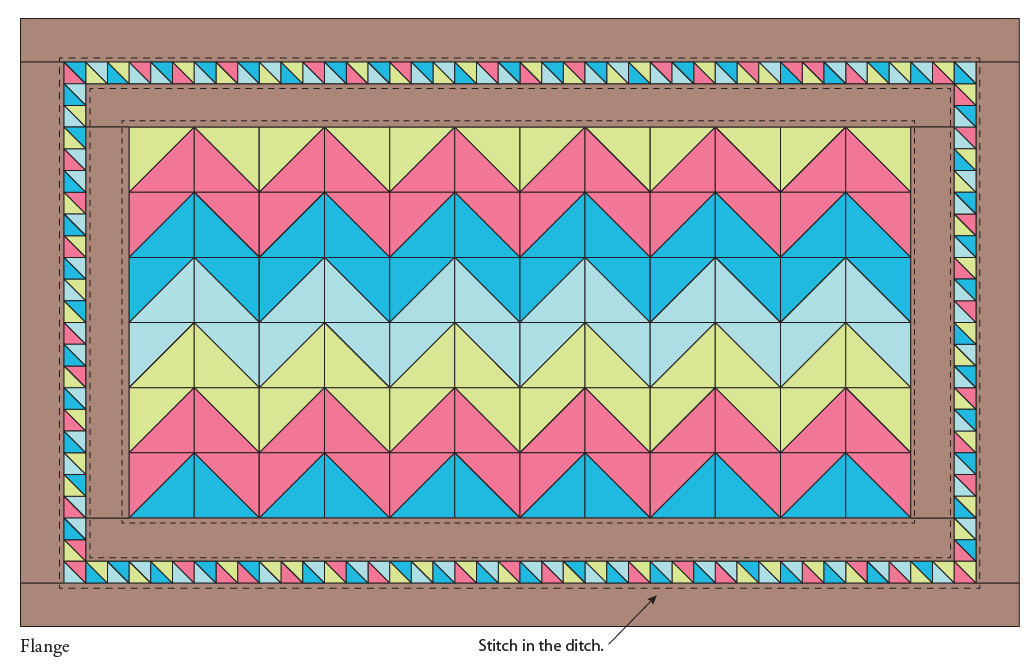
The Dividends Bolster uses both sizes of the half-square triangle units that are by-products of the connecting-corners construction used in Bohemian Dance. Their finished sizes are 2˝ × 2˝ and ¾˝ × ¾˝. The larger half-square triangle units are used in the center. A chevron effect is created by controlling the color placement. The smaller half-square triangle units are used as a pieced border. The small size of these half-square triangle units lends a wonderful detail and texture to the project. Wool flannel was used for the solid borders and the back not only to richly frame the brighter-colored detail of the interior but also to create a contrast of texture.
Use your dividends to create this project, or first make the half-square triangle units from yardage. The quantities are given for doing it either way.
Read Exploring New Textiles: Eclectic Fabric Guidelines before beginning.
Note: Interface all the silk dupioni before cutting. Also test any other loose weaves to determine whether they would benefit from interfacing before you begin.
Materials
Dividend units: 116 smaller dividend half-square triangle units and 72 larger dividend half-square triangle units
Brown wool flannel (54˝–60˝ wide): ⅓ yard for borders
Backing (54˝–60˝ wide): ⅝ yard
12˝ × 24˝ pillow form or fiberfill of your choice
If you are constructing the half-square triangle units and not using dividend half-square triangle units, you will also need these materials:
Scraps: Approximately ½ yard total of mixed eclectic cotton prints
Fuchsia silk matka: ⅛ yard
Teal Radiance silk/cotton blend: ⅛ yard
Turquoise silk dupioni: ⅛ yard
Cutting
DIVIDEND UNITS
• Trim 116 smaller dividend units to 1¼˝ × 1¼˝.
• Trim 72 larger dividend units to 2½˝ × 2½˝.
BROWN WOOL FLANNEL
• Cut 2 strips 2˝ × 32˝.
• Cut 2 strips 2˝ × 27½˝.
• Cut 2 strips 2˝ × 17˝.
• Cut 2 strips 2˝ × 12½˝.
BACKING
• Cut 2 strips 20˝ × 22˝.
Note: Follow the remaining cutting instructions only if you are not using dividends from previous projects.
SCRAPS
• Cut 18 squares 2⅞˝ × 2⅞˝.
FUCHSIA SILK MATKA
• Cut 24 squares 2⅞˝ × 2⅞˝.
TEAL RADIANCE SILK/COTTON BLEND
• Cut 18 squares 2⅞˝ × 2⅞˝.
TURQUOISE SILK DUPIONI
• Cut 12 squares 2⅞˝ × 2⅞˝.
Note: Add the scraps from the previous cuts of silk matka, Radiance silk/cotton blend, and silk dupioni randomly into the textile scraps mix for the smaller squares that follow.
SCRAPS
• Cut 116 squares 1⅝˝ × 1⅝˝.
Construction
If you do not have dividend units, construct half-square triangle units as instructed below.
LARGER HALF-SQUARE TRIANGLE UNITS
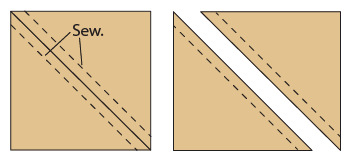
1. Draw a diagonal line from corner to corner on the wrong sides of 12 scrap 2⅞˝ squares.
2. Pair these squares with 12 fuchsia matka squares, right sides together.
3. Sew a scant ¼˝ seam on either side of each drawn line. Cut on the drawn lines. Each pairing yields 2 half-square triangle units measuring 2½˝ × 2½˝. Press the seams in one direction. There will be 24 scrap/fuchsia units.
Half-square triangle units
4. Following the same process, construct 24 units with 12 fuchsia squares and 12 teal squares.
5. Construct 12 units with 6 teal and 6 turquoise squares.
6. Construct 12 units with 6 turquoise and 6 scrap squares. You will have a total of 72 larger half-square triangle units.
SMALLER HALF-SQUARE TRIANGLE UNITS
1. Randomly select 57 pairings of the 1⅝˝ × 1⅝˝ squares.
2. Construct 116 half-square triangle units as instructed above.
Assembly
1. Lay out the center panel by arranging the larger units into 6 rows of 12 units each. Control the color placement to create the chevron effect.

Bolster assembly
2. Sew the units in each row together. Press the rows in alternating directions.
3. Join the rows together. The center will measure 12½˝ × 24½˝.
4. Add the 2˝ × 12½˝ wool flannel strips to the sides of the center panel. Press the seams open.
5. Add the 2˝ × 27½˝ wool flannel strips to the top and bottom. Press the seams open.
6. Sew 2 rows of 20 smaller half-square triangle units each. Add a row to each side of the center. Press the seams toward the wool strips.
7. Sew 2 rows of 38 smaller half-square triangle units each. Add the rows to the top and bottom of the center. Press the seams toward the wool strips.
8. Add the remaining wool border strips. Sew the 17˝ strips to the sides and then the 32˝ strips to the top and bottom.
9. The project front should measure 20˝ × 32˝.
Finishing
The bolster can be finished with a simple knife-edge detail. To make it easier to insert the pillow form and to also create a flange detail at the outer edge, we finished it with a panel construction.
TIP • To give the bolster a slightly more decorative appearance, I did four lines of stitching approximately ¼˝ apart on one of the chevrons on the top panel.
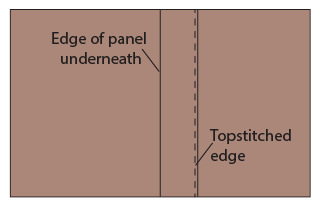
1. Finish one short edge of each of the 20˝ × 22˝ backing panels by turning under a ½˝ hem and topstitching.
2. Place both back panels with right sides down on the right side of the bolster front panel. Align the raw edges of all 3 panels. The back panels will overlap each other by approximately 4˝.
Back
3. Stitch around the entire outside edge. Turn the bolster right side out through the opening of the back panels. Press.
4. Pin or baste the overlapping back panels in place. Stitch in the ditch, through all the thicknesses, around the center panel and around the pieced inner border. This will create a flange. Insert the pillow form and enjoy!