Further techniques
In this chapter we are going to look at those techniques that might not form part of the basic workflow, or indeed be necessary on all images. These will include cloning, healing, and use of content-aware fill. Warping, rotating, and ways of transforming the shapes of images to eradicate problems, and lesser-used, but invaluable adjustment layers.
One of the most significant tools within Photoshop is the ability to remove unwanted elements from photographs; recent versions of Photoshop have increased the arsenal of tools available beyond the original clone stamp tool (S) to include a healing brush tool and spot healing brush tool (J), and the content-aware fill option.
Despite developments in Photoshop over the years, none of these ‘eradication’ tools are surplus to requirements, all have their uses, and whilst there is room for overlap between the tools, they still have their ideal purposes.
HEALING BRUSH (J)
Starting with the healing brush, and the spot healing brush (J). One of the best uses for the spot healing brush is for cleaning up marks on the image – dust spots on the sensor (yes, they do happen – especially at small apertures), odd bits of litter/light stones and so on in the foreground that you overlooked at the taking stage.

Fig. 6.1
Original file of a shot of Derwentwater showing blemishes on both the sky and the land that need tidying up.
As with all work in Photoshop, try to leave the background layer relatively untouched. This goes for using the healing brush too. Looking at the image (Figure 6.1) of Derwentwater, there are a number of minor blemishes on both the sky and the area of land above the horizon on the right. The healing brush tool is ideal for quickly getting rid of these.
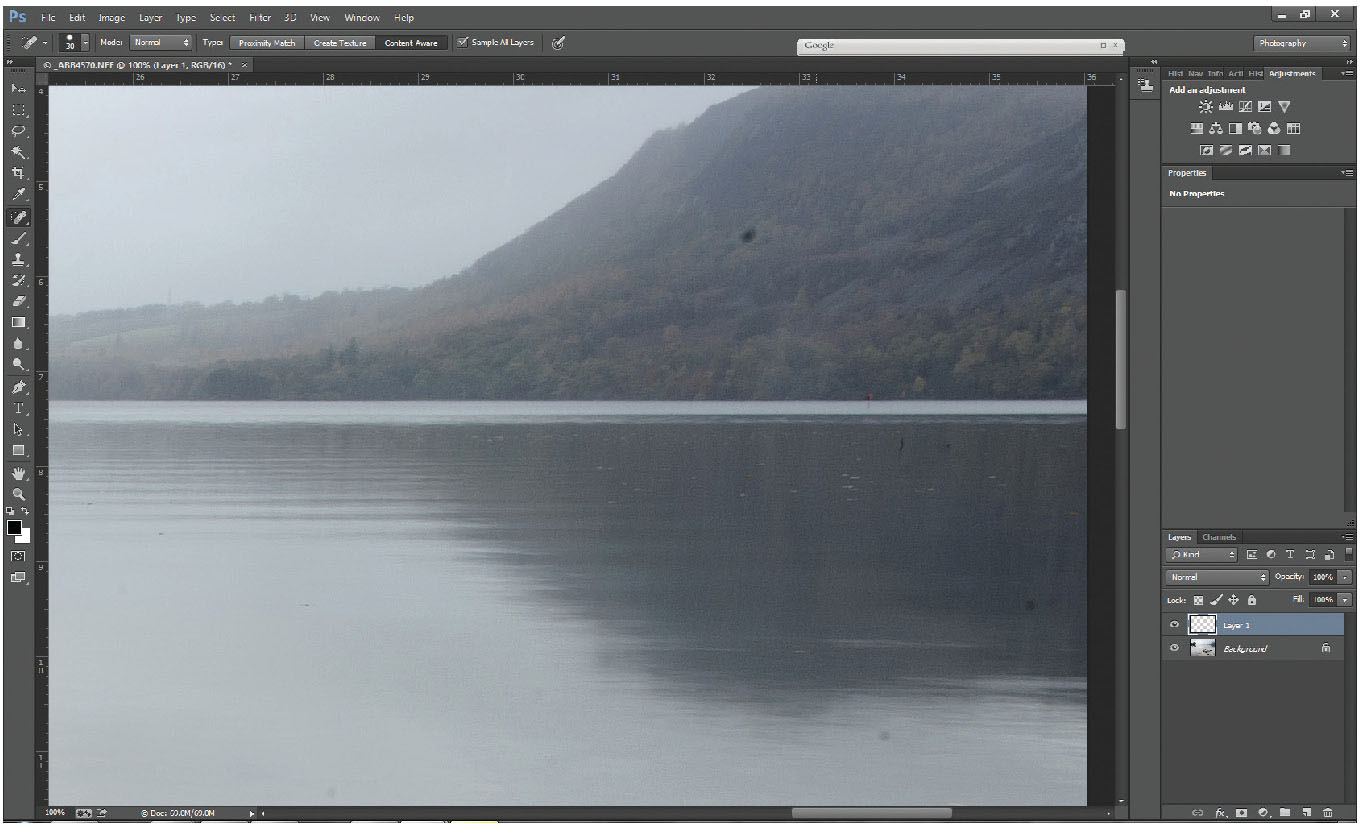
Fig. 6.2
Close-up of part of image at pixel size (100% magnification) to show sensor dust and the addition of a new layer (Layer 1).
First, add a layer using the new layer button at the bottom of the layer palette.
This will form an active (blue bar) layer 1 above the background layer. Ensure the spot healing brush is selected (J) or Shift-J if one of the other tool selections are present.
In the tool options along the top of the screen, under ‘type’ there are three options:
Generally, content-aware will give the best results for spot removal, but occasionally, proximity match can be used as an alternative. Ensure the healing brush is set to a hard edge (Shift + right-hand square bracket until you get a hard brush) and using the square brackets select the brush size that neatly covers the blemish on your picture.
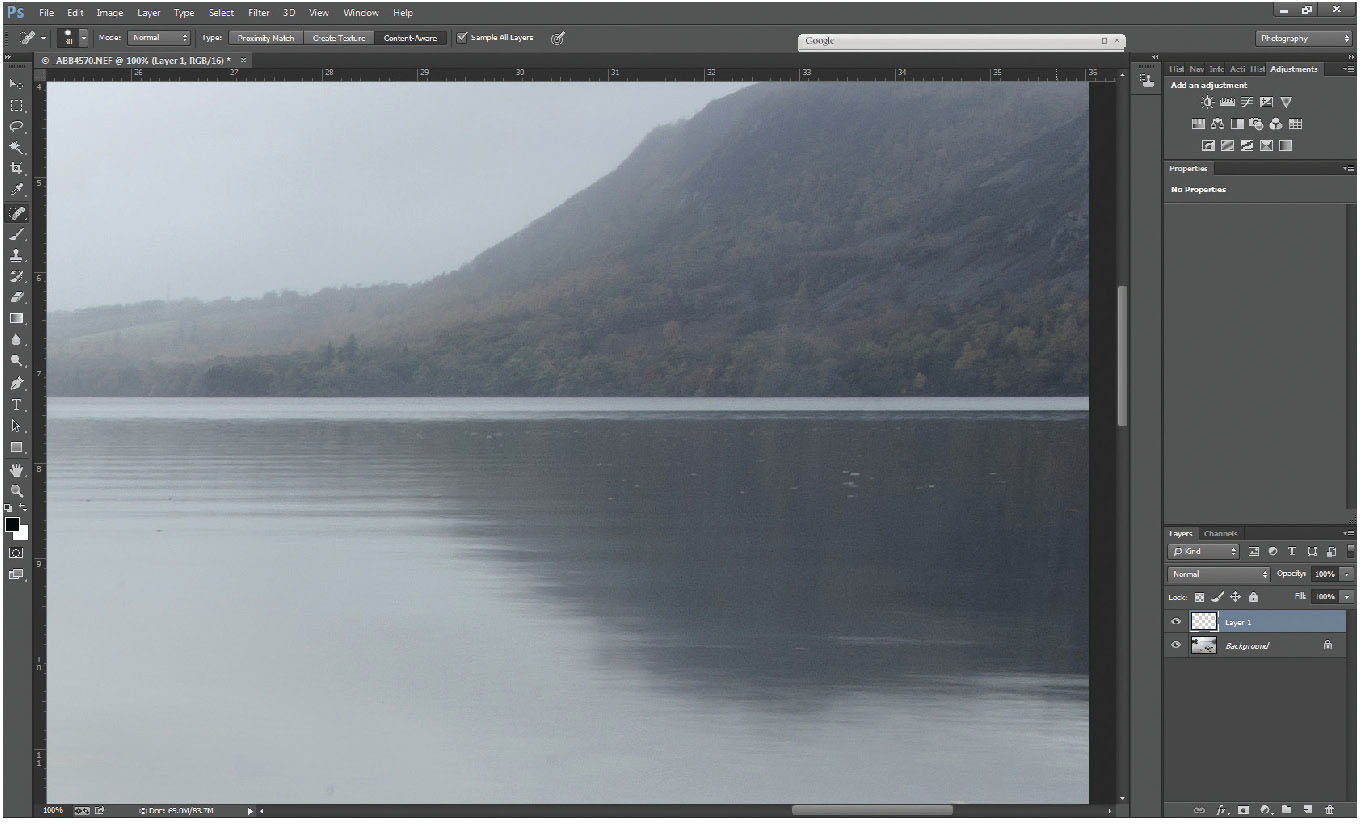
Fig. 6.3
Content-aware healing brush used on Layer 1 with tool options set to ‘sample all layers’ and Type set as ‘content-aware’ to repair blemished areas.
As you are working on a transparent layer, not the background layer, ensure that the ‘Sample all layers’ box is ticked on the tool options. As you paint over the blemishes, this will copy pixels (using content-aware fill technology) from the background layer to the transparent layer, covering up the blemishes, but not making any changes to the background layer below.

Fig. 6.4
Original file of picture of Hawes End Jetty showing a distracting handrail sign.
Should the healing brush give any ‘odd’ results, these will only be on the layer of transparency and by using the eraser tool (E) any less than perfect healed areas can be erased from Layer 1 and you can try again.
The reason for the healing brush to have a hard edge is that with a soft edge to the brush, it tends to cover up the blemish only partly; it has an almost translucent effect.
CLONE STAMP TOOL (S)
One of the most talked about, most used tools in Photoshop, and so often misunderstood, the clone stamp tool is a great way of covering larger elements that might obtrude in a photograph. Whereas the content-aware fill tool can work really quickly, and will often create the perfect fill, the clone stamp tool can sometimes add that touch of precision.
There are two modes for the clone stamp tool – aligned and non-aligned. Aligned measures the offset from the sampled position to the clone position; when you move your mouse to a different location in the picture, it measures the same offset from which to take its start point. Whilst this can be very useful if you are working on small blemishes around a picture, if you are sampling from a very small source point, the unaligned option can be best, as each time you relocate the mouse, the source point stays at its original position.
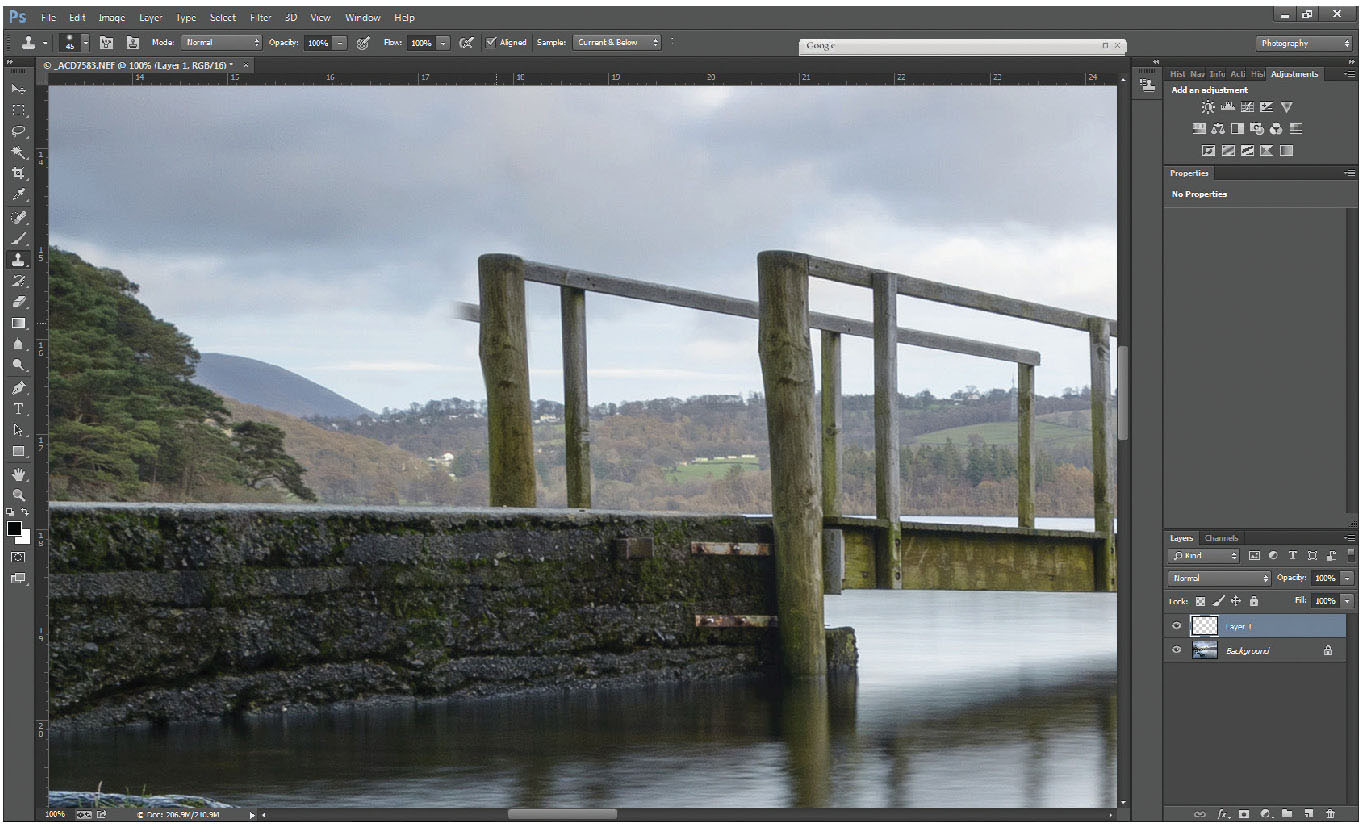
Fig. 6.5
Sign removed with clone tool, although the small section of additional fence on the clone layer remains.
In the picture of the jetty, the sign on the handrail ‘Slippery when wet’ adds nothing to the image. Again, add a new layer, and select the clone stamp tool (S). Ensure the aligned box is ticked, and the sample box is set to ‘Current and below’. (If you leave it set at the default ‘Current layer’, when working on the blank new layer you will simply be cloning transparency.)
Hold the Alt key down and click with the mouse on the start point where you want to sample from (the right-hand jetty post). Reposition the cursor to over the left post and click and drag the mouse to clone the right post over the left. Don’t worry about the extra bit of handrail that clones with the post.
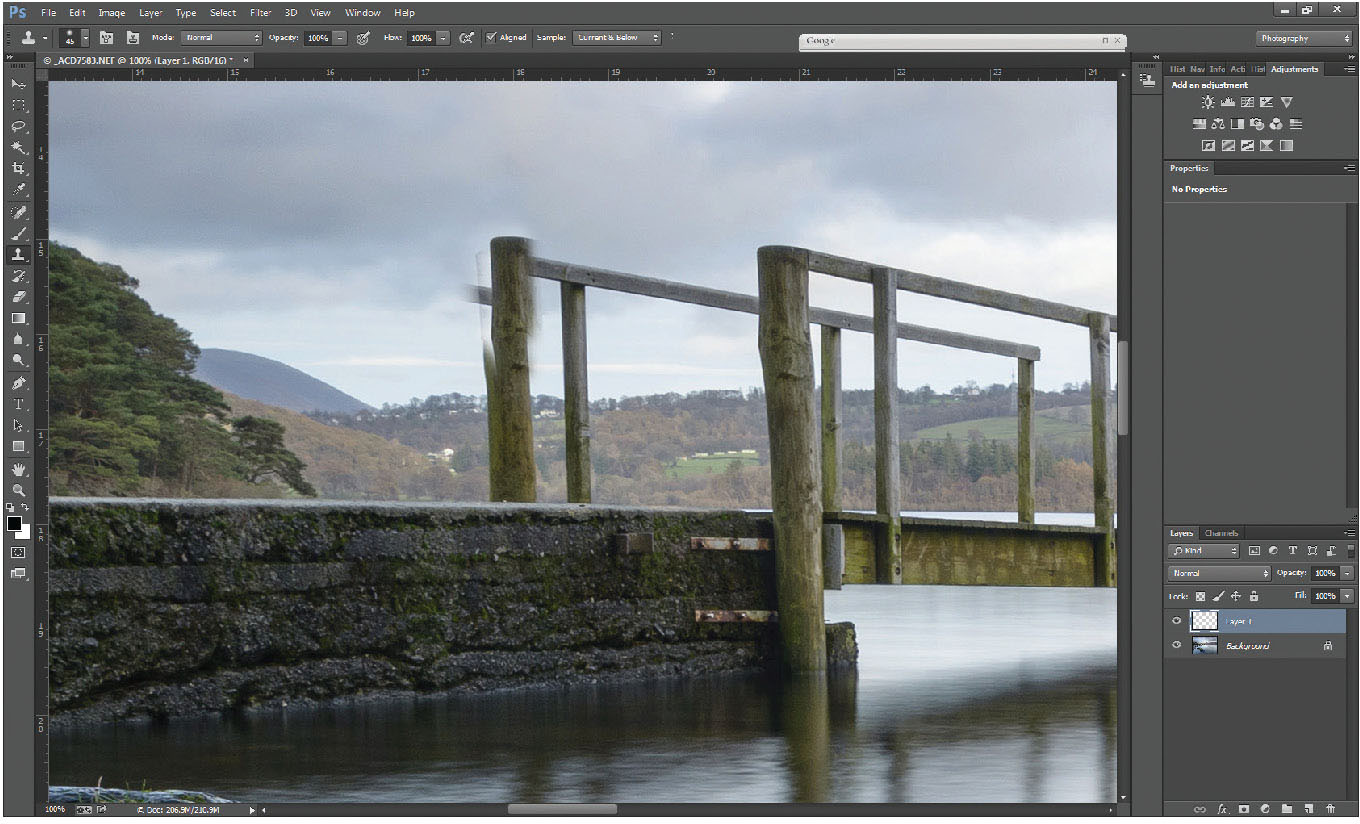
Fig. 6.6
Misaligned clone, but being on a separate layer it is easy to reposition.
One of the great advantages of cloning onto a new blank layer is if the clone isn’t perfectly lined up, as it is on a totally independent layer, by selecting the move tool (V – or hold down the Ctrl key to temporarily invoke the move tool), reposition the clone layer to line it up perfectly. If the source from which you clone is at a slightly different angle, the clone layer can be rotated or scaled to suit. A slight CCW rotation helped align this perfectly.
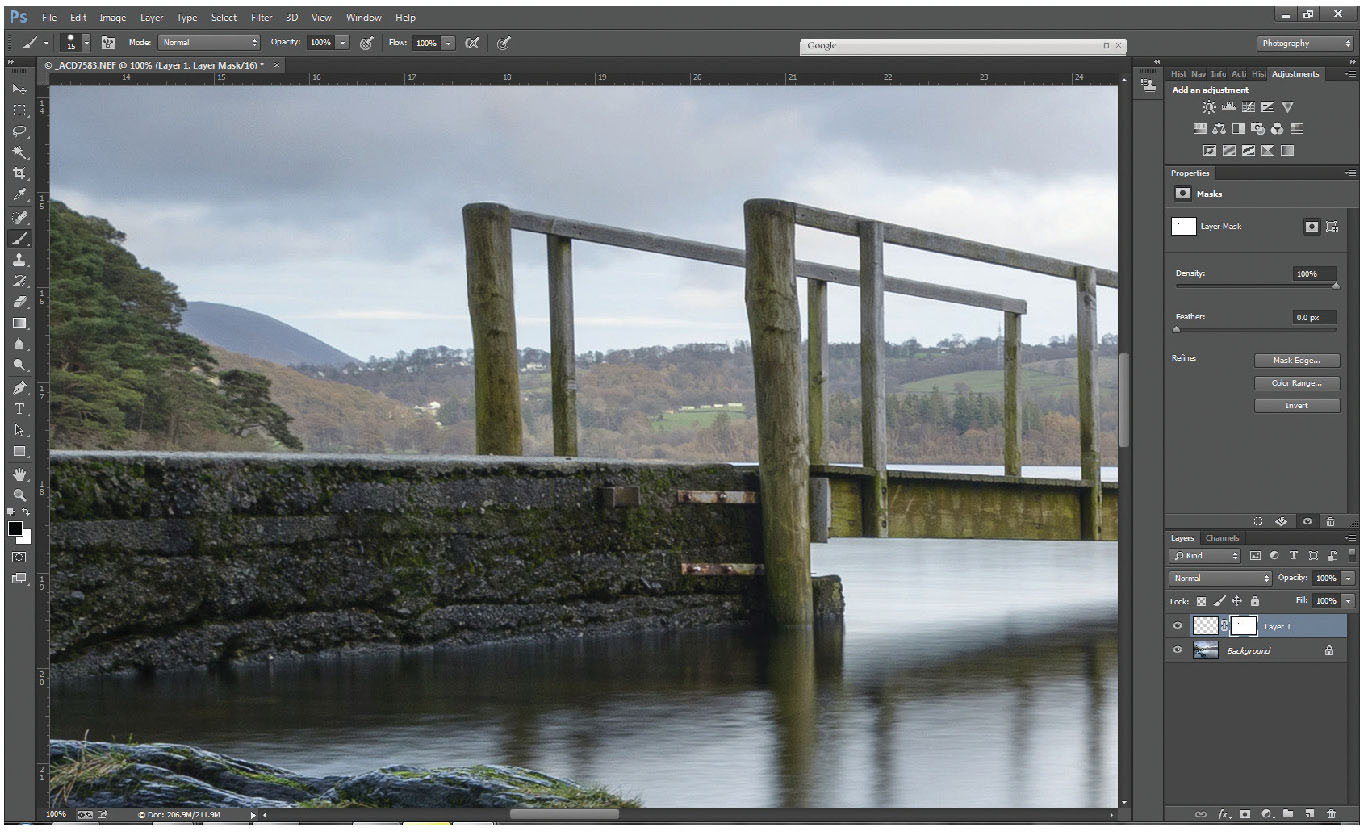
Fig. 6.7
Realigned clone with excess cloning of fence removed on a layer mask.
To remove the excess cloning (the handrail) either: carefully erase it using the eraser tool (E), with a hard edge or add a layer mask (by clicking on the layer mask icon at the bottom of the layers palette), and erasing the unwanted handrail by painting on the layer mask with a (hard-edged) black brush. This method has the advantage that if you erase or mask too much, by painting back with a white brush you restore the cloned element.
CONTENT-AWARE FILL (NO SHORTCUT KEY)

Fig. 6.8
Selection of metal bracket and fill option to perform content-aware fill.
The most recent introduction in the Photoshop stable, content-aware fill was introduced with CS5, and was hailed as the answer to all our cloning prayers. To some extent it is – being a truly powerful tool – but it can get it wrong, and it is best to use it in conjunction with the healing brushes and the clone stamp tools at the most appropriate times.
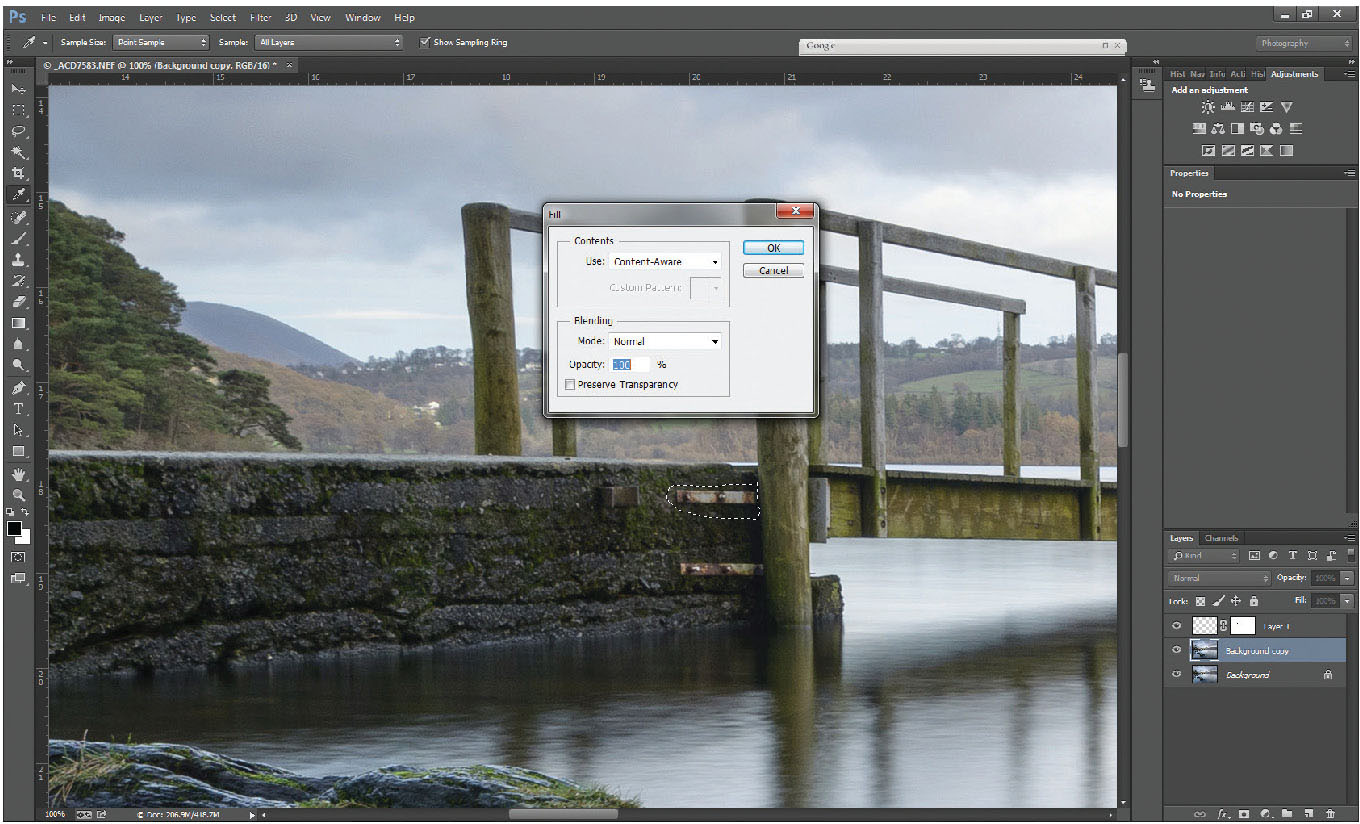
Fig. 6.9
Content-aware fill selected (blending mode at normal and opacity at 100%).

Fig. 6.10
Entire image showing completed cloning.
The two brackets fixing the end post of the jetty to the concrete of the walkway are pretty unsightly, and removing them would improve the appearance. They are too large to use the healing brush/spot healing brush, and to use the clone stamp tool would replicate the textures of the concrete too obviously. Content-aware fill is the ideal tool for this. The main difference between content-aware and the other ‘cloning’ tools, is that it cannot work on a transparent layer. It can therefore be used directly on the background layer, or if you are worried about making a mistake (remember – there is always the history undo facility), you can duplicate the background layer. (Click on the background layer on the layers palette, and hit Ctrl-J or Command-J on a Mac to duplicate the layer.)
For something as simple as these brackets, select around them roughly using a lasso tool, right-click within the selection and a dialogue box will appear with a ‘Fill’ option about halfway down the list.
Select fill, and under ‘content’ make sure ‘content- aware’ is selected.
If the result isn’t to your liking, undo the fill and the selection and start again. Repeat the action for the second bracket. The large post to the left of the jetty could also be removed using content-aware fill in the same manner. If the top edge of the concrete doesn’t perfectly line up, a slight repair using the clone stamp tool can line it up quickly and easily.
The final result looks tidier and natural, allowing the viewer’s attention to be taken to the important parts of the picture.
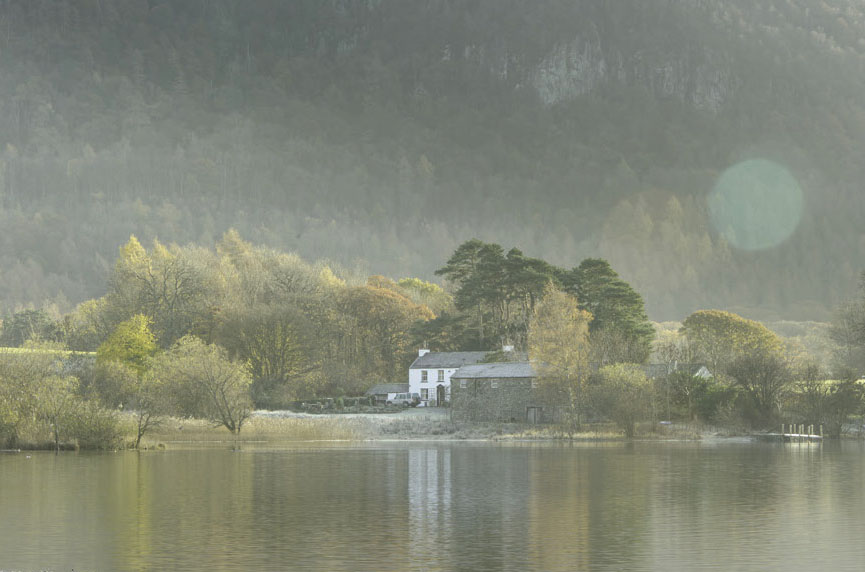
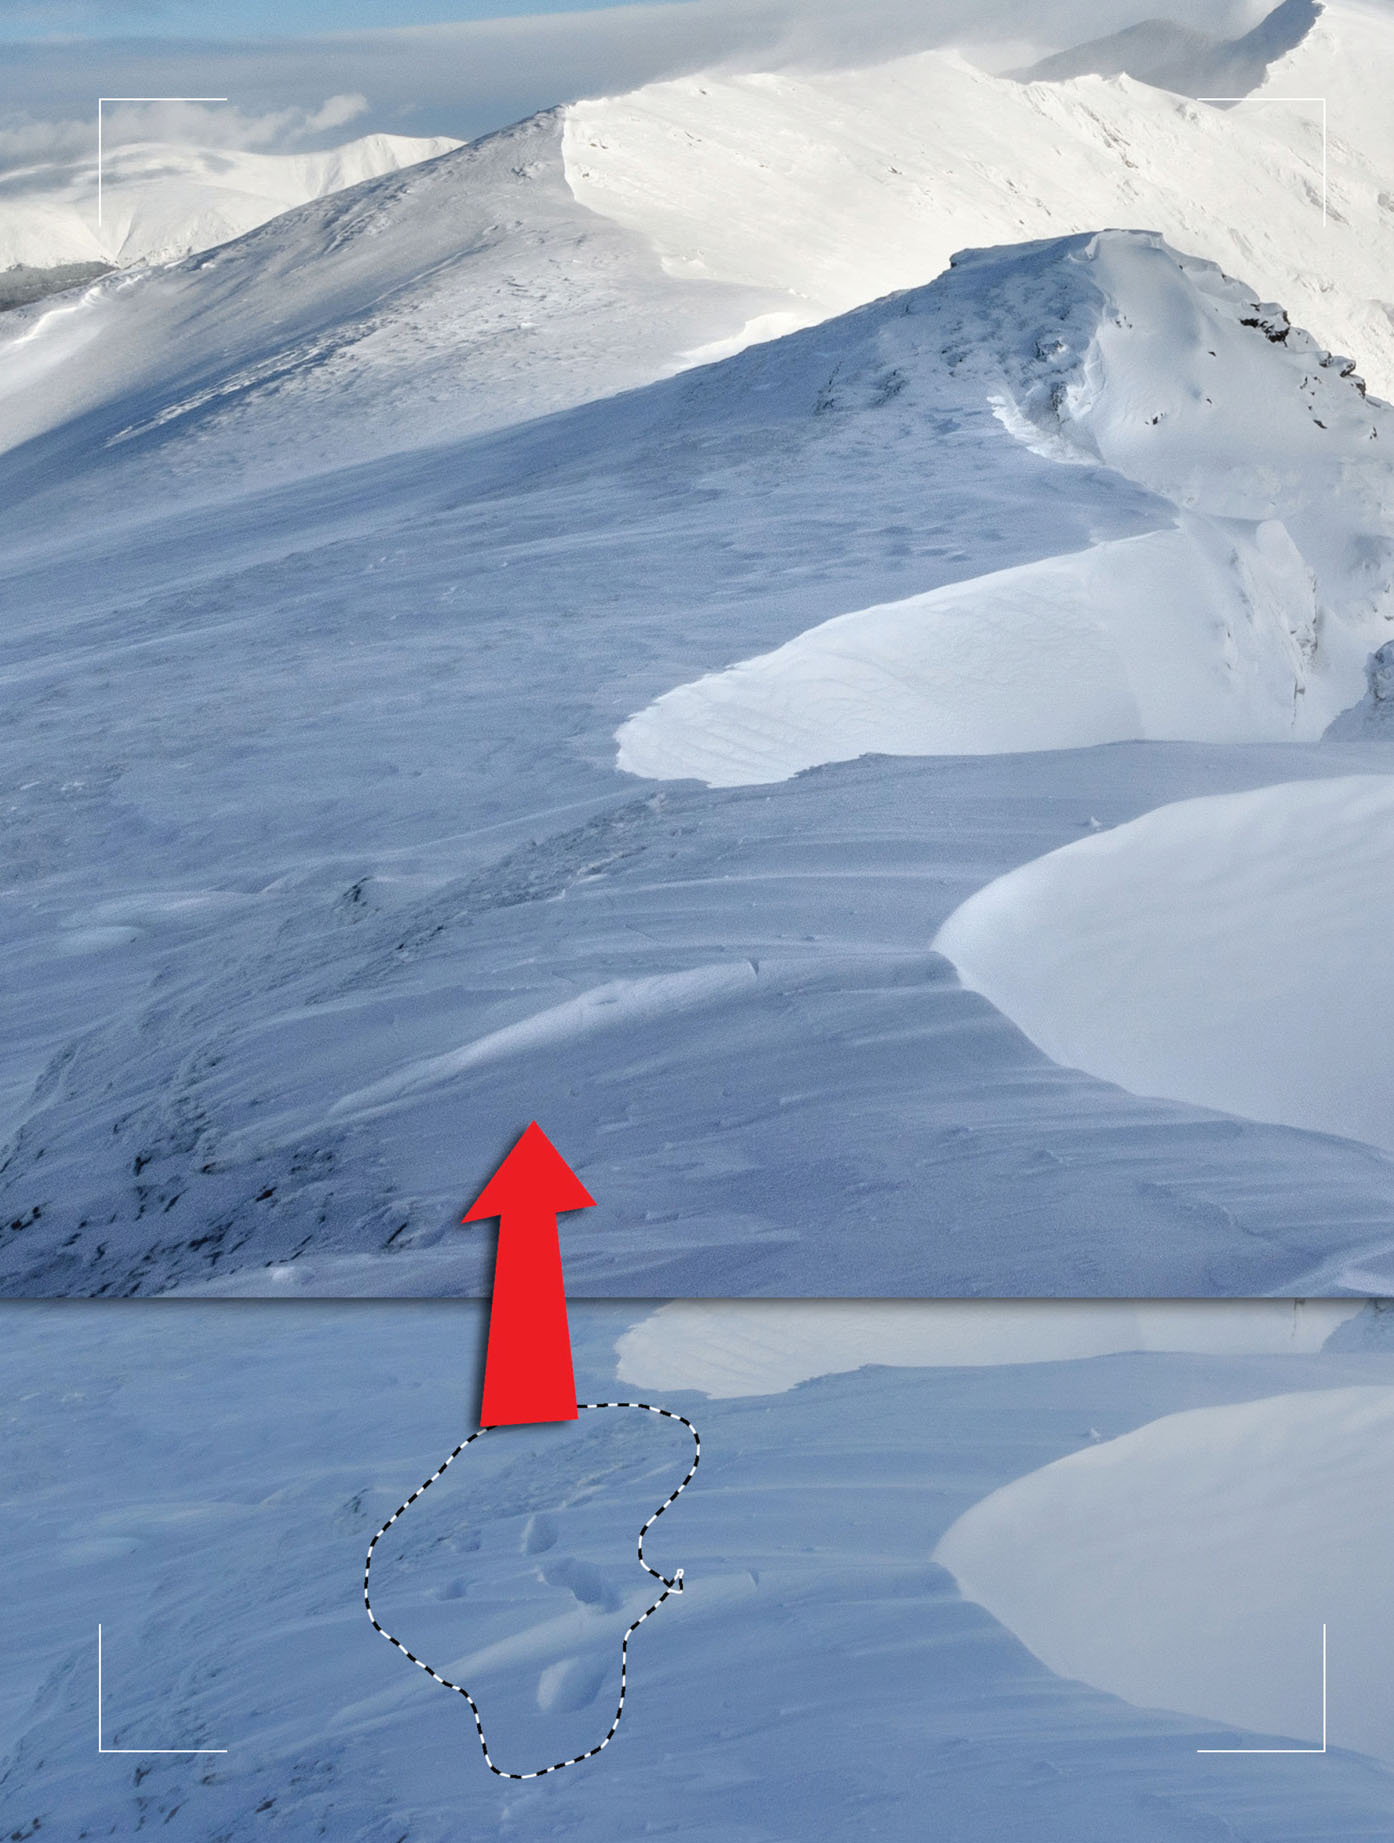
Fig. 6.11
Original image of early morning picture at Calfclose bay with flare spots.
Another use of the content-aware fill tool can be seen on Figure 6.11.
A photograph taken towards the sun, where even with a lens-hood, the low level of the sun gave rise to a couple of large flare spots. Select the flare spots using a lasso tool
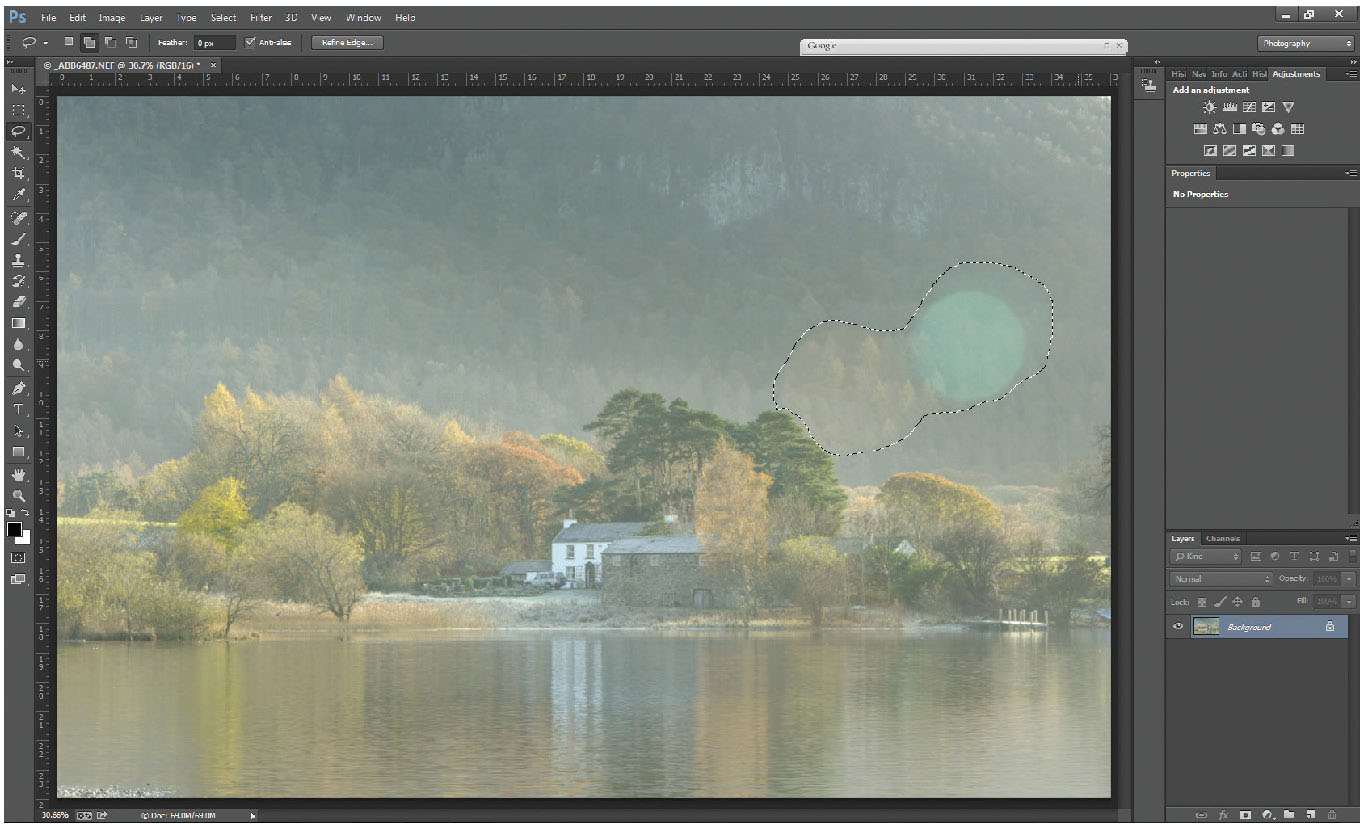
Fig. 6.12
Selection of flare spots.
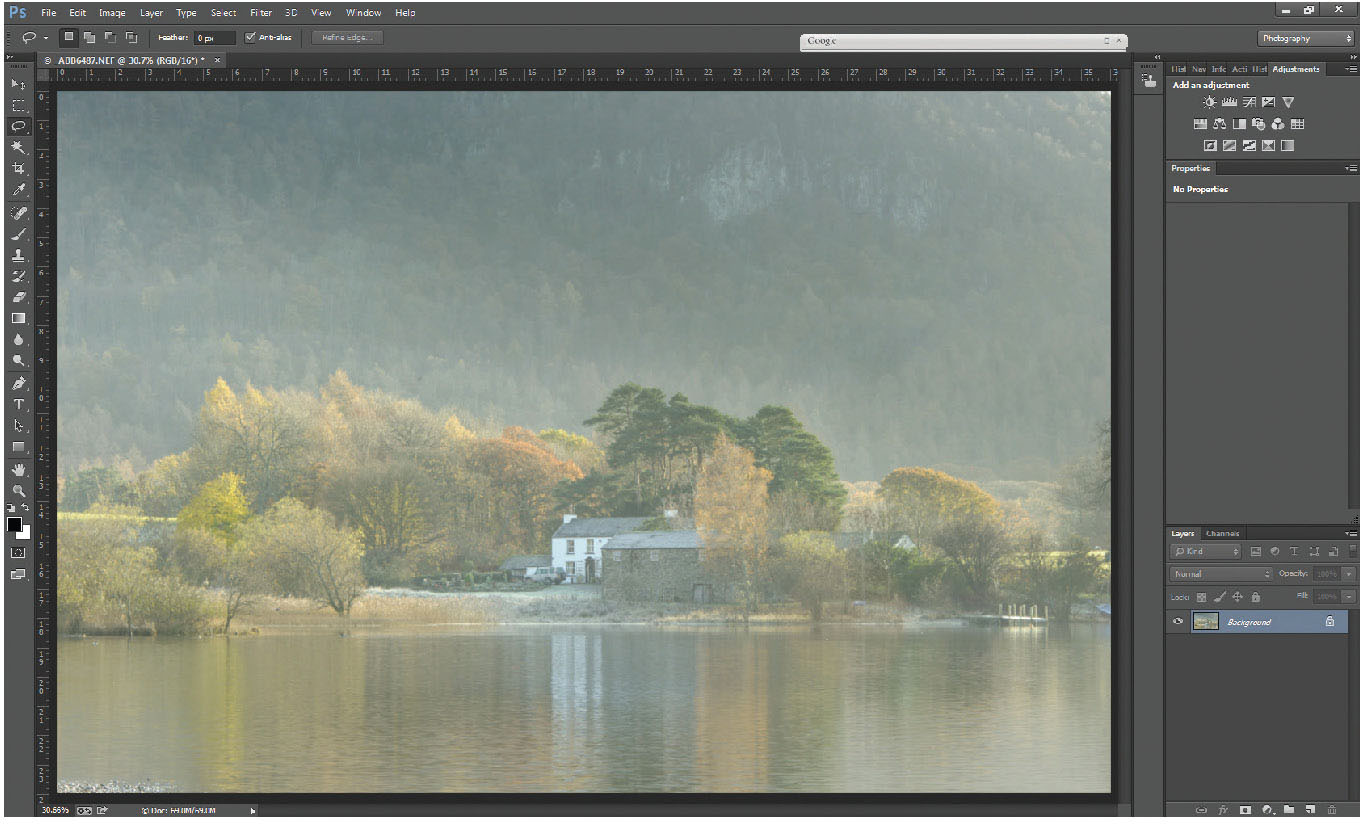
Fig. 6.13
Flare spots removed using content-aware fill.
On a first attempt, the large selected area might partly fill with unwanted parts from the picture, like the less hazy foreground trees. Simply reselect the small area of unwanted fill and refill it – a few attempts should give a perfect result.
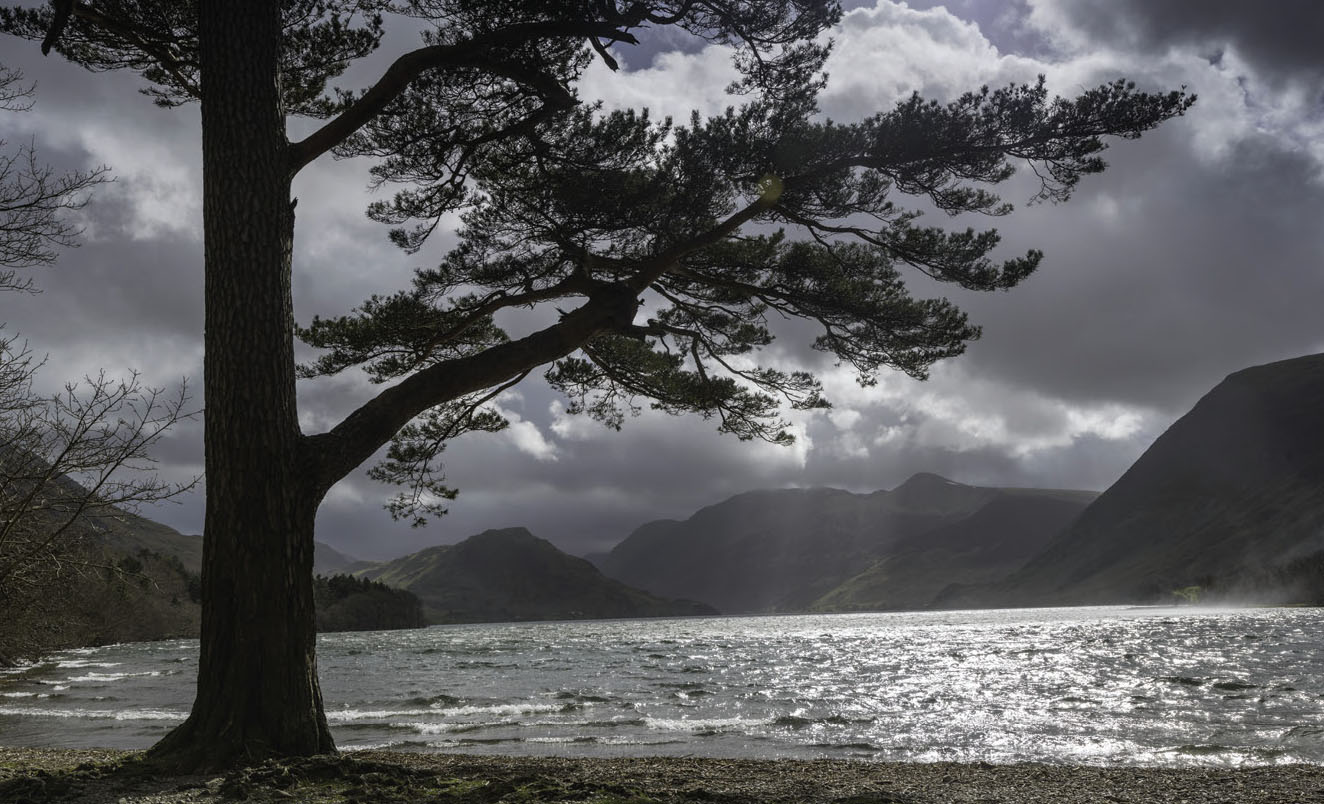
Fig. 6.14
Original image looking down Crummock Water showing crooked horizon.
There are a wealth of options under the Edit>Transform or Image>Rotate tools within Photoshop, many of which are of great use to the landscape photographer.
There can be the odd occasion that, despite using tripods and spirit levels for every landscape photograph, one escapes the net and still looks a touch crooked on the picture.

Fig. 6.15
Ruler tool set along far shoreline, which should be a horizontal line.
Straightening the picture couldn’t be easier. Under the eyedropper tool (I) on the tools palette is the ruler tool. Click on the end of a known horizontal (or vertical) line, and drag to a corresponding point. Remember, looking across a lake, such as in this photograph, whilst we usually visualize the far shoreline as horizontal, if you are looking at an angle across the lake, it can actually be at an angle. If there is a tree or something similar reflected in the lake, remember any part of the tree will be vertically above its reflection. On this image, however, the far shore of Crummock Water is a horizontal line, so click (and hold) the ruler tool on one end of the crooked shoreline, and move the cursor to the other end of the shoreline.
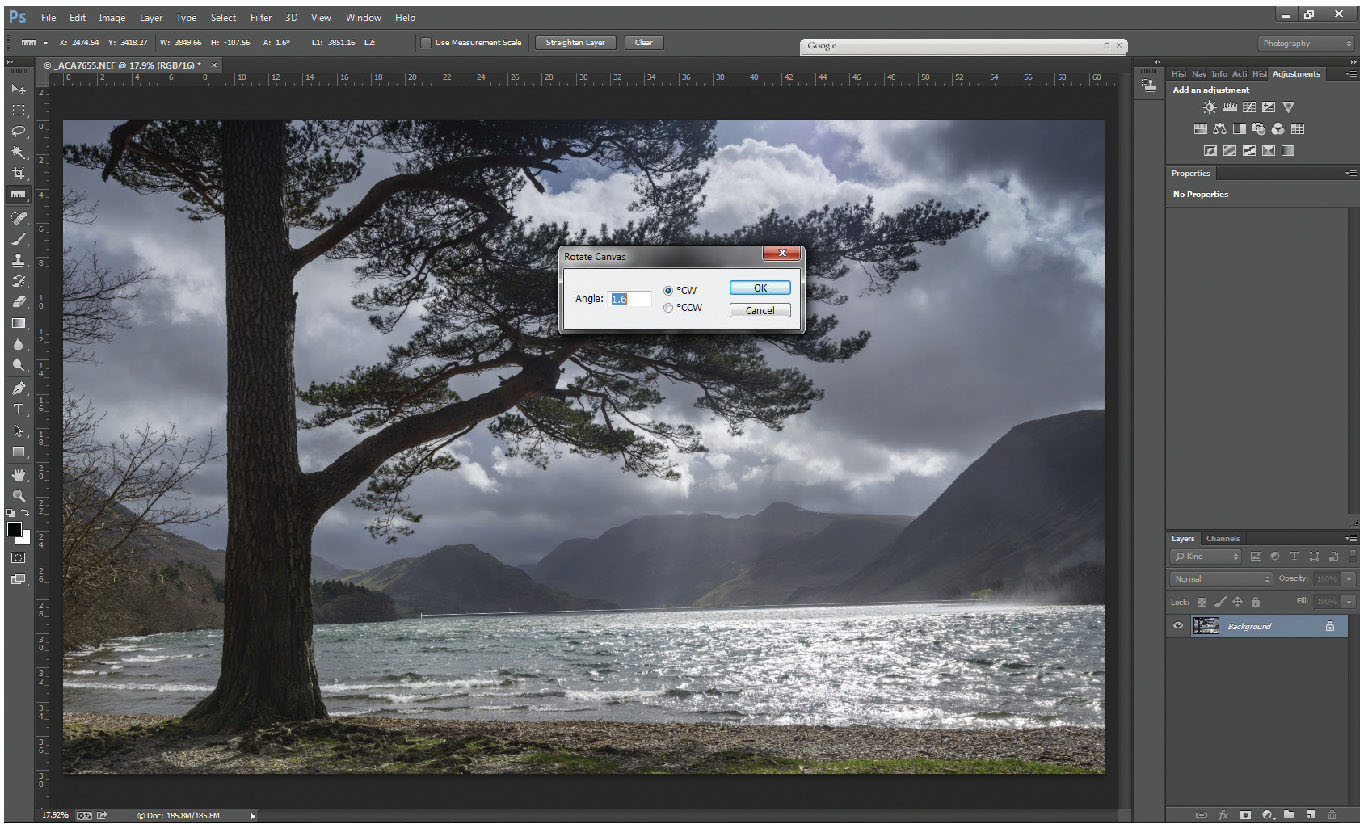
Fig. 6.16
Rotate arbitrary selected, showing a 1.6 degree clockwise rotation needed to level the line to horizontal.
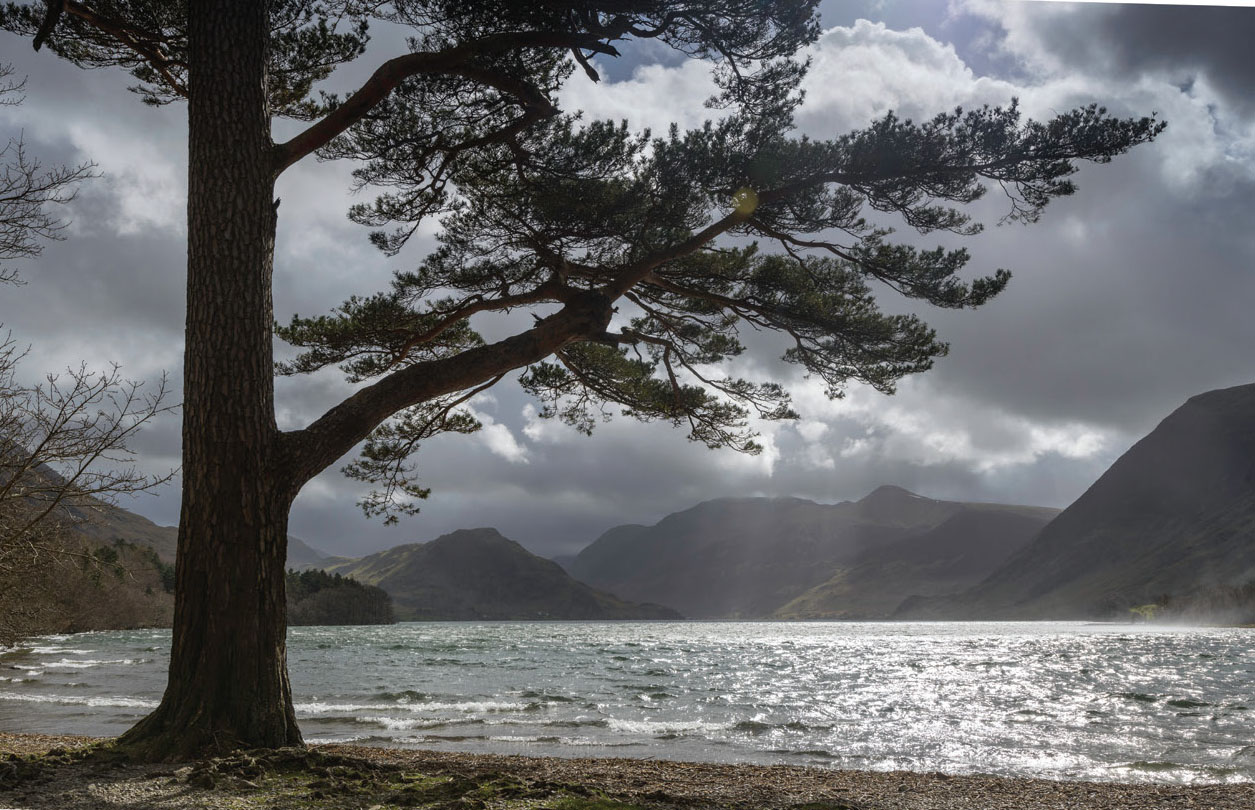
Fig. 6.17
Rotated image levelling the horizon.
The line is clearly at a slight angle, Under Image>Image rotation>Arbitrary, Photoshop measures the horizontal and vertical offsets of the line and inserts the CW or CCW rotation required.
All that is needed after that is to crop the image to suit. However, in this particular image, the tree to the left of the photograph appears to lean in to the picture slightly. Using other transform tools can rectify that. Remember, this adjustment is personal choice only, although the lean on the tree is a correction of converging verticals.
In order to compare before and after results, it’s worth making a duplicate layer (Ctrl-J). To ensure your lines are square, switch on the grid (Ctrl-’) or View>Extras. Select Edit>Transform>Skew and clicking on the top left-hand corner of the picture, drag the point out to the left until the tree is as vertical as looks correct.
Turning the layer on and off by clicking on the ‘eye’ icon will show the before and after versions.
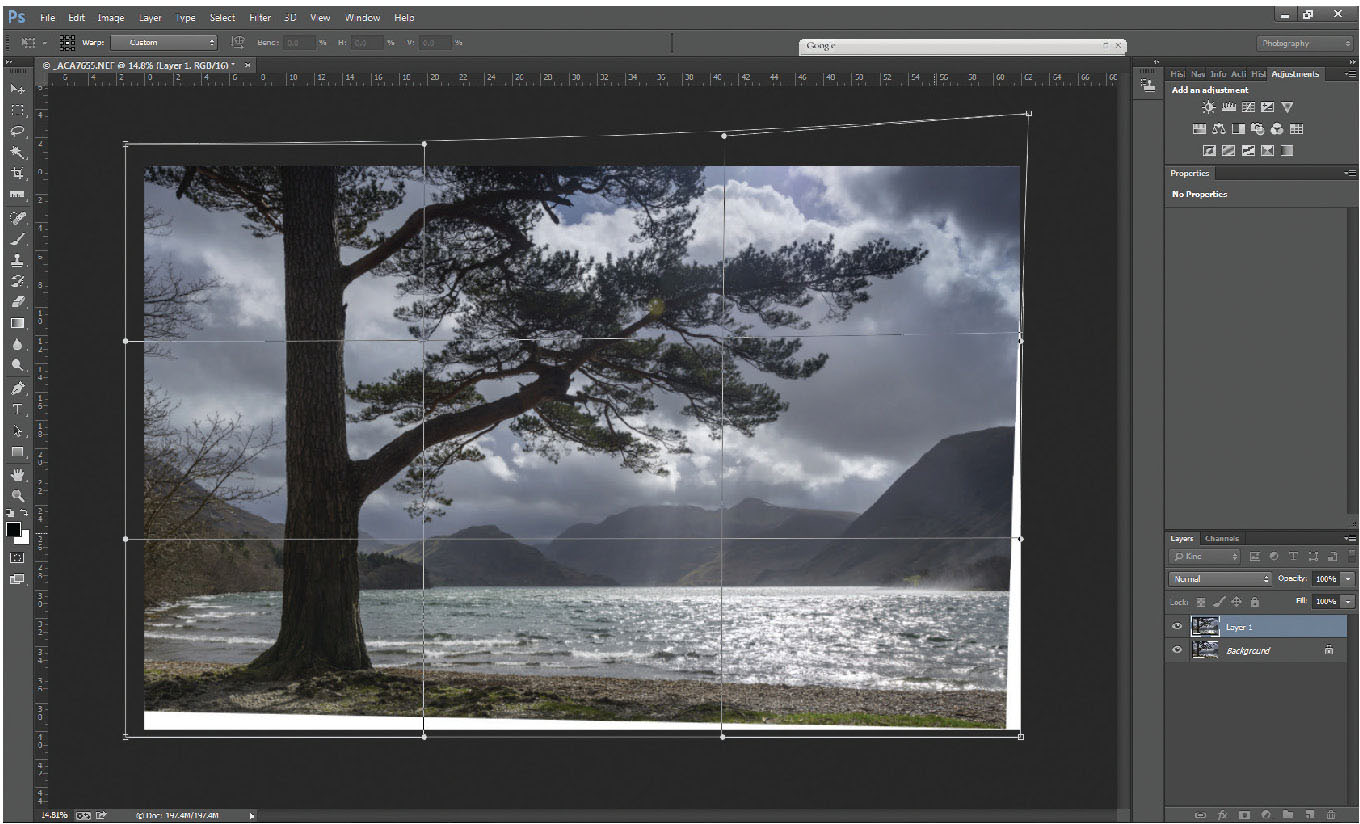
Fig. 6.18
Use of the skew tool to straighten the tree and the warp tool to adjust the top right-hand corner.

Fig. 6.19
Completed photo cropped to size.
In this image, cropping off the white borders caused by the image rotation to straighten the picture works on the sides and the bottom of the picture, but would be a touch tight on the top branch of the tree, setting it slightly too close to the edge of the picture. There are a few techniques that can be used to fill the top right white section – content-aware fill might work, but in this case, as the tree is of a non-specific shape (unlike, say, a building), try Edit>Transform>Warp, and drag the top corner up a little (Figure 6.18). Finish off with a crop to tidy the edges and you have your completed picture.
SELECTIVE COLOUR CORRECTION/CONTROLLING COLOUR
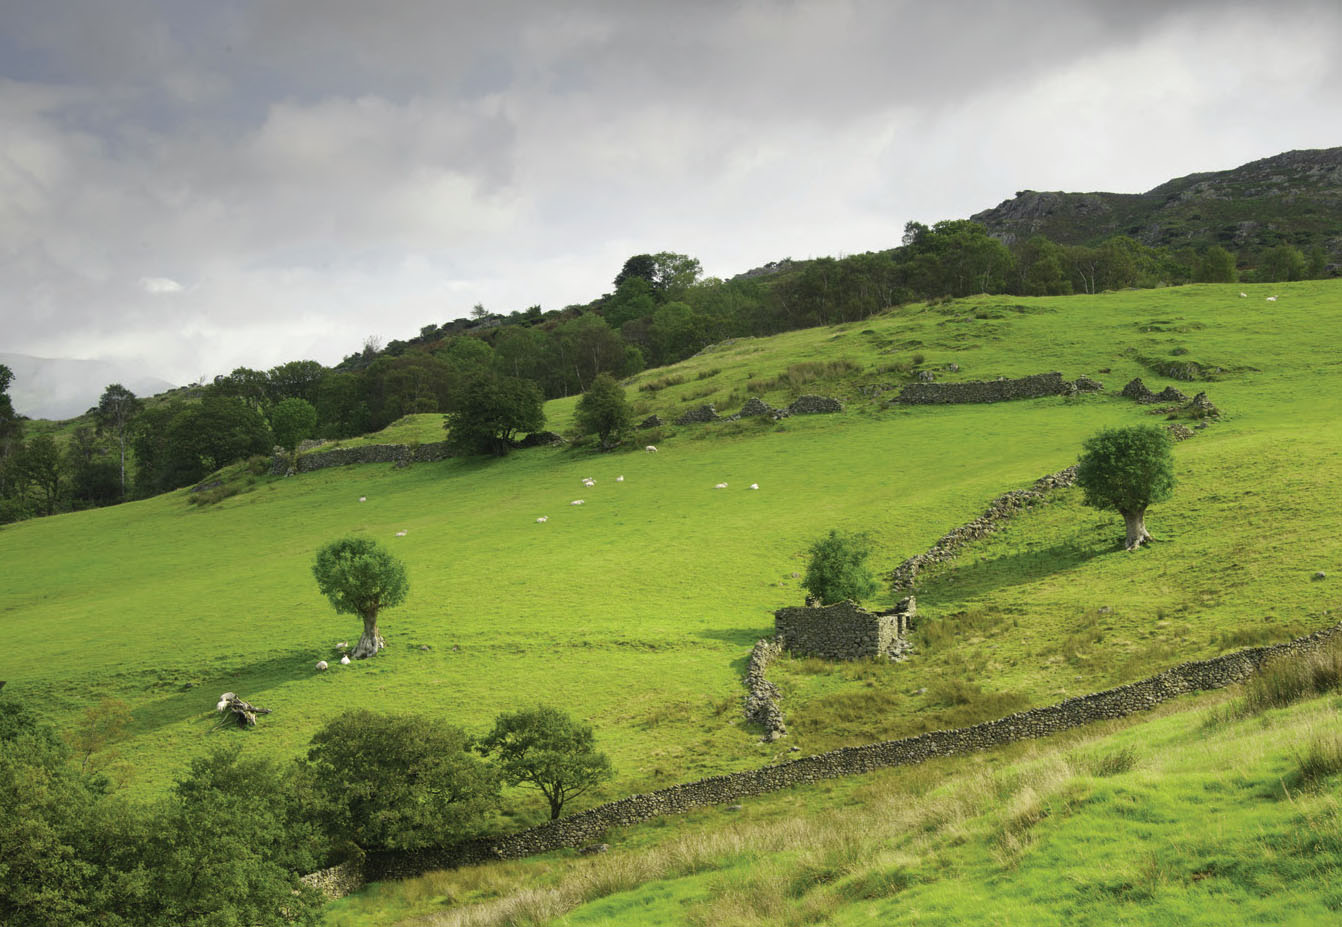
Fig. 6.20
Original landscape image showing very strong green tones.
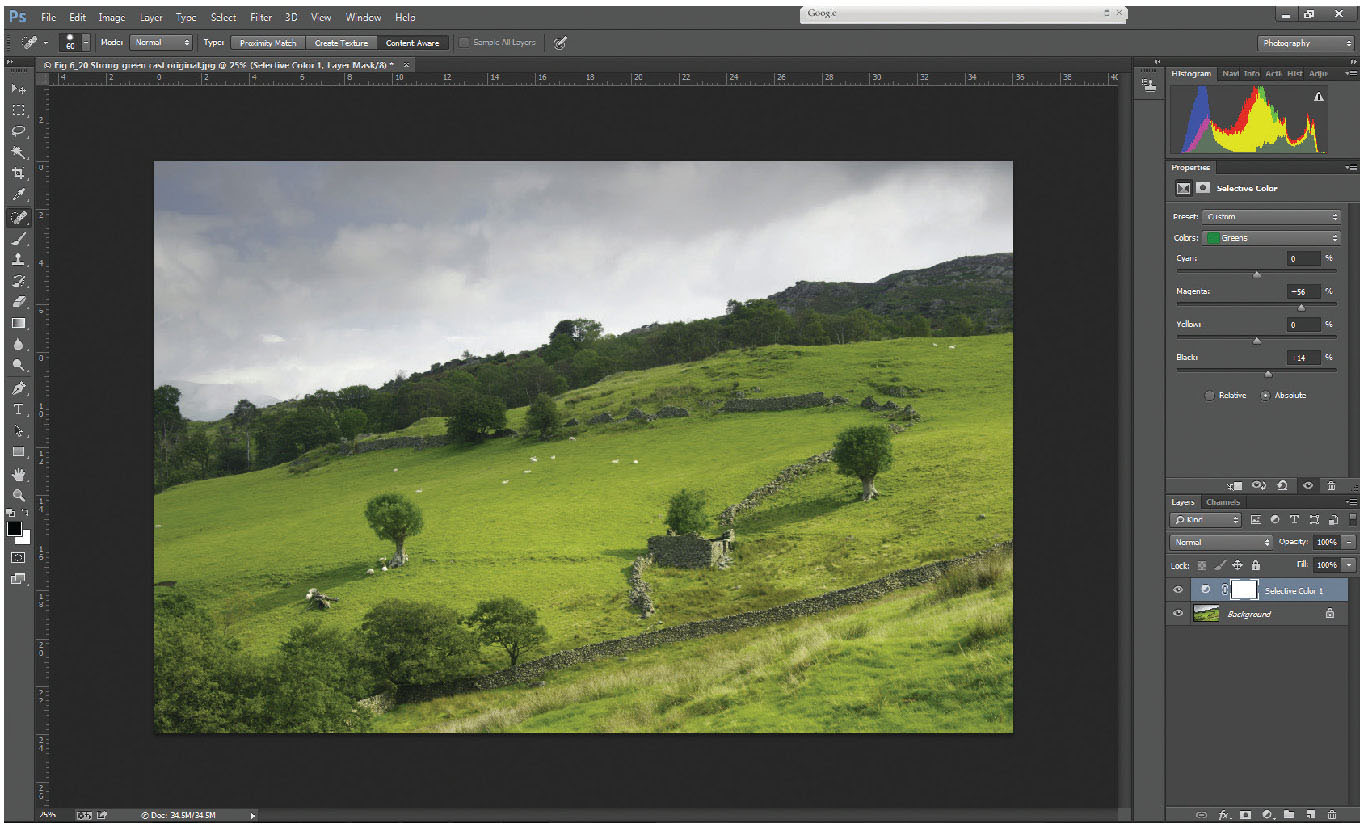
Fig. 6.21
Selective colour adjustment layer inserted, adding magenta to the greens, resulting in more natural tones.
Despite the sophistication of the RAW image and the ability to change white balance easily in processing, occasionally colours within a scene do not always record as you visualize them. Greens in particular can have a habit of appearing too vivid when they are a lush green in a scene – however accurately the camera might record them. Photography, like all art forms, is about interpretation and perception, and colours in photos often need to be how you perceive them, rather than their precise colour. Summer greens are so often one such colour; they often record so green that they look almost unnaturally lush. The example in Figure 6.20 is one such picture.
Correction of these greens is very straightforward and simple. Many photographers would reach for the ‘photo filter’ adjustment layer, but before trying this, there is a simple way that often works perfectly and is much more controllable.
Add a selective colour layer and on the colours drop-down on the properties palette, select greens. There are two strengths for selective colour adjustments – relative and absolute. Relative is a very gentle alteration, absolute is much stronger and for this type of adjustment, is the best one to choose. The second of the sliders on the selective colour properties is magenta, which is directly opposite to green on the colour wheel. Adding magenta to the greens mellows them off. There is no set figure for this; simply adjust the magenta slider until the greens look about right.
Although this example is directed at the greens within a landscape, all the other colours (red, yellow, green, cyan, blue and magenta), can be adjusted in similar ways. By adding black to blue, skies can be darkened; by adding black to bright reds, the colour becomes slightly less ‘orange’ on the resulting print.
CORRECTING FILTERING PROBLEMS
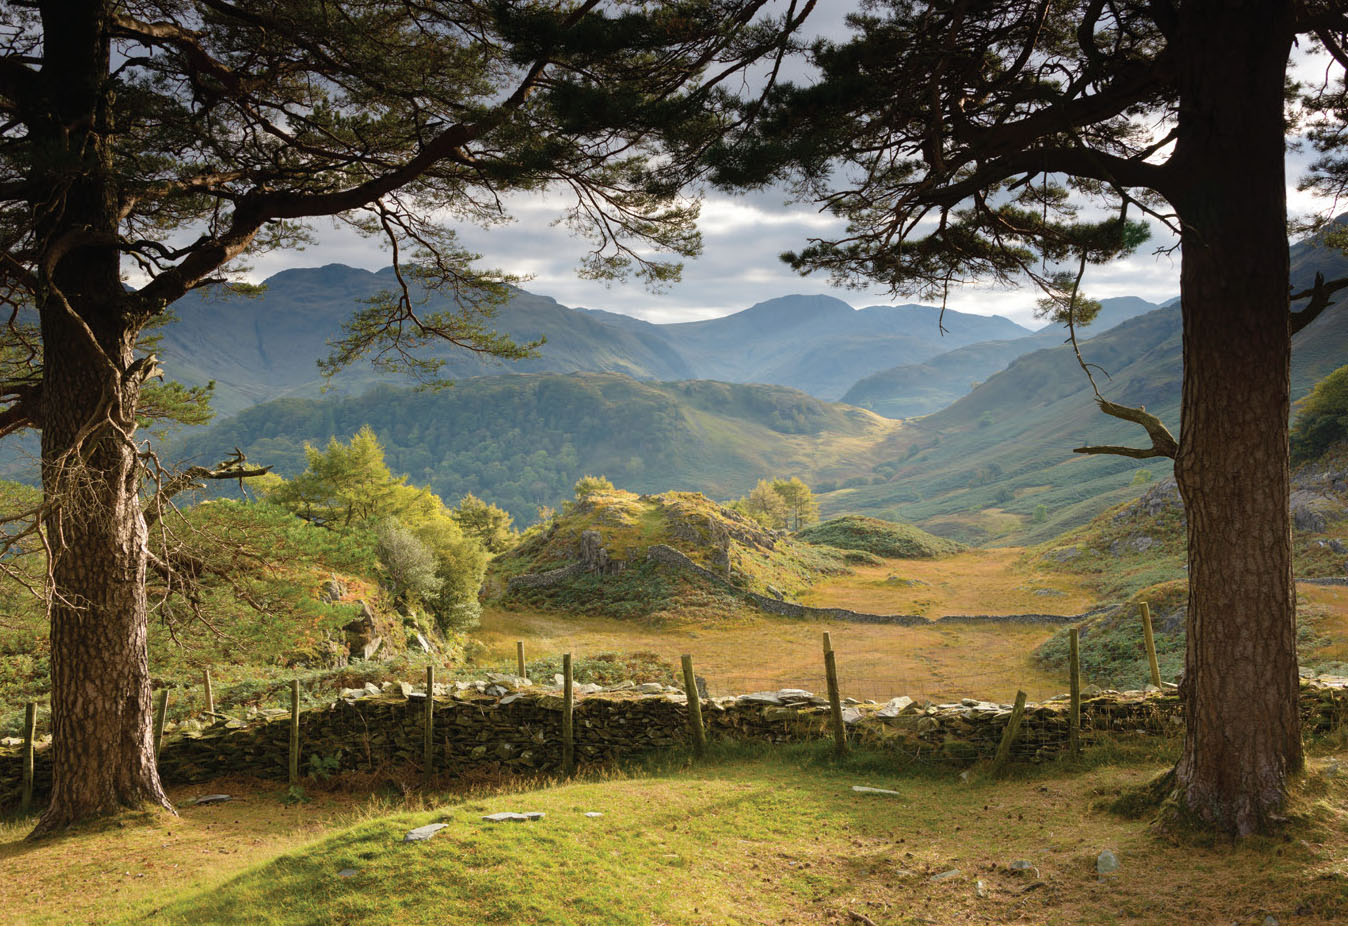
Fig. 6.22
Castle Crag trees original with dark tops to the trees where a graduated filter was used.
The photograph of trees at Castle Crag shows a problem faced by many landscape photographers. The sky was quite bright, and without the benefit of a graduated filter, would have blown out the highlight detail badly. One solution to this might have been to have bracketed the exposure and created an HDR image, but the wind was blowing the trees around and ghosting of the leaves and branches could have been an issue. Using the graduated filter however, the sky has been rendered well, but the top of the trees have come out semi-silhouetted.
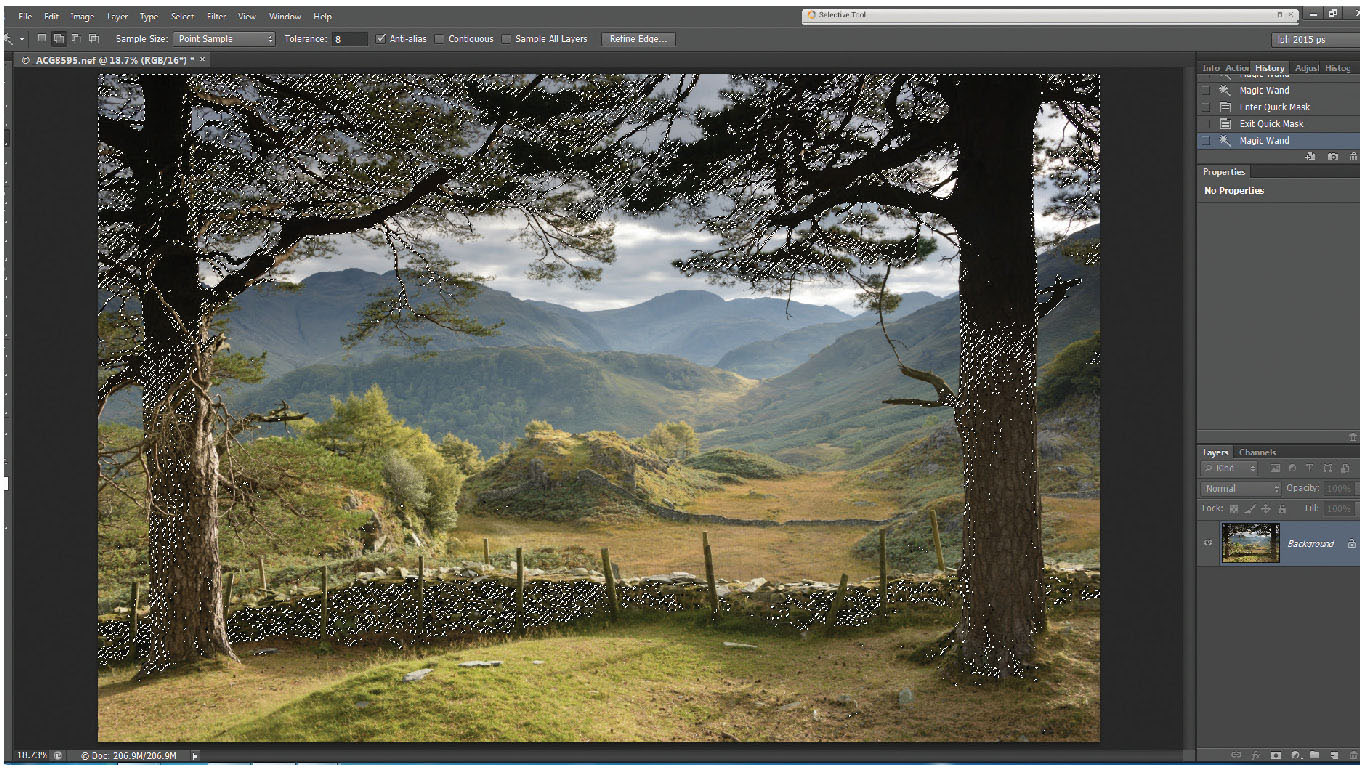
Fig. 6.23
Selection of top of the trees, extending down to parts of the lower trees and the wall.
By careful exposure, detail has been retained in the shadow areas of the trees, and therefore can be lightened. Selection of the tops of the tree trunks, branches and dark leaves can fairly readily be done using the magic wand tool (W). Use the wand tool at a fairly low tolerance (8), with the ‘add to selection’ button selected and contiguous unticked in order to select from the whole area, to speed up selection and to ensure that most of the dark area is selected. (Figure 6.23). In this case, unticking contiguous, whilst giving greater accuracy in picking up stray leaves and the like at the top, has also selected parts of the lower trunks of the tree and some of the dry stone wall.
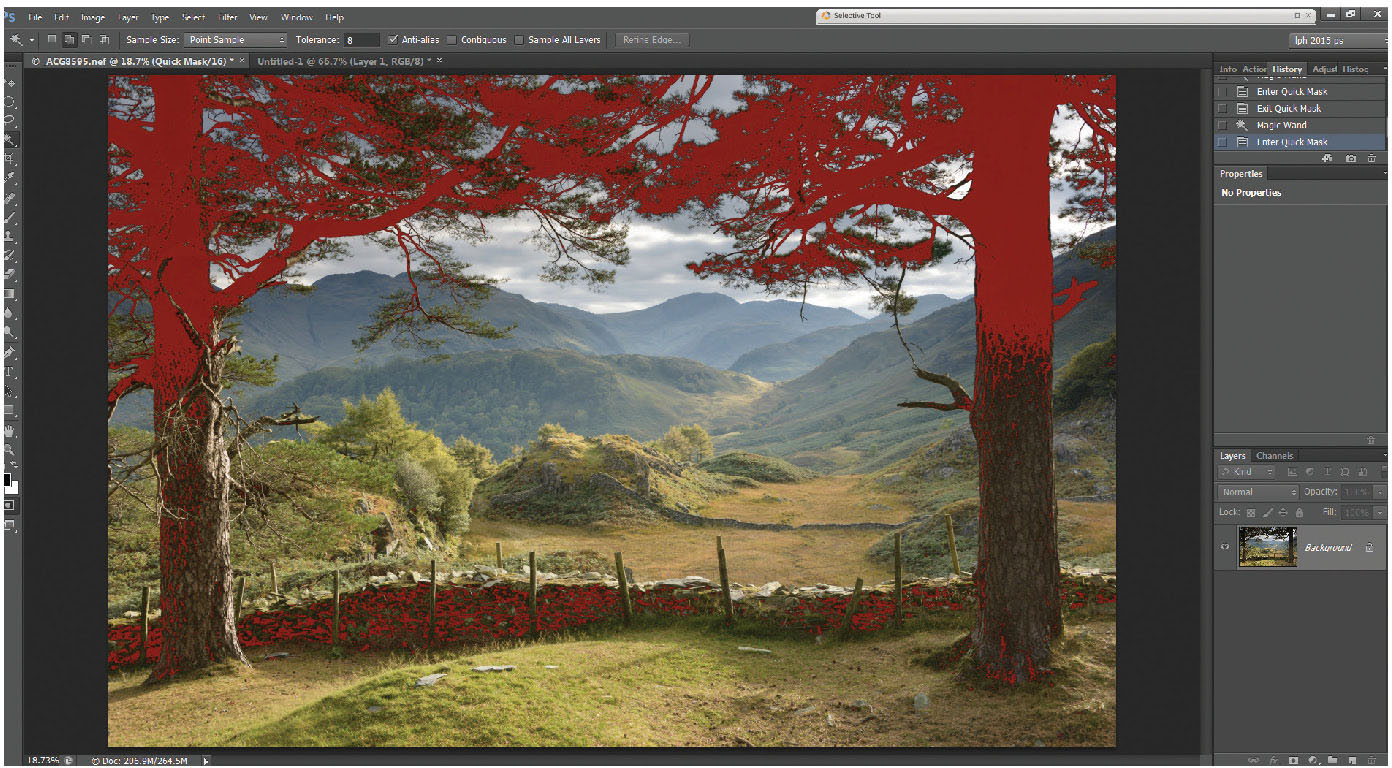
Fig. 6.24
Quick mask mode showing full selected area includes part of the wall.
The full extent of the selection is easier to see by entering quick mask mode (Q) in Fig 6.24.
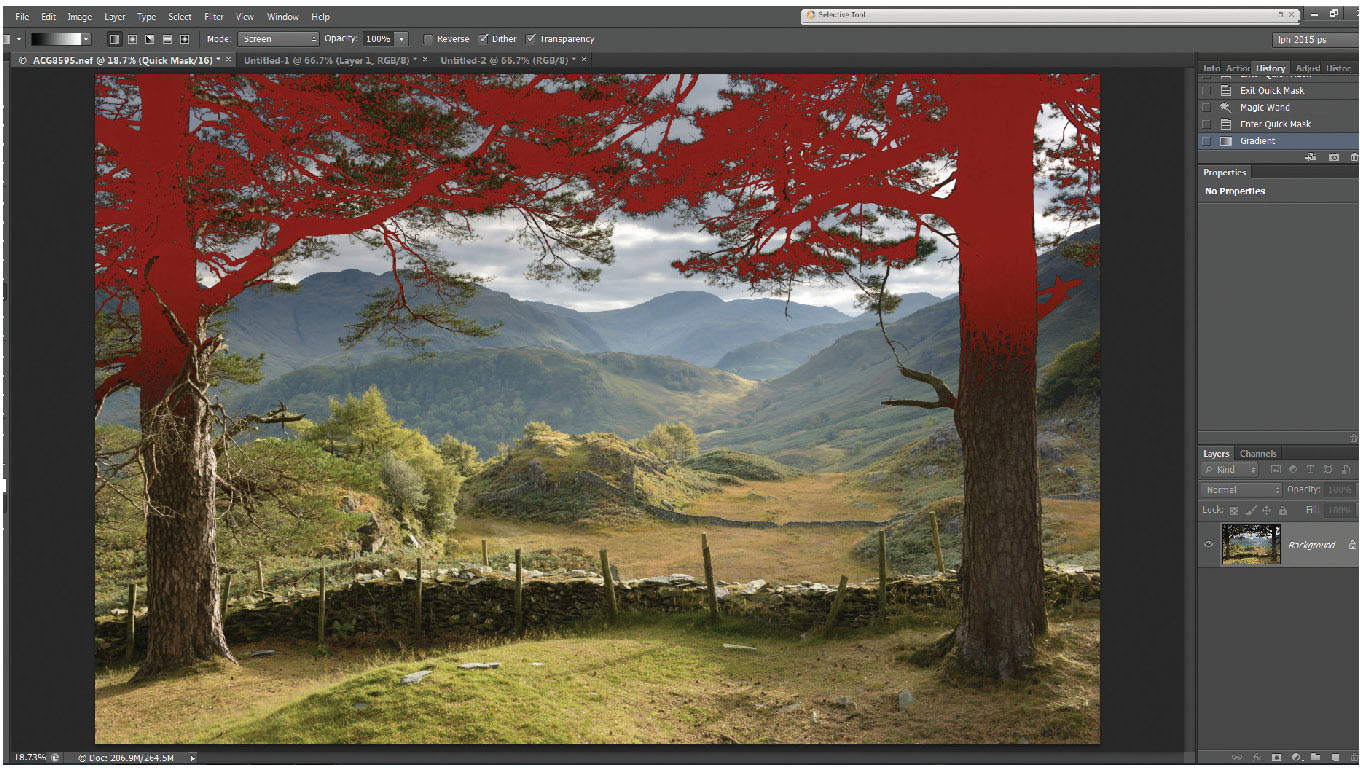
Fig. 6.25
Lower part of the selection removed by gradient tool set to screen blending mode.
The next stage is simply to remove the lower areas from the selection. A remarkably easy and straightforward step. Whilst in quick mask, select the gradient tool, and change the blending mode of the gradient tool to ‘screen’. Ensure the gradient is set to black to white (or foreground-to-background colour, with default colours set). This, when the gradient is drawn downwards where the original graduated filter would have been positioned, will remove the lower parts of the selection.
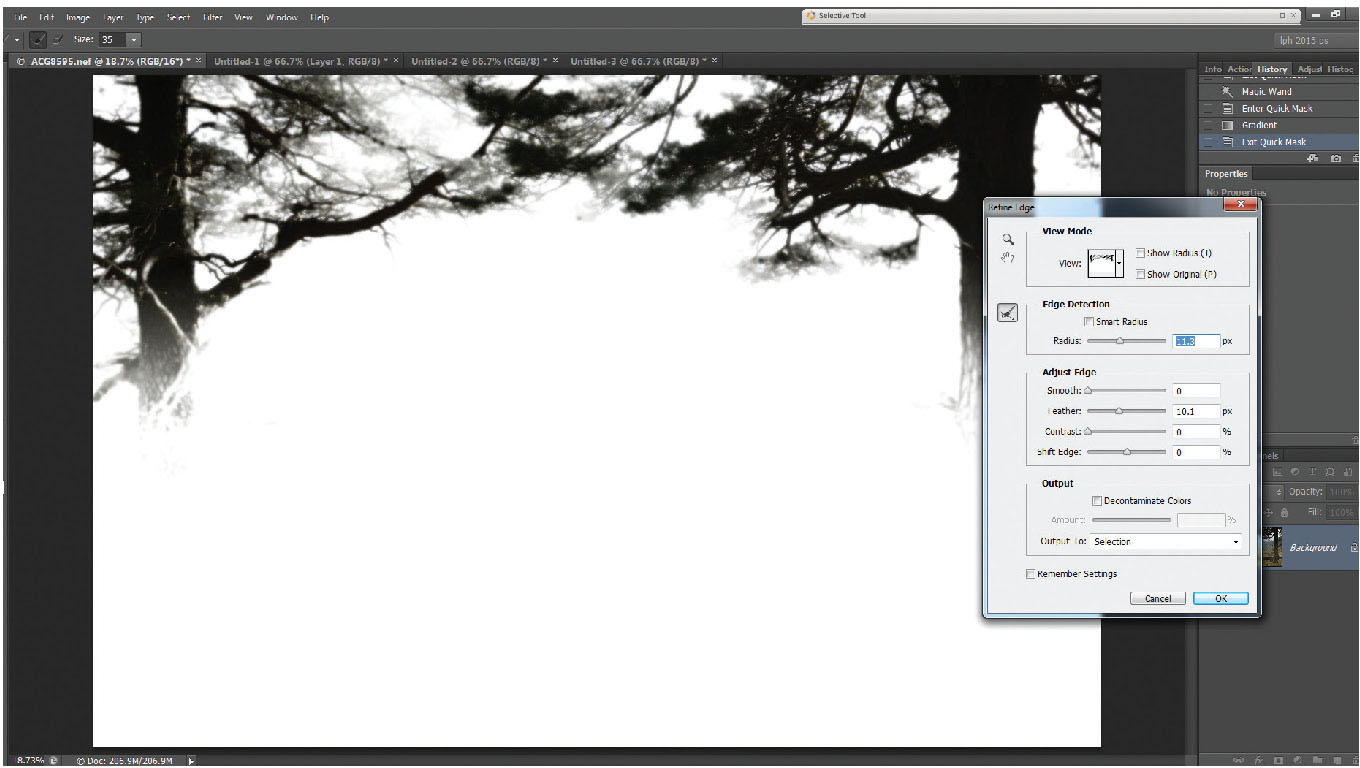
Fig. 6.26
Refine edge/Select and Mask selected to feather the edge of the selection and fit it to the shape of the trees.
The next step is to ensure the edges of the selection are neither too defined nor too feathered, so adjustments carried out on the selection look natural. Firstly exit quick mask (Q) so your selection is again a series of marching ants. Then either by right-clicking within the selection with any selection tool active, or by clicking on Select>Refine edge/Select and Mask or Alt>Ctrl>R, the pop-up menu shown in Figure 6.26 will appear, along with the selection appearing as a mask.
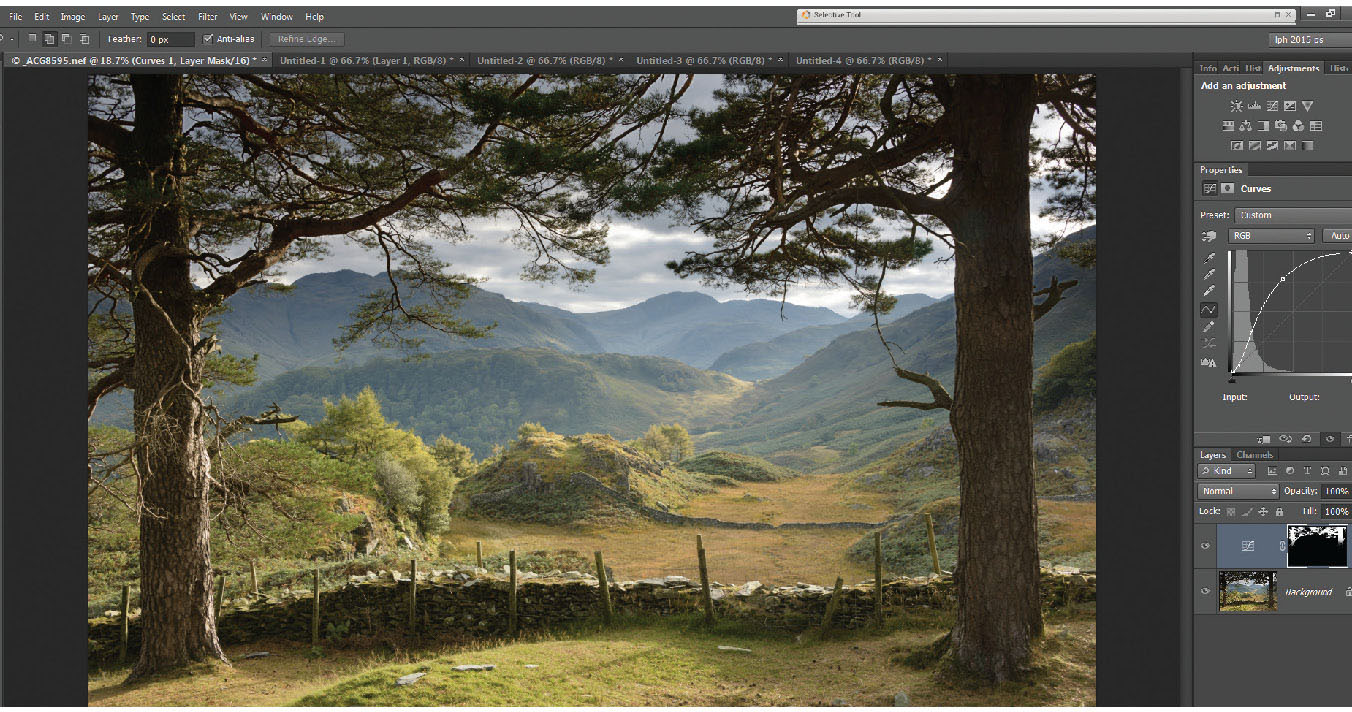
Fig. 6.27
Curves used to lighten the dark tree areas.
In this image, a feather of about 10 pixels works well, but changing the edge detection radius allows the edge of the selection to fit to the contours of the trees really well. A radius of about 11 gives an excellent result. Clicking on OK will return to the main image with the marching ants still visible. The selected area can now be lightened by using either levels, or as in Figure 6.27, curves, just by lifting the centre of the curve.
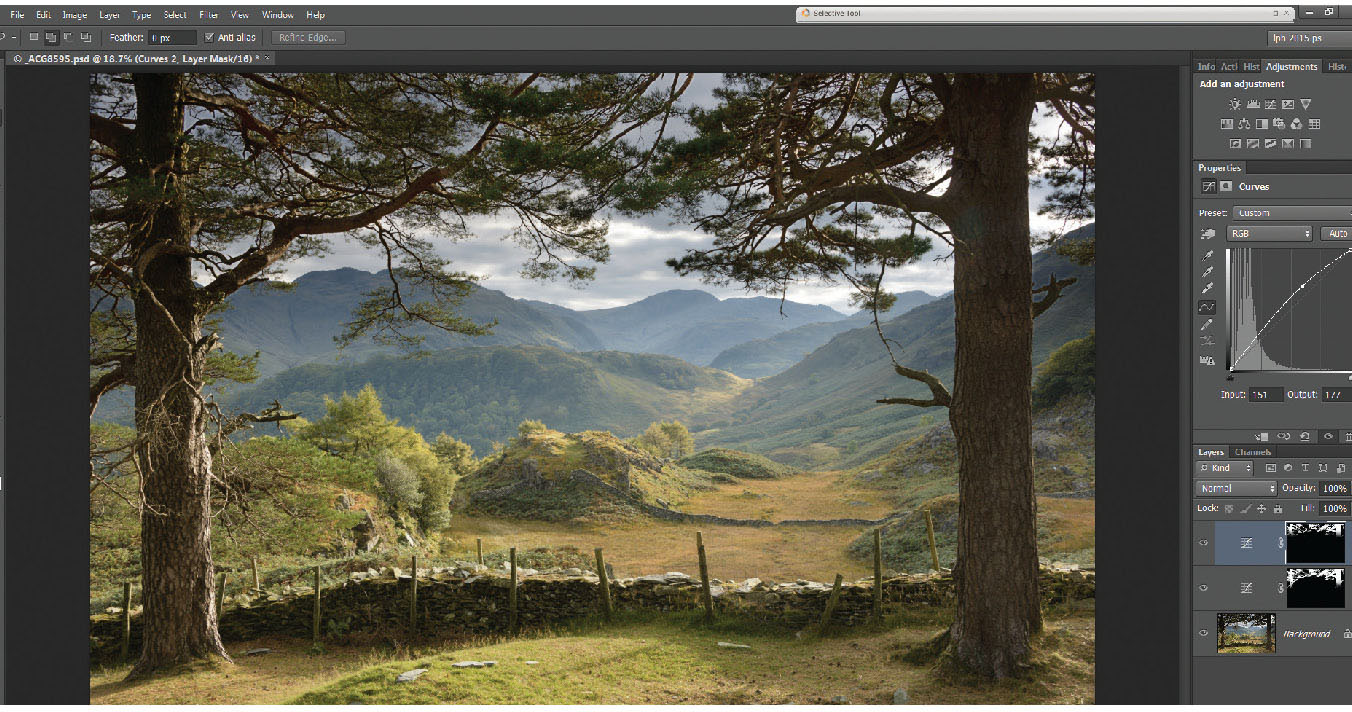
Fig. 6.28
Second curves layer working on a slightly reduced mask area, restricted to the top edge of the image area.
In this image, the top section of the trees needed a little more lightening. By trying to lift the curves lighter, the lower part of the selection would have become too light. A repeat of the selection stage with the gradient used to select only the top section of the trees and a further curves adjustment layer is shown in Figure 6.28 (check the second curves layer added and the shape of the mask). This two-stage lightening has just lifted the tones in the branches enough to look believable rather than over-worked.

Fig. 6.29
Final image, showing the top areas of the trees much closer in tone to the lower trunks, looking natural in tone, but with detail preserved in the sky beyond by use of the graduated filter at the taking stage.
Figure 6.29 shows the final image.