An Appendix of Useful Items and Practical Methodology
There are such a huge variety of tools and materials available that finding the right thing for a job can be quite daunting. I have listed and explained all my favorite things and techniques’ but there are plenty more you may find easier to obtain or preferable to use. If you have a better way of doing something or a more exciting component than the one I’ve used’ by all means’ follow your instincts!
Remember’ practice makes perfect for basic skills’ so try the appropriate technique for your project on scrap pieces before using your more precious materials.
SUPPLIES
Bezels
A bezel is an edged shape that can be used to hold a flat-backed stone or to pour resin into. They come in all sorts of shapes’ sizes and depths. Some have hanging loops attached for pendants; others are attached to rings’ cufflink backs or earring studs. You can also find interesting objects to make your own bezels. Try bottle caps’ for example.
Cabochons
A cabochon is a flat-backed’ unfaceted stone of any shape. Most usually are oval or round. They can be real stones like malachite or opal’ or faux pieces created from polymer clay’ resin or other materials. They are usually either glued into a bezel or impressed into polymer or silver clay as part of a larger project.
Chain
Both long and small bits of chain are useful. I often recycle old broken lengths and am a happy recipient of friends’ discarded oddments. You can also take apart chain made from enormous loops to make interesting jump rings. There are some gorgeous fancy chains currently available for purchase that add a wonderful touch to steampunk projects. I particularly like the range of natural brass chains from Vintaj.

AN ASSORTMENT OF BEZELS

AN ASSORTMENT OF BEADS AND CHARMS
Charms’ Beads and Crystals
Look out for unusual charms with steampunk motifs’ and collect them so you have a little stash of interesting charms’ like tiny clock faces’ airships’ submarines’ corsets and top hats.
Buy the best-quality beads you can for art jewelry. Real stones’ real pearls and high-quality glass will look better and last longer than cheap plastic’ and they will often cost only a few pennies more. You can even take apart old necklaces from thrift stores and use their lovely beads in new pieces.
I use only Swarovski crystal for faceted sparkling designs. The Austrian company still produces the best and most long-lasting sparkle of any crystal bead. The shape I use most often is the bicone. Do feel free to substitute your own bead color and shape choices throughout the book. Try to make each piece your own rather than copying exactly.
Filigree
Filigree is a wonderful way to add vintage styling details to your pieces without having to carve or engrave it yourself! A huge range of metals and shapes are available with elegant designs embossed and stamped out’ leaving a fine’ lacelike effect. The metal is usually soft enough to sculpt and bend around other objects’ creating interesting settings and backgrounds for your work.
Findings
Findings are the general name given to all those oddments needed to finish off a piece of jewelry. Some examples are clasps’ brooch backs’ earring wires or “fishhooks” and jump rings. Headpins are long’ blunt pins; you can get fancy ones or pins with plain ends. Eye pins are a piece of wire with a loop on one end. Headpins and eye pins are used to thread beads and also are used as dangles or connectors. Calottes’ necklace ends and ribbon ends are all used to finish off the thread’ thong or ribbon you have strung your beads onto.
Found Objects
Natural and synthetic found objects can add a story element to your pieces and make them truly unique. Sea glass created from old bottles polished by the waves and sand are favorites of mine. I’ve also picked up some wonderful rusty washers and gorgeous shells. Stones’ twigs’ bits of rock’ broken components’ old fairground tokens and vintage ephemera are all perfect.
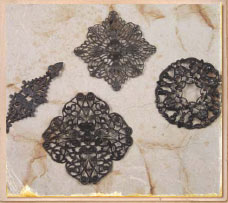
AN ASSORTMENT OF FILIGREES

AN ASSORTMENT OF FINDINGS’ FEATURING HEADPINS OF ALL WIRE TYPES’ EAR WIRES AND LOBSTER CLAW CLOSURES
Glitter and Inclusions
You can add things to resin and polymer clay to make interesting and realistic faux stones and textures. I love very fine micro glitters for a magical effect’ but natural inclusions like dry’ rough coffee grounds’ bits of mica and seeds’ as well as embossing powders’ can be fun’ too.
Glues
The most useful glue for adhering metal to other materials (and to itself) is 2-part epoxy glue. I use the brand Araldite. Other craft glues like UHU are handy for tacking things in place’ like leather or ribbons’ while you attach them in a more permanent way. Be wary of superglue’ as it often dries white and will dim your beads and crystals.
Leather
Every adventurous steampunk needs leather! There are also many wonderful faux leathers and suedes for vegans and vegetarians. Buy it in either sheets or thong lengths. It’s perfect to rivet metal cogs to and can give a manly and bold look to jewelry pieces.
Lockets
Lockets were very popular Victorian items. They look like a pendant but can be opened to reveal the inside. They often held a picture of a loved one or a lock of hair. Why not reduce a picture of your own beloved to fit inside?
Paint
I use a lot of paint to color and distress my jewelry. I mainly use acrylics in dark browns and blacks for aging polymer clay. I also use bright-colored alcohol inks and enamels or metal paints for metal. Have an experiment to see which combinations of paint and other materials work best for you. Always test pieces before using on a gorgeous “almost finished” item.
Polymer Clay
Polymer clay feels a little like plasticine and can be modeled in the same way’ but when it is baked it fuses together and creates a lovely solid shape. There are lots of brands on the market; Fimo’ Sculpey’ Cernit and Kato are just a few. Each brand has its own idiosyncrasies’ and many artists prefer one or another for their own particular style. I mainly used Premo! Sculpey in this book because I like its sculpt ability (although I do use Kato for millefiori canes’ as it keeps a lovely firmness that is essential for cutting thin strips). Liquid polymer clay is also useful. It needs to be baked to set (just like normal clay) but will act as a glaze for your pieces or even as a glue to bond baked pieces together.

AN ASSORTMENT OF LOCKETS

AN ASSORTMENT OF RIBBONS AND LACE
Resin
I use 2-part epoxy resin called ICE Resin for all the projects in this book. It is a 1-to-1 mix and dries completely clear. However’ it can take up to 48 hours to dry’ so you must be very patient. Always follow the manufacturer’s instructions exactly when using resin. Use exactly the right amounts and mix them for the recommended amount of time. You could also try UV resins on most projects in this book. These can be set much more quickly under a UV acrylic nail lamp. It’s easy to color your resin with tiny amounts of oil paint.
Ribbon and Lace
For a soft and feminine vintage look’ odds and ends of pretty old ribbons and lace can be tea dyed (just dip them in a cup of hot black tea and dry) for a creamy color. Look for natural fibers’ cotton silk and velvet for a truly Victorian feel.
Shrink Plastic
This does exactly what it says: It is plastic that shrinks when heated. You can write on it and color it before shrinking to create some stunning tiny objects and charms. Colors intensify enormously when shrunk’ so do play a bit before making a perfect piece! There are lots of different types and brands; the one I use most is “Shrinkles” frosted.
Silver and Metal Clays
There are two main brands of silver clay: PMC and Art Clay World. Much like polymer clay’ both brands have admirers but basically do the same thing. The main products feel like potter’s clay and can be sculpted and rolled before drying’ sanding and finishing’ and then firing and polishing. There are also liquid and paste types and even a paper one for origami-style pieces. They are designed to be fired with a blowtorch or in a kiln’ at which point the clay burns away’ leaving the silver particles to fuse together. During this process the piece does shrink slightly’ so details (and imperfections) become more noticeable. Art Clay World also makes a “low fire” version that can be fired on a normal cooking gas ring. The disadvantages are that it dries out faster and is more expensive per gram than its equivalent’ sheet precious metal. There are other metals now available’ including copper and bronze’ but at the moment they need a kiln to fire properly.

AN ASSORTMENT OF SMALL GLASS VIALS AND THEIR TOPS
Vials
Tiny glass bulbs now come in a variety of shapes and sizes. Fill them with colored liquid’ glitter or mica flakes’ and use them as a mad scientist’s miniature experiments for charms and pendants. They have little lids with hanging loops’ too.
Wire
Wire comes in an assortment of gauges and sizes as well as colors and hardness. Most jewelry wire is not too stiff but will comfortably hold its shape if knocked. Never cut wire with scissors; you will notch the blades. I love to recycle copper wire from old lengths of electrical cable. The wire I use most often in this book’s projects is 0.4mm wire (i.e.’ 26 gauge).
EQUIPMENT
Cutters
A pair of small’ sharp wire cutters is essential. Mine are specially designed for jewelry makers and have nice little blades and a pointed tip. For cutting thick chunky’ electrical-style or toughened wire’ use a small jeweler’s saw or a big chunky pair of pliers.
Drills
Sometimes you need a hole in something that is too hard to just push through. That is when you need a drill. There are some lovely small electric hand drills made just for the hobby market’ like Dremel. But if you don’t want to spend a load of cash’ why not try a tiny pin drill’ as used by railway-model enthusiasts? They take more work but are accurate’ and you can change the drill-bit sizes just like a Dremel. If you only ever want to punch small holes through sheet metal’ try a tiny screw-down hole punch. These give lovely’ perfect holes—usually one widget has two hole sizes available.
Files and Sandpaper
To achieve professional results’ finishing is very important. Some materials’ like silver clay’ need to be beautifully sanded and finished prior to firing. This cuts down on harder finishing work later. Other materials’ like polymer clay’ can be sanded after baking to give a rough or smooth texture. For coarse sanding’ ordinary sandpaper is fine; but for superfine sanding and polishing’ you need wet and dry papers or mesh of grades 400 to 1’000 or more. It is laborious’ but the final piece will look so much better. Honest.
Knives
A craft knife is invaluable for precision cutting of paper’ plastic and clay. Small disposable craft knives are also useful in this respect. Tissue blades are long’ wafer-thin razors with one sharp edge. Great care must be taken when using them’ but they are essential for some polymer clay techniques like cutting millefiori and mokume gane.
Metal Stamps and Textures
These are great tools for distressing or imprinting on metal. You can write words or sentences with the letters and make patterns and pictures with the others. They are made from toughened steel’ and you need something firm like a steel bench block on a hard rubber mat to place underneath as you strike them with a hammer.

WIRE CUTTERS

AN ASSORTMENT OF KNIVES

METAL STAMPS AND TEXTURES
Modeling Tools
I love my set of metal dentist’s tools! I bought them at an army surplus store many years ago when I was a student. They are fabulous for small-scale sculpting. But pretty much anything can be made into a modeling tool—the end of a pencil’ a pin head’ a looped bit of wire’ a cocktail stick with a bead stuck on the end. There are lots of inexpensive sets designed specifically for polymer clay. I urge you to experiment and make or find your own favorite tools.
Needles
A needle tool is great for piercing through beads’ making holes in pendants and for sewing! I have a variety’ from tiny and fine sewing types for threading silk ribbon to chunky darning needles’ used for sculpting and piercing (and for which I made a polymer clay handle).
Pasta Machine
This is a rather odd but essential tool for the serious polymer clay artist. It enables you to roll clay out to a uniform thickness every time—even to wafer thin. It also cuts down considerably on the time spent conditioning clay. Don’t use the same machine you use for making pasta though. It’s best to keep craft and food tools separate. You should clamp it to the edge of the table to keep it steady while you roll the clay through. Always start on the thickest setting and slowly decrease the thickness to avoid stressing the machine. It’s also used for some specific techniques’ like the skinner blend (see page 118). There are specific ones sold for polymer clay’ but I use one intended for pasta that I received as a wedding present. It has done sterling service for my polymer clay but has never made linguine.
Pliers
There is a bewildering assortment of pliers available but the absolute essentials are round-nose pliers for making little loops and flat-nose pliers for gripping and making right angle-bends.

MODELING TOOLS


A VARIETY OF PLIERS
I also use needle-nose pliers’ which are similar to the flat-nose pliers but have a longer tapering tip. A pair of nylon-jaw pliers are also useful for flattening filigree and working with wire because they won’t scratch. Bail-making pliers are quite fun’ too—they can create a cylinder shape from a small’ flat piece of metal or filigree.
All these pliers are extensions of your hands and fingers’ so it’s worth investing in good quality. They will last longer and be nicer to use for long periods of time.
ROLLERS AND BRAYERS
Sometimes a pasta machine is not the right rolling tool. For gently blending and flattening polymer and silver clay’ a small hand roller or brayer is invaluable. You can use acrylic rollers sold for sugar craft or rollers designed specifically for polymer or silver clay. Mine has a little handle like an old-fashioned lawn mower’ which is sweet’ but a plain acrylic tube works just as well.
Stamps and Texture Plates
Almost anything can be used to add texture to clay—the rough side of a shell’ an old filigree necklace clasp or traditional stamps with Victorian themes. I love using rubber stamps with clock themes. You need stamps with fine’ deep detail. Look for quirky steampunk-related images you’ll use again and again. There are also texture plates sold specifically for use with clay’ some of which are quite elegant. The lace and letter scripts are particularly good.
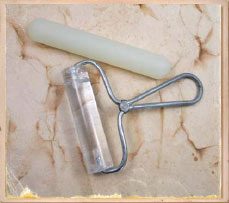
Rollers and Brayers

Stamps And Texture Plates
USING VINTAGE ITEMS
I think a large part of the “punk” in steampunk comes from making things yourself’ using items in a way they were not intended and being inventive with found objects and vintage parts. You can find vintage pieces in garage sales’ thrift and charity shops’ online at eBay and Etsy’ or even at the bottom of your own jewelry box. Broken things can be taken apart for their components’ shiny things distressed to look old’ and old things shined and polished to look new. The only limit is your imagination.

Taking a Watch Apart
It’s very important not to destroy valuable pieces’ so before you do anything at all’ make sure the watch has no monetary terms or sentimental value! If it’s broken’ can it be fixed? If not’ you can take your watch apart for the bits.
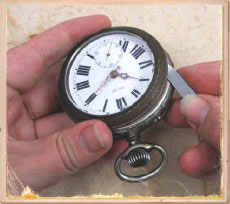
Step 1 Carefully take off the back and the glass front—pretty much all backs and fronts either unscrew or need to be levered off. There are special watchmaker’s tools available for this’ but you can also use a knife blade or thin screwdriver. Be very careful when using blades’ as they can snap under pressure. And wear eye protection when necessary.

Step 2 Start undoing every little screw you can find. You will need an absolutely tiny screwdriver. A set of jeweler’s or watchmaker’s tools are useful’ but I’ve also found that the tip of a broken craft knife works well.

Step 3 As pieces become loose’ remove them. Keep all the tiny pieces in a small jar—they are just as useful as the large parts. Some pieces may be held in place by pressure rather than screws’ so be careful that they don’t go flying off into the room!

Step 4 Continue removing larger connected pieces until the watch case is empty.

Step 5 Using the watchmaker’s tools’ begin unscrewing pieces of the watch parts.

Step 6 Some pieces that look solid may have other bits inside them. Pictured above is the mainspring case’ which reveals a lovely spring when pried open with pliers!

Step 7 Continue unscrewing any parts that were hidden by the clock face until you have a pile of pieces ready to create with.
Pieces You’ll Find in Watches

WATCH FACES
On the front’ of course’ is the clock face. These are often enameled with copper and will crack if bent or manhandled. The face is often held in place by two copper prongs. Try to locate these and gently ease them out of their holes without flexing the face.

COGS AND GEARS
A cog is’ in fact’ just the tooth bit of a gear wheel or sprocket’ but for the less pedantic it covers any of these lovely steampunk icons. You’ll find large ones’ about an inch’ inside clocks’ and teeny ones inside watches.

BRIDGE PIECES
There will probably be several “bridge” pieces of different shapes and sizes inside. Some vintage bridge pieces are absolutely exquisite with etched detailing. You will also see tiny red gems—these are rubies (both synthetic and real) meant to allow moving parts to rotate without friction and wear. They add gorgeous dewdrops of color to your pieces.

REGULATORS
A regulator is often the most beautifully engraved piece of a watch. It is used to set the rate of oscillation of the balance wheel’ helping the watch not to gain or lose time.
CLEANING AND MENDING VINTAGE FINDS
Not everything in steampunk has to look as if it’s old and battered. The industrial processes of the Victorian age made shiny new items more affordable than ever before’ so revel in the bling of your highly polished brass and steel.
I polish dingy metals using a rotary tumbler (such as those used by rock-polishing kits) filled with assorted shapes of stainless steel shot (i.e.’ nonrusting) and a drop of cleaning compound’ all of which are available from websites selling silver metal clay. Within an hour’ most pieces are supremely shiny. You can polish chains’ too’ but be warned that they will get tangled.
If you don’t want to spend any money’ you can do what the medieval knights made their squires do with chain mail: Pop your piece in a canvas bag with some dry sand and shake it for ages until any rust and imperfections have been abraded off. Then polish it with a soft cloth and some Brasso or a similar metal polish.


Once your pieces are clean’ you may decide you actually really like them just as they are. If they were just broken’ try repairing them with the jewelry-making techniques you’re going to learn.
Distressing and Coloring New Items
I love the look of rusty ancient bits and pieces’ but real rust poses some practical problems. Another dilemma occurs when a perfect component is shiny silver and you want it to look brass. A most satisfying solution to these problems is to change a component’s superficial appearance by distressing it yourself. A few suggestions to achieve these looks follow.
PAINTS AND ALCOHOL INKS
First take the shiny item and quickly sand it with fine sandpaper’ just to help the paints adhere.
Lightly dab texture paint over it in some areas. Don’t swamp it. Try to imitate the way real rust might build up. I use Ferro paint from Viva Decor in rust color; it has little flakes of metal in it’ which makes a lovely texture and dries really fast. Experiment with your own favorite gels and mediums to see what you like best.
Finally’ drop a bit of alcohol ink into the recesses. Use a tissue to wipe color off the raised areas for highlights. Blend the colors if you like’ and use blending solution to remove if it all gets a bit dark. I use Ranger alcohol inks’ which dry within seconds’ but you could experiment with other things like metal paints and enamels’ which are tough-wearing but slow-drying.
PATINAS
There are many patina and aging kits available. Polymer clay artist Christi Friesen has used some commercial kits to great effect on her pieces. You don’t have to stick to metal either. You can age and distress polymer clay’ paper’ wood and bone’ too.
Other techniques to try include heating metal to change or deepen the color and using liver of sulphur to provide a black patina on silver. Patinas on metals can be sealed by the application of Renaissance Wax’ which forms an invisible protective coating.


JEWELRY TECHNIQUES
Making a Loop

Step 1 Grip the round-nose pliers about 1” (2.5cm) from the top of the wire.

Step 2 Twist the pliers 90 degrees away from you’ creating a right angle in the wire.

Step 3 With your free hand’ curve the top piece of wire back toward you’ shaping it tightly over the top jaw of the pliers.

Step 4 Keep curving until it crosses the other piece of wire and then remove the round-nose pliers.

Step 5 Slide the wire cutters inside the loop’ so the cutting edge is flush with the inside edge of the wire circle’ and snip.
Wrapped Loop

Step 1 Grip the round-nose pliers about 1” (2.5cm) from the top of the wire. Twist the pliers 90 degrees away from you’ creating a right angle in the wire.
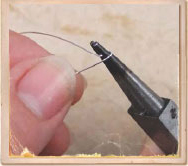
Step 2 With your free hand’ curve the top piece of wire back toward you’ shaping it tightly over the top jaw of the pliers.

Step 3 Keep curving until it crosses the other piece of wire’ and then remove the round-nose pliers.

Step 4 Grip the loop in flat-nose pliers.

Step 5 Start wrapping the tail around the stem wire very neatly. Wrap three times close together.
Using the wire cutters’ place the cutting edge flush with the edge of the wrapped coil and cut off the excess wire’ leaving the stem intact.
Opening and Closing a Jump Ring

Step 1 Using two pairs of chain-nose pliers’ hold each side of the cut opening. Twist in a scissorlike fashion. Do not pull the ring apart’ or it will not return to a perfect circle.

Step 2 To close’ grip each side of the ring with the pliers and twist back again.
Ribbon Ends

Step 1 When using crimp ribbon ends’ place a dab of glue on the end of the ribbon. If the ribbon is very fine’ fold over a small portion of the ribbon end to give the metal something to bite on.
Place the crimp ribbon end over the end of the ribbon. Using the chain-nose pliers’ squeeze the bend in the crimp to press the crimp together.

Step 2 Squeeze the sides of the ribbon end to securely clamp it to the ribbon. Allow the glue to dry thoroughly before wearing.

Step 3 If you’re using cord tips’ place a dab of glue on the end of the ribbon or leather cord. Using the chain-nose pliers’ fold over one side of the tip and squeeze it shut.

Step 4 Fold over the other side and squeeze it shut. Allow the glue to dry before wearing.
POLYMER CLAY TECHNIQUES
Conditioning

Step 1 Using a tissue blade’ slice the clay brick into thin pieces. Slightly overlap the pieces as you layer them on your work surface.

Step 2 Run the overlapped clay through the pasta machine on the thickest setting.

Step 3 Fold the clay mass in half’ and repeat step 2. Continue to do this’ gradually resetting the pasta machine to thinner settings’ until the clay mass is smooth and pliable.

Step 4 If the clay crumbles when you run it through the pasta machine’ put a piece of paper underneath to catch the crumbs. Press the crumbs together and repeat step 3 and 4 until the crumbs are incorporated back into the clay mass and the clay is smooth and pliable.
HOW TO MAKE MOLDS
You can make your polymer clay take any shape you desire by making a mold for it. You can choose almost any object to make a mold from’ but I recommend starting simple until you get the hang of popping the object from the mold. Great objects to begin with include shells’ beads and pendants’ keys and other objects that are easy to press in and remove. Molds can be made in two forms: hard and soft.
To make a hard mold’ condition enough polymer clay to have about twice the volume of the object to be molded. Roll it into a ball and flatten it slightly. Spray the clay with water (to aid in release) and press the object firmly in. Gently pull the item out again’ being careful not to distort the mold. Bake the mold according to the manufacturer’s instructions and allow it to cool before using.
Soft molds are made most easily using a two-part silicone modeling putty (often sold in places that supply silver clay). This method is best for delicate pieces or for those pieces with undercuts’ which will benefit from the mold flexing to enable release. Simply mix equal parts of the compound together until they are fully blended. Press your objects into it and wait until the compound has completely set to a slightly firmer but still rubbery form. Pop the object from the mold’ and the mold is now ready to be used.
Skinner Blend

Step 1 Roll equal amounts of conditioned clay into two balls.

step 2 Form the balls into teardrop shapes and press them together.

Step 3 Flatten the clay slightly and form it into a rough rectangle.

Step 4 Pass the clay rectangle through the pasta machine on the thickest setting’ multicolored edge first.
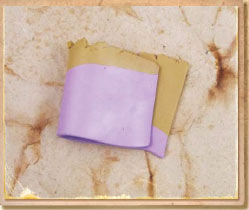
Step 5 Fold the clay in half’ matching the colored edges’ and run it through the machine again’ folded edge first.

Step 6 Repeat step 5 as often as necessary (10–20 times) to get a beautiful’ even blend.
BAKING
I recommend using a small toaster or craft oven that is dedicated to polymer clay baking’ especially if you use polymer clay on a regular basis.
If polymer clay is infrequently used in your projects’ using your home oven is fine’ but you should tent aluminum foil over the pieces before placing them in the oven to bake. And after you’re finished baking and the oven has cooled’ wash the inner walls of the oven with baking soda and water. Following these tips will help keep your home oven safe for food preparation.
Whatever oven you use’ always bake your clay in a well-ventilated area.
To bake the clay’ begin by laying the clay piece(s) onto a ceramic tile or baking sheet. Support large or awkwardly shaped pieces on a bed of cornstarch. (Dust or wash off the cornstarch after baking but before glazing.)
Bake the clay according to the clay manufacturer’s instructions. (Different clays bake at different temperatures—always check manufacturer’s instructions for the correct baking times and temperatures.) Also’ always allow for the full amount of baking time to ensure your clay piece will be fully baked.
When the time is complete’ turn the oven off’ open the oven door and allow the clay to cool completely before removing it from the oven.
SANDING
Dry and baked polymer clay can be sanded to help achieve a smooth look for your finished pieces’ make a lovely surface to apply glaze and be a pleasure for the wearer because you’ve removed potentially irritating bumps and snags. Dry metal clay can be sanded to help achieve a smooth surface after firing. Needle files are useful for smoothing out tiny spaces’ like the holes you punch for jump rings.
Start with fine wet and dry sanding paper or a block of grade 400 and sand evenly while the piece is wet. Gradually work your way down through the grades of paper to 1’000 or more. Buff and polish the piece to a high shine using a buffing wheel or a piece of cloth.
Glazing

Step 1 Place the piece of baked clay onto the work surface.

Step 2 Using a paintbrush’ apply a layer of liquid polymer clay to the baked clay.
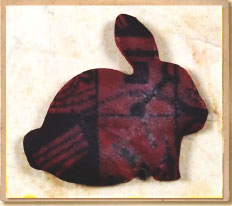
Step 3 Return the piece to the oven to set’ following the polymer clay manufacturer’s instructions for temperature and timing. This picture shows the clay with the polymer clay completely cooled.

Step 4 After the glaze has set’ you can either
leave it matte or heat it to a glasslike shine with a heat gun. Don’t overdo heating it with the heat gun’ or the clay will bubble. You can see it change texture’ just as embossing powder does. This picture shows polymer clay that has been heated to a shine.