
Jurassic Valley Exploration
DEAR MR DICKENS’
The jungle grows ever thicker and more oppressive. At night the cries of distant unknown beasts fill the air. Lord Philip Barham is an exemplary expedition organizer’ however’ and well deserving of the Natural Science Institutes bursary. We have real hopes of entering the Jurassic valley again tomorrow. After dinner’ served in candlelight by the admirable Jackson’ we even attempted a few lively renditions of Gilbert and Sullivan numbers. We have nearly finished the brandy’ however.
Pip told me all about his previous expedition when he first discovered the hidden valley’ lost in an oasis of time. The rest of his party had long turned back’ calling him insane. Yet still he followed the ancient glyphs’ appearing at intervals through the jungle’ which he believed to be signposts to somewhere wondrous. Exhausted and nearing starvation’ he at last stumbled over a precipice—but instead of falling to his doom’ he descended into a lake heated by thermal springs. All around’ giant dragonflies whirred’ and ancient fern species thrived. Herds of huge beasts’ no longer seen in the civilized world’ roamed freely.
This second expedition with film and camera equipment should prove most illuminating. I have also taken rubbings of all stelae we have encountered so far and hope to translate them upon our return.
VERY BEST WISHES’
Emilly

Adventurer’s Fob Watch
IMPRINTS OF SKELETON LEAVES AND RAINBOWS DECORATE THIS STUNNING PIECE’ which belonged to the third Lord Barham. Followers of the adventuring family’s exploits may remember that Lord B disappeared in darkest Peru while attempting to find the source of the Ucayali. This fob watch was discovered’ with his field notes and several new species of beetle’ in an empty canoe drifting some miles down the Amazon.
There is a twin to the large rainbow gem’ set into the bar at The Adventurer’s Club’ Mayfair. When the two stones are in alignment’ the watch vibrates’ ensuring that the wearer can never be lost and will always be able to return to the club in time for luncheon. This makes Lord Barham’s disappearance all the more mysterious.
His son’ Philip’ has mounted several expeditions to discover the truth’ believing that his father may have been captured and held prisoner by a lost civilization deep in the jungle.
SUPPLIES
OLD WATCH
POLYMER CLAY SKINNER BLEND
POWDER PIGMENTS’ IRIDESCENT AND GOLD
SCRAP CLAY
LIQUID POLYMER CLAY FOR GLAZING
I0Z POLYMER CLAY’ GREEN
5–6 3MM OR 4MM CRYSTAL CHATONS
ACRYLIC PAINT’ BROWN AND BLACK
SMALL FOSSIL
0.4MM GOLD PLATED WIRE
I DOME BUTTON
4” (10CM) PIECE OF LARGE BRASS CHAIN
LARGE BRASS JUMP RING
TINY BRASS BEETLE CHARM (VINTAJ)
ASSORTED CHARMS AND BEADS’ ALL BETWEEN ½“ (1.5CM) AND I” (2.5CM)
EQUIPMENT
WATCHMAKER’S SCREWDRIVER SET
TISSUE BLADE
PASTA MACHINE (FOR CONDITIONING AND ROLLING CLAY)
FLAT-NOSE PLIERS
CABOCHON MOLD
STAMPS (BY SEE-D MORSELS)
TWEEZERS
COTTON SWAB OR SPONGE
2-PART EPOXY GLUE
SMALL PLASTIC OR PAPER CUPS
BENT-NOSE PLIERS
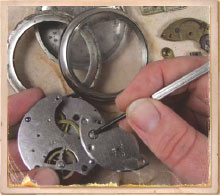
Step 1 First take apart your chosen watch (see Taking a Watch Apart on page 107). Using the watchmaker’s screwdriver set’ unscrew everything and set aside several pieces to be used later. You’ll need some tiny cogs and little screws’ too. If you’ve just got an empty watch case’ collect some interesting cogs and metal plates from previous projects. Reassemble the case and unscrew the glass front or bevel (if your watch has lost its glass). If the glass is very scratched’ you may want to remove or replace it.

Step 2 Take your skinner blend (see Skinner Blend on page 118) and roll it up tightly’ matching colors’ so you have a striped sausage shape. Gently compress it into a rectangle’ pushing from each end with your fingers and thumbs. Cut a slice from it. If the blend isn’t perfect’ you can reblend it through the pasta machine if necessary. Roll it out to the right size to fit in the mold.
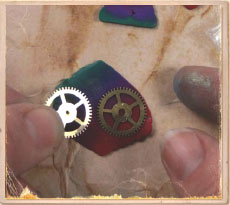
Step 3 Gently dust the cogs with iridescent powder and lay them’ powder side down’ on the rainbow slice. Tap the cog all over with the end of the pliers to make sure every bit of it has touched the clay. You don’t need to squash the cogs in’ just transfer the powder. (Experiment with scrap clay to see how much powder to use.) Remove the cogs’ levering them off the clay with a pin if needed.
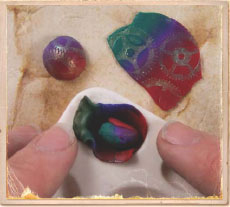
Step 4 Spray the cabochon mold with water. Place the mica-embellished rainbow slice’ cog imprint side into the mold’ and fill the rest of the space with a ball of scrap clay. Fold the edges in over the top and smooth the clay. Pull everything out of the mold’ using a pin to loosen the clay if needed. Bake the cabochons according to the manufacturer’s instructions. When cool’ glaze the cabochons with the liquid clay (see Glazing on page 121).

Step 5 Pack the inside of the watch case with the green polymer clay. Smooth the clay until it is level with the top edge. Check that the bevel or glass can still screws on. Stamp gently all over the clay. (I used tiny Jurassic-style ferns and leaves’ but any detailed stamp will impart a good texture.)
INQUIRE WITHIN
Try spraying the surface of the clay with water if your stamps stick. You can overlap images’ too. If you don’t like your pattern’ smooth the clay and start again.
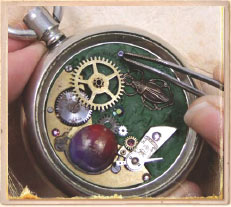
Step 6 Position the metal elements on the clay’ trying not to cover up too much of the stamping. Use the tweezers to embed them into the clay; you can hollow out the clay beneath them if necessary. Place the tiny cogs and screws into the piece’ replacing them in any original watch parts where you can. Finally’ press in the crystal chatons for dewdrop sparkles. Bake the whole piece according to the clay manufacturer’s instructions.
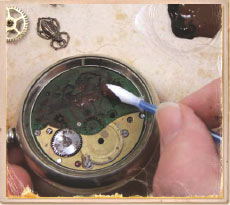
Step 7 When the watch has cooled’ remove the small metal and crystal components. These will need to be glued in place after applying the patina. Rub brown and black paint well into the clay. Using a barely damp piece of sponge or cotton swab’ wipe off the paint from the texture to highlight the stamped pattern. Glaze with liquid clay. When cool’ glue the metal and crystal pieces back in place.
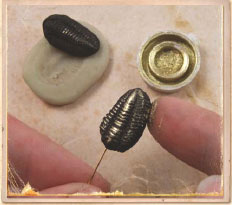
Step 8 To make a trilobite or fossil fob’ first create a mold from your original piece (see How to Make Molds on page 117). Mist the mold with water and then press in black clay. Make 2 impressions and sandwich a piece of wire between them’ using the liquid clay as glue. Using your finger’ dust gold powder on the surface of the fossil to highlight the raised areas. Bake and glaze as before.

Step 9 Attach the button to one end of the chain using the bent-nose pliers (this will attach to your waistcoat buttonhole). Fix the other end of the chain to the watch’ using the large jump ring if necessary. Hang the beads and charms from the chain using split rings or wrapped loops; try to get an interesting selection of dangles’ appropriate to the theme of the watch. Replace the front bezel or glass.
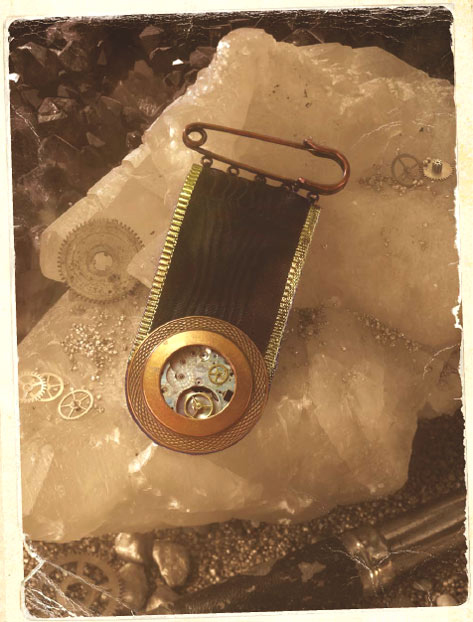
Empire Medal
AS THE HORDES OF TENTACLED AIR KRAKEN EMERGED FROM THEIR DAYTIME LAIR’ hoping to feast on the delicious blood of princess Aspidistra of Vlacq’ only one man stood in their path. Brandishing his Apogee 726 repeating pistol’ Captain Pip Barham leapt into the midst of the monsters. Firing wildly left and right’ he did not think them too many’ slaughtering the cephalopods with careless abandon.
The King of Vlacq was suitably impressed’ and it is only with great difficulty that the future Lord Barham extricated himself from the marriage arrangements and evaded pursuit by the lovesick and wilting Aspidistra.
Upon his return to Blighty’ he was awarded The Empire Medal for services leading to greater harmony between the empire and alien nations’ and also The Swift Cross for outrageous embellishment of exploits.
SUPPLIES
METAL DONUT AT LEAST ½“ (1.5CM)LARGER THAN YOUR WATCH (I USED A VINTAJ BRASS DONUT AND A SCAVENGED ALUMINIUM DISK FROM THE INSIDE OF A COMPUTER)
A BROKEN WATCH AT LEAST ½” (1.5CM) LARGER THAN THE DONUT’S INSIDE HOLE
ALCOHOL INK
TAFFETA RIBBON THE WIDTH OF THE OUTSIDE OF YOUR DONUT (MINE IS I½” [4CM])
KILT PIN (WITH OR WITHOUT HANGING LOOPS—MINE DOES HAVE THEM)
SMALL PIECE OF LEATHER’ FELT OR ANY OTHER NONFRAYING FABRIC
EQUIPMENT
WOODEN SHAPING TOOL AND DAPPING BLOCK (OPTIONAL)
WATCHMAKER’S SCREWDRIVER
2-PART EPOXY GLUE
SMALL PLASTIC CUPS
COCKTAIL STICKS
SANDPAPER
SCISSORS
NEEDLE AND THREAD
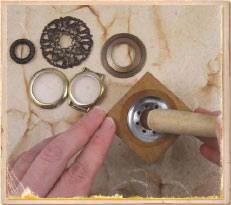
Step 1 If your donut is completely flat’ you will need to put a slight curve into it. Place the metal piece into an appropriately sized depression in the dapping block’ face down’ and tap all around with the wooden shaping tool.
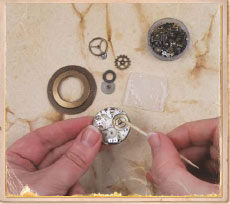
Step 2 Take the watch apart to make the most of all the components. Reattach some cogs and gears if you think it looks bare’ and set aside any pieces not required for this project. If desired’ move the pieces around to add more interest. Mix the 2-part epoxy glue in a small plastic cup and use it and the cocktail stick to adhere the extra bits.
INQUIRE WITHIN
The brass ring I used already used has a useful raised lip’ so it was unnecessary for that medal. Experiment with all sorts of frames’ but make sure they are a good weight to hang well.

Step 3 Mix up another batch of the epoxy glue and apply it all around the inside edge of the donut hole. Place the watch part on the glue so the interesting side faces up through the hole. Leave it to set completely.
If you want to distress or color your metal surround’ now is a good time to do that. I added a bit of alcohol ink to my aluminum medal and’ when it was dry’ distressed the edges with fine sandpaper.
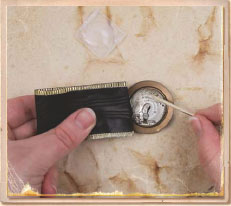
Step 4 Fold your ribbon in half and glue it to the back of the watch plate. (If your kilt pin doesn’t have hanging loops’ thread the ribbon through the pin at this stage.)
INQUIRE WITHIN
Look for interesting striped grosgrain and taffeta ribbons in unusual colors. If they seem a little bright’ you can always dim the colors a bit by dipping the ribbon in a cup of hot black tea. This will give them an aged effect.

Step 5 Cut a circle of the leather’ felt or nonfraying fabric the same size as the metal surround’ and glue it down to cover all the messy inside areas. Make sure the glue goes all the way to the edges to stop the cover from peeling back with use.

Step 6 Very neatly sew the top of the ribbon to the hanging loops on the kilt pin.
INQUIRE WITHIN
If you prefer for your pin to be completely hidden’ you could sew a regular broach finding to the back edge of the back ribbon’ so it has no visible means of support. If you have a long medal bar’ you could thread a few medals onto it and hang them all at once!

Adventurer’s Necklace
THROUGH THE RED SWIRLING MISTS OF MARS’ the jungle drums were sounding their war cry. With an explosion of heat’ a geyser erupted on the path directly ahead. With all exits now cut off’ Captain Pip and his trusty sidekick had nowhere left to turn. Then a shapely arm’ covered in tribal trinkets’ beckoned through the fog. Without hesitation’ they set off in pursuit.
The beautiful Martian and her equally lovely handmaidens hid them from her tribe for many moons’ teaching them how to survive on the strange rocklike fruit thrown up by the geyser’ and to bathe in the warm volcanic water. When eventually their distress flare brought a regimental escape gurney’ Lord Barham (to be) gently took the Gorgonops tooth necklace from the neck of the sleeping Martian and stole away into the night.
SUPPLIES
WHITE POLYMER CLAY
TRANSLUCENT POLYMER CLAY
BRASS FILIGREE RING (I USED VINTAJ 24MM FILIGREE RING)
0.6MM BRASS WIRE
SHEET MICA (FROM OBJECTS AND ELEMENTS)
BLACK STAZON INKPAD
4 9MM ETCHED JUMP RINGS
6 7MM JUMP RINGS
10 5MM JUMP RINGS
0.4MM BRASS WIRE
HEISHI BEADS (FROM OBJECTS AND ELEMENTS)
ABOUT 7 GARNET AND AMETHYST TUMBLE CHIPS
FOCAL BEAD (I USED A I” [2.5CM] DIAMETER RAINBOW JADE DISK)
2 LARGE OPEN COPPER COGS (TIM HOLTZ SPROCKET GEARS)
22” (56CM) LENGTH SUEDE LACE
4 BRASS NECKLACE ENDS TO FIT THE SUEDE LACE
CLASP (I USED A 27MM × 9MM ETCHED CREATIVE BAR FROM VINTAJ AND ANOTHER TIM HOLTZ SPROCKET GEAR)
EQUIPMENT
PASTA MACHINE (FOR CONDITIONING AND ROLLING OUT THE CLAY)
TISSUE BLADE OR CRAFT KNIFE
FLAT-NOSE PLIERS
WIRE CUTTERS
ROUND-NOSE PLIERS
SHARP SCISSORS
DRILL OR HOLE PUNCH
RUBBER STAMP (I USED INK AND THE DOG CLOCK PLATES)
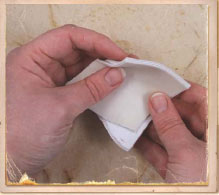
Step 1 Using the pasta machine’ condition and roll out both colors of clay to a medium thickness. Layer them on top of each other’ cut this slab in half and layer them again so you have 4 alternating colors. Try to keep a fairly neat rectangle. Run this layered sheet through the pasta machine. Cut it in half and layer it. Repeat this until you have a slab about 1" × 1" × 2" (2.5cm × 2.5cm × 5cm).

Step 2 Using a tissue blade’ roughly cut the side profile of a big tooth in the clay’ replace the pieces you cut off and turn the slab over 90 percent of the way. This will give you a stable base to cut exactly the same profile again’ but this time it will make the front and back curves. Remove all the clay’ and you should have a squared-off tooth shape with lots of lovely stripes.

Step 3 Round off the sharp edges using the tissue blade or craft knife. You may need to do it a couple times on each edge to completely round them. Gently stroke the clay with a finger along the stripes to smooth it. Try not to blend the stripes; just make a nice ergonomic shape. Slightly curve the tooth until it looks suitably ferocious.
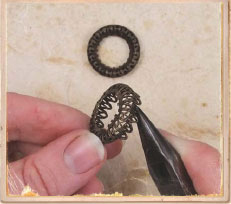
Step 4 Use flat-nose pliers to pry open the filigree shape and gently reshape it into a cap for the tooth. Work your way around the ring’ slowly adjusting the shape only a little bit each time you go around.
INQUIRE WITHIN
You could use all sorts of things for the top of the tooth—an open metal ring’ a cog’ an ornate ring or some fancy wire work.
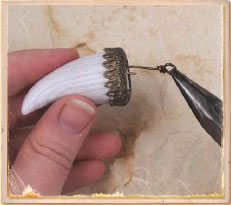
Step 5 Ease the ring into place on the top of the tooth’ reshaping if necessary. Cut a piece of 6mm wire about 3” (7.5cm) long. Create a wrapped loop at one end (see Wrapped Loop on page 113) and trim the other end to ¾ “ (2cm). Make a hook on the end with round-nose pliers. Push the wire down into the top of the tooth and smooth the clay back into place around it. Bake according to the clay manufacturer’s instructions and allow it to cool.
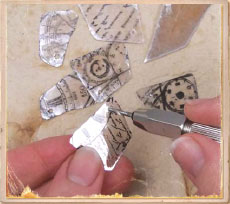
Step 6 Cut the mica into 2 natural-looking shapes with a craft knife or very sharp scissors. Be gentle; mica is quite fragile. Drill a small hole in the corner of a piece (not too close to the edge). Use your thumbnail to gently separate each tile into 2 pieces. Stamp the pieces with the StazOn ink and allow it to dry. Drill a small hole in the corner of each piece’ not too close to the edge.
INQUIRE WITHIN
If your tooth looks a bit bright and white’ you can make it creamier by rubbing it with acrylic paint and then quickly rubbing most of it off with a tissue. Alcohol ink mixed with blending solution works well’ too.

Step 7 Press all around the filigree with pliers to fully secure the tooth. Make a wrapped loop with 6mm wire at the top and bottom of the focal bead. Attach the cooled tooth to one loop with an etched jump ring.
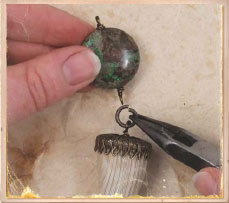
Step 8 Thread 7mm jump rings through each mica tile and close them. Link two 5mm jump rings to the first jump ring. Make a wrapped loop at the end of a 0.4mm piece of wire. Thread on the Heishi beads’ tumble chips and mica tiles. When you reach half of the wire’ thread on the focal bead and tooth. Continue adding the Heishi beads’ tumble chips and mica tiles on the other side.
When everything is threaded’ make another wrapped loop at the other end. Trim any excess wire.

Step 9 Attach the large copper cogs to each side of the beaded segment using an etched jump ring on one side and 7mm jump ring on the other.
Cut the suede lace in half. Fold one piece of lace in half and pass the folded loop end up through the cog. Thread the loose ends through the loop and pull tight.
Secure the ribbon findings to each of the four ends of leather lace. Thread a 5mm jump ring onto the ribbon findings from one side of the necklace and close. Attach half of the clasp to the 5mm jump ring using a 7mm jump ring. Repeat this on the opposite side for the remaining clasp.
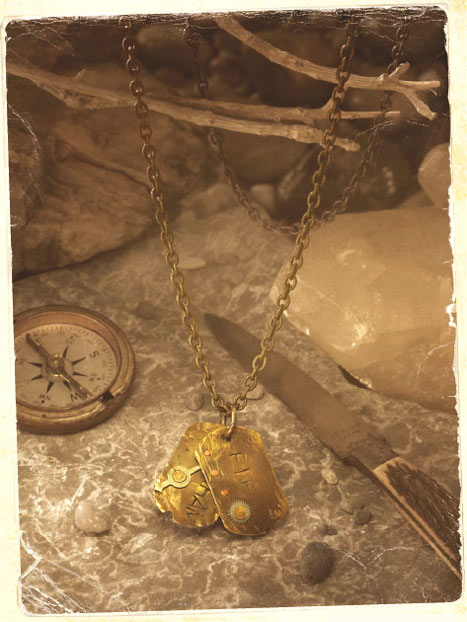
1st Lunar Regiment Dog Tags
WHEN THE ONLY REMAINING TRACES OF CAPTAIN PIP WERE A SET OF IDENTIFICATION TAGS HANGING FROM A BRANCH’ HIS ARISTOCRATIC FAMILY FEARED THE WORST. Having surreptitiously attached a tracking device to the regulation regimental tags’ they really should have realized that their son would soon have discovered the surveillance and made a bid for freedom.
After his grand tour of the less salubrious areas of the Empire—leaving behind a wake of broken hearts’ leveled buildings and impressive dueling scars—he returned to the bosom of his family and was reunited with the tags. Fortunately’ on his travels he had learned a few tricks and was able’ with a few small modifications’ to transform the tags from a trailing mechanism to a fine shortwave radiophonic device’ capable of picking up the latest tunes from Vienna’ Lyra and London.
SUPPLIES
2 BRASS DOG TAGS (I USED VINTAJ ALTERED BLANKS)
SMALL COG OR WATCH PART
NAILHEAD RIVET
BLACK ACRYLIC PAINT
ABOUT 2” (5CM) OF IMM THICK WIRE I USED SILVER-PLATED COPPER WIRE)
LARGE JUMP RING
BRASS CHAIN (LONG ENOUGH TO GO OVER YOUR HEAD)
EQUIPMENT
METAL BENCH BLOCK
SANDBAG OR PIECE OF RUBBER
MASKING TAPE
METAL LETTER PUNCHES
HEAVY HAMMER (I6 OZ)
PLASTIC HAMMER
DRILL WITH 1MM BIT OR METAL HOLE PUNCH
NEEDLE FILE
WIRE CUTTERS
RIVET HAMMER
TISSUE
TABLETOP VICE
FLAT FILE
INQUIRE WITHIN
To imprint the letters onto the tag’ you need to hit the punches pretty hard. Practice on a piece of scrap metal. I try to hit each letter just once’ in case the punch moves.
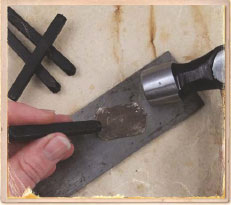
Step 1 Place your metal bench block on a sandbag or piece of rubber to absorb the shock from hammering. Decide where you will place the letters (use a bit of masking tape to mark the bottom edges if needed). Hold the desired letter punch onto the metal tag and give the top one sharp’ hard rap with the hammer.
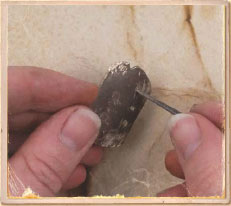
Step 2 If the punching has distorted the tag’ hit it with a rawhide or plastic mallet to flatten it again. You can also add extra texture by hammering the edges to give it a distressed look.
Mark where the rivet holes are going to be and punch or drill them out. Make sure there is enough space for the cog or watch part. File the edges smooth’ if necessary’ and check to make sure the 1mm wire will fit through exactly.

Step 3 Place the cog on top of its appropriate hole and thread the nailhead rivet through (the front of the rivet is shown in step 4). Snip the stem off so only about 1/16” (2mm) sticks up through the hole. The wire cutters will have squashed it a bit’ so file this end until it is completely flat.
Using the rivet hammer’ gently tap all around the edge of the stem’ curving and flattening the “corners” into a mushroom shape that won’t pull through the hole.
INQUIRE WITHIN
You can also use permanent markers and alcohol inks to color inside the letters if your tag is made of a shiny metal. Simply draw or paint onto the surface’ wait for the inks to dry and then gently sand off the unwanted areas with a superfi ne sanding pad.
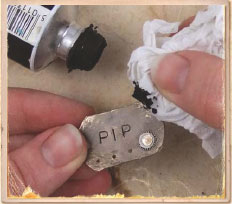
Step 4 Dab black acrylic paint over the letters’ making sure it gets right down into the grooves. Rub it off the main part of the tag with a bit of tissue’ ensuring that paint remains only in the letters.
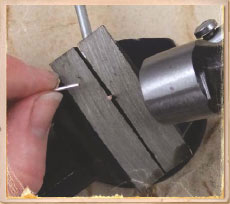
Step 5 To make the tiny wire rivets’ cut several pieces of wire about 1” (2.5cm) long. Pop one in the vice with about ¼” (6mm) showing. In the same way that you created the back of the nailhead rivet’ file the top of the wire flat’ and then tap gently all around the “edge” to make a little dome. It doesn’t have to be huge’ just big enough not to pull through the hole. The more you hammer’ the bigger it will get.

Step 6 Place your newly made rivet in one of the tag’s empty holes and snip off any excess wire to about 1/16“ (2mm). File the cut wire flat. Create the back of the rivet by hammering the wire in the same manner as you did in step 5. Practice will make perfect with these!
To complete the necklace’ thread the two tags onto a large jump ring and hang them from a chunky chain (see Opening and Closing a Jump Ring on page 114). Rather than adding a clasp’ join the cut ends of the chain together as you would a jump ring; or’ if the links are soldered’ use a jump ring.