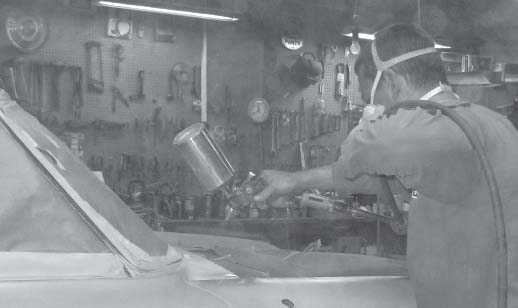

This painter is using a pressure-pot system. Pressure pots are great for really large projects, but are usually overkill in automotive projects, even a full-size car such as this 1964 Ford Galaxie. The long hoses can be a challenge to clean, but are worth it on large jobs.
Paint is probably the first feature people immediately notice on a vintage vehicle. In order to get the best paint results, it is necessary to have the right tools for the job. There are a number of paint spray gun types on the market and in this article we’ll describe the styles and their uses to the hobbyist.
One of the things to take into account when selecting a paint gun is the type of material that will be going through it. It’s important to have separate guns for primers and colors. Primer is thicker than paint and requires a larger tip size to get the proper film build. Regular build primer generally sprays well through a 1.7-1.8 tip size. A high build primer needs to be sprayed through a 2.0 tip size. Primers can be thinned with urethane-grade reducer, but adding too much reducer cuts the film build. If it becomes necessary to add a lot of reducer to get the primer through the gun, then it is time for a larger tip size.
Color is less sensitive to tip size than primer, but it is still important. Most vehicle projects get painted with base coat/clear coat or single-stage urethane (there’s not much enamel out there any more). Most urethane colors will work well in the 1.3 to 1.5 tip size range with a little adjustment to the rate of reduction. There is some difference of opinion on tip sizes for various clear coats. Since viscosity of clear tends to have a pretty wide range, there can be some trial and error involved. That being said, a 1.3 or 1.4 tip size is a good starting point to get the best atomization. Many clear manufacturers have tip size recommendations right on the product.
The most common paint guns are gravity feed (cup on top) and siphon feed (cup on bottom). Pressure-pot paint guns are less common, but still have their uses. Gravity-feed guns come in regular and HVLP (high volume, low pressure) styles. With HVLP guns, the reference to high volume is serious. These guns can shoot some serious cubic feet per minute (12-16 CFM).

This is an old Sharpe siphon-feed
gun based on the famous “Binks #7” design. It is fairly easy to service, but part kits for these styles are growing less common.
HVLP guns
Many companies make HVLP paint guns: Sharpe, DeVillbiss, SATA and plenty of others. When selecting a spray gun, think about how it will be used. An automotive refinisher professional-grade HVLP can cost more than $500. This might be overkill for the average hobbyist. These guns are designed to lay down automotive base coat and clear coat to match modern automotive finishes for hundreds of paint jobs. Most home enthusiasts won’t be painting that many cars with a single spray gun, so the boosted longevity of top-tier spray guns isn’t necessary. The more expensive and elaborate spray guns are also much more expensive to maintain. Rebuild kits for these guns also have a higher price tag and are more complicated.
Second-tier manufacturers such as ATD, Mountain, Astro Pneumatic and Max Air might make a little more sense for the “backyard” enthusiast, because they are much less expensive and provide a level of performance that is more than adequate for the types of paint common in today’s market. A note of caution on the second-tier guns: parts availability is limited and rebuild kits are few and far between. The good news is that these guns are so inexpensive that they can be cheaply replaced when they start to wear out. Most hobbyists simply won’t use a paint gun enough to wear it out.
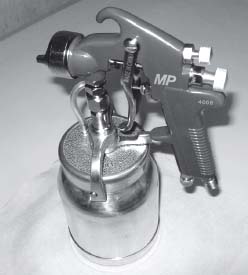
This red-handled Siphon fun spray gun by Astro is good for primer and has all the traditional adjustments. Expect to get a good-quality gun such as this for less than $50.
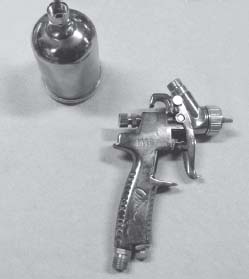
This is an inexpensive gravity-feed paint gun. These guns are popular now, and a good-quality spray gun can be had for less than $100.

This is the Devilbiss Millennium HVLP paint gun. It is a good value for a top-flight gun. Note that the only air pressure adjustment is on the regulator.

An inexpensive HVLP gun by ATD; note the painter’s hand is on the air pressure adjustment. Setting proper air pressure saves materials and gives a better finish. It’s an art learned through practice.
Siphon-feed guns
The most common siphon-feed gun is the legendary Binks #7 design. This gun has been copied endlessly and import versions are available everywhere from Harbor Freight to Walmart. The only thing to keep in mind with the economy-grade copies is that the cheapest versions are almost always “one-use wonders,” at best. It is hard to purchase a decent siphon-feed gun for less than $40. Siphon-feed guns use additional air pressure to pull the paint up from a siphon tube in the cup below the gun. This means there is more over-spray with a siphon-feed gun than with an HVLP, and therefore more wasted material. It is also hard to use up the last of the material that is in the cup — another disadvantage to the siphon-feed. Paint often sloshes away from the siphon tube, which causes spitting and sputtering. Top-feed guns don’t have this problem, because the paint falls from the cup into the spray chamber via gravity.
Pressure-pot guns
Pressure-pot guns are built similar to siphon gun heads, but have hoses leading to a large-capacity pot that sits on the ground. These systems are most commonly used when painting very large projects that require a lot of paint to be mixed at once. Since most hobbyists won’t ever need this feature, there’s little reason to go with a pressure-pot design. It makes more sense to mix paint in a 5-quart mixing cup and refill a regular-size gun more often than it takes to go through the extra effort of cleaning the pressure pot and lines in addition to cleaning the paint gun itself. Even “cheap” pressure pots aren’t cheap, so unless the project in question is a Peterbilt with a matching trailer, it’s best to stay with the more traditional top- or bottom-feed designs.
Setting up the gun
Once the style of gun is selected and the type of product to be sprayed is selected, it’s time to actually set up the gun. The settings for most paint guns are pretty close from the factory, and seldom are the adjustments set all the way to one extreme or the other. The paint gun will come with instructions, but there’s trial and error involved in adjusting the gun as well. Testing and practice are both important when setting up a gun.
Most paint guns have three common adjustments: air flow, liquid flow and fan. All of the adjustments are very important. Air flow will vary depending on what product is being sprayed. Primer will require more air pressure than color, because it is a heavier material. HVLP guns use less pressure, but more volume of air than siphon-feed guns. The instruction manual will have initial guidelines, but these settings are often low. Many times, these settings are referring to “at the cap” air pressure, not the air pressure as it comes into the gun from the air line. Setting the air pressure at the bottom of the gun to “at the cap” recommendations will leave the air pressure too low. When in doubt, 24-32 lbs. at the air line is a good starting point; be sure to test it with the material that’s going on the job.
Liquid flow is controlled by a positive stop needle that restricts the total travel of the trigger assembly. This is the only adjustment that is always in the same spot, regardless of the design of the gun. Adjustment of the liquid flow is best set just off the maximum for primer, because it needs to go on fairly heavy. The colors are thinner and may require less fluid flow. This adjustment is also heavily influenced by the technique of the painter. A fast mover will need more liquid (and air) than a slower painter. There’s no right or wrong way here. Whatever feels best probably is best.
The fan setting adjusts the width or narrowness of the paint pattern. This is the adjustment that is frequently changed, depending on the shape of the item being painted. Long, narrow pieces require a narrow fan, while panels get a wide fan pattern. Most of the time, turning the fan needle inward (tighter) narrows the fan. On guns with a side-mount adjustment, there’s usually a narrow to wide engraving that makes the method of adjustment obvious. A really narrow fan pattern can require an air pressure adjustment. When setting the fan, a painter’s technique is also an issue; about a 70 percent overlap is required to prevent “stripes” appearing in the paint due to improper overlap coverage. Fanning too wide often leads to “dry spray” as the paint starts to dry before making contact with the surface. Developing technique takes time and practice. It is a gentle blend of proper product mixture, proper gun settings and application. Moving the paint gun faster or slower, closer or farther away from the surface, and with less or more overlap, all combines with the gun settings to give the final result.
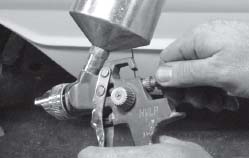
Adjusting the fluid control is done by setting the positive stop on the trigger. This adjustment is always in line with the gun needle.

The fan adjustment sets the width of the pattern. Too wide a pattern can cause dry spray; too narrow will result in runs. The fan adjustment is commonly on the side as in the picture. Some guns will have the adjustment on the rear.

The screwdriver in this picture points to the fan control adjustment. Notice that it is not a common side-mount adjustment.

Barely visible in this picture is the paint pattern after adjustment. Practice setting the pattern with lacquer thinner first to get close, and then do final adjustments with the material being sprayed.

The pressure gauge is clearly visible in this photo showing pattern adjustment. This is an example of a very narrow spray pattern.
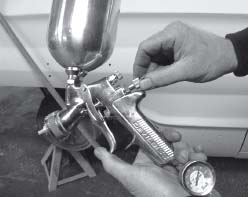
This knob will set the fluid control by limiting the travel of the needle assembly.
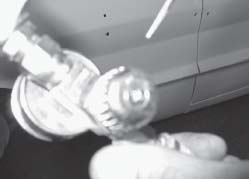
This is a picture of the air pressure regulator adjustment. As a rule, turning the knob clockwise will allow more air to flow through the regulator.
Paint gun accessories
Paint gun accessories should also be considered upon purchase. A good water trap is very important. There should be a trap on the compressor, but there should also be a trap on the gun itself. This allows condensation in the air line to be kept out of the paint gun. Nothing fouls up a great spray pattern as much as water droplets! There are two common filter types that attach to the paint gun. The less expensive is the ball-style, which works great. The more expensive is a desiccant style, which has the added advantage of allowing the painter to see when it is about to fill with moisture. Both of these attach to the paint gun right where the air hose enters.
Speaking of air hoses, more is better. HVLP guns, in particular, prefer a lot of flow. Larger-diameter air hose and high-flow fittings such as Prevost and RBL are much better than standard air hoses and fittings. A paint gun has a much higher duty cycle than an impact wrench or an air ratchet, so the amount of air used is much higher. This means the compressor has to be up to the job. A compressor that has to run continuously will build more heat and therefore develop more condensation in the line. Smaller compressors will therefore have more trouble with moisture buildup than larger ones. Any restriction in the air line reduces air flow. While this seems like an obvious statement, it is common to see painters with 100 feet of air hose between the paint gun and the compressor. This is asking for pressure and volume issues.
Cleaning your spray gun
After using the paint gun (job turned out great, didn’t it?), it’s time for clean up. This is where most guns are ruined because not all the paint or primer was removed before the residue dries. The second biggest mistake is taking the gun too far apart. There won’t be any residue outside of the paint chamber or in the gun body itself. There’s no reason to completely break down the gun.
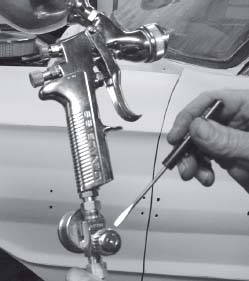
Since there is no built-in air pressure adjustment on this style of paint gun, the regulator is absolutely mandatory. All disposable water traps should be mounted below the regulator.
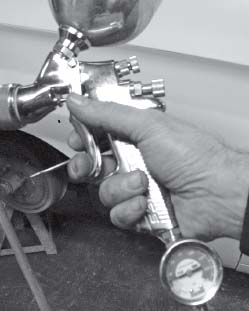
After setting the fluid control and air pressure, it is time to fine tune the two settings into balance. The regulator shows pressure in the “green zone” and the trigger travel is just right in this picture.

Proper cleanup is necessary in order for the paint gun to perform properly. The gold wrench in this picture is the specialty tool that will come with the paint gun for disassembly. A good paint gun cleaning kit will cost less than $30.
A good cleaning kit will have an assortment of brushes and needles to help with the job. First, run plenty of clean thinner (laquer thinner, urethane reducer or enamel reducer, depending on the product sprayed) through the gun. Clean the cup and cup lid and wipe down the outside body with thinner while wearing rubber gloves. After that, remove the air cap, which should thread off by hand. Sometimes, there is a gasket or “O” ring behind the air cap. Don’t lose it. This will expose the fluid nozzle, which can be unthreaded using a special wrench that came with the gun. Once the fluid nozzle is out, it will expose the needle. It will come out the back when the flow adjustment is unscrewed all the way. There will be a spring that tensions the needle — don’t lose it, either. Now the paint chamber is exposed and can be cleaned. Be mindful of the needle packing and don’t damage it. When the needle is cleaned, it needs to be lubricated with gun oil before it is re-installed. A good paint supply store will have gun oil (a good cleaning kit will have gun oil, too). The air cap and fluid nozzle can be cleaned individually and then re-installed. Don’t over-tighten these parts.
After the gun is back together, run plenty of thinner through it to remove any excess gun oil from the front part of the needle and readjust the gun for a medium pattern. Check for leaks and wipe down the spray gun’s housing so it is stored completely clean. If the gun uses a cup filter, install a new one at this time. Pressure pots will require more cleaning, because the pot and lines have to be cleaned, too. Siphon guns need to have the siphon tube removed and cleaned and the coupling between the gun and cup has to be disassembled and cleaned.
Final tips
In most cases, a painter is better off using a middle-grade gun. A good quality primer gun will be around $100. This same amount will usually buy a good color gun as well. Material is expensive, so a gun that doesn’t waste it quickly pays for itself. When stepping up, the Devilbiss GTI Millennium is a good value in the $300 range. For most hobbyists, a top-flight paint gun is not worth the expense, because the extra durability will never be an issue.
Used paint guns are almost always a bad investment. Part kits have become less common and even the big-name manufacturers no longer stock parts for older guns. Don’t expect to be able to find odd-and-end parts for paint guns. Common wear items are about all that is available without going to a specialty provider.
Remember to save the instructions that come with the gun and follow the manufacturer’s recommendations as a starting point. From there, review the technical data sheets that come with the liquid product and adjust accordingly. When in doubt, a little more air pressure seldom hurts. After painting, clean the gun diligently — it is a useful tool that requires proper care to remain functional. Remember: Practice makes perfect, and if things go badly, there’s always sandpaper.