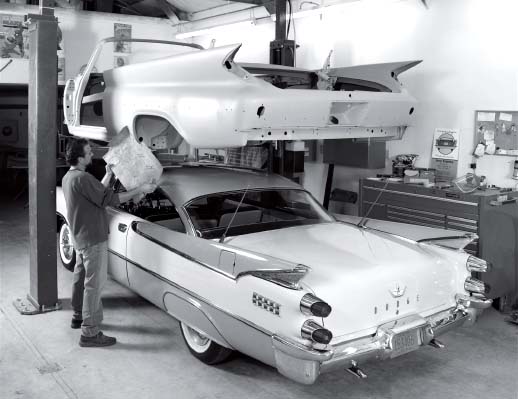

Jerry Kopecky examines the floor of the 1960 Chrysler 300-F his shop replaced. He holds the old, rusty floor section that was removed.
From the salty tip of Texas to the moist summer air of Maine, sheet metal can take a beating. With precious few exceptions, the metal floors of most cars turn to swiss cheese after 50 years and tens of thousands of miles of exposure to water, snow and salt. Though floor pans are seldom seen and sometimes forgotten, most restorers know they will have to repair them on cars that enter their shops. Among those restorers is Jerry Kopecky of Kopecky’s Klassics in Iola, Wis.
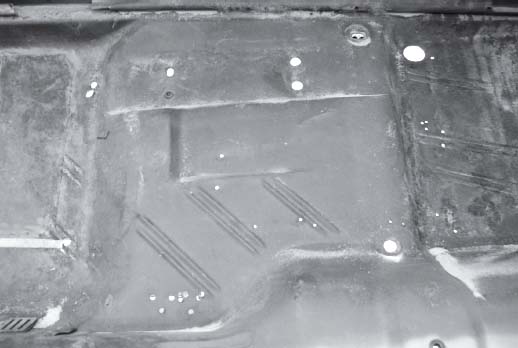
Here’s the 1960 Chrysler 300-F’s floor pan “before.” This car’s floors had already been replaced, but incorrectly with flat metal that flexed (note where the ribs stamped into floor abruptly stop). A previous owner also drilled several holes in the floor for reasons unknown; these were welded shut as the area they were drilled was not part of the replacement floor.
Kopecky has restored several types of collector cars, but his restoration business has evolved to specialize in finned MoPars, especially convertibles. Thanks to his attention to detail, restorations out of Kopecky’s shop have commanded record prices for finned MoPar convertibles at Barrett-Jackson’s January auction. Kopecky’s latest project car is a customer’s 1960 Chrysler 300-F convertible, one of today’s hottest postwar cars. That 300-F is the subject of this article, though the principles that Kopecky undertook to repair the floor pans apply to all finned MoPars, as well as most other metal-floored vehicles.
When this particular 300-F came into his shop, it was wearing an older, driver-quality restoration that still looked presentable. Its owner was looking for a correct, show-quality restoration on the rapidly appreciating Chrysler, and he knew Kopecky and his team were the right shop for the right car.
Kopecky knew immediately that the 300-F would need floor repair. The rocker panels were swelling, and like most old cars, any sign of rust indicates more rust was probably hiding, particularly in a car’s floors.

The support brace beneath the floor also had to be replaced, due to an inadequate repair job to the area. (A previous restorer had simply welded a new patch over the original rusted piece — not good in any aspect of restoration).
“Before the driver who delivered the car left, we had it on a hoist,” Kopecky said. After scraping the undercoating off, it was clear the floors had already been replaced, but with incorrect flat metal, rather than the correct ribbed material. Using flat metal to repair cheese grater-like floors was once common, but the material flexes when stress is applied, even from the light touch of a passenger’s feet. Flat metal also lacks the correct rib marks, which manufacturers added for strength and to prevent flexing.

Here’s new metal installed in the brace. The new patch had to be made larger than the old brace due to progressing rust from the bad earlier repair.
To best assess the situation, Kopecky Klassics sandblasted the floors after the interior and undercoating were stripped. Sandblasting is the best way to get metal as honest-looking as possible, as even tiny holes become evident.

Although Kevin Dombrowski usually leaves all of the original floor in place before cutting it out with the new piece laid on top, he cut the middle of the area out to get at the rusty brace beneath (it also functioned as a relief cut). There’s still more metal here than will be needed, as the floor pan section is larger than the hole he cut. He can now place the new floor pan over this opening, then cut around the new pan so it falls into place.
“We pull the interior out, the carpeting, seats — that’s when you get the real story,” Kopecky said.
With the floor and trunk pan completely stripped, Kopecky called R Car Fabs to determine which floor parts were available. Fortunately, everything Kopecky needed could be ordered.
While waiting for the new pans to arrive, Kopecky sprays a primer over the exposed metal to prevent flash rust from appearing.
When the new panels arrive, Kopecky checks them for fit. The 300-F panels worked well, so he was ready to proceed. Rather than cut out all the rusty metal at one time, possibly leaving the entire floor open, Kopecky braces the convertible body tub in the door openings and cuts out and replaces only one section of the floor at a time. (The focus of this article is the front floor pan of the 300-F.)
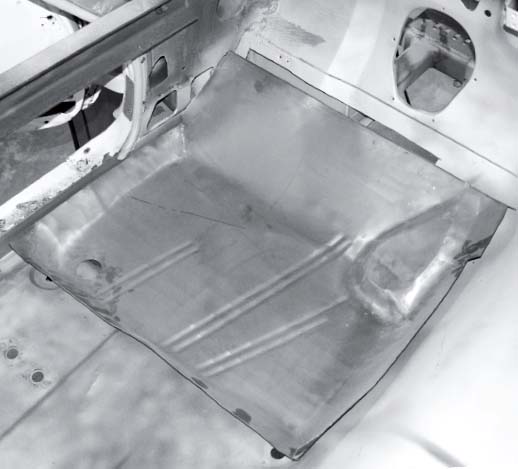
The new floor plan section is laid in place. Al tack weld will be put in one corner when the floor is in the correct position, then the old floor will be cut out from around the edge of the new floor. This is done one side at a time, using a MIG welder to butt weld the part in place.
With the new section of floor in hand, Kopecky Klassics employee Kevin Dombrowski lays the new floor pan over the existing pan while it’s still in the car. Dombrowski usually uses the entire pan sent, because the parts typically extend to a flat area of the floor, which is a good place to complete the butt weld, then apply the finishing touches.
With the new floor pan in place over the old floor, Dombrowski tack welds one corner of the new floor to the old floor. He then runs a 3-inch cut-off wheel along the edge of the new floor pan to cut out the old pan. This allows the new pan to fall perfectly into place. Although some body professionals use a plasma cutter, Dombrowski prefers cut-off wheels because they cut in a precise line without warping the metal.
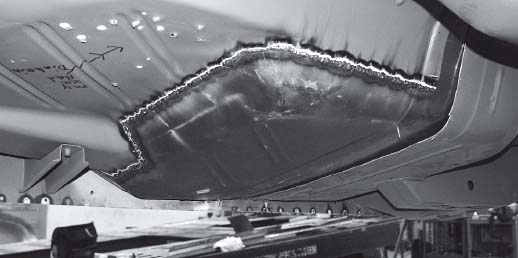
The pan after all four sides have been butt-welded into place as the old floor was cut out. The welds have not been ground down.
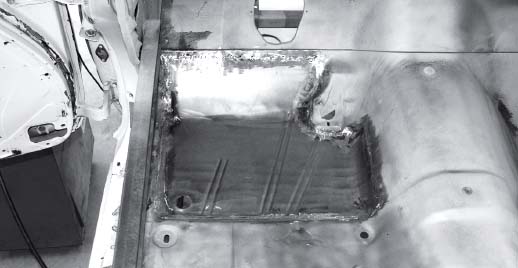
The floor pan section is completely welded in place with the welds ground down. Four steps of sanding will further even the weld. When primed and painted, it will be impossible to determine that the floors were replaced.
After the length of one side of the new pan has been cut from the existing floor, Dombrowski goes back and uses a MIG welder and wire-feeds the side of the new pan in place. Sometimes, a putty knife must be placed between the new floor pan and the surrounding area of the floor to line up these two areas. Dombrowski is also cautious to avoid heating up the surrounding floor or new floor pan section to the point each part warps during the butt weld process.
A two-part, catalyzed seam sealer is placed over the butt-weld seams to add another layer of protection against water entering the car.
The process is repeated for the other three sides of the floor pan. The process of laying the new floor pan section over the old floor allows the new section to fall into place as Dombrowski is working, and also prevents the pan from shifting out of place.
With the pan completely welded in place, Dombrowski goes over the welds with a cut-off wheel to bring down the weld, then smooths the weld with four stages of sanding using 36-grit sandpaper, then 80-, 180- and finally 320-grit. The area is again sandblasted to eliminate any flash rust and welding splatter, leaving a clean area to allow the primer and paint to bond. At this point, a cataylzed, two-part seam sealer is laid over the seam between the new floor sections and original floor as an additional safeguard against water entering the vehicle from below.
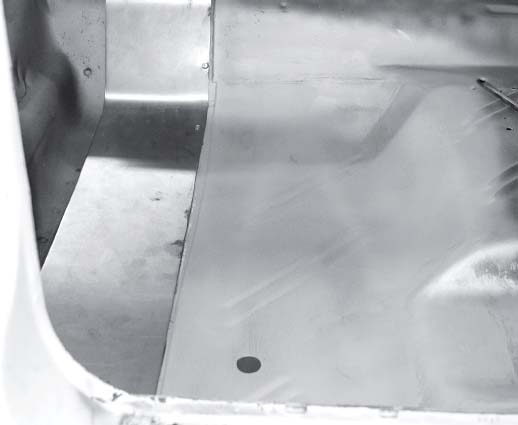
After paint, the floor again retains the original structural rigidity built into the car, and in an authentic fashion.

Ta-da! The finished floor now looks just how Chrysler originally built it.