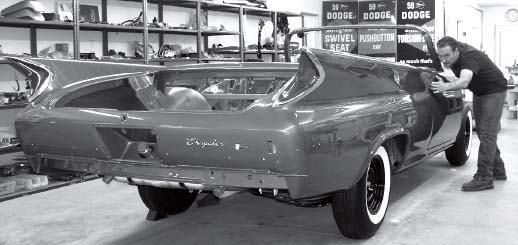

After this 1960 Chrysler’s body was placed on the restored chassis, restorer Jerry Kopecky began working on the wiring well before any other components were re-installed.
To the first-timer, a car or truck’s wiring harness looks like a giant plate of spaghetti without a beginning or an end. Determining where to take the first bite can be an overwhelming decision, but following the basic principles of wiring plus the following tips can make installing a new wiring harness a little less of a mouthful.
For this story on wiring harness tips, we followed Jerry Kopecky of Kopecky Klassics in Iola, Wis., through the rewiring of the 1960 Chrysler 300-F convertible featured in the previous issue of Old Cars Guide to Auto Restoration. Although the subject car is pictured here ready for wiring following the paint process, Kopecky started working on wiring well before he picked up his spray gun, or the sandblaster, for that matter.
“Make sure everything works before disassembly,” Kopecky warned. Even though Kopecky is installing an entirely new wiring harness, making sure all of a car’s components work before disassembly will isolate trouble areas upon reassembly. Finding bad switches, worn out motors, burned-out bulbs and poor grounds will determine what parts need specific attention in a partial restoration. Also, examining such components before disassembly can help the restorer understand how those parts go back together during reassembly.
Once all of the electrical components are made to work again, Kopecky recommends tagging every wire to identify its place in the car after the battery is disconnected, even when a new harness will be used. Also, photograph any areas where the wire is grounded as well as its path as it winds through the car. Make sure the photographs show the complete context to guide you to the location later; if that’s not possible, make a sign and place it within your photograph to pinpoint where the photograph is being taken. If you’re not sure of a wire’s correct location, now is the time to refer to your car’s shop manual, a reference no restorer should be without.
“I recommend a [shop] manual,” Kopecky said. “It’s my bible. Some guys read the manual front to back before they start [restoring a car].”
The shop manual not only includes the wiring (including its color, gauge and path), but often also includes the correct sizes for the bulbs. “A lot of times, the bulbs in the car might be the wrong size,” Kopecky added.
Also note and photograph the grounds and the hardware used to attach the wiring to the car. If the hardware appears to be original, it will need to be restored and reinstalled. If the factory wiring path appears to compromise the stability of the wiring with sharp corners and bends, seek a nearby path that will avoid these areas that could crimp it or slice it open.
With the battery unplugged, removal of the old wiring can commence. Kopecky begins at the rear of the car and works toward the instrument panel, stopping when he gets to this point. He exercises caution when pulling the wiring through small crevices in the car to ensure the old wire doesn’t break further and his tags are not torn off. For the wiring at the front of the car, Kopecky works from forward-most point (headlamps, turn signals, etc.) towards the instrument panel.
With the wiring removed from the car, Kopecky lays it out on a clean area of his floor and notes any breaks, cuts and any other trouble areas if it’s being reinstalled. With the availability of wiring harnesses from a variety of sources today, Kopecky does not recommend reusing an old harness. However, this is a necessary step if the harness will be reused or even replicated.
Travis of Rhode Island Wiring Service recommends saving the old wiring harness until it is fully installed.
“Do not throw anything away until you’re satisfied and done with the job, so in you have some wiring that wasn’t provided, it can be duplicated,” Travis said. When purchasing a wiring harness, Travis has some suggestions.
“When ordering a harness, make sure the seller is going to be there on the phone if you have any problems, and they have a technical support service. We get a lot of complaints that the seller didn’t want to talk about the wiring harness after the sale was made.
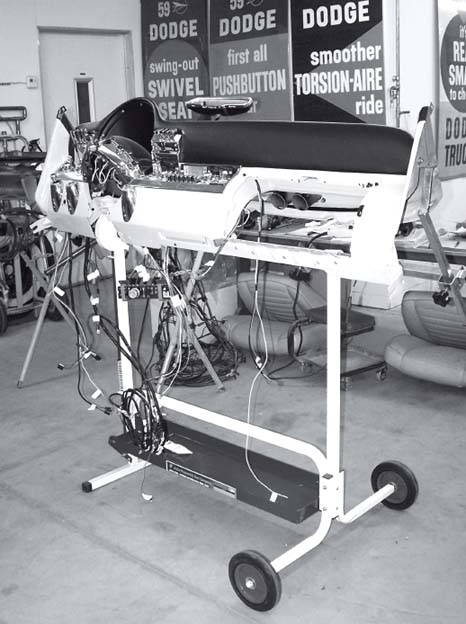
When wiring a car during a complete restoration, Jerry Kopecky assembles and wires the instrument panel out of the car to greatly ease access. Installing the instrument panel is at least a two-person job, of course, but Kopecky said it sure beats wiring a car from beneath when the panel is in the car. The stand allows the instrument panel to be turned — it’s an ordinary fender stand used in standard body work. The only modifications Kopecky made were small braces to secure the instrument panel.

A removed but otherwise-untouched instrument panel shows every hobbyist’s worst nightmare — a mess of old, broken or cracked wires mixed with vacuum hoses.
“Also, the most important thing is to get a harness with complete instructions, read them over, and lay it out and study it up before it is installed in the car,” Travis said. “That way if you find anything strange you can ask questions.”
Since Kopecky normally undertakes complete restorations, he pulls the instrument panel so that it can be refinished. When behind the wheel of a restored car, its straight sides, perfectly painted air cleaner and rechromed parts can’t be seen, but its gauges, instrument panel and other instrument panel components stare the driver square in the eye. Therefore, making this part of the car look like new is a task he feels is equally important to the exterior restoration. Removing the instrument panel also makes wiring the car that much easier, Kopecky notes. As on several other types of cars, reaching the instrument panel wiring on the subject Chrysler is nearly impossible while the instrument panel is in the car. Therefore, he assembles and completely wires the instrument panel out of the car.
“It’s how the factory did it, so that’s how I do it,” Kopecky added. He’s seen instrument panels filled with sand from being media blasted during previous restorations and has seen the damage sand can wreak on still-assembled instrument panels and their gauges and other components. Working with the instrument panel out of the car also makes installing the radio, switches and gauges much easier.
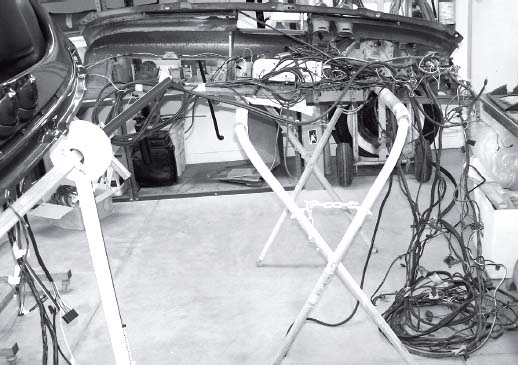
Even old wiring that will not be reused should be laid out, labeled and kept until the new harness is installed.
To make working on the instrument panel easier, Kopecky has slightly modified a wheeled cart originally built to hold fenders and other body parts. Such a cart is available for about $125 from suppliers that service body shops, or stores with inventory to assist such work.
For this MoPar restoration, Kopecky sent out all of the switches, motors and the special dome-shaped speedometer to J.C. Auto Restoration, which bench tests all of the parts it restores. This company replaces all of the inner parts to the components it restores, and even restores the exterior of electric parts for a new finish and new functionality. However, other parts of this restoration not handled by such a one-stop supplier such as J.C. Auto Restoration require some care and forethought. For example, the turn signal housings were re-chromed in this restoration, and since material is added during the plating process, the openings for the bulb sockets was made smaller. Kopecky was prepared for this.
“When it comes to sockets in cast parts, work with your wiring harness provider because fresh plating may alter the size of the hole where the socket is installed,” Kopecky said. His wiring harness provider was prepared for this side effect to plating and included light sockets with spring clips to hold the bulb in place. This style of clip is not 100 percent original, but will guarantee other original parts (such as the housings themselves) can be reused and will correctly function.

By installing the wiring while the instrument panel is out of the car, the wires can be more easily accessed from behind. Using this rotating body shop fender stand also makes the process much easier.
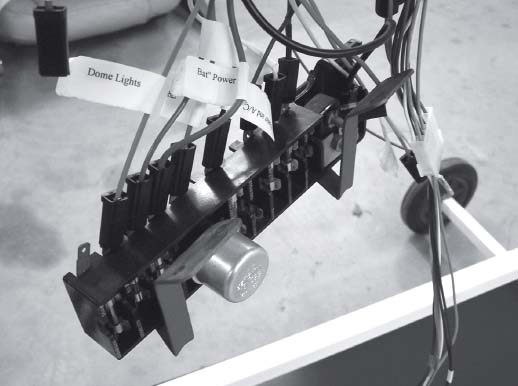
Use the new connectors and fuses, which are usually included with a new wiring harness. Also note that the wires are labeled from this wiring harness’ producer.
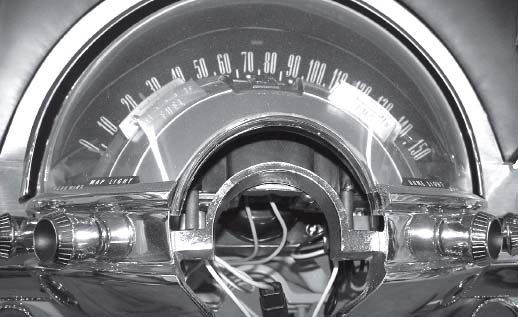
This instrument cluster, an electro-luminscent unit found on early-1960s Chryslers, was rebuilt to ensure proper function once the car is restored. The rebuilder, J.C. Auto Restoration, offers several tips to first turning it on to prevent damaging the lighting components the first time it is lit. Getting installation and running tips from any parts rebuilder is always recommended to prevent unnecessary damage and related expenses.
Before installing the instrument panel, Kopecky installs everything he can to the firewall and the area beneath the instrument panel; this includes heating and air conditioning components, vacuum lines, the wiper motor and accompanying parts and any other components that hide beneath the instrument panel. Kopecky also checks the function of the parts as much as he can at this point in the restoration. Once the instrument panel is installed, access is significantly cut off to this area of the car. If any problems are noted with the freshly installed components, now is the time to correct them.
At this point, the repainted and assembled instrument panel, fully connected to the new wiring harness, can be carefully re-installed in the painted car body. Kopecky connects the remaining wires from the instrument panel and the main fuse block to their respective locations one at a time, making sure the contact points are clean and free of corrosion and paint. He also works from the instrument panel to the engine compartment before working from the instrument panel to the tail lamps, since the forward area contains wiring important to making the engine run.

The manner in which the turn signal housings and wiring originally mounted allowed these parts to corrode together (left). Replating the housing reduced the size of the opening for the bulb and wiring to be re-installed, so the wiring harness company offered a solution of flexible clips to hold the bulb in place (right).
While the car remains at its barest point, Kopecky checks the wiring, lamps and function of all other electrical parts before the car is totally reassembled to prevent the need for removing restored parts and risking damage, and headaches. He also recommends testing the new wiring harness off a trickle charger, rather than straight from the battery, in the event that incorrect bulbs have been installed or there is another problem in the wiring. Incorrect bulbs with too high of a wattage will reveal themselves by being brighter that other bulbs when tested in this manner. In the event of an overbright bulb, the trickle charger will prevent the bulb from melting a lens or causing other damage. Since this Chrysler has an electro-luminescent speedometer, a trickle charger will reduce the likelihood of damaging the bulbs in the system at the first start-up.
In one final note of advice, Kopecky offers this tip: Work with your parts suppliers.
“I learn a lot from vendors,” Kopecky said. These hobbyists work with the parts every day and can often provide more valuable tips, especially those that are specific to your project and the parts purchased from them.