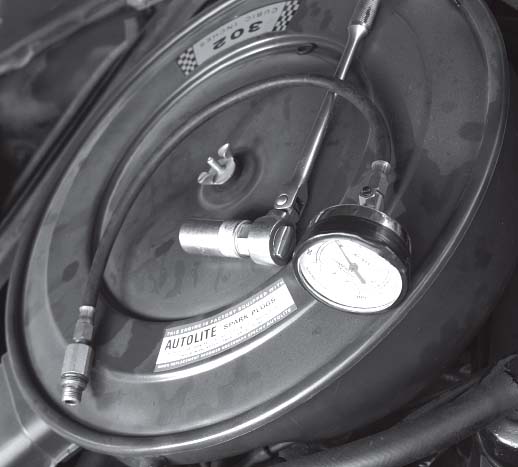
Perhaps your car’s engine has begun to idle in a rough manner. Maybe you found the collector car of your dreams, but are unsure of the condition of its engine. When in doubt, a cylinder leak-down test or compression test is in order. While a leak-down test may be more accurate, it requires compressed air, whereas a compression test can be done almost anywhere. In this story, I will walk you through the compression test.
A properly conducted compression test will provide a good indication of engine condition. An improperly conducted test will give erroneous information. Unscrupulous used-car dealers may insist on a compression test on vehicles it takes in trade. Their mechanic will jerk the plugs and immediately conduct a compression test. This is a problem, however, because removing spark plugs will loosen bits of carbon, which can become stuck between valves and valve seats. A compression test made using this method will usually indicate lower readings and may not show the true cylinder condition. Readings may also vary far more than specifications allow. The unscrupulous dealer will point out the low readings and deduct the cost of a valve grind, or even an engine overhaul.
Prior to beginning the test, roll the engine over several times using the starter, but with its ignition primary wire disconnected or the coil wire removed. (Consult your vehicle’s shop manual for the proper procedure as it relates to your specific vehicle, because later electronic ignition systems can sometimes be damaged by improperly removing the secondary coil wire.) If the engine turns over evenly, this preliminary test indicates that compression is similar between all the cylinders. An uneven rhythm indicates one or more cylinders has a problem.
Required tools
Basic tool set
Spark plug socket
Shop manual
Compression gauge (screw-in type)

A screw-in tester is preferred over the less expensive push-in tester.
The compression test
To get accurate results from a compression test, a compression gauge of good quality is required. A screw-in gauge is preferred over cheap gauges with a rubber friction cone that pushes into the spark plug hole. An assistant with a pencil and pad of paper is also helpful.
Start the engine and run it up to operating temperature. If the vehicle has been sitting for a long period of time, it should be run for about a half hour to re-seat the rings. Then, shut down the engine and loosen each spark plug about a half turn. Then go back and re-tighten each spark plug, start the engine and let it run for a couple of minutes. Shut down the engine and pull the plug wires.
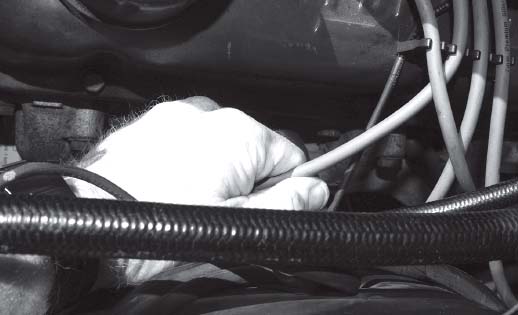
The improper method of removing spark plug wires is shown. Yanking on the middle of a spark plug wire will internally damage the conductor, which is usually a carbon-impregnated filament.

The proper method of removing a spark plug wire is to remove it at the boot. There are special tools available to remove the wire at the spark plug.
When removing plug wires, be gentle and only pull them from the boot over the spark plug. Do not yank the middle portion of the wire, as the electrical conductor has carbon-impregnated filaments for radio suppression that can be damaged. Be sure to record which wire goes to which cylinder. If in doubt, tag or label each wire.

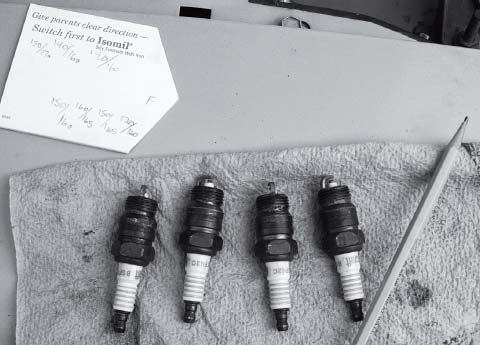
Arrange the plugs in order in order to compare readings. In this instance, four of the plugs read differently, indicating a carburetion problem.
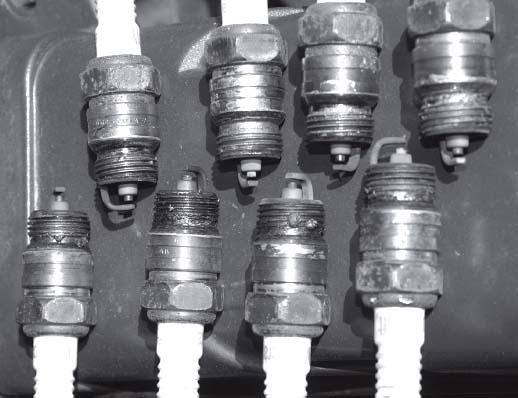
Use the proper tools, including a special plug socket, to remove the spark plugs.
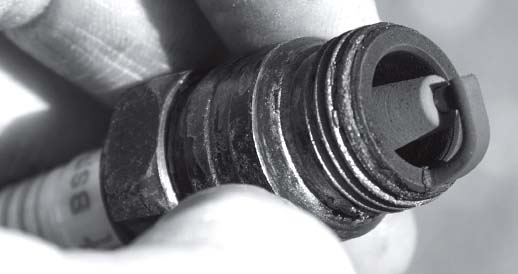
“Read” the spark plugs as they are removed.
Pull the spark plugs and carefully arrange them in the order of the cylinder from which they were removed. Take time to “read” the spark plugs, as they indicate a lot about the condition of the cylinder from which they were removed. Ideally, the plugs should have brown insulator deposits. Sooty black insulators indicate anything from carburetion problems to major engine issues. Blistered white insulators indicate overheating, or the mixture is too lean. A light yellow glaze on the insulator indicates the car was running at low speeds for an extended length of time and somebody suddenly jumped on the throttle.
If an assistant is handy, he or she can sit behind the wheel and operate the starter. If an assistant is not available, the starter must be operated from under the hood. Ford and Chrysler vehicles have relatively easy access to the starter solenoid. The solenoid on General Motors vehicles, especially those with V-8 engines, is more difficult to access.
Screw the gauge into the first cylinder and engage the starter with the throttle wide open. Watch the first reading, as well as the final reading. The first stroke should read in the neighborhood of 70 pounds. After four or five revolutions of the engine, a final reading can be obtained, which will generally be around 150 pounds. (Consult a repair or shop manual for the specifications of the vehicle in question.) If it takes several revolutions to reach 70 pounds, there is a problem, most probably a burned or sticking valve. Continue with the remaining cylinders, recording the information for each. After completing the test, you may find cylinders with markedly low readings. In these cylinders, insert a teaspoon of oil into the questioned cylinder and retest. If the reading(s) markedly improve, this indicates a ring problem. Readings should not vary more than 20 percent between the highest and lowest cylinder.
Record the first stroke reading as well as the final reading to determine cylinder condition.
Deciphering the readings
Low-compression readings can be caused by various conditions. The most obvious is the engine is old and worn out. Older engines, manufactured prior to 1972, were not designed to be run on unleaded gasoline. Tetraethyl lead, which has long been phased out of gasoline in the United States, serves as a lubricant, thus hardened seats were not necessary in vehicles manufactured during the period in which Tetraethyl lead was in use. Running a pre-1972 engine that requires lead on modern unleaded fuel without lead additive can produce low readings due to engine wear/damage.
A misfire at idle, accompanied by the clicking of a lifter, can indicate a bad valve seat. Engines requiring frequent valve adjustments, where valve clearances rapidly tighten, can indicate a receding valve seat or a stretching valve stem. Either condition immediately should be attended to in order to avoid other problems. If it is necessary to pull the cylinder heads, have the machinist install hardened valve seats to avoid future problems with unleaded fuel. One vintage truck group has had good results overcoming excessive valve seat wear by opening up the exhaust system to dual exhaust.
A ruptured vacuum advance diaphragm also will contribute to premature valve burning, especially if the vehicle is subjected to hauling heavy loads, such as towing a trailer. This is due to the retarded spark where the burning mixture is going out the exhaust, rather than propelling the vehicle. Fuel mileage will be reduced if the spark advance systems are not working properly.
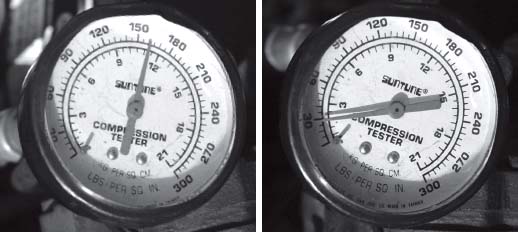
Above, the final reading shows this cylinder is “healthy.” Right, this reading shows this cylinder is “sick.”
The state of California mandated exhaust emission controls on new cars beginning with 1966 models. These controls focused on reducing unburned hydrocarbons and carbon monoxide output. A few years later, it was learned that these early modifications greatly increased oxides of nitrogen (NOx) output, and California began a program to retrofit pre-1970 cars and light-duty trucks with NOx devices. All of these devices involved some form of disconnecting the distributor vacuum advance. Most of these retrofit devices brought about an increase in engine operating temperatures, and many of the poorly engineered or cheap devices did not have temperature-override provisions. Those devices without this provision could cause an engine to suffer from prematurely burned exhaust valves.
Valve clearances should be periodically checked and adjusted. Valves that are set too tight will prematurely burn. When I worked in the tune-up field, I would purposely set valves a tad on the loose side — especially exhaust valves. This resulted in slightly noisier valves, but valve life was extended by the looser clearances.
Lean fuel mixtures will also shorten valve life or, in extreme cases, burn holes in pistons. Reading spark plugs can be an indicator of mixture. If in doubt, go to a shop with an infra-red exhaust analyzer to determine an improper fuel mixture.
The author, John L. Bellah, is a member of SAE International. He spent several years in the automotive tune-up field and is thoroughly familiar with tune-up and carburetion issues on vehicles from the 1940s through the 1970s.