Chapter 5: The Big Build is Here: Late Spring
Spring is in full swing now. You are ready to build more of your structure and finally plant your garden. If you are planning on enlisting the help of friends, put out the call. Your list is long, and you are going to need assistance to get your cellar built. But once you get started, you will see fast progress and soon be enjoying your garden harvest.
Constructing the Floor
By now, you have a fully cured foundation with drainage tile laid down — the perfect base to build upon. Your next step is to create the floor of your root cellar. You might already be done with this step because the best choice is a plain earthen floor. This is not the most attractive option and can leave your shoes muddy, but when it comes to controlling temperature and humidity, a dirt floor is ideal. All you need to do to complete your floor is to level it as best you can so it will be even with the walls and door. Try to remove big rocks or chunks, and use a big metal rake to smooth it out so you will not trip every time you go into the cellar.
If you do not prefer dirt, other options for flooring are cement, wooden planks, or even tile. Previous sections have discussed the disadvantages of these choices, but if you are willing to take on some extra maintenance, these options will work for you. To install any of these materials, consult the manufacturer’s instructions and follow the standard protocol for pouring a cement floor or putting in wood or tile. Be sure to install a vapor barrier beneath your flooring. Otherwise, you might have problems with moisture buildup, which would be detrimental to your materials.
Building the Exterior Walls
You also have a few choices for materials when it comes to building your exterior walls. The simplest option is to find a cave with natural stone walls, but these are not easy to come by. It is up to you to create your own cave to trap the Earth’s cooling power. Previous chapters have briefly touched on the following options, and each has advantages and disadvantages. For your root cellar, you will need to review each option and determine where it fits into your budget, skill level, and design plans. Each of these choices is suitable for root cellaring aboveground, underground, or in an existing basement space:
- Poured concrete: Shown in Appendix B (plans No. 1, No. 2, and No. 8). This type of building requires the most skill and should only be done with expert supervision. Poured concrete is also the most expensive choice for materials. For information on forming and supporting concrete, please refer to the masonry books listed on page 97, or give this job to a contractor.
- Concrete block: For plans showing poured concrete walls, you can easily substitute concrete block walls. This also requires special skills, but a do-it-yourselfer can more easily do this than pour concrete. This option is less expensive but does take more time. The masonry books on page 97 also show how to work with concrete blocks.
- Timber and lumber: Shown in Appendix B (plans No. 3, No. 4, and No. 5). Timber is the least expensive and the simplest material to work with. It also is the most susceptible to decay because wood will absorb moisture when in contact with the ground. To build an exterior wooden wall, consult a carpentry book or find a contractor to help you.
The plans in Appendix B will guide you through the basic process of assembling the walls. No matter which type of material you choose, the first step to building a wall is to carefully measure wall placement, especially corners. Check and double-check your corners are square before you start building forms or laying block. You will be amazed by how quickly you can get off course without proper measuring throughout the entire building process. And, without straight, square walls, the rest of the project will be much more difficult and frustrating to complete. Use the same measuring method you used to lay out the footings; mark the corners with stakes or tape, and measure diagonally from corner to corner. If these diagonal measurements are not equal, your building will not be square. Adjust placement and remeasure until you have equidistant corners. If you are planning to include electric wiring or plumbing, preliminary work must be done as the wall is built. Work with these specific contractors now to determine where pipes or conduits will enter the structure, so you can plan ahead and get these installed before you get too far along.
This is a critical stage of your building project and, if done improperly, your entire root cellar could cave in. A poorly built wall could cause many problems. This a safety issue, and all your hard work and expense would be for nothing. If you feel unsure at any step or do not know how to do some of the more complex work, ask for help. Contact a local contractor or a trusted friend, or do research at your local library. One advantage with this project is it only needs to be functional, not pretty. This is a project through which to learn construction techniques, such as building a concrete wall. As long as you have a good mentor, you will not have to worry.
TIP! Be sure to follow the manufacturer’s instructions for the curing time of your new concrete walls. Some require up to 14 days before you can begin further construction, such as weatherproofing, roofing, or backfilling.
Whether you chose concrete or timber, you must install some type of weatherproofing to the outsides of your walls before you replace the soil. This product will help keep moisture from seeping through the walls of your underground structure and will also add protection from any critters thinking about chewing through the walls. Waterproofing products range from painted or tarry substances to self-adhesive membranes. The type of product you choose depends on the type of material you will be weatherproofing. Ask at your local building center, and they will direct you to the product most suited to your specific project and budget. Before you install weatherproofing to the walls, make sure the cement is fully cured or the wood is not wet from recent rains. Also, cut or mark all the exterior openings for plumbing, wiring, and ventilation, or you might compromise the integrity of your weatherproofing by cutting into it later.
Throughout the framing and building, be sure to refer back to your original plans, or remind your contractor to do so. This is not your average construction project, and a few of the components, such as ventilation and insulation, will be different than other underground projects. Insulation will be discussed later in this chapter, and ventilation will be discussed in Chapter 6.
Case Study: A Happy Accident Makes a Perfect Root Cellar
Tom and Kim Muller
1582 Hill Street
Chatfield MN 55923
Tom and Kim Muller currently live in a small town in southern Minnesota. Sadly, they had to leave their root cellar when they moved, but they continue to keep a few chickens, grow a big garden, and preserve their harvests every year. Kim dreams of the day when she can once again have a root cellar in her home.
We have always been avid gardeners, and my wife is a pro at canning, preserving, and cooking all our bounty. It seemed natural for us to have a root cellar. The opportunity presented itself when we were building onto our previous house in Pennsylvania. After pouring a concrete slab for a back porch, I found I had a 12-foot by 12-foot space with two walls completely underground. It was perfect for a root cellar. By putting in some block walls, adding a side entrance, and building a few shelves, we could now store a lot more fruits and veggies.
This unexpected space turned out to be ideal. Heat was not active in the space, so it stayed at a constant temperature and kept a good humidity level. As a beginning root cellar owner, I measured these things by feel. If we had stayed in that house, I am sure I would have upgraded to a more scientific monitoring system with thermometers. Access to the root cellar was also convenient because it was right under our back porch, and we could just run down each night to find veggies for dinner.
Even with my minimal monitoring and lack of external controls, we had good luck with our root cellar. We were able to keep potatoes, carrots, and other root crops we grew in our garden — and they lasted through the cold Pennsylvania winters. We also bought apples from a
local orchard and were able to keep those well into the storage season. We kept an eye on the produce and tried with my wife’s preserving expertise to can or freeze things that were beginning to soften or ripen too much. The root cellar was also a way to free pantry space in our kitchen because we were able to move the canned goods down into the root cellar.
I did not have to maintenance our root cellar other than keep it clean. With more time, I probably would have upgraded my cellar to include a few amenities, such as lighting. Without a light, we always needed a flashlight or lantern to go down into the cellar. That was not the most convenient system, especially on those winter nights when the sun set before dinnertime.
Take-away tip from Tom and Kim:
Using a root cellar for storage helped increase the shelf life of all the fruits and veggies we grew in our garden, which meant we had tastier, more nutritious meals for our family.
Raise the Roof
Depending on your design, you might be able to put in a below-grade flat roof. This is a perfectly acceptable design that will work for your root cellar. It will be relatively maintenance-free and unobtrusive once finished. However, most plans require a poured concrete roof and good support structures because your roof will be bearing loads of soil and winter snow. Unless you have worked with concrete before, it is best to consult an engineer or cement expert during this step of construction. Once you have installed the roof, you need cover it with soil, grade the slope away from your walls, and seed it with grass or sod. After your roof is covered with soil, mark or fence it off so you do not accidentally drive over it or damage it during later projects.
If you are building your cellar in an area in which an underground roof will get frequent, heavy foot or machinery traffic, consider installing a standard hip roof. This style is shown in Appendix B, plan No. 1. This roof will deter overhead traffic, direct water away from your cellar, and also discourage heavy snow buildup. In addition, this raised roof gives you more room within the root cellar because the heat and humidity can rise higher. Conversely, you could install a removable interior ceiling panel to control these levels.
TIP! Protect your structure from water and critters by making temporary covers for holes that will become vents, plumbing, or other structures. Just nail pieces of scrap plywood over openings until you can finish them. Also, be sure to cover large openings at the end of the day in case of unexpected rain.
The plans included in Appendix B show underground and aboveground roof designs and give instructions for installation. When building an exposed roof, you have all the options available to regular homebuilders. From asphalt shingles to premade metal panels, any material will work as long as it fits into your budget. If this is your first construction project, consult a carpentry book or a trusted expert to guide you. Chapter 6 will cover additional roofing instructions, including ventilation plans and finishes, in more detail.
Make an Entrance
Your root cellar is starting to take shape, but you will need stairs and a door to enclose your structure. With premade, prehung exterior doors or a door you make out of leftover materials, the only factors to consider are insulation value, element resistance, and ease of use. Probably the best, but also the most expensive, choice is an insulated, exterior steel door. These are designed for the coldest climates and can be purchased prehung in the frame from any home improvement store. They come ready to attach to your structure and will last for many years without maintenance. Be sure to select a door without a window so you do not let light into your cellar. In the following insulation section, this book will cover structural insulated panels (SIPs). SIPs are also a good choice of material for a door, and you can make your own from leftover scraps.
For cold climates, another option is to install two doors with an air lock in between. Just like in science fiction movies, you come in through the outer door, close it to seal out cold air, and then open the inner door. This does require more space that is essentially not usable for storage, but it will ensure blasts of cold air do not affect the inside cellar temperature every time you come in. This is an optional step that will add more expense to your project but will pay you back with easier ongoing maintenance during the colder months.
Whichever type of door you install, thoroughly insulate around the entire door frame, including underneath the frame, if possible. This is a place to use insulating foam from a can. Be sure to also install a sweep on the bottom edge of the door so air does not seep in. Spray foam will be covered in the following insulation section.
Once you have decided on your door, it is time to install steps. They do not have to be fancy, only practical. Plain, premade wooden steps work fine, but you might also use poured concrete if you have the time and money to do so. Just be sure the steps line up well with the doorway and you have enough head room to go up and down comfortably. For extra comfort, consider installing a handrail because you will be going up and down the steps frequently while carrying loads of produce.
Time for Utilities
Once you build everything, but before you insulate and enclose the walls, be sure to install any of the extras you have decided to include. Plumbing and electrical systems need to be put in, and your permit might require an inspection. These are areas that require expert knowledge, so please consult with a contractor or thoroughly research these topics.
Electrical
Do-it-yourselfers can do the majority of work, such as laying in conduits and attaching outlets, related to electrical wiring as long as they have expert guidance and inspection. Working with power is a potentially dangerous situation, and you do not want to undertake this job unless you know exactly what you are doing. Standard electrical practices apply here, but for a root cellar, these are areas that are most important and might be governed by local ordinances:
- Conduit protection for wires. The power you run from your main power source and the wiring you install within your root cellar should run through a conduit. PVC electrical conduit is preferable because it is easier to work with. This will protect the wires from coming into contact with water, which could create an electrical shock.
- Ground fault circuit interrupter (GFCI) outlets. This type of outlet is designed for installation in areas in which water might come in contact with the outlet, which is possible in a root cellar. If the GFCI senses an imbalance in current contact with water causes, the outlets will automatically trip the circuit, shut off the electrical current, and save you from an electrical shock.
The locations of lights and outlets were laid out during your previous planning. Now that you have a structure, walk through to make sure these are the best places in your finished space. Aim for a light and switch near the inside entrance and a high-quality shop light above the worktable. If your cellar is located far away from other buildings, consider installing a light outside the cellar door you can switch on from your house. For outlets, place at least two outlets at the floor level at different locations and one outlet at worktable height. Once everything is installed, make sure the lights, switches, and outlets work as you imagined. It is easy to fix or add more before the wallboard and insulation go in.
Timers, thermostats, and alarms
Automatic timers, thermostat controls, and warning alarms all fall squarely in the optional category. These are control measures that will ensure your root cellar will not catastrophically fail due to an extreme condition change, which is especially important if you live in an area in which night temperatures fall far below zero. Once you have installed electricity in your cellar, these are all relatively inexpensive and easy to install additions. Check your local home center or electrical supply store for the following items:
- Automatic timers. Leaving a light on overnight could work in two distinct ways for your cellar. It could raise the temperature and damage your produce, or it could help heat the cellar during cold nights. Setting your lights with a timer will turn the lights on or off as you desire and help maintain appropriate temperature conditions.
- Thermostat. This can be set to your desired temperature range and hooked up to the light so the light will turn on if the temperature drops too low. Installing this setup might take more wiring expertise, so ask an electrician if you are not sure.
- Buzzer or warning light. Similar to the thermostat, and often attached to it, this is an alarm that will go off if the temperature drops past the level you set. If you have installed an outside light, you can also hook the thermostat up to this light, and it will light up to warn you the temperature is too low.
Plumbing
Another task that requires expertise, installing running water can be tricky for the beginner. In general, for a root cellar, the job is straightforward and will not require a lot of time for a plumbing contractor to finish. The most difficult, and potentially messiest, job is connecting the pipes to your house’s water supply. Also, pipes that go outside to reach the root cellar must be properly protected from freezing temperatures. Depending on your area of the country, this could include burying, insulating, and even heating the pipes. A pipe that freezes during the winter will be expensive to fix and could damage the main water supply in your home. Ask your local plumbing contractor for guidance if you don't know what your area requires. At this stage of construction, you only need to get the pipes to the root cellar and placed in the walls. The next chapter will cover hooking up the sink and drain.
Keep Your Cool with Good Insulation
Now that everything is sealed and protected from the rain, it is time to insulate. This is one of the most important aspects of your interior construction. Critical to maintaining proper temperature and humidity, good insulation combined with adequate ventilation will make your maintenance easy and your cellar results reliable. Because insulation is so important, it is also not an aspect to skip over or skimp on. The traditional, less-expensive rolls of batt insulation used in home construction will not give good results in an underground cellar. This type of insulation will draw in moisture and can cause unwanted condensation or mold growth in your root cellar. Batt insulation is also attractive to rodents as nesting material. In an aboveground application, batt insulation will work, but the following types are recommended:
- Structural insulated panels (SIPs): These are panels created by sandwiching and permanently bonding a piece of rigid foam between two pieces of oriented strand board or plywood. These panels are so strong that they do not need studs, and they are used in load-bearing applications. They come in various sizes, can be cut to size with a standard circular saw, and can be installed between framed studs. Once installed, the joints are sealed with spray foam. These types of panels are relatively new to the market and might need to be special-ordered. They also are more expensive than standard insulation but are more efficient and effective for this type of construction.
Another advantage is the panels are essentially finished on both sides. Once you have installed the panels, you will already have a wall that looks finished. However, you can also apply wallboard or drywall directly to the SIPs.
- Spray foam insulation. This insulation begins as a liquid and is sprayed through pressurized tanks into the spaces between studs and into any cracks or openings within the structure. As it is applied, it expands and hardens and effectively seals every space between and around the walls. It is also more expensive than batt insulation but is more efficient and worth the extra money. Spray foam is especially useful in a root cellar because it seals the structure tightly so rodents cannot get in.
Contractors frequently apply this type of insulation because it does require special equipment to install and safely handle. It is possible to do this on your own; ask at your building center or research your particular brand online for instructions on how to apply the product. Spray foam also comes in small cans and is good for sealing around doors and vents and in small cracks.
You can efficiently use these two insulation types in combination. Use the SIPs as easy installation for large areas, especially the ceiling, and fill in the joints and smaller spaces with spray foam.
One good use for batt insulation is to wrap it around ductwork or hot water pipes that run through your cellar, whether it is aboveground or underground. Wrap the pipes and the openings where the pipes enter your cellar with small strips of insulation. Be sure to wear gloves when handling this type of insulation. When sealing joints with tape, use the product the manufacturer recommends. For less complex storage with the pit or trench styles, using filled leaf bags or bales of hay as insulation covering the ground is fine.
TIP! Cellars made with concrete walls do not need as much insulation and can be left bare. Wait one year to see how things run before you fully insulate the walls.
Once insulated, your root cellar will begin to go to work. As long as you keep it sealed during the remaining construction, you will notice the temperature decreasing and the humidity levels increasing. Until wallboard is installed against the insulation, be sure to keep the insulation intact and avoid tearing or puncturing the material. Also, as you continue to work inside the root cellar, keep the door closed so warm air does not sneak in. The following section will address ventilation systems that will also help you control the cooling effects now working for you.
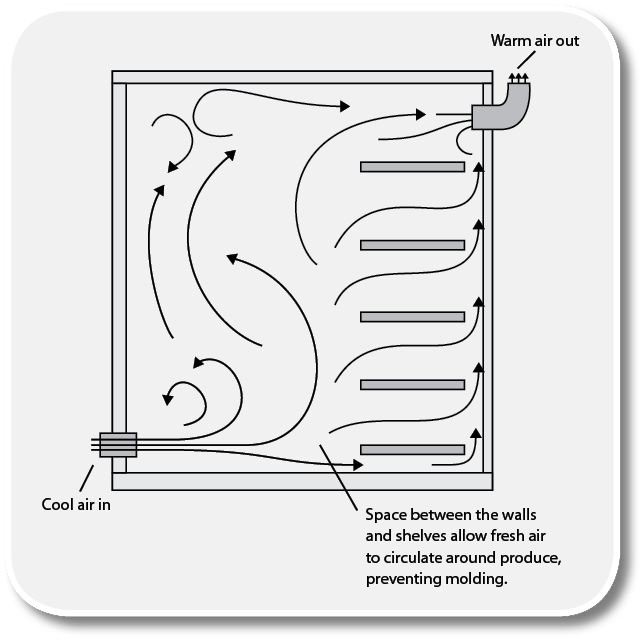
Good Air In, Bad Air Out
Air movement into, out of, and within your root cellar is critical to maintaining proper storage conditions. Now you have the structure built, you can turn your attention to installing ventilation. Chapters 1 and 3 discussed the basic principles for air movement in any type of root cellar: cold air sinks, and warm air rises. For a well-functioning root cellar, you want to remove the warm air and draw in the cold air.
To achieve this continuous airflow, most designs require two vents: an intake vent and an exhaust vent. The intake vent is a pipe that enters near the top of the wall and extends down toward the floor so it can dump the cold air into your cellar. The pressure this incoming cold air creates forces the warm air up and out through the second vent, which must be placed near the ceiling or extended up through the roof. The exhaust vent must sit flush with the interior root cellar wall so a pocket of air does not become trapped around this pipe. A trapped air pocket would cause undesirable condensation. The exhaust vent will also help expel ethylene gasses and odors so your produce will not ripen too quickly.
Along with maintaining an even temperature, ventilation also helps control the humidity in your root cellar. It is important to install vents that can be opened and closed throughout the season as conditions warrant. For example, during the colder months, the air coming in will be dry and will evaporate the moisture from your produce. This moisture will try to escape along with the warmer air through your upper vents and will cause your temperature and humidity to drop to subpar levels. By installing vents with louvers or control mechanisms, you will be able to trap in that moisture to help increase your humidity during the winter. Controlling these conditions with ventilation during each season will be covered in more detail throughout the coming chapters.
Vent material choices are up to your personal preference and budget. The more you spend, the easier the system will be to work. You can opt for galvanized pipe with an electric exhaust fan in each opening, or you can choose inexpensive materials, such as a simple piece of PVC pipe you operate by hand with a simple cover. Browse the aisles of your local heating supply store for ideas on the ventilation that will work best for you. The size of pipe should be at least 3 inches in diameter, but you could go all the way up 8 inches for larger root cellars. Luckily, this is an aspect that will be easy to upgrade if you decide you would like a more expensive but easier-to-operate system. As long as you install something to begin with, you will always have the vent openings to work with later.
TIP! Be sure to wrap the vent openings with plastic or cover them with a bucket if you are moving soil around your cellar. Dirt that falls into the vent pipe will be hard to remove and will decrease the efficiency of your ventilation.
One important reminder about ventilation: your vents make the perfect entry point for mice, gophers, and every other rodent living in your area. The smell of those tasty vegetables will continuously attract them. Take steps now to secure the vent itself and the cracks around it. Cover vent openings with a fine mesh screen, and make sure it is tightly secured around the pipe with tape, glue, or a wooden frame. Seal with spray foam all the way around the location the pipes extend through the roof or wall. For extra protection, pack steel wool around these areas to deter chewing, but make sure to replace this before it begins to rust. If you choose a design with a pipe extending up through the roof, be sure to install a cap, such as those used in regular chimney construction, to keep water from running into your pipe.
Backfilling Around Your New Structure
You have interior work, such as shelving, and some exterior finishing to do, but you now have a fully enclosed, completed structure. As long as you have placed your utilities, you can backfill around your structure and cover the roof with soil. If you used poured concrete or concrete block, refer to the recommended curing time before you backfill. Wait until this time period is over before continuing work on or around the walls.
Backfilling should be a simple, straightforward job that requires minimal equipment and expense, especially if you were able to save a large amount of high-quality soil when you excavated the hole. The best soil to use for backfill is light and coarse and will be easier to put into place. Avoid using heavy clay soil or soil filled with rocks or chunks because these will leave air pockets and cause uneven settling. Heavy soil might also exert too much pressure on the finished exterior wall. If necessary, purchasing soil is worth the expense because you will have the best results and the fewest problems later on. For larger fill jobs, you might want to rent or borrow a skid steer loader to make the job go faster. You can, however, accomplish this phase with a shovel and a strong back.
TIP! If you are planning to install a second level of drainage tile, mark your wall with tape or string all the way around so you know when to stop with the backfill to install this second line.
As you fill in the soil, be gentle with your first loads so you do not crush or damage the drain tile you laid in earlier. Be careful around your new construction. Do not push on your new walls or roof, and be cautious around any utilities or vents coming out of the structure. Soil should completely fill the space around the structure’s side and back walls and extend the full height of all walls. Near the entrance and door area, mound as much soil as possible around the front walls and steps.
Once you have the sides filled in, you could proceed to covering up the roof if that fit your design. Be extremely careful when walking across your roof, and do not drive heavy equipment across this area. An underground roof needs more covering than just soil, so first cover the exposed roof with 2-inch thick sheets of rigid foam, and adhere this to the exposed surface with construction cement. Make sure to tape and seal all joints. Cover the foam with polyethylene sheets and seal all the joints if needed. Finally, cover the roof with at least 2 feet of soil, and slope the soil out farther than the edges of the cellar so water will slide off the roof, not pool at the top of the walls.
Do you have soil left over? If, after backfilling, you have dark, rich soil left over, use it to create another garden or add to your existing garden. Just pile it near the garden site, and you can till it in when you start working in the garden again.
After the backfill is in place and properly graded away from your structure, seed the area with a groundcover to help stabilize the slopes and keep your soil from eroding. Follow the instructions on the grass seed packet for proper application and watering levels. To ensure your grass will grow and not get washed away with the first rain, lay down a thin layer of straw after you have spread out the seed. This protects the seed and soil from eroding, and the new grass will grow through it. Water the straw with a light spray to keep it from blowing away, and it will eventually break down and become mulch for your grass. After the first couple of mowings, it will completely disappear.
Once you have planted the grass seeds, you will not be able to walk over the cellar for at least four weeks. You have work to do within the root cellar and the garden, so be sure to seed only the areas you will not be need for access. You can seed or sod those additional areas later once your cellar is done and the garden is planted. Speaking of the garden, it is time to consider the late-spring work list for that area, too.
What’s Going On in the Garden?
You have a lot to do this time of year, but it might be nice to get outside and enjoy those lovely late-spring days. Your garden is ready and waiting, your new seedlings are itching to get outside, and the cold-tolerant seeds you planted early in the season are probably starting to sprout.
Getting the garden planted with seeds
By now, the outdoor and garden soil temperatures are perfect for planting the rest of the seeds you ordered in the winter. Follow your mapped plan for the garden, and make sure you space everything according to the seed packet instructions. Planting seeds too close together will only lead to thinned plants and reduced harvests. Review the planting instructions on the seed packet because some seeds need to be soaked before planting.
TIP! Some gardeners plant before an impending thunderstorm because they say the lightning will release nitrogen into the air, which will boost the seeds’ growth. Make an experiment of it but do not work outside if it starts thundering.
Gardeners have different styles when it comes to planting the garden. Some like straight rows with everything neatly grouped together. Others like to mix varieties and plant in clumps. Whichever style you prefer will work as long as you clearly mark each row or area so you know what is growing there. Be sure to save the seed packets, too, if they have a picture of what the emerging seedling looks like. That picture will come in handy in about two weeks. Once everything starts to pop up, you might not be able to determine what is produce and what is weed without a visual.
Once you have planted all your seeds, lightly feed the entire garden with fertilizer and water with a fine mist. Make sure to clean up any seed or plant debris after you are done planting. Leftover seeds or plant parts will attract critters that will happily dig up your newly planted seeds. Keep your seeds evenly watered during the next two weeks, and you will soon see new sprouts.
Hardening off seedlings
If you started some seeds indoors, they are ready to go outside, and the temperatures are warm enough to keep them thriving. They do need some tender, loving care to make the transition to the outdoors. Up until now, they have lived a sheltered life without the elements of sunshine, wind, or rain. Slowly introducing them to the elements by hardening them off helps them acclimate to outdoor conditions without too much stress. It is a simple process and only requires a small amount of time every morning and evening.
To begin hardening off, review your seeds’ instructions and count back 10 days from the safe transplanting date, which coincides with the date when all danger of frost has passed. During this 10-day period, you will move the seedlings outside during the day and slowly increase the length of time they stay out. Finally, for the last day or two, you will leave the plants outside overnight and then plant them directly into the garden.
TIP! Even plants bought from a nursery can benefit from the hardening off process. You do not need to spend the full 10 days; instead, shorten the process to three or four days, and your new investment in garden plants will thrive.
Throughout the hardening off stage, you must continue to water the plants and thin them out if there is any overcrowding. Be sure to choose a place for them outside that does not receive hot afternoon sun and is protected from the wind. As the days increase, try to keep them in direct sun for longer periods of time, and when you bring them in each night, do not put them in a place that is too cold, such as a basement or chilly room.
Transplanting seedlings
After hardening them off, plant your new seedlings directly into the garden. Follow your garden plan for placement and the seed packet for spacing. If possible, choose an overcast day to transplant, and try to put the plants in after the hottest part of the day has passed. Dig a hole as deep as the original container but twice as wide, pour in fertilized water, and place the plant in the hole. Keeping the plant’s soil level even with your garden level. Peat pots can be planted directly into the garden with the plant because they will decompose over time, and the plants’ roots will grow right through them. Lightly fill in the area around your plant, tamp down the soil, and water again. Mark each plant with the planting date and variety.
If you buy your plants from a nursery, inspect them closely before you bring them home. Do not choose plants that already have buds or fruit; this might indicate they are root-bound and might not survive transplantation. Also avoid plants that have the symptoms of being stressed: wilted or yellowing leaves, roots growing through the bottom of the container, or spindly stalks that are bending over. Plants in this condition will struggle to survive and might never catch up to the rest of your garden. They might also harbor disease or pests that could spread to the other plants in your beds. To plant nursery-bought seedlings, you might need to disturb the roots before planting. If you remove the plant from its container and you see a thick mat of roots, gently separate these with your fingers before planting. You can reuse the pots these plants come in for next year’s garden if you give soak them in diluted bleach, dry them out in the sun, and store them away for next season.
Once your plants are in the ground, keep a close eye on weather conditions for the following week. It will take new plants about one week to develop strong roots in your garden, and during this time, heavy rainfalls or cold nights could harm them. If extreme conditions are predicted, cover up your plants with a sheet or with the plastic bottles you started saving back in Chapter 4. Ice cream buckets or five-gallon pails also work for overnight protection.
Critter control
Once you have plants growing in your garden, you will have frequent visitors looking for a free lunch. Deer, squirrels, rabbits, and other animals love those tasty new seedlings and can destroy an entire garden in one night. Prepare now for the inevitable. Numerous methods deter or prevent marauders from raiding your garden, and you can spend a small fortune to protect your crops. The most effective, but not necessarily the most attractive, is to install a fence around your entire garden. This will keep almost anything out, but it does require extra work and expense. Organic animal repellent products on the market are effective, long-lasting, and safe to use on produce. Check the pest control aisle at your local garden store, and you will find something that works for your garden.
Animals are not the only eaters you have to be concerned about. You also will have to deal with pesky insects that can destroy an entire crop. Some garden insects are beneficial, so you do not want to blanket your garden with pesticide that will kill everything. Many sprays and powder repellents that target specific insects but leave your produce safe to eat are now sold. Otherwise, several organic ways will keep your insect enemies from chewing on your plants and produce.
As you plant, take steps to protect your plants from specific insects and harsh conditions. Your sprouts and plants are most vulnerable to damage during their beginning stages. Here are a few ways to organically protect your plants with the items you started saving back in Chapter 4:
- Cardboard tubes: Plant crucifers, such as cabbage and celery; tomatoes; green peppers; and eggplant in a cardboard tube to deter cutworm damage. Put the tube in the ground one-half inch above soil level, and place the roots and stem in the tube. Fill soil in and around the tube, and water. Leave in place all summer.
- Aluminum foil: Place around the base of plants to deter crawling insects, such as slugs, snails, and beetles. Leave in place until the end of the season, and remove when you clean out your garden.
- Empty coffee or soup cans: Remove both ends and place around new plants to keep away nibblers, such as bunnies and squirrels. These can be left in place all season.
- Empty plastic jugs: Cut off the bottom of the jug and remove the lid. Place over young plants to protect from cold night temperatures or heavy downpours and wind. Remove after threats of extreme weather and as plants get larger.
- Dryer sheets: Place around the perimeter of your garden to deter mice and small rodents.
- Baby powder: Sprinkle liberally around the edges of your garden to discourage rabbits and other night raiders. Reapply after each rainfall.
Weed, feed, and water
Planting is just the beginning for the gardener, and from now until fall, you will be on call for your garden. Keep it consistently watered and fed with fertilizer. Read the fertilizer instructions for proper application amount and frequency. As long as you have the hose out, do not forget your newly planted grass seed around the root cellar. That, too, will benefit from frequent and consistent watering. Spring rains will prevent you from having to water frequently during this time of year.
You will begin to see weeds springing up in your garden. Be vigilant, and do not let them gain a foothold. Your seeds and seedlings need all the nutrients and water they can get, and weeds will try to steal these things from your plants. Weeds are easily pulled early in their growth because they do not have established roots. Once they get bigger, their roots will stretch deep into the soil, and they will be difficult to remove. Weeds that grow big also will quickly go to seed and spread more weeds throughout your garden.
The best weed-removal method is to use a hand spade or fork to dig the weed out by the root on a day when the soil is moist. This will loosen the weeds at the root so you can pull them out and dispose of them. Make sure you know what your new seeds look like as they grow so you do not accidentally pull them out. Avoid placing weeds with seed heads into your compost pile because the seeds will fall off and could grow in your compost heap. Dispose of these matured weeds in an area away from your garden and compost.
Keeping a Record
Even though you are busy right now, take the time to record your progress. Try to make notes daily as you build and plant. Record all the details, such as problems encountered during construction, weather patterns you noticed, and successes you had in your work. For the garden, keep a detailed map of where you planted seeds and plants. Include the specific varieties and expected harvest dates. As the season progresses, record information about the plant’s growth and harvest levels. This information will be valuable next year as you are planning your garden for the second time and will help you properly rotate your crops to ensure the best soil nutrients for each plant.