Dust collectors? I think not! Beautifully crafted objects that often have no function deserve far greater credit than many give them. Spanning more crafts than any other aspect of a space, objects offer the maker THE most wondrous opportunity for an adventure (not to mention a home with authentic souvenirs).
As a maker, I naturally veer toward decorative, non-functional pieces. I always have; I think it stems from growing up on a sheep and cattle farm that spent much of its time in drought. Although it was stunningly beautiful, I could never shake the feeling that the dry, dusty hills and paddocks, coupled with the utilitarian aspects of a working farm, felt harsh, aesthetically. To counterbalance this I subconsciously found myself inclined towards the decorative aspect of a space over its functional one. While I now understand this motivation as ingrained, I also appreciate that it developed my respect for craftsmanship, good design, and quality materials.
The objects in most homes are made up of mementos collected from travels, work, relationships, and life, and, of course, while they all have meaning, those that have been made by the occupant hold an added layer of experience. Conveying personal inspirations and skill, they have the power to take the maker with them to a place not found on any map. The message behind object making is explained here by the output of a collection of makers who explore paper art, weaving, metalwork, fabric mâché, woodwork, leatherwork, and glass blowing. Their sense of adventure in making is glaringly obvious, appointing them as those whose work resonates with me the most.
“Working with paper is my passion. I find it an endlessly inventive medium. When I make I go with the flow and don’t get caught up in right or wrong. I don’t like to repeat myself so I try to approach each new piece in a unique way.”
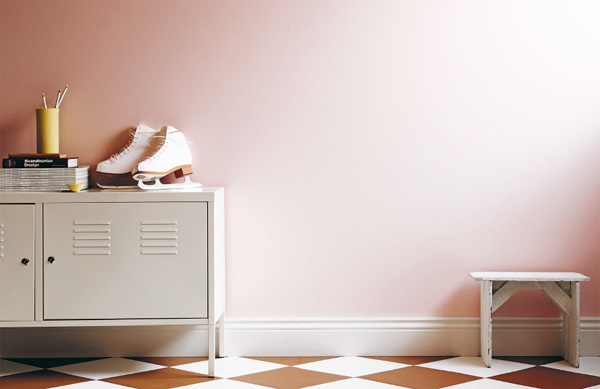
BENJA HARNEY, PAPER ENGINEER
(SYDNEY, AUSTRALIA)
Life-size ice skates sculpted from lightweight paper card
“Weaving with plant materials connects me to the seasons and the natural world. Random weaving is a contemporary technique adapted from Japanese interlacing. It lets go of the drive for symmetry and embraces organic form, sweeping rhythm and texture.”
HARRIET GOODALL, FIBER ARTIST & BASKET MAKER
(ROBERTSON, AUSTRALIA)
Random weave basket, using indigo-dyed core cane
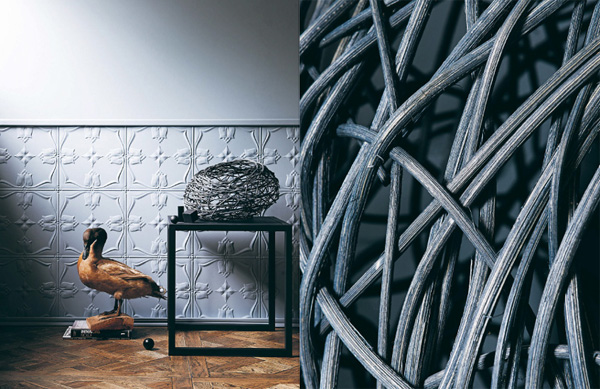
“I started welding and working with precious metals as a sculptor, creating works that are difficult to see how they have been produced. It’s very hard work but the results are worth it.”
BEN BLAKEBROUGH, DESIGNER & MAKER
(SOUTHERN HIGHLANDS, AUSTRALIA)
Welded brass candelabra finished with a blackened patina
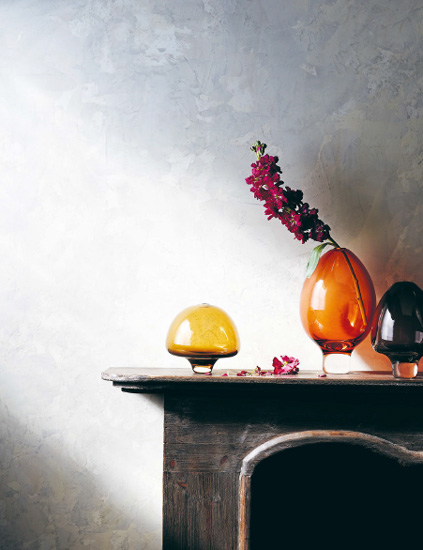
“Working with glass is the single most amazing thing I have ever done. I make with my heart and hands and feel confident that, even if my head is not sure what we are making, my hands will lead the way.”
AMANDA DZIEDZIC, GLASS BLOWER
(MELBOURNE, AUSTRALIA)
Hand-blown colored glass vessels
Maker to Maker with...
Georgina Brown, textile & papier-mâché artist
(Sydney, Australia)
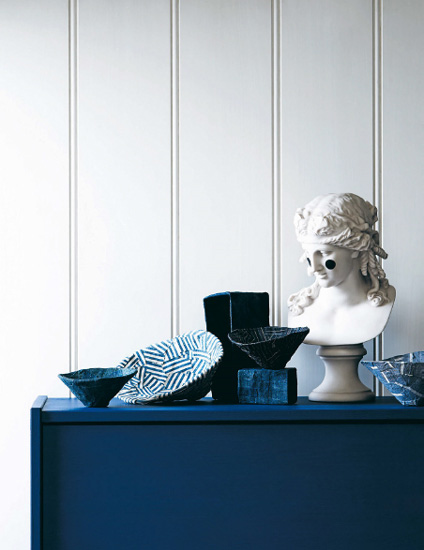
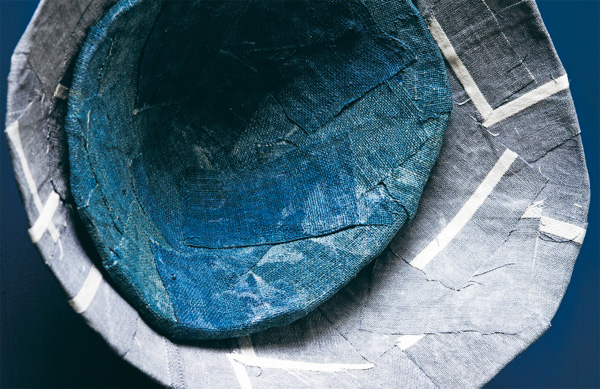
TM: Georgina, describe your sculptural fabric mâché.
GB: These pieces are a selection of bowls and shapes patched with vintage fabrics, Japanese boro, and vintage tickings.
TM: Can you explain the technique?
GB: I start with a shaped piece of cardboard, layer and layer papier-mâché and then, when the shape and weight is working, I add a final layer of fabric patched over the top.
TM: Sounds messy . . . Where do you make?
GB: We live in a shoebox! I grab space wherever I can. I’m lucky to have a long sunny window ledge to dry pieces on.
TM: Does indigo blue always play a starring role in your pieces?
GB: I am always drawn back to blue and, as my work has a strong Japanese influence, indigo and boro are a perfect match. I love to add inky blacks and chocolate ikat in here and there . . . but, yes, it is all about the blue.
TM: Have you always been a maker?
GB: I started in a very different field, as a makeup artist for TV and film. After a stint living in New York I turned to design and there was no turning back.
TM: How has it changed things for you?
GB: Making is essential in my life. It gives me the balance to do all the other stuff.
TM: Can you describe what happens when you make?
GB: I get lost in the process.
TM: What do you think papier/fabric mâché brings to a space?
GB: An organic sculptural quality.
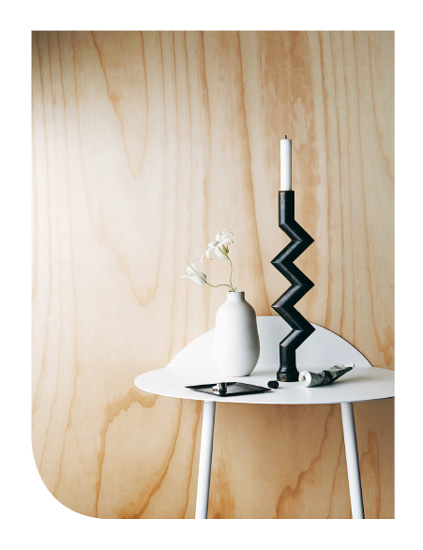
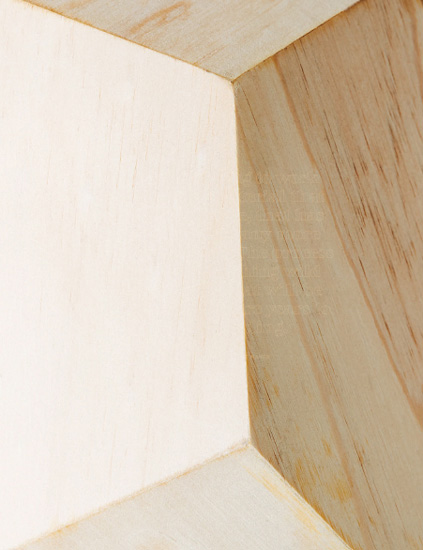
Constructed wood gems using mitered and beveled plywood / Nick Pearce
“I find it humbling to work closely with a material that was part of nature, that has often stood for many more years than I have. The process of refining something wild into something that will be loved for many more years to come is rewarding.”
NICK PEARCE, FURNITURE & OBJECT MAKER
(MELBOURNE, AUSTRALIA)
“I think the need to create is hardwired into our DNA as human beings. Working with leather fascinates me daily. I am always discovering new ways to manipulate it so that I can create unexpected objects”
JENNIFER STILWELL, LEATHER ARTISAN
(NEW YORK, USA)
Cuir bouilli (boiled) molded planter made from naked vegetable-tan leather
“My turned wooden dolls are influenced by those of the Avant-garde artists of the twentieth century and are created as part of that tradition. It is important to me that the work I make sits well beside those I’m inspired by.”
SARAH K, DESIGNER, MAKER, & CURATOR
(SOUTHERN HIGHLANDS, AUSTRALIA)
Hand-painted dolls made from turned wood offcuts
“Working with sustainable wood is really gratifying. It’s beautiful, natural, renewable, readily available, and offers a variety of colors and patterns.”
COCO REYNOLDS, LIGHTING & FURNITURE DESIGNER
(SYDNEY, AUSTRALIA)
“Plastic is a super-material and should be considered a valuable commodity. It has this ability to last forever so, instead of creating pieces intended for a single use only to be subsequently discarded, we make this that need to be cared for and kept.”
SARAH K & LIANE ROSSLER, FOUNDERS OF SUPERCYCLERS INTERNATIONAL SUSTAINABLE DESIGN COLLECTIVE
(SYDNEY, AUSTRALIA)
“I like to be able to trace every element of the piece back to its source, preferably harvesting, foraging and collecting the materials myself.”
HARRIET GOODALL, FIBER ARTIST & BASKET MAKER
(ROBERTSON, AUSTRALIA)
Making can mean chewing through raw materials, relying on resources such as energy, and ultimately adding to landfill. This leaves the maker with a responsibility to question their practice and how they might make choices that support sustainability and challenge perceptions of what is valuable. Being aware of and accountable for sustainability isn’t as hard as you might think and thankfully there are incredible opportunities to incorporate it.
Supporting sustainability can mean choosing to use raw materials that have been certified sustainable, discarded as waste, or sourced locally—effectively reducing the emissions involved with freight. Many makers are now offsetting the fossil fuel emissions used in the manufacture of their product by donating to environmental causes focused on developing renewable energy and sustainability. Others adopt advances in production that allow them to reuse waste water, for example. The other aspect of sustainable making, which can drastically reduce waste, is finding ways to place greater worth on the maker’s output. Being transparent about your making process is a great place to start to encourage the concept of value. Including sustainability in a practice might be a daunting thought, but it is becoming increasingly essential, and achievable, and will most definitely result in adding further uniqueness to the maker’s output.
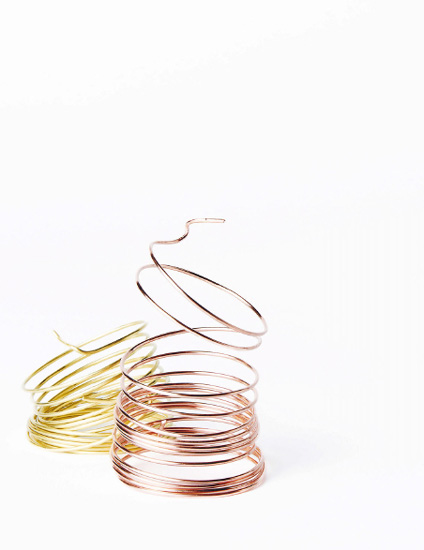
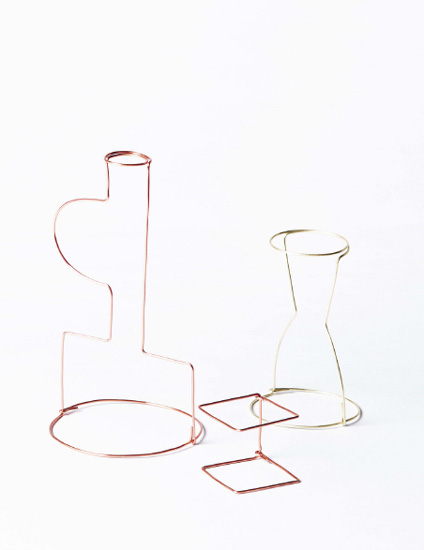
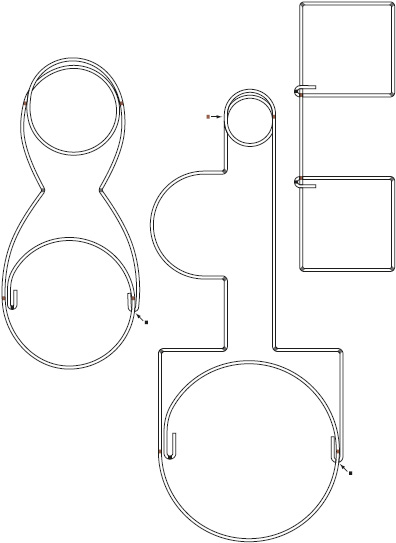
PROJECT No 2
wirework 3D silhouettes
The template on the following pages is a guide only and not to scale. A complete ready-to-print template can be found at www.tamaramaynes.com.
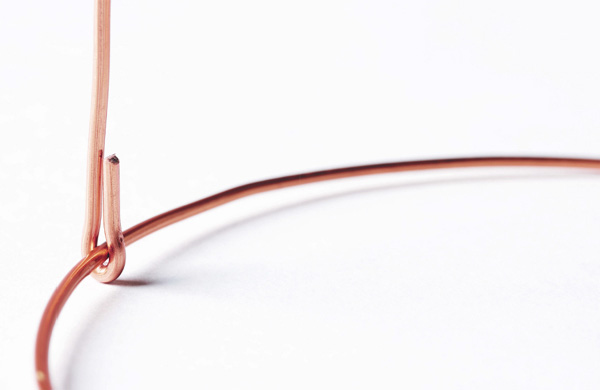
Wirework is a fond inclusion in my personal practice. I love that the finished work looks so simple, yet requires more technique and skill than most people realize (until they begin exploring it). The main response I get when teaching wirework is “I had no idea how challenging it would be!” Having said that, patience and commitment to learning this craft, coupled with experience working the material, will have you making quality wirework. To get you started, this project focuses on making bends and curves using a “dead soft” enameled copper wire—dead soft being the term used to refer to the hardness of the wire. I have specified 12- or 14-gauge—if you are an absolute beginner, the 14-gauge will be easier to work. Be aware that as the gauge size gets higher, the wire gets thinner, so a 12-gauge is .08 in (2.1 mm) thick while a 14-gauge is .06 in (1.6 mm) thick. This wire can be bought easily at jewelery-making supply stores, craft and art stores, and online.
The pliers required for this project are basic and consist of: chain-nose with non-serrated jaws (their smooth jaws protect the wire from being scratched when grasped); nylon-jaw flat-nose pliers (whose jaws have a larger surface area and are even more gentle on the wire’s surface); and flush-cutting wire cutters, which make a good clean cut that leaves no sharp edges. All can be bought wherever you purchase the wire. Take this project slowly and, if possible, buy some extra wire to play around with first, perhaps an even thinner 16-gauge sample. Working with pliers successfully also takes practice, but stick with it.
› Printed template online: www.tamaramaynes.com
› 12- or 14-gauge round, dead soft, enameled copper craft wire (for contrast, use 1 short spool each of tarnish resistant brass and natural copper)
TOOLS
› Non-permanent marker with fine-pointed tip (ensure it will not mark wire permanently)
› Chain-nose pliers with non-serrated jaw
› Flush-cutting wire cutters
› Nylon-jaw flat-nose pliers
› Polishing cloth, for final cleaning if necessary
PREPARE
1 / Download the template and print out onto plain 11 x 17 in (A3) paper at 100%.
2 / Gently unfurl the first 12 in (30 cm) wire. Do not cut the wire, but leave it on the spool and continue to unfurl it in sections as you work.
MAKE
1 / Lay template on the work surface. Lay the section of unfurled wire on top of the template and, starting at either end of the template, use it as a guide while you bend the wire to mirror the pattern. Keep the wire flat and untwisted while you form the outline, laying it over the template regularly to make sure it matches.
2 / To make angles, transfer the bend spot indicators (in gray on the pattern) to the wire with the marker. Grip the jaws of the chain-nose pliers around the wire just beside the mark and bend the wire with your fingers to form the angle.
3 / To make curves, manipulate the wire between your thumb and index finger.
4 / To straighten the wire, if necessary, place the wire between the jaws of the flat-nose pliers and run them along the wire gently until it is straight.
5 / To finish the silhouette, transfer the end point from the pattern onto the wire with the marker. Use wire cutters to cut the wire and remove spool.
6 / To form the 3D aspect, transfer all the brown bend spot indicators from the pattern to the wire with the marker. Grip the jaws of the chain-nose pliers around the wire just beside the first mark and bend. This bend should be perpendicular so that the wire form is no longer flat. Repeat for each brown mark, forming the “top” and “bottom” of the silhouette.
7 / To secure wire at beginning and end, transfer the black bend spot indicators from the pattern to the wire with the marker. Grip the jaws of the chain-nose pliers around the wire just beside the mark and bend the small section back on itself so it is almost parallel and forms a hook. Place the complete wire section that meets or crosses this point inside the hook. Finally, place the jaws of the flat-nose pliers around the hook and lock it by gently squeezing it closed.