
The face is the most important feature you create to make people recognize your characters. Think of each face you see as unique and individual. The smallest, most subtle changes in facial structure or skin color can change the look and expression of the character. In the world of manga, we have more freedom to create the look of our characters in any way we desire. Big glowing eyes, colorful skin tones, or round, chubby faces with hair dyed crazy colors—anything can happen when you let your imagination go wild.
This section features techniques for drawing and painting human heads. You will find the basics of proportion, and learn how age and gender can affect your character’s appearance. We’ll also look at how to create various skin tones through several demonstrations.

The face is the starting point to make your figures recognizable. It can indicate if your character is male or female, young or adult, and reveal traits of their personality.
In manga, although facial structures and features are different from reality, whether exaggerated or minimized, most retain realistic proportion to the human head. Proportion can even be adjustable once you learn the basics. Here are some simple steps for drawing a human face.

1 CREATE THE BASIC SHAPE
Draw a circle and place a vertical line down the center. Add a horizontal line, with a bit of a curve about two thirds from the top of the circle. Draw a jawline and chin under the circle.
2 ADD FEATURES PLACEMENT
Place the nose at the bottom of the circle. Create a triangle shape at the center, then add a vertical line on each side, meeting the triangle wings. Draw another horizontal line at the jawline.
3 START ADDING ROUGH FEATURES
The lines indicate where the facial structures should be placed. The eyes should not be drawn too far from the center of the face; they should align with the end of the nose’s wings. Place the mouth at the lower horizontal line, but it can be adjusted in whatever ways you want to suit your character.
4 REFINE THE DETAILS
Erase all those horizontal and vertical lines, and the unnecessary curves or scratches that you no longer want.

Not every character’s face is drawn in the same way. Some artists tweak and exaggerate features to make a character look different to match a certain artistic style. For example, in shojo manga, the eyes are usually drawn bigger with smaller noses and mouths. The best way to find what style is right for you is to shift around or scale up and down the facial features. As long as everything stays in proportion and looks good, you are the hero!
Facial structure and proportion change as someone ages. Modifying the size of the features, such as the eyes, nose and mouth, helps your characters fit better with their age group. Kids and adolescents tend to have big eyes and round, soft facial features. Adults have stronger jaws, and more angular and detailed features.

Different genders can have different looks even at the same age. Generally, a female character can be drawn with a shorter face and a slight pointy chin. In contrast, a male character’s face is more angular, with a strong jawline. Draw a male’s chin wider and less pointy than a female’s.
The features are as important as the facial structure. For females, enlarge the eye size and add eyelashes. Male characters will have flatter lips, while females’ lips will often be fuller and sexier, especially the lower lip.

Adults have smaller eyes than children, yet mature females still have bigger eyes than males. Compare the eyes of the child and adult figures.

You can dramatically change a character’s look by adjusting the angle of the basic features and the proportion. Study your face at different angles in the mirror and observe people around you.
When it comes to drawing manga hair, stylize reality rather than copy every detail. Plan the entire look by thinking about your characters’ personality and style preferences. The following steps will show you how to draw a hairstyle. Always start with basics, then develop more details as you go along.

1 START WITH THE HAIRLINE
Draw the hairline on the forehead. Usually the hairline can be placed about halfway between the top of the head and the eyebrows.

2 DRAW A ROUGH SHAPEOF HAIR
Focus on drawing the rough shape of hair instead of making it look perfect. Roots of hair bangs should start from the hairline and follow the shape of the head.

3 ADD VOLUME AND ACCESSORIES
You can have a lot of fun refining details and adding accessories. Consider highlights and shadows of the hair while adding volume. Leave space for the parts that have highlights and define more subtle details on shadowy areas. The groups of individual strands will help the hair have a flawless look, but don’t overdo it by drawing every strand.

Use Magazines for
Hairstyle Reference
Look for cool and unique hairstyles in magazines. They are a great resource of inspiration for your manga characters.
From glamorous, high-body waves to wild spikes to green pigtails, there are millions of hairstyle choices for your characters. Stick with plain, natural styles, or go severe. Hair colors are just as diverse. Pick a color for your character and have fun with it!

glamorous and high-body

short and spiky

short and wavy
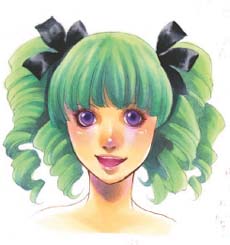
curly and cute
Manga skin tones can vary from natural to super extreme, from ivory pale to saturated colors, or whatever color you desire. There are no limits to picking the perfect skin tone for your character. Here are a few of the basic types of skin tones. Use these color combinations as a basis for creating your own skin tones in the future.

Pale skin tones can be achieved by E000-Pale Fruit Pink and E00-Skin White. If you prefer something less pink and more ivory, try E30-Bisque, E41-Pearl White, and E51-Milky White.

A medium tone is good if you don’t want your characters too pale or too dark. Use E11-Bareley Beige, E21-Baby Skin Pink, and E53-Raw Silk.

Dark skin can be achieved with E13-Light Suntan, E15-Dark Suntan and E33-Sand.

Dark elves are recognized by their dark gray skin. Good marker choices include cool gray shades such as C3-Cool Gray No. 3, C5-Cool Gray No. 5, and C7-Cool Gray No. 7.
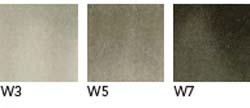
Warm gray shades also work really well, especially W3-Warm Gray No. 3, W5-Warm Gray No. 5, and W7-Warm Gray No. 7.

Want your character to be unique? Blue, green or even purple skin can work for your character as long as it looks adorable. Some of my choices are G00-Jade Green, B00-Frost Blue, B32-Pale Blue, and BV000-Iridescent Mauve.
Picking the skin tone for your character is the easy part, but painting it is another story. There are three shades required: the basecoat, middle tone and shadow. Layering these shades will help your character look more natural. You may ask yourself, “How do I know which shade to add first?” The following exercises show some basic techniques for blending and layering skin tones. Although the two styles require the same markers, the results are different—when blending start with the darkest shadow tone, when layering begin with the lightest color. Which style you choose for your characters is your artistic choice.

1 PAINT THE DEEPEST SHADOWS
Consider where the light source is hitting the skin and paint the deep shadows first.

2 ADD THE MIDDLE TONE
Let the middle color blend where it overlaps the dark shadows you already painted.

3 COAT THE WHOLE AREA WITH THE LIGHTEST SHADE
Add the lightest shade to wash out the shadows and blend all the colors together smoothly like watercolor. Here, I added the eye colors last.
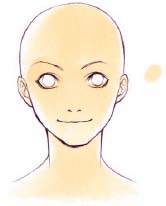
1 PAINT THE ENTIRE FIGURE
Coat the entire skin of your character with the lightest color.
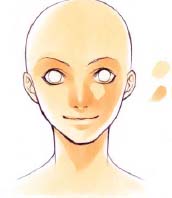
2 ADD THE MIDDLE SHADOWS
Once the basecoat dries, paint the middle tone as your second layer. The middle tone will start creating dimension on the face—here it has helped shape the eyes, nose, cheeks, mouth and neck shadow.
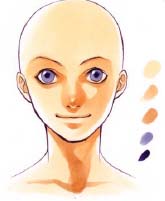
3 GIVE A FINAL TOUCH WITH THE DEEPEST SHADOW
Consider what needs to be painted with the darkest shadow, such as under the neck, under the nose and the corners of the eyes. The darkest shadow will not fade like it does in the blending style; instead, it remains its original color.
Rather than relying solely on facial expressions, a variety of shades can boost your characters’ moods. The right color can illustrate your characters’ expressions, whether they are happy, grumpy or sulking.

Warm colors can be crimson, red, orange or yellow tones. The warm shades usually depict characters who are excited, angry or energetic.

If your character is sad, calm or even depressed, cool colors can be a perfect match. In manga, the choices of cool colors range from green to blue. Lighter cool tones normally represent calmness or a subdued demeanor, whereas a few cool shades darker or with more intensity can depict depressing and mournful.

Gray shades help your characters look serious, gloomy or determined. The darker the gray shade is, the more intense your character will look. Some artists even use black for extreme emotion.
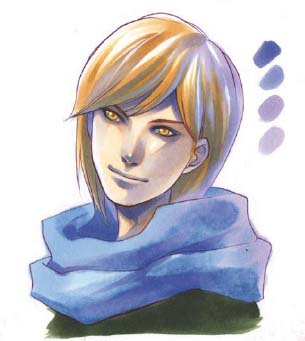
Purple shades help your character look more mischievous and cunning. Sometimes they can also lend an air of wickedness.
Another way to build up your character’s dimension is to add extra light, or reflected light. Reflected light is the light that hits objects and characters that bounces the color back to your eyes. In manga settings, base these reflected colors on your backgrounds and general artistic preferences.

Understanding how light hits an object is important to becoming a better artist. Here are the basics of how objects reflect light to form shadows.
Highlight—This is the brightest surface of the object and the area that the light source hits first.
Form shadow—This is the normal shadow. A form shadow is the area not facing the light source; its shade can vary but often contains the darkest dark of the object.
Reflected light—The light that is sometimes reflected from the surroundings. Usually it is placed opposite the highlight.
reflected light

In this comparison, reflected light drastically changes the dimension of the character. It draws attention to the shadow and makes the character look less flat. Reflective light can be applied to skin, strands of hair, clothes or props, just modify the color of reflected light to go along with the color theme of the background.
A common skin tone for girls in manga is delicate and light in color. Painting light skin is a great starting point for learning to paint other types of skin colors. It’s easier to adapt a light tone to dark than the other way around
COPIC MARKERS
0-Colorless Blender, B01-Mint Blue, B24-Sky, C3-Cool Gray No. 3, E000-Pale Fruit Pink, E01-Pink Flamingo, E11-Bareley Beige, E13-Light Suntan, E55-Light Camel, G00-Jade Green, R11-Pale Cherry Pink, RV11-Pink, V93-Early Grape, Y23-Yellowish Beige, YG00-Mimosa Yellow
OTHER TOOLS
cardstock paper
pencil
eraser
brown or sepia and gray 005 (0.2mm) waterproof, fine-point technical pens (Pigma Micron or Copic Multiliner)
white acrylic paint and a no. 2 round brush (or white gel pen)

1 ADD THE FIRST COLORS TO CREATE FACIAL DEPTH Once you’ve sketched your drawing on cardstock paper, ink the character with a brown or sepia 005 (0.2mm) waterproof technical pen. Use a gray technical pen for her eyes and clothes. For the deepest shadow, shade the character’s skin with Bareley Beige around her eyes, under her chin, her lower lip and hair, and around her clothes to indicate where the shadow is. Also, add a touch of cheek blush with Pink and Pale Cherry Pink, and fade it smoothly with Colorless Blender.

2 CREATE THE MIDDLE SHADOW Give her light skin volume by painting Pink Flamingo on her left cheek and arms. Leave some unpainted areas empty, especially at the tip of her nose.

Less Is More
Keep things simple by working with minimal colors at the beginning, then add more colors later rather than throwing together every color you have at once. Use less at fi rst and you’re good to go!

33 PAINT THE BASECOAT Paint most of her fl esh with Pale Fruit Pink, leaving some small areas for highlights on the right side of her cheek and arms.

4 ADD SKIN DEPTH AND DETAILS Once the basecoat dries, bring out subtle depth and details. To make the eyes pop, paint Light Suntan on her lashes and the outer corner of her eye. Repaint the faded color around the eyes with Bareley Beige. Early Grape is also a good choice for adding distinct depth, but be careful not to overdo it. Also, add Pink and Pale Cherry Pink again on her lips to make them stand out.

5 COLOR THE HAIR Add shadowy streaks on some areas with Light Camel. Coat most of the remaining hair with Yellowish Beige, making sure to leave some highlights. Once it dries, use Early Grape to intensify the shadowy streaks of hair.
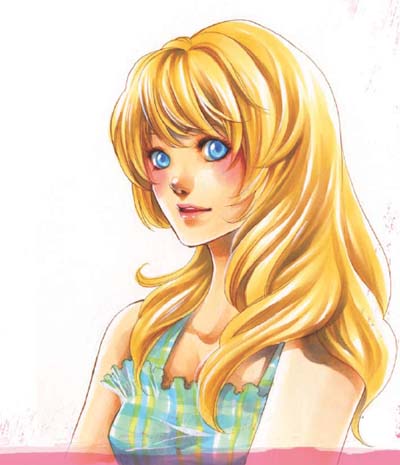
6 FINISH THE EYES AND CLOTHES Blonde hair goes well with light, bright colors such as blue and green. It can defi nitely make your girl more lively! Paint Mint Blue on the irises, and dot Sky at the center to mark the pupils. Mimic these blues and greens in her clothes. Use Mint Blue, Jade Green and Mimosa Yellow to create tartans. Follow with Cool Gray No. 3 to create fabric creases. Finally, clean up the entire image with white acrylic paint and a no. 2 round or a white gel pen to her eyes, tip of her nose and lower lip.
Illustrations of Asian characters often depict narrow eyes and lightly-tanned skin. It is also common for Asian skin to have some yellow undertones. You can easily achieve these effects with just a few markers.

1 ADD THE FIRST COLORS TO CREATE FACIAL DEPTH
Sketch and ink your character with a brown or sepia 005 (0.2mm) waterproof technical pen. For the deepest shadow, shade the character’s skin with Light Suntan and blend carefully with Bareley Beige. Add these first colors around the eyes and lips, under the lower lip, on the left side of his face, under his hair, and around his clothes. Use the Colorless Blender to fade the colors in some areas, if desired.

2 CREATE THE MIDDLE SHADOW
Since Asian skin requires yellow, use Baby Skin Pink as the middle tone. Paint almost all of the flesh, leaving some room for highlights.

3 PAINT THE SKIN’S BASECOAT
Slowly coat all of the flesh with Egg Shell. The basecoat allows you to subtly blend different colors without leaving unnecessary streaks or marks.

4 DARKEN THE SKIN DETAILS AND SHADOWS
Always make the eyes the main focus of the character. Use both Dark Suntan and Light Grape, to darken the outer corner of each. Use these colors to deepen the shadows around his lips, under his nose, lower lip and hair, and around his clothes. A touch of Light Grape will produce the darkest darks of the deepest shadow, making your character look lively and keeping his flesh from looking too flat.

5 ADD THE HAIR’S MAIN COLOR
With Cool Gray No. 10, paint shadowy strands on his hair, but leave some highlight space on the right side of his head to indicate the light source. Use Colorless Blender to dilute some tips of the Cool Gray No. 10 paint streaks, especially those closer to the light source, and use to paint his eyebrows.
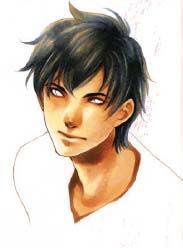
6 FINISH THE HIGHLIGHTS
For a sleek look for the hair, blend Cool Gray No. 7 at the tips of the Cool Gray No. 10 paint streaks and smooth the colors together. Add brown to the highlight areas with Dull Ivory as a basecoat to his hair.
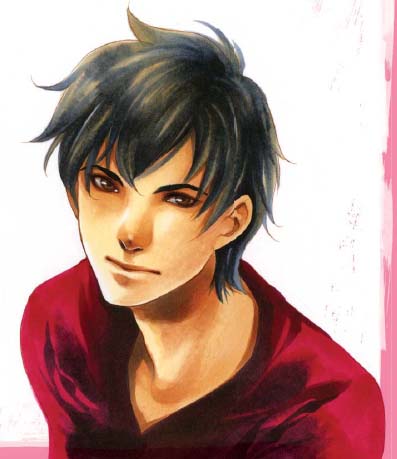
7 ADD THE FINISHING DETAILS
Finish the eyes by adding Light Walnut on his irises, and when dry, follow with Burnt Umber for the pupils and the corner around the irises. To make his pupils pop, touch them up with more Cool Gray No. 10.
For the shirt, create the shadows of the folds and wrinkles with Argyle Purple. Dilute some of those streaks with Colorless Blender. Paint the entire shirt over the shadows with Crimson.
Add a touch of reflection with a no. 2 round and white acrylic paint or a white gel pen to his eyes and the tip of his nose.
Some alternative skin tones don’t exist in real life, but do in the fantasy world. The dark gray skin of a drow or dark elf is exotic, but elegant enough to catch your attention.
COPIC MARKERS
0-Colorless Blender, C7-Cool Gray No. 7, C10-Cool Gray No. 10, E11-Bareley Beige, E13-Light Suntan, E15-Dark Suntan, E21-Baby Skin Pink, E29-Burnt Umber, E43-Dull Ivory, E50-Egg Shell, E57-Light Walnut, RV29-Crimson, RV99-Argyle Purple, V95-Light Grape
OTHER TOOLS
cardstock paper
pencil
eraser
brown or sepia 005 (0.2mm) waterproof, fine-point technical pens (Pigma Micron or Copic Multiliner)
white acrylic paint and a no. 2 round brush (or white gel pen)

1 ADD THE FIRST COLORS TO CREATE FACIAL DEPTH
Sketch and ink the character with a gray 005 (0.2mm) waterproof technical pen. Since the light source comes from the left, paint the deepest shadows under the chin, inside his long elvish ear, on the shoulder blade, under the hair, under both the upper and lower lips, and on the left side of his face with Cool Gray No. 8. Use Colorless Blender to dilute and lighten some of the shadow areas, but be careful not to fade the Cool Gray No. 8 paint too much.

2 ADD THE MIDDLE TONES
Paint the middle tones with Cool Gray No. 5. Leave some highlights on the right side of the character’s jawline, neck, shoulder blade and nose. Dilute the Cool Gray No. 5 color with Colorless Blender. No need to worry if some splotches occur when you blend the colors.

3 PAINT THE BASECOAT
Use Cool Gray No. 3 to coat all of the character’s flesh. The basecoat that you paint on top will allow all colors to blend together neatly and reduce any splotches that previously occurred.

4 DARKEN THE DETAILS
After the basecoat dries, darken the shadowy areas with Cool Gray No. 6. Paint this color in the corners of his eye, inside his nostril, under the upper and lower lips, under the chin, inside his long elvish ear, under his neck, around his scar and on his shoulder blade.
Lighten up some areas with the tip of the Colorless Blender’s brush nib to slightly paint a streak on his upper lip and the side of his nose. Don’t overuse Colorless Blender or his skin will splotch again.
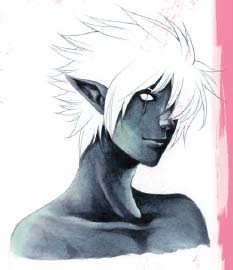
5 ADD SOME GREEN
Use Pale Green to coat over all his flesh. The green will complement the dark gray, creating a nice coolness for your character.
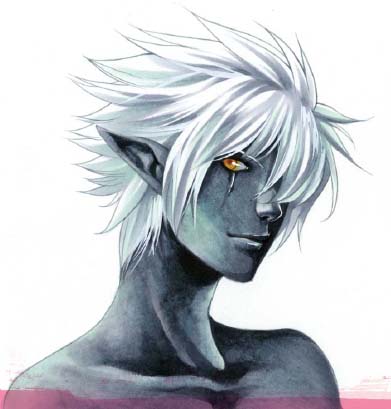
6 PAINT THE EYES, HAIR AND FINAL DETAILS
Use a bright color to make his eyes stand out against his dark skin. For his iris use Maize, and once dry, follow with Caramel for the pupils and the corners around the iris.
Shade the darkest shadows of the strands of hair with Cool Gray No. 3. Add some streaks at the center of the head and on his bangs. Leave the tips mostly white. Use Cool Gray No. 1 to blend the Cool Gray No. 3 streaks outward. Add some cool tones by painting Pale Green at the tips.
Use a no. 2 round and white acrylic paint or a white gel pen to finish off the picture. Dot a small mark on his eye and make a tiny fine highlight line on the side of his nose, scar, and eyebrow. Make single strands scattering all over his hair, adding a sense of flow and movement.
Who says hair must stick to the colors of nature? In manga, it’s great to create exaggerated hair colors that you don’t see generally in daily life. Don’t limit yourself. Have fun and play around!
COPIC MARKERS
0-Colorless Blender, B01-Mint Blue, B02-Robin’s Egg Blue, B24-Sky, B95-Light Grayish Cobalt, C5-Cool Gray No. 5, C10-Cool Gray No. 10, E000-Pale Fruit Pink, E01-Pink Flamingo, E11-Bareley Beige, E13-Light Suntan, E18-Copper, G16-Malachite,11-Pale Cherry Pink, R46-Strong Red, RV11-Pink, RV13-Tender Pink, RV93-Smoky Purple, V05-Marigold, V12-Pale Lilac, V95-Light Grape, YG01-Green Bice, YG17-Grass Green, YG21-Anise, YG23-New Leaf, YG41-Pale Cobalt Green, YR12-Loquat, YR21-Cream, YR24-Pale Sepia
OTHER TOOLS
cardstock paper
pencil
eraser
brown or sepia and gray 005 (0.2mm) waterproof, fine-point technical pens (Pigma Micron or Copic Multiliner)
white acrylic paint and a no. 2 round brush (or white gel pen)

1 ADD THE FIRST COLORS TO CREATE FACIAL DEPTH
Sketch your character on cardstock paper and ink with a brown or sepia 005 (0.2mm) waterproof technical pen. Use a gray waterproof technical pen for her bangs, irises, eyes, clothes and half of her hair. Shade the deepest shadows with Bareley Beige around the outer corners of the eyes, under her chin, lower lip, hair and nose, on the tip of her nose and around her clothes. For the middle tone, paint Pink Flamingo on both sides of her cheekbones to her jawlines, the sides of her nose, under her hair and on her neck. Be sure to leave some unpainted spaces for the skin’s final basecoat. Add some rosy cheek blush to the character with Pink and Pale Cherry Pink, and fade it smooth with Colorless Blender.

2 ADD THE MAIN SHADOWS
Paint all her flesh with Pale Fruit Pink. Leave some highlights around her cheekbones. Once the basecoat dries, use Light Suntan to darken the shadowy areas under her neck, inside her nostrils, under her lower lip, under the tip of her nose, under her hair and around her clothes. Before the Light Suntan dries completely, blend Smoky Purple to create depth.
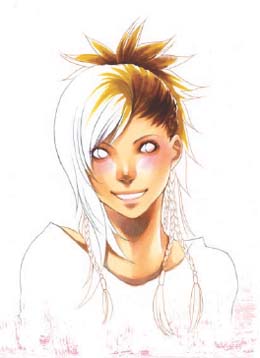
3 PAINT THE NATURAL TONES FIRST
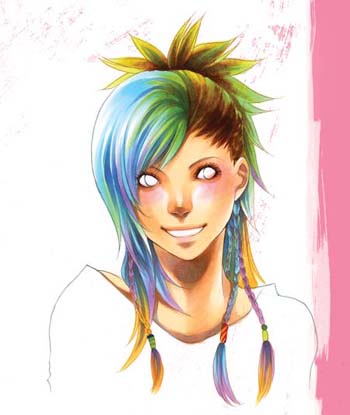
Start with the left side of her hair. Shade the darkest shadows of the strands of hair with Copper. Dilute the tips with Colorless Blender until the color gradually fades. Once it dries, use Pale Sepia to make streaks on top. Leave the tips of her hair unpainted.

4 ADD GREENS
It’s time to have fun! Choose bright, saturated colors for her hair dye. Coat her spiky hair at the back with Anise, and gradually blend together with Pale Cobalt Green. At the front bangs, paint streaks of Pale Green.

5 ADD BLUES
First paint Light Grayish Cobalt and Robin’s Egg Blue to lay shadowy streaks on some individual strands behind her right jawline. Add more strands on her bangs and some of her braids. When dry, lay Mint Blue on top of the right side of her hair and her braids that we painted shadows on earlier.
6 EMBELLISH THE HAIR’S DETAILS
Paint the tips of her hair and braids with Pale Lilac, Loquat and Cream. Blend well with the greens and blues. Once dry, use Light Grayish Cobalt and Light Grape to deepen the shadows and make the strands more individual.
Paint the beads with colors that stand out against the braids, such as New Leaf, Loquat, and Green Bice. Paint the beads’ stripes with darker colors such as Sky and Strong Red.
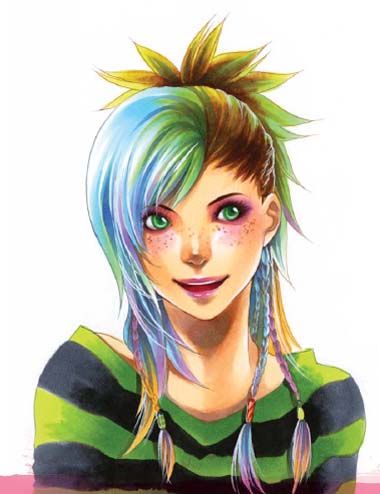
7 PAINT THE MAKEUP, CLOTHES AND WHITE DETAILS
Complement her face with colorful makeup. Use Marigold to paint her lashes. Follow with Tender Pink and Pale Lilac on the lids, outer eye corners and lips. Dot Light Suntan and Bareley Beige on her cheeks as freckles—but use sparingly! Add fine streaks of Copper on her eyebrows.
Lay stripes of Cool Gray No. 10 on her shirt, and gradually blend with Cool Gray No. 5. Use Grass Green on top of the remaining stripes with Green Bice.
For her eyes, use New Leaf on her irises. After the color dries, dot in the pupils with Malachite.
With a no. 2 round and white acrylic paint or a white gel pen, lighten up her eyes with a single dot on each iris. Place fine dots of white on her lips, the tip of her nose, and the hair beads. Finally, paint individual strands on her bangs and the tips of the braids.
What if your character falls into depression, shock or awe? The easiest way to portray emotion is to draw a character with a clear expression and in a moody color. Always try to work within a family of colors for shadows and highlights, although throwing in a different color can really liven up your character’s mood.
COPIC MARKERS
0-Colorless Blender, B00-Frost Blue, B32-Pale Blue, B41-Powder Blue, B95-Light Grayish Cobalt, BG09-Blue Green, E11-Bareley Beige, E30-Bisque, E33-Sand, E34-Orientale, E50-Egg Shell, E53-Raw Silk, E59-Walnut, RV29-Crimson, YG23-New Leaf
OTHER TOOLS
cardstock paper
pencil
eraser
brown or sepia 005 (0.2mm) waterproof, fine-point technical pens (Pigma Micron or Copic Multiliner)
white acrylic paint and a no. 2 round brush (or white gel pen)

1 ADD THE FIRST COLORS TO CREATE FACIAL DEPTH
Sketch your drawing and ink it with a brown or sepia 005 (0.2mm) waterproof technical pen. Shade the deepest shadow with Bareley Beige around the outer corners of her eyes, under her chin, upper and lower lips, nostrils, the top of her nose, and chest near the shirt collar. Keep the light source and reflected light in mind by leaving a white area on both sides of her face from the cheekbones through the jawline and sides of her nose. For the middle tone and basecoat, blend the deepest shadow with Bisque and paint with Egg Shell.

2 PAINT THE HAIR AND CLOTHES
Because the main light source is from the left side of the character, shade the darkest streaks of the hair with Sand, leaving some unpainted space on the right side, especially at the tips of the strands. Paint fewer streaks on the left side and more on the right. Once the streaks are dry, paint a layer on top with Raw Silk, remembering to leave some approximate highlights.
Lay Walnut for the first layer of clothes. Make some folds and wrinkles by diluting areas with Colorless Blender, and leave some unpainted areas on both sides for highlights. On the left side, paint Orientale, coating on top of the darkest paint of Walnut. Do not worry about the right side yet.

3 DARKEN THE SHADOWS
To emphasize the character’s fearful look, lay Light Grayish Cobalt and Pale Blue on the shadowy areas. For the skin, paint the colors on the same spots that we painted the deepest shadows with Bareley Beige. Also apply the Light Grayish Cobalt and Pale Blue on the darkest streaks of the hair. On the clothes, paint Light Grayish Cobalt only on her right side where the unpainted spaces are left, but leave some spaces clear for the reflected light.

4 SMOOTH THE FLESH COLORS
Apply Powder Blue on top of the flesh areas and blend the blue shadows with the color of the natural skin.
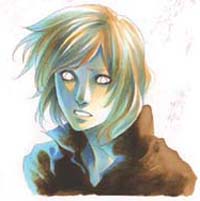
5 ADD REFLECTED LIGHT
To enhance the character’s expression, use a light blue color for the refl ected light. With Frost Blue, paint those unpainted spaces at the right side of the character. Leave alone the highlights on the left
6 REFINE THE DETAILS
If there are any places that require more shadow, repaint with Light Grayish Cobalt and Pale Blue. Add more layers of highlights on her hair with Egg Shell on her left side. Finish up the eyes by adding New Leaf on the irises, and once dry, dot Blue Green for the pupils and corners around the irises. Use Crimson for her tongue. Finally, use a no. 2 round and white acrylic paint or a white gel pen to add extra highlights. Place them on single strands of hair and in the light reflecting on her eyes and lower lip.
You can easily create drama and mood with shadows and reflecting light, but what about extreme opposite colors? Complementary colors can boost your picture’s appeal, especially when depicting a fiery, berserk character.
COPIC MARKERS
0-Colorless Blender, 100-Black, B24-Sky, B32-Pale Blue, BG11-Moon White, BG13-Mint Green, E11-Bareley Beige, E21-Baby Skin Pink, E51-Milky White, R08-Vermilion, R14-Light Rouge, YR02-Light Orange,YR04-Chrome Orange, YR21-Cream
OTHER TOOLS
cardstock paper
pencil
eraser
brown or sepia 005 (0.2mm) waterproof, fine-point technical pens (Pigma Micron or Copic Multiliner)
white acrylic paint and a no. 2 round brush (or white gel pen)

1 ADD THE FIRST COLORS TO CREATE FACIAL DEPTH
Ink your sketch with a brown or sepia 005 (0.2mm) waterproof technical pen. After cleaning up the pencil traces with an eraser, darken the deepest shadow with Bareley Beige around the outer corners of the eyes, under his chin and upper and lower lips, on the tip of the nose, inside his nostrils and on his shoulder. Consider the light source coming from the right and leave a lot of unpainted space on that side, as well as on the left for reflected light. Paint the middle tone on the sides of his face, from the cheekbones through jawlines, with Baby Skin Pink, and lay down a coat of Milky White on most of his skin except the tip of his nose, which will be reflected light.

2 PAINT THE HAIR AND CLOTHES
With Chrome Orange, paint the initial streaks of hair and continue layering with Cream. Leave the edges on his left unpainted. Use Black for his clothes and keep the unpainted spaces around his shoulders. Fade the folds and wrinkles by blending with Colorless Blender.

Make Your Characters Pop With Complementary Colors
Complementary colors are colors that are opposite each other on the color wheel. Common combinations are red and green, blue and orange, and yellow and violet. When they are placed next to each other, you can create nice, bright contrasts that make your characters come alive.

3 DARKEN THE SHADOWS
For the shadows choose any strong, dominant color that will go along with his berserk look. Lay Vermilion and Light Rouge as the shadowy streaks of the hair. Use the same colors for the cast shadows, such as under the tip of his nose and the left side of it, under the neck, under the upper and lower lips, and under the outer corner of the eyes. Once again, make sure to leave some room for the reflected light areas. Coat the right side of his shirt with Vermilion.

4 BLEND THE HAIR AND SKIN TONES
Blend Light Orange on top of the Vermilion and Light Rouge paints, then blend the colors together with the actual skin.
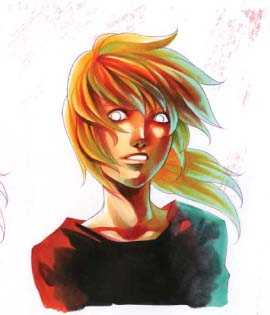
5 ADD REFLECTED LIGHT WITH OPPOSITE COLOR
Use complementary colors that contrast the cast shadow. If we mainly use red tones as the cast shadows, green tones are the perfect complementary match. Paint Moon White as the reflected light on the left of his hair and face. Don’t forget to emphasize the light under the tip of his nose and under the lower lip. To create depth, use Mint Green to add the darkest shades on the nostrils and some strands of the hair. For the shirt, use Mint Green as the reflecting light.
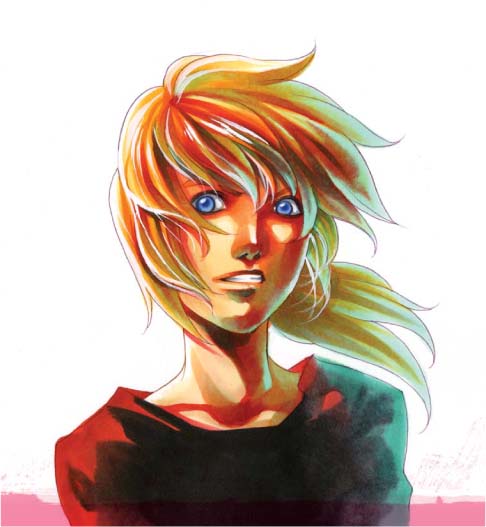
6 FINALIZE THE DETAILS
Any color that stands out from the entire image is good for the eyes. Paint Pale Blue on his irises, and mark the pupils with Sky. Finalize the details with a no. 2 round and white acrylic paint or a white gel pen. Add single strands of hair and the light reflection in his eyes.
