Introduction: Thoughts about Slow Cooking
In some corners of the food media world, where I worked until I started this book, there’s a low-level snobbery about slow cookers. I was guilty of it, too. So many slow-cooker recipes seemed to promise more than they could deliver or were stuck in Condensed Soup Land. For me, that changed when I worked on a story about slow-cooker recipes for Food & Wine with Grant Achatz. (He was kind enough to write the foreword to this book.) Listening to him excitedly rattle off all the dishes a slow cooker could make (barbacoa and steamed British pudding; whole grains and dumplings!) made me really excited to go home, dust off my slow cooker, and take it for a spin. I made perfect polenta without stirring once, and then a velvety pot de crème, and I was hooked.
The idea for this book came out of those conversations with Grant—and specifically, the sense of excitement that came with them. Whether you’re a slow-cooker skeptic or someone who uses a slow cooker all the time, what I would most like to convey is that sense of fun—the joy of tinkering with this underestimated gadget.
This is a slow-cooker book for people who love to cook. It’s not all about getting out of the kitchen as quickly as possible at any cost to the finished dish. I love being in the kitchen, and I want to use my (sometimes limited) time there efficiently and well. Some of the recipes in this book are fast and easy, some are one-pot meals, and all of them are realistic. But with a few exceptions, I’m not a fan of setting and forgetting—by which I mean putting raw ingredients in the slow cooker and then eating them ten hours later without doing anything else. In most cases, dishes cooked that way will be underwhelming; they’ll lack vivid flavor and texture.
So you’ll notice that most of these recipes have steps to take before you slow-cook and then just before you eat that build layers of flavor: Sauté aromatics before you go to work, for example, or broil before serving to add caramelization. Simple techniques like those can make slow-cook dishes taste as vibrant and alive as the food you cook on your stovetop. Often, these upgrades take a matter of minutes. (And if you need a set-it-and-forget-it recipe, I suggest duck confit, which is just about the easiest, most forgiving dish in this book.)
Some of these recipes can cook (or can hold on warm) all day or all night, and I’ve marked those for you so you can find them when you need them. But some of them cook for only a few hours, because I’d like to broaden the way you think about your slow cooker. The ability to cook unattended for eight to ten hours is just one of the slow cooker’s advantages. Pour a little water into the bottom and it’s a bainmarie, or water bath, perfect for gently cooking custards. (I’ll never make a custard any other way ever again.) It saves a burner during the holidays; it cooks without heating the kitchen in the summer. It uses far less energy than the oven, and it can steam a perfect batch of whole grains while you’re on a conference call. It creates a cooking environment that’s dense with moisture, trapping flavorful steam almost like a tagine. Wrap a big hunk of chile-rubbed lamb in banana leaves, and the slow cooker will braise it as slowly and gently as an earthen barbecue pit. And, yes, it can make pho and cassoulet and polenta and congee while you’re at work.
I’ve tried to walk a line between excellence and expediency throughout, which is a line I think we all walk all the time. Sometimes you plan a dinner party for fun and sometimes you just need a supersimple dish of beans and kale on a night when you’ve worked late. The mix of recipes is designed for real life.
And I’d like to push back a little against slow-cooker snobbery in general. Let’s be honest: The slow cooker became popular because it made it possible for women to do something other than check the roast all afternoon. And maybe that association with female home cooks has something to do with the slow cooker’s place in the culinary pecking order.
My first encounter with a slow cooker was through my grandmother. My grandparents lived in a creaky old house in Topeka, Kansas, where they moved when they retired and sold their family farm out on the prairie. The house had a big garden in the backyard where my grandparents grew tomatoes and carrots and roses. It had an old wooden ice-cream maker with an iron handle that all the cousins took turns cranking. And in the kitchen, of course, there was a slow cooker, which my grandmother used to make pot roast with carrots. She cooked the pot roast all day, while she cleaned, worked, gardened, or went to church, and the small house filled with the most delicious, promising aroma. By the time we sat down to eat, the pot roast was a little dry and the carrots were mushy. But it was delicious in the way that slightly overcooked pot roast can be, especially when it’s made by your grandmother. And here’s the thing: My grandmother was a great cook. But she was also a farm woman and a nurse, and on her feet all day, and if the pot roast was a little dry, well, so be it. She had things to worry about, and the utter perfection of dinner wasn’t one of them. (Here I feel the need to reassure you that modern slow cookers have an automatic warm setting that helps prevent overcooking.)
I know this is not an unusual story. That’s why slow cookers have a nostalgic pull. They are our parents’ food, our grandparents’ food. They are love and a busy life, work and family dinners. So as much as I am seeking to update, improve, and modernize slow-cooker cooking, I have huge respect for what the slow cooker means—and for the women who were able to do something else while the roast cooked.
The Birth of the Slow Cooker
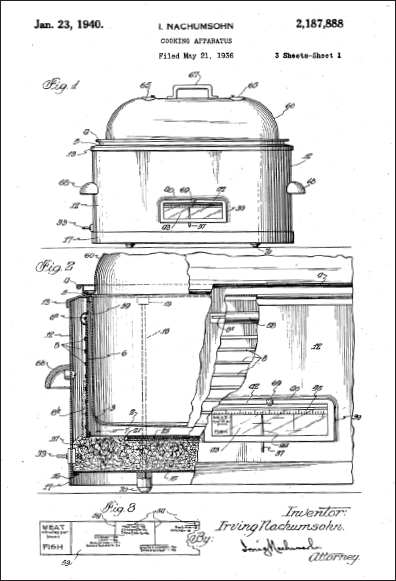
The story of the slow cooker begins in a small Lithuanian village in the mid-1800s. There, every Friday afternoon, a little girl named Tamara Kaslovski Nachumsohn was dispatched by her mother with a big pot of uncooked cholent, a rich bean stew, to the bakery’s communal oven. Tamara’s soup pot went into the oven on Friday, along with all the soup pots of her neighbors. At sundown, the baker banked the oven’s fire and went home to observe the Jewish Sabbath. All Friday night and all day Saturday, the cholent simmered away in the gentle, fading heat of the unattended oven. Around sundown on Saturday, Tamara and her neighbors went back to the bakery to fetch their pots of stew for dinner.
Fast forward to 1936 Chicago: A professional inventor named Irving Nachumsohn (he later changed his name to Naxon) remembered his mother, Tamara, telling him about this ingenious way of cooking cholent completely unattended. So he invented a “cooking apparatus” designed to mimic the conditions in that long-ago, faraway bakery oven: an electric heating element wrapped around an insulated, lidded pot, all of it housed in an outer casing.
He may have invented it with bean stew in mind, but Nachumsohn imagined his apparatus as having almost limitless possibilities in the kitchen. In the patent application, which was granted in 1940, he wrote: “One object in my invention is to provide an improved cooking means capable of meeting the diversified phases in the general art of cooking, such as baking, searing, scalloping, steaming, stewing and so forth.”
Nachumsohn, who also invented the telesign (the scrolling signs you see in Times Square), the electric frying pan, and a washing machine for doll clothes, marketed his invention as the Naxon Beanery and sold it throughout the 1950s and ’60s. In 1970, he sold the invention to the Rival Company, which rebranded the gadget as the Crock-Pot.
Although there have been cosmetic changes to slow cookers in the intervening years, the core technology really hasn’t changed. It’s still an electric cooking element wrapped around an insulated pot, housed in a casing. Your slow cooker is really a Naxon Beanery.
How Your Slow Cooker Works
A slow cooker is made up of two basic parts: The first is the outer casing, or base, which contains the control panel and the hidden electric heating coils that wrap around the bottom and sides. Then there’s the insert, or crock, in which you put your food; it’s usually a heavy stoneware pot similar to a Dutch oven. Then, of course, there’s the lid. That’s pretty much it—slow cookers haven’t changed a lot since they were invented.
I wish I could say that every slow cooker has a standardized temperature for warm, low, and high settings, but they vary among brands and models. For reference, this is a very generalized guide.
WARM: 155˚F to 165˚F
LOW: 175˚F to 190˚F
HIGH: 200˚F to 212˚F
However, your mileage may vary! I conducted an experiment in which I put eight cups of 70˚F water (cool water out of my tap) into three new six-quart slow cookers from three different common brands; let’s call them cookers A, B, and C. I turned on the cookers to low heat, and after one hour cooker A was at 152˚F, cooker B was at 125˚F, and cooker C was at 120˚F. After about three hours, the difference between cookers A and C had evened out, and they were both chugging away at about 180˚F, where they stayed. That is a great temperature for long braising—well below the boiling point, which is 212˚F. Cooker B, however, continued to climb, and while cookers A and C held the lower temperature, cooker B set on low ended up all the way up at 210˚F after eight hours. I then decreased the heat on all of them to warm, which is the setting that should hold your food at a safe temperature until you’re ready to eat without overcooking it. Both cookers A and C dipped down to 158˚F, which is a food-safe but not-too-high temperature. Cooker B actually jumped from 210˚F to 212˚F when I set it on warm (now it was at a full, rolling boil) before falling down to 180˚F, which is too hot for holding food.
On the other hand, some older, vintage slow cookers run quite a bit cooler than the new ones I was working with. That’s because there’s a recent emphasis on (or paranoia about) food safety. Some of the older models didn’t heat up quickly enough, leaving foods too long in the temperature range where bacteria can grow. The general, simplified rule of thumb is that you don’t want any food to be between 40˚F and 140˚F for longer than four hours. Below 40˚F and above 140˚F are the safe ranges for holding food for longer periods of time.
So the moral is this: Get a probe thermometer (they are inexpensive and extremely useful) and get to know your slow cooker’s temperament by filling it halfway with cold water and then monitoring the temperature over the course of several hours. Remember two things: First, for food safety, you want the water temperature to rise well above 140˚F well before four hours elapse. Second, water boils at 212˚F, and that’s too hot for long, slow braising—if your slow cooker hits 212˚F while on low heat, it runs hot. If you know it runs quite hot, you will want to err on the side of shorter cooking times. (Or, frankly, if you slow-cook a lot, it might be worth getting a new one that doesn’t run hot, like one of the models I recommend below.) If it is a vintage model and runs cool, you may want to start foods on high to get the temperature up more quickly before reducing to low, if that’s the setting the recipe calls for.
Buying a Slow Cooker
I did not test every single slow cooker that is on the market (there are hundreds), but I did a lot of research on the most popular brands and models and regularly tested with six different models (and had recipe testers try the recipes with still others). Here are three essential takeaways.
THE MOST VERSATILE SIZE IS SIX-QUART OVAL.
Yes, that’s on the large side, but it’s easier to use a larger cooker for smaller quantities than the other way around. I find that cooking moderate amounts of food (say, four servings) in a six-quart cooker works very well, and the additional space means that you can sometimes get nice browning, which is not something you can always count on in a slow cooker. (The Chipotle-Almond Braised Beef Tacos are a great example of this; the beef gets a nice crust on it.)
FOR BEST RESULTS, YOU NEED A PROGRAMMABLE COOKER WITH AN AUTOMATIC SWITCH TO WARM.
That rules out the models with the knob with which you have to manually switch the heat. The newer programmable models allow you to set them to cook for a certain amount of time on either low or high heat. After that time has elapsed, the cooker automatically switches to warm, which should then gradually drop the temperature to 160˚F at most and hold it there. Food will still overcook if you leave it on warm for too long, but that setting is invaluable for a gap of an hour or so between when the food is done and when you get home. (And each recipe indicates how long it is advisable, from a taste point of view, to leave it on warm.) Without that automatic switch to warm, your cooker will just keep bubbling away on low or high until you turn it off.
IT’S NICE, BUT NOT AT ALL NECESSARY, TO HAVE A SLOW COOKER THAT ALLOWS YOU TO SEAR DIRECTLY IN THE INSERT.
Some cookers have an insert that has a searing or a browning function: This allows you to brown meat or sauté aromatics directly in the insert, either with the insert set on a stovetop burner or in the cooker on a browning setting. This is really great for saving a pan to wash, but these cookers tend to be more expensive. And, anecdotally, I’ve heard that the nonstick coatings on them can bubble or flake with heavy use—you have to be careful not to use metal cooking implements or steel wool on them. Still, the convenience factor of using only one pan to sear and then slow-cook is pretty fantastic, and if you use your slow cooker quite often for main dishes, this feature might be worth it to you. You’ll notice all the recipes in this book are written for slow cookers that do not have a searing or browning function. If you happen to have one, simply disregard the direction to cook in a skillet and use your insert instead. That might require you to reorder a step or two, so please read through the method first, and if there’s a step that directs to sauté or brown before slow cooking, just do that in your slow cooker before you add anything else.
If you’re in the market for a new slow cooker, I’d recommend one of the following three choices.
The best overall is the KitchenAid 6-Quart Slow Cooker with Glass Lid (list price is about $100). I love it because it runs very, very low and slow—to me, the biggest problem with modern slow cookers is that they run too hot. KitchenAid’s low setting is truly low: It reaches only about 180˚F and then steadily holds there, thanks to an internal thermostat that makes small adjustments to keep the temperature constant. (Most slow cookers don’t have this.) When the warm setting kicks in, it eventually falls all the way to 147˚F. (If you are cooking with this model, whenever there is a temperature range in a recipe, know that you should plan for the longer cook time.) It also has special insulation that prevents hot spots and doesn’t scorch the outsides of delicate dishes like stratas, which feels like a minor miracle. Additionally, the control panel is a joy—extremely intuitive to set and easy to read. The handles on the insert stay relatively cool while cooking. There’s an alarm when the cook time has elapsed. This is a basic model—and you do need to remember that it runs slower than most—but it does everything right.
My second-favorite is the Hamilton Beach 6-Quart Programmable Stovetop Slow Cooker (list price about $80). This model has a nonstick-coated aluminum insert, which is much lighter and easier to wash than the traditional stone crocks—but more to the point, it’s also stovetop safe. It works just as well as a skillet for sautéing aromatics or browning meat. So you can sauté on the stovetop and then transfer to the casing to slow-cook. I only wish it had more bottom surface area—to avoid crowding the pan, you’ll likely need to sear meat in batches. It also offers nice, even low heat without hot spots and a wonderfully intuitive control panel.
Then I have a slightly irrational favorite: It’s the All-Clad Gourmet 7-Quart Slow Cooker with All-in-One Browning (list price about $300, though you can usually find it discounted). Like the Hamilton Beach, this comes with a nonstick-coated aluminum insert, but you can use this one either on the stovetop or with the slow cooker’s browning setting. There are a few notable downsides to this cooker, including the price and the fact that it won’t let you program fewer than four hours for the low setting and two hours for the high setting. (I believe this is a kind of paternal attempt to make sure you are following food safety rules.) It also runs a bit hot, around 200˚F on low. But it has a very major upside, and that is that its searing and browning ability is the best of any I tried. The insert is wider and shallower than most others, with lots of surface area—five chicken thighs fit easily without crowding. Turned to 400˚F, it gets screamingly hot, enough that chicken skin sizzles violently on contact. Set to 350˚F, it perfectly sautés an onion. If you (like most people) most often use your slow cooker for main dishes that require sautéing aromatics first or browning meat, it’s worth considering an investment in this slow cooker—especially if you really hate doing dishes. It also has an internal thermostat like the KitchenAid does, so it holds a steady temperature. It’s also really good-looking. But if you use your cooker for items like frittatas and cakes that cook for less time than four hours, then it might not be worth the money, both because of the timing quirk and because of the shape of the insert.
What about the Instant Pot?
The Instant Pot is a multi-cooker—it has settings for pressure cooking, slow cooking, sautéing, and yogurt making, and it can probably do your taxes, too. It’s a very cool appliance, but I don’t think it’s as good at slow cooking as traditional slow cookers are. That’s because the lid seals and locks in place—as it must for pressure cooking—which allows for even less evaporation than traditional slow cookers. In some circumstances, that means a dish ends up swimming in liquid when you translate a traditional slow-cooker recipe to slow cooking in the Instant Pot. (The locking lid also means you can’t use a probe thermometer and close the lid over it—not the end of the world, but not ideal.) I also find the control panel not at all intuitive, though of course you can figure it out once you fiddle with it for a while.
To further confuse matters, the Instant Pot also has three slow-cooker heat settings (not counting warm): less (180˚F to 190˚F), normal (190˚F to 200˚F), and more (200˚F to 210˚F). Those do not exactly correspond to the heat settings on most other slow cookers—although the “less” setting seems like it would be the same as low, it seems to run much slower. Instant Pot does have an auto-switch to warm, as does a traditional slow cooker.
All that said, if you have an Instant Pot, yes, you can use the slow cooker setting to make many of the recipes in this book, with a few caveats.
• The manufacturer claims the Instant Pot’s “less” setting runs at about 180˚F, but I don’t think I believe them. (And I can’t use a probe thermometer to find out for sure because of the way the lid locks into place.) The “less” setting runs very, very slow. If you’re looking to stretch out a cooking time, try the “less” setting where “low” is called for, and increase the cooking time by an hour or so. But the better analog is the “normal” setting: In general, use the “normal” setting for when “low” is called for and the “more” setting where “high” is called for.
• If the finished product is quite dependent on a certain ratio of liquid in the dish (as in polenta), try reducing the cooking liquid slightly, by about 15 to 20 percent, to compensate for the complete lack of evaporation.
Getting the Most Out of Your Slow Cooker: Flavors and Ingredients
Long cooking softens flavors. Think, for example, about the difference between freshly grated garlic and garlic confit. Or think of the way a long roast transforms fennel from crunchy, vegetal, and sharp to silky and sweet. Cooking ingredients for a long time tends to marry and mellow flavors, but you also want the finished dish to have oomph: balanced and varied flavors and textures. I think when we say something is delicious, we mean that there’s a certain tension in the dish—a push-pull of sweet and salty, tart or herbaceous and rich, crunchy and soft. The tension between or the balance among the flavors is what makes the dish vivid, and a slow cooker can bring homogeneity to otherwise distinct ingredients.
So here are a few rules for thinking about flavor when using your slow cooker.
1. USE BIG FLAVOR (MORE THAN YOU WOULD OTHERWISE).
It’s helpful (and logical) to start with ingredients that can stand up to long cooking—flavors that can take a little mellowing and actually be improved by it. That can be as simple as a big dose of ginger and garlic or a spoonful of fennel seeds and red pepper flakes or a handful of pickled peppers. But keep in mind that as a general rule you can use a larger quantity of big-flavor ingredients than you normally would, because their intensity will mellow.
2. ADD INGREDIENTS AT DIFFERENT STAGES.
There’s no rule that says that everything has to go into the cooker at the same time. In fact, it’s better to add ingredients at different intervals. For instance, for Spicy Kimchi and Pork Ramen, I add most of the kimchi at the very beginning, but then add a little bit more just before the soup is done to add back some of the tart intensity that’s been cooked out of the first batch. Similarly, in Farro Puttanesca the tomato-y farro is cooked with garlic, fennel, and red pepper flakes for three hours, and then right before serving, I bloom more fennel seeds and red pepper flakes in olive oil and stir that in for a more immediate, fragrant pop of flavor. You can do this with fresh herbs, too—stirring in a handful of chopped herbs in the last few minutes will wake a dish right up.
3. BEFORE SERVING, TASTE FOR SALT, SOUR, SWEET, FRESHNESS, AND RICHNESS.
Everyone knows to taste for salt before serving, and you certainly should do that, but taste for all the other variables that make a dish delicious, too. A last-minute squeeze of lemon or drop of vinegar can do wonders, but so can a drizzle of olive oil or honey if a dish is feeling too austere or sharp. I suggest a version of this in most of these recipes—braise eggplant in harissa and honey, for example, and then before serving, stir in more harissa and honey. It’s a simple finishing step that takes literally seconds, but it makes a huge difference. So I can’t emphasize it enough: If you taste a dish straight out of the slow cooker and it isn’t delicious, it’s probably mellowed out too much. First add a bit of salt, and then think about the seasonings that are already in it (herbs, citrus, vinegar, sweetener, spices) and add more of those elements, just a little at a time, until it tastes good to you.
Getting the Most Out of Your Slow Cooker: Techniques
Moisture is key to the slow cooker’s strengths. The way it traps moisture makes it great at braising, steaming, poaching, and acting as a water bath. But it can also be a problem. That’s because every fresh ingredient has moisture, and in the closed slow cooker, little of it evaporates. If you put fresh vegetables and/or meat in the slow cooker with some broth, for example, when it’s done you’re going to have more liquid than you started with. That’s why I sometimes add very little or no liquid at the start—in the slow cooker, everything is self-saucing.
Here are four techniques you’ll find throughout this book that are designed to control moisture and make sure you don’t end up with a watery dish.
1. SAUTÉ AROMATICS.
I really wish you could just throw raw diced onion in the slow cooker, but you generally can’t. If you do, the onions will retain a weirdly crunchy texture while also giving off a ton of liquid that will swamp the dish. That’s why I nearly always sauté onion, garlic, and other aromatics before adding them to the cooker.
2. SOAK UP CONDENSATION BY LINING THE LID.
When you’re using the slow cooker as a water bath for delicate custards and the like, place a double layer of paper towels over the top of the cooker before closing the lid on top (see photo). The paper towels soak up the steam and prevent it from dripping back down onto the surface of the custards. You could also use a kitchen towel, but I like that paper towels are both absorbent and thin enough to allow the lid to close tightly.

3. SET THE LID AJAR TO LET MOISTURE ESCAPE ENTIRELY.
In certain cases and/or for short periods of time, you can use the slow cooker with the lid set ajar or removed entirely. The manufacturers don’t want you to do this because without the lid, they can’t ensure raw food gets hot enough to be safe to eat. So I use this technique sparingly, as with toasting granola or Chex mix or reducing liquid at the end of cooking. You should not, for example, put raw meat in the cooker and then set the lid ajar while cooking it.
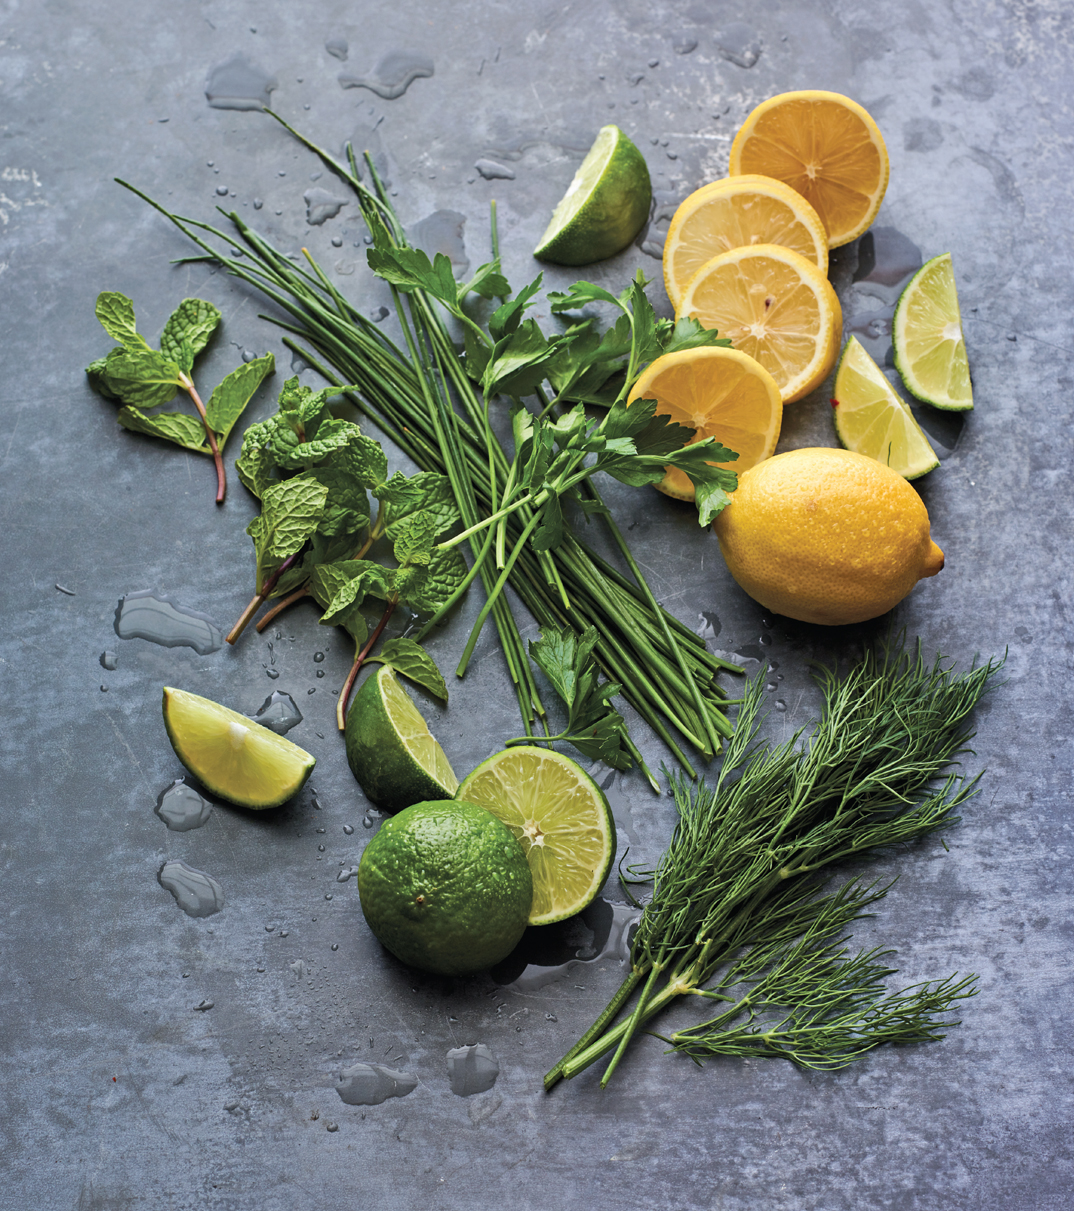
Slow cooking mellows flavors; use citrus and herbs to wake up a dish before serving.
Before serving, taste for more than just salt—think about the seasonings that are already in the dish and add a little bit more of those tart, rich, spicy, or sweet ingredients until the dish tastes vivid.
CLOCKWISE, FROM TOP: feta, harissa, Parmesan, olives, chile flakes, olive oil, fennel, honey
4. DON’T PUT FROZEN FOODS INTO THE SLOW COOKER.
Always defrost and drain frozen foods before putting them in the slow cooker. This is for two reasons: First, frozen foods contain water, and defrosting and draining first prevents that water from diluting the dish. Second, and most important, frozen foods will prevent the temperature of the food from rising quickly enough as it cooks, and that’s a food safety issue.
Getting the Most Out of Your Slow Cooker: Tools
Useful equipment: a probe thermometer for slow cooking with precision and bakeware that fits inside the slow cooker
These tools and tricks make it possible to slow-cook and serve efficiently and well.
1. TO CHECK THE TEMPERATURE WITHOUT OPENING THE LID, USE A PROBE THERMOMETER.
Avoid opening the slow cooker while it’s cooking because you’ll lose heat, causing the dish to take longer to cook than expected. Peeking once or twice, especially to stir, is not the end of the world, but you want to avoid opening the lid when it’s not directed in the recipe. The best solution is using a probe thermometer. That way you can, for example, stick the probe end into a whole chicken or a meatball, close the slow-cooker lid over the cord, and set the thermometer to alarm when the food hits the desired internal temperature. It’s the best and easiest way to use a slow cooker with precision—you can find out exactly how hot or cool your cooker is running without ever opening the lid.
2. USE BAKEWARE AND OTHER VESSELS.
You can use your slow cooker as a water bath for making custards or as a steam oven for cakes—you just need bakeware that fits in the insert. Anything that’s oven-safe is fair game. Ramekins, either four or eight ounces, are extremely useful for custards and puddings, as are eight-ounce canning jars, and a baking dish or loaf pan is great for steamed cakes and cheesecakes. And the presentation is pretty, too.
3. USE A FOIL COLLAR TO PREVENT DELICATE DISHES FROM BURNING.
On most cookers, the hottest spot is a thin strip all around the bottom of the side of the insert and, in particular, the side that is opposite (farthest from) the control panel. It might also be the two narrow curved sides on an oval slow cooker. Luckily, there’s an easy fix. When you’re cooking anything that might be at risk of burning against the side (like a frittata or a cake that’s baked directly in the insert), just put a folded strip of foil around the sides of the insert (see How to Insulate with a Foil Collar). You can do it on only one side or both, depending on your slow cooker’s temperament. The foil will act as insulation and prevent overbrowning.
How to Insulate with a Foil Collar
1. To make a foil collar, fold a piece of foil so it’s about 12 inches long and 3 inches wide. Repeat if you plan to line both sides of your cooker.
2. Use the piece of foil to line the side of the insert that runs the hottest; it’s most likely the wall of the insert opposite (farthest from) the control panel. For most recipes, like a strata or spaghetti pie, you will only need to line one side. You’ll then line with parchment (see How to Line a Slow Cooker with Parchment), and the food you add to the cooker will hold the foil in place.
3. If your slow cooker runs particularly hot or if you are cooking a cake directly in the insert (such as the Cardamom-Molasses Apple Upside-Down Cake), you will want to line both sides to prevent burning. Simply repeat the process on the other side.
4. LINE WITH PARCHMENT FOR EASIER CLEANUP AND MORE ATTRACTIVE SERVING.
Lots of people like to use plastic slow-cooker liners, but they are expensive, especially since they can only be used once. And they’re not nonstick. (And something about cooking directly in plastic is a little unappetizing to me.) Instead, simply line your slow cooker with parchment paper and then trim the top so the lid can close. This makes it so much easier to remove dishes that are baked directly in the insert, like frittatas and cakes—just reach in, grab the edges of the parchment liner, and carefully lift the whole thing out. And it also makes cleanup much faster. You can use foil in exactly the same way, but it will need to be well greased, whereas parchment is a one-step process.
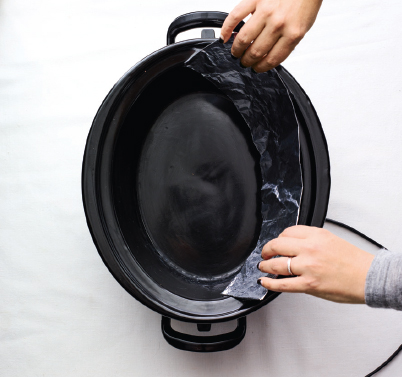
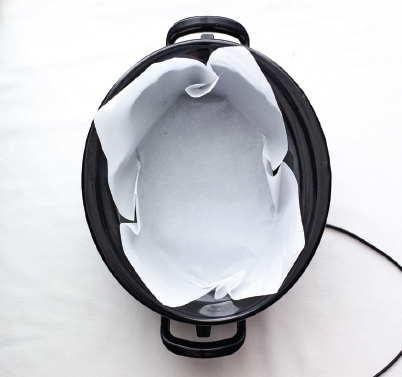
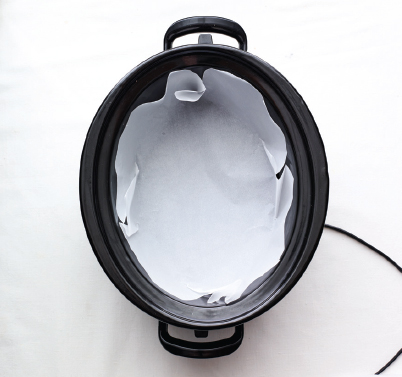
How to Line a Slow Cooker with Parchment
1. Fit a sheet of parchment into the slow cooker. You will need to crumple, press, and fold it to fit, and that’s fine.
2. Using scissors, trim the parchment wherever it will prevent the lid from closing. Make sure it comes up at least 2 inches on all sides, so that food doesn’t run between the parchment and the slow cooker.
Finding Ingredients
I know I call for ingredients that your closest supermarket may not carry. It’s always better to shop from small business owners, so if you have markets in your area that carry Latin American or Asian products, check them first and keep your money in your community. But I admit that even though I live in New York, it can be a hike to find certain ingredients, so I use Amazon for lots of nonperishables, like za’atar and Sichuan peppercorns. I find the prices reasonable and the delivery very prompt. I also like Temple of Thai (templeofthai.com) for banana leaves (and really terrific stone mortar and pestles). The Mala Market (themalamarket.com) is great for Sichuan ingredients. If you can find an Indian grocery store, buy a year’s supply of spices—you’ll find them generally fresher than those sold at other stores (high turnover) and extremely affordable. These shops usually carry a wide variety of spices, not just the ones you might think of as exclusively Indian. So even if you only use garam masala once a year, it’s worth stopping in at a Patel Brothers (or another Indian grocery) to get the spices you use most often, because I guarantee you can get a big bag of black peppercorns or fennel seeds at a fraction of the price you’d pay elsewhere. Penzeys (penzeys.com) is also a good source for excellent-quality spices like smoked paprika and vanilla beans.
IF YOU HAVE QUESTIONS ABOUT OR ISSUES WITH ANY OF THESE RECIPES, PLEASE EMAIL ME: ADVENTURESINSLOWCOOKING1@GMAIL.COM.