A perfected modern battle plan is like nothing so much as a score for an orchestral composition, where the various arms and units are the instruments, and the tasks they perform are their respective musical phrases. Every individual unit must make its entry precisely at the proper moment, and play its phrase in the general harmony.
Maj-Gen Sir John Monash (Commander 3rd Australian Division, Messines 1917 and later Commander, the Australian Army Corps 1918)1
Plumer’s confident answer to Haig was qualified by the fact that there was still a great deal to do. Preparations had been going on for a good month already. Formations and units warned off for the possibility of the assault on the Messines–Wytschaete Ridge now knew that the plan would go ahead. The tunnellers had been scrabbling away here for some time already and many of the infantry divisions that would attack were already holding the line in this area. The rest had to be brought into Second Army area and prepared for battle. The arrangements were elaborate and each unit had first to be brought up to full strength in manpower, weapons and equipment. Then, Second Army and corps HQ staffs coordinated the necessary training and rehearsals, passage of operational and administrative orders and a programme of rest for each unit before the battle. It was often hectic stuff, but it instilled a general confidence throughout. (See map 6)
Pte Jungwirth (10th Machine Gun Coy, 3rd Australian Division) had been keen to move away from the ‘Nursery’ where 3rd Australian Division had been since arriving in France. The ‘Nursery’ was a sector of the front line near Armentières, a few miles south of Messines, where new units were introduced to the realities of the Western Front. Jungwirth wrote:
… [On 2 May] Fritz raided at 4 a.m. and got in our trenches. We lost 7 killed and about 60 wounded. None of his men got back. A few taken prisoner, the rest killed. From this day on, things got very lively and there were plenty of air fights, but our chaps had Fritz well under. The Germans held [the Messines Ridge]. We knew we were going to take that ground from then soon… . Some of the bloodiest fighting [had taken] place here. But we felt confident that we would take it.2
Even to the veterans of previous offensives, the preparations were impressive. To the troops of 3rd Australian Division, about to embark on their first, it was both awesome and awe-inspiring:
The thousands of guns and heaps of shells gave us confidence. To see the preparations behind our lines was wonderful. No one that had not actually seen it could imagine the magnitude of it. Railways were laid from main lines, new roads made, hundreds of light Rlys [railways] branching from the heavy lines. Motor trains ran right up to the trenches. Men, guns and ammunition could be rushed to any part at anytime … 60,000 shells a day were sent across to [Fritz] and … millions of machine gun bullets… . His men were afraid to go for their rations and went hungry for days.3
Plumer was an excellent communicator and he ensured that both he and his Chief of Staff consulted widely on operational and administrative issues. Both visited subordinate HQs regularly and the troops knew the General affectionately as ‘Daddy Plumer’, or ‘Old Plum and Apple’. Lt-Col Philip Neame, who had won a VC at Neuve Chapelle, saw Plumer as ‘… one of the best Army Commanders… . He was so personally in touch. He would be up and see the troops and talk to them in the way they understood, and he’d talk to any junior officer … – he would be interested in what was going on and interested in the person. And there is no doubt his judgement of the war was very fine’.4 Pte Frank Dunham, a Stretcher Bearer (SB) with the 1/7th London (City of London) Battalion of 47th (2nd London) Division, was moving up the line towards Messines at the end of May when: ‘En route, we came upon General Plumer … standing just off the roadside to take our salute, and a few days later our CO read out to us a message he had received from the General, complimenting us on our good bearing. Probably every battalion received the selfsame message; nevertheless, these little “pats on the back” were good tonics for the “Tommy”.’5
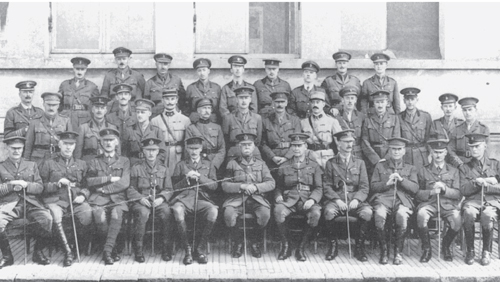
Headquarters (HQ) Second Army: Commander and Staff, June 1917. (See Appendix 1)
Despite the more common touch with the soldiers and junior officers, Plumer demanded from them the same high standards and attention to detail that he expected from all under his command. He was hard-nosed enough to accept that even successful actions against a determined enemy in the white heat of this war would result in relatively high casualties. He mitigated against this by meticulous planning, training, rehearsals and the issuing of orders down to the lowest common, but most important, denominator: the private soldier, trooper, gunner and sapper. Plumer had established an excellent reputation already: ‘Plumer … was, in some ways, the most talented of all [of FM Haig’s Commanders]… . Even before Haig became C-in-C, one divisional commander declared: “Popular opinion pointed to Haig as the ‘pretendant’, though Plumer would probably have had the army’s vote”. This was long before he had won his important victories.’6
Most importantly, Plumer’s relationship with his Chief of Staff, Maj-Gen Charles ‘Tim’ Harington, and Second Army staff, and their relationship, in turn, with the troops which they served was a model of efficiency and cooperation. The correspondent Philip Gibbs wrote, ‘There was a thoroughness of method, a minute attention to detail, a care for the comfort and spirit of the men, throughout the Second Army staff which did at least inspire the troops with the belief that whatever they did in the fighting … would be supported with every possible help that organisation could provide’.7 Harington told Gibbs at the end of 1917 that ‘It was my ambition to make cordial relations between battalion officers and the Staff… . The Second Army staff has been able to show the fighting soldiers that the success of a battle depends greatly on efficient staff work, and has inspired them with confidence in the preparations and organization behind the lines’.8
Harington’s own philosophy was simple: that all staffs exist to help units, and not make difficulties for them. This position perfectly suited the maxim that: ‘… the best means of organizing an army … is to: 1 – Give the command to a man of tried bravery and experience, bold in the fight and of unshaken firmness in danger; 2 – Assign as his Chief of Staff a man of high ability, of open and faithful character, between whom and the commander there may be perfect harmony’.9
It was a doctrine which not only inspired confidence in the Commander and his staff by the fighting units, but also promoted the belief that this was a winning team; a belief which was to prove to be unequivocally justified. Their guiding principles were what Plumer termed as the Three Ts – Trust, Training and Thoroughness.10
The difference between this harmonious situation and that which existed between Gough’s Fifth Army staff and the troops under their direction could not have been more different. Lt-Col Philip Neame underlined the reservations of the troops: ‘The only serious criticisms or complaints that I heard were against Gough’s Fifth Army. It got to the stage where everyone hated the idea of going to Gough’s Fifth Army.’11
Typical of the contrast in attitudes was that of the men in 4th Australian Division, warned off for Messines so soon after their experience at Bullecourt. Unlike 3rd Australian Division, for which Messines was its debut in a major offensive, 4th Australian Division had gained wide experience on the Western Front already. It was heavily involved at Pozières during the Somme offensive in 1916 together with 1st and 2nd Australian Divisions, where the combined casualties of these divisions from 23 July to 3 September had amounted to 23,000, of which were over 7,000 killed. Yet they had inflicted similar casualties on an increasingly desperate German defence against all the odds.
Then, in April 1917 4th Division fought at Bullecourt. The plan was to use Fifth Army to assault the formidable Hindenburg line near the village as a diversionary operation separate from the main offensive around Arras. The 4th Australian Division was to assault the German line to the right of the village, then sweep right to left along the Hindenburg line, creating the conditions for 62nd British Division to then assault and capture the village itself. The final phase of the battle would exploit the success of this plan by allowing a link-up between the two divisions and a deep penetration into the German depth positions. The actual result was nothing short of a fiasco. The preliminary artillery barrage failed to cut much of the massive fields of barbed-wire in front of the German positions, so Fifth Army HQ decided to use the tanks which were to support the attack to flatten the wire. Gen Gough was persuaded by a relatively junior Staff officer in Fifth Army HQ that this could be achieved safely for the tanks only if the planned creeping artillery barrage planned to assist the infantry assault was cancelled. Then, most of the tanks failed to arrive and the 4th Australian Division was ordered to attack without the support of tanks or artillery. Once again, poor planning and execution of the attack plan left the Division exposed to determined German resistance, but 4th Australian Division managed to enter the German second defensive line before being forced back by sheer weight of fire by the enemy and because of conversely ineffectual artillery and other fire support of their own. As a result, the division suffered 3,000 casualties.
The common denominator in 4th Australian Division’s experiences at Pozières and Bullecourt was Gen Sir Hubert Gough and his Army staff. The confidence of the officers and men of the Australian divisions commanded by Gough was seriously undermined, a fact which was both inevitable and enduring. When 4th Australian Division was given its orders to prepare for Messines, its morale was lifted by the knowledge that it was to be relieved at least of the responsibility to continue its association with Fifth Army. The Aussies felt that they would be better served by Second Army HQ as their new masters, though their recent experience had hardly made them relish the prospect of another major battle within two months of Bullecourt. For many of the Australian troops it was still a grim prospect.
The division had become hardened to the realities of the war and had adopted an uncompromising attitude in dealing with the enemy, as Messines would show. Their disillusionment with the news of being involved in this forthcoming battle could have affected their morale badly. That it was not, was the direct result of both the move out of Fifth to Second Army and the fact that 4th Australian Division had one of the most able and experienced divisional commanders within the BEF: Maj-Gen William Holmes. He became a citizen soldier at the age of 10, commissioned in 1886 and, by 1903, had become CO of his parent unit, 1st Infantry Regiment of the New South Wales colonial forces, which he had joined as a bugler. He served with distinction in South Africa against the Boer and saw action at Colenso, Pretoria and Diamond Hill. His courage during these actions was reflected by his award of the DSO, Mentions in Dispatches and promotion to Lieutenant-Colonel. From 1912, he commanded the Australian 6th Brigade and at the outbreak of the war was appointed as commander of the Australian Naval and Military Expedition Force, which captured German New Guinea, before he was selected to command 5th Infantry Brigade from March 1915 for the Gallipoli campaign. He commanded the brigade with excellent and inspirational skill throughout the ill-fated campaign until the evacuation. He remained in command during the brigade’s training for and actions on the Western Front, most notably on the Somme in 1916. With this track record, he was a natural and wise choice for the command of 4th Australian Division. His trust in his men and his example as a highly experienced field soldier and commander were the perfect combination of leadership which 4th Division so sorely needed at this time.
In fact, one highly significant factor in the planning for Messines was that compared to the opening of previous offensives on the Western Front, the troops assembled for this attack were a genuine commonwealth of nationalities. As well as the Australians, there were New Zealanders (‘Kiwis’), already established as tough and resolute in both Gallipoli and at Flers (Somme) alongside 41st Division on the day that tanks were first used – 15 September 1916. The 41st Division was an excellent mix of Home Counties men from Surrey, Kent, Middlesex with the Hampshires, the King’s Royal Rifle Corps and Royal Fusiliers. There were also the proud men from the coal and slate mines and the rugged farmland of north and south Wales. For the first time (at the express wish of Plumer himself), Southern Irishmen and Ulstermen were to fight alongside each other. This was a little over a year after the bloody fighting of the Easter Rising in Dublin, but Plumer suggested that this time they would feel a great deal better by fighting the Germans rather than each other. Both the 16th (Irish) and 36th (Ulster) Divisions had distinguished themselves on the Somme, having established a fearsome reputation and admiration from the enemy. Now they had an opportunity to prove that they could do the same together. The character of each division was not in doubt and personalities within each division gave hefty testament to their ability to turn on the charm as well as the aggression from the top downwards.
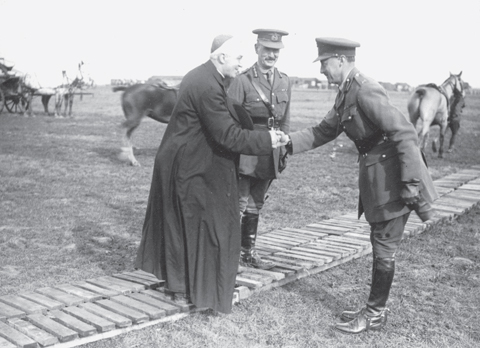
Maj-Gen W.B. ‘Willie’ Hickie (centre), GOC 16th (Irish) Division, with Cardinal Bourne and Brig F.W. Ramsey (48th Brigade).
Maj-Gen William (‘Willie’) Bernard Hickie, GOC 16th (Irish) Division, was typical of the personality. Born into an Irish Catholic family, partly of Spanish descent, he was an energetic 52 in 1917, having already completed 31 years in the Army. He had seen operational service in Egypt, India and South Africa during the Anglo-Boer war. His military reputation was established by the outbreak of the First World War and he was given command of 16th Irish Division when it was deployed for front line service, in preference to Sir Lawrence Parsons, the first GOC and who had been responsible for its formation and training. Lt-Col Hammond, a senior staff officer with 16th Irish Division from its inception, was asked by Sir Lawrence to sum Willie Hickie up. After suggesting that he would be eminently qualified for senior command when it came along, Hammond also noted that he was: ‘a fine looking man, full of charm and with a bit of a reputation with the ladies. [He is] … a very clever fellow, and he is a really good sort, though a great talker and a bit of a windbag’!12 It was a reputation which suited the man and those under his command, a common thread which was to bind the Irishmen together for the forthcoming offensive.
The remaining divisions came from almost every enclave of the cities, towns and countryside of England: men from the north, north-west and north-east, London, the Midlands, and others from the southern or home counties. Most of the divisions were already part of Second Army, or knew this part of the salient well.
The 23rd Division recruited from the north Midlands and the north and north-east of England, including two battalions of General Plumer’s former regiment, the Yorks and Lancs, and included the Northumberland Fusiliers, Green Howards, Sherwood Foresters, King’s Own Yorkshire Light Infantry (KOYLI), the West Yorkshire Regiment and Durham Light Infantry (DLI).
By this time 47th (2nd London) Division was in the line near Hill 60, having been there for some months. The division still retained a very parochial reputation, so its units were known as, for example, the Post Office Rifles, the Poplar and Stepney Rifles, London Irish Rifles and the Civil Service Rifles Battalions of the London Regiment. By 1917 its territorial force – ‘Saturday night soldiers’ – had really come of age and were to play a prominent part in the battle.
Second Army’s preparations for the battle were characteristic not only of detailed planning, but also of the most up-to-date training, based on lessons learned from previous campaigns such as the Somme as well as the more recent offensives around Arras and the Chemin des Dames.
The Somme had demonstrated the tactically decisive advantage of platoon weapons such as the Lewis ‘light’ machine-gun, the rifle-grenade and the Stokes light mortar. These weapons improved the infantry’s chances of fighting their way forward without the advantage of an artillery barrage if it had moved too far ahead of the assaulting troops. Such weapons were becoming more plentiful for infantry platoons and companies. Experience was to lead to their more skilful and effective use.
The winter of 1916/1917 had seen the publication of two vitally important army-issued pamphlets which distilled and sought to apply the tactical lessons learned in 1916 in particular. The first was SS 135: Instructions for the Training of Infantry Divisions for Offensive Action (December 1916); the second was SS 143: Instructions for the Training of Infantry Platoons for Offensive Action (February 1917). Both were absorbed and translated in practical terms in typically assiduous fashion by Second Army staff. They would be applied for the Messines battle. SS 135 acknowledged the importance of the creeping barrage and the primary role of artillery to fire the infantry onto the enemy objective, supported by mortars and Vickers machine-gun barrages. Thereafter, enemy resistance would be broken by a combination of snipers, Stokes mortars, Lewis guns, rifle-grenades and smoke barrages, ultimately followed by the infantry assault using riflemen and ‘bombers’ (grenade-men) to mop up any enduring enemy pockets of resistance. SS 143 developed this framework by providing the detailed instructions for the structure and tactics of the infantry platoon. The use of waves of infantrymen going over the top in extended line was a tactic that was to be gradually phased out.
From these crude beginnings, the infantry platoon was to become a self-sufficient, specialist group, based on a small platoon HQ and four sections (approximately seven to ten men per section). Each section was to have a particular task: the first being the ‘bomber’ or grenade-specialist section, the second providing the Lewis gun section, the third providing the ‘assault’ section (normally with a sniper and a ‘scout’), and finally, the rifle-grenade section, which would have four specialists assisted by their protection party of a further four or five men.13
The New Zealand Division, under Maj-Gen Sir Andrew Russell’s personal direction, took steps to apply the new tactics zealously. Russell, like Plumer, was a meticulous and thoughtful commander in preparing his men for battle. Not only were the new tactics and plan for Messines rigorously rehearsed, but also each commander, from brigade to section level, had gone forward before the battle to see the ground over which they were to attack. Every man knew his task and that of the units on each flank.
Most importantly, Plumer and Harington were disciples of other innovative methods which had been advocated by Pétain. In Second Army, staff and regimental officers were already being sent to French tactics schools to familiarise themselves with the evolving tactical and operational doctrine. Despite the long-held myth that senior officers and their staffs were incapable of learning lessons from the mistakes of previous battles, it had become clear during the Somme offensive that the Allies were developing alternative methods which were severely testing German defensive resolve. In a less than a year, lessons had been learned and applied. Examples were the use of surprise, the creeping barrage, improvements of artillery munitions such as the ‘106 instantaneous fuse’ (more effective in cutting wire), the development of ‘fire and manoeuvre’ infantry tactics, the use of tanks, closer ground–air cooperation, the application of the increasing accuracy and range of the Allied artillery and the use of sound-ranging and ‘flash-spotting’ methods to pinpoint enemy artillery.
Messines was to show that these developments were becoming integral in evolving tactical methods to defeat strong German defences and would reflect the growing Allied consensus encapsulated by the principle of ‘bite and hold’ operations. Despite the relative inactivity of the French forces at this time as a result of the fallout from the Nivelle offensive, Pétain was already planning for a revival of French offensive spirit. This would be reflected by two remarkable successes in August and September at Verdun and on the Chemin des Dames. In both cases, much of the foundation for each of the victories would be laid by the example and lessons learned from Messines, a fact acknowledged by Pétain in his operational directives for 1917.

Troops from 3rd Australian and 25th Divisions study the scale model of the battlefield, 6 June.
At the tactical level then, all the troops were given detailed orders of their tasks and their role in the battle as a whole. Similar detailed training had been applied successfully also at Arras/Vimy in the spring. The use of carefully prepared, accurate scale-models was manifest throughout the army, ranging from the Second Army model of the whole battlefield area at Scherpenberg down to platoon-level models of company, platoon and even section objectives. Equally, training and rehearsals returned to first principles, such as individual shooting skills and fitness. This rapidly graduated to collective tactical training at platoon, company and battalion level to inculcate the wider tasks and responsibilities of units for the battle. In addition to the models, large areas were laid out behind the lines to rehearse each battalion, brigade and corps for its particular role. This they did several times. Each battlefield rehearsal area was laid out to scale and enemy positions, including pillboxes, machine gun posts and headquarters, denoted by various markers such as location boards, flags and different-coloured tapes. At the end of each rehearsal, there would be training conferences to carry out a critique from which suggested improvements were welcomed. Where relevant, adjustments were made to the plan.

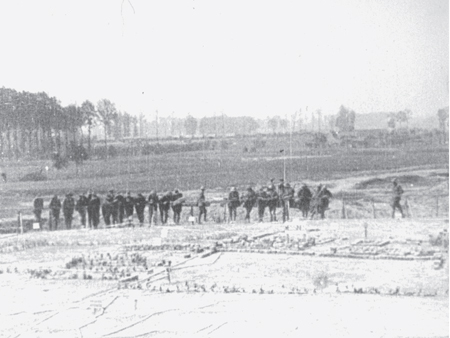
Troops of 3rd Australian Division leaving the scale model area.

Troops of the New Zealand (NZ) Division conduct rehearsals near Scherpenberg for the forthcoming battle, 2 June 1917.
The training throughout May was hard, relentless and exhausting. Nevertheless, when the time came, the troops were ready and more confident on the outcome of this battle than of any other in which they had fought before. Pte Victor Fagence, a Lewis gunner with the 11th Royal West Kents (122nd Brigade of 41st Division), described the preparations:
We did sort of open warfare … attacking [mock] trenches that had been temporarily built by an opposing company or battalion… . We would be doing the same sort of thing that we would be doing in actual combat… . It was all explained to us and models were shown, models to scale showing our front line, No Man’s Land, the enemy front line … and how far our objective would be… . It was all pretty good really.14
Plumer’s view was that his troops should train hard and consequently fight more easily. It suited his philosophy that the Army must be built from the bottom-up, the foundation of the three Ts.
Thorough planning was characteristic of all of the corps and divisional HQs, and this was passed on down the line. The scale of the detail communicated to subordinate units before battle was joined varied considerably, as it would in any large organisation. Sir John Monash considered himself fortunate to be commanding his division within Second Army. He saw it as an organisation which put into practice much of what he had been preaching during the division’s formative period in the UK and at the ‘Nursery’. Monash prided himself on his attention to detail. As a professional engineer outside army life, he regarded the meticulous planning for this battle as he might a civil engineering project.15 Notwithstanding this, he realised that he had an excellent mentor. He wrote home on 19 May that: ‘[Gen Plumer] The Army Commander spent all yesterday afternoon with me, going patiently and minutely through the whole of my plans, and said [that] he felt sure that I had done all that was possible to ensure success’.16
Monash was to call this first major battle for his 3rd Division his ‘Magnum Opus’. One guiding principle was that of giving to each of his brigade commanders as much information on the operation as early as possible and in as much detail as possible. Consequently, the first lengthy draft of the orders for Messines, entitled ‘Magnum Opus’, was produced between 9 and 14 April, two months before the event. There would be another thirty-five instructions which covered everything from the concept or design for battle down to detailed platoon-level tasking, including techniques to defeat enemy strongpoints. The administrative detail was as vital to him as the operational planning and his influence was evident concerning both.17
Second Army was well-drilled in the principles of war long before the battle. The aim was crystal clear and every man knew what he was expected to accomplish. The troops built a detailed knowledge of their tasks through orders, briefings, rehearsals and the models which were built to scale representing the ground over which the battle would be fought. Morale was high. Cooperation was the watchword at all levels of command. The administration, or logistics, of the operation were remarkable. Surprise was planned through the exploding of nineteen enormous mines beneath the German front line. Offensive spirit was to be the key once the mines were blown and the infantry assaulted the German defence.
Above all, Plumer had achieved the concentration of force so vital for success. Linked to that, he foresaw that all-arms cooperation was a battle-winning factor. This meant that the supporting arms – namely engineers, artillery, machine-guns, tanks and aircraft – were brought together to improve the chances of the infantry’s ultimate tasks of closing with and killing the enemy, achieving its objectives and then consolidating and holding the ground taken.
Plumer’s philosophy was encapsulated by Maj-Gen Sir John Monash:
The true role of the Infantry was not to expend itself upon heroic physical effort… . But, on the contrary, to advance under the maximum possible protection of the maximum possible array of mechanical resources: guns, machine-guns, tanks, mortars and aeroplanes … to be relieved as far as is possible, of the obligation to fight their way forward.18
Arras had confirmed that the new German flexible defence methods had a number of flaws which could be exploited. Plumer’s formula to achieve this was based on the principle of unleashing a locally overwhelming concentration of force on a narrow front, consolidation of objectives and the deliberate ‘come-on’ to the enemy’s counter-attack forces. Therefore, Plumer intended to invite the main counter-attack forces into a pre-planned ‘killing area’ where they would be systematically destroyed by the massive use of a combination of artillery, mortars, machine-guns, infantry Lewis gun and rifle fire.
Therefore, the aim was to defeat the German garrison occupying the Messines–Wytschaete Ridge in detail. The plan was to ‘pinch out’ the southern part of the salient by assaulting the whole of the Messines–Wytschaete Ridge with three corps. There would be nine initial assault infantry divisions and three reserve infantry divisions, over 150 battalions, giving a total assault force of 80,000–100,000 men.
Plumer had the artillery plan he required with the necessary guns and ammunition, as well as excellent and innovative Gunner commanders, staff and men. The Royal Engineers, or Sappers, were responsible for the explosion of the mines beneath the German front line at zero hour. The Gunners would be assisted in turn by the Royal Flying Corps (RFC). Its principal tasks were to identify German artillery positions as targets for counter-battery (CB) fire, to adjust artillery fire to support the assaulting infantry once the battle was joined, including low-level strafing attacks on German troops and defensive positions, and to disrupt enemy movement in the German rear areas.
The three Corps allotted for the operation were (north to south):
• X |
23rd, 47th (London) and 41st Divisions designated as the assault divisions, with 24th Division as the Reserve; |
• IX |
19th (Western), 16th (Irish), and 36th (Ulster) Divisions (assault), with 11th Division as Reserve; |
• II ANZAC |
25th, New Zealand and 3rd Australian Divisions designated as the assault divisions, with 4th Australian Division as Reserve. |
Once the Messines Ridge was secure, the Reserve divisions would assault the final objective – the Oosttaverne Line.
In reserve for Second Army:
• XIV Corps i.e. Guards, 1st, 8th and 32nd Divisions.
The three principal tasks for the offensive were to be: first – to capture the enemy position on the Messines–Wytschaete Ridge, including the villages of Messines and Wytschaete (see maps 7 and 8), from Observatory ridge in the north to St Yves in the south: a front of about 10 miles; second – to capture as many as possible of the enemy’s guns behind the ridge; third – to secure and consolidate a final objective east of the ridge (the Oosttaverne Line) and establish a series of posts in advance. Subsequent operations to exploit a success at Messines would be planned for and carried out as ordered.19
The second-phase/final objective was defined as the Oosttaverne Line, which stretched like a chord across the base of the Wytschaete Salient. This conformed in the main with the German depth position: the Sehnen Stellung (‘bow-string’) of the Wytschaete-Bogen. There would be two main phases: the capture of the Ridge (‘Black’ line) and then the Oosttaverne Line. The intermediate stages (‘Red’, ‘Blue’ ‘Green, and ‘observation’/‘Black dotted’ line) would allow time for consolidation of gains made and fresh troops to move on to the next stage.

Map 7: Wytschaete: Second Army/IX Corps Intelligence estimate of enemy dispositions as at 22 May 1917.
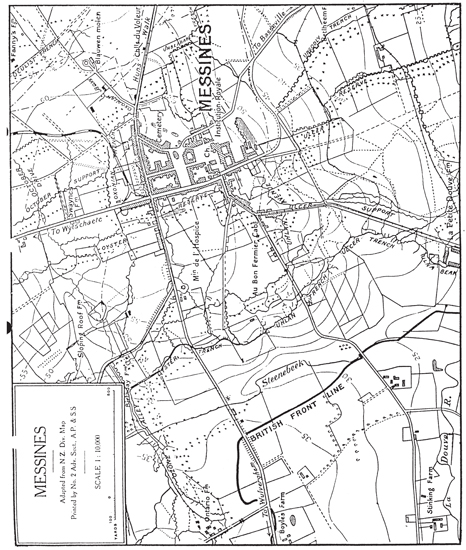
Map 8: Messines: principal defensive layout, 1917.
1 Gen Sir John Monash KCB, The Australian Victories in France in 1918 (Battery Press for the Imperial War Museum, originally published in 1920).
2 AWM PR89/63 Private Papers of Pte L.M. Jungwirth, 10th MG Coy AIF.
3 Ibid.
4 Private Recollections of Lt-Col (later Lt-Gen Sir) Philip Neame, VC, KBE CB DSO DL: Western Front; Life and Operations, Reference No. 000048/15: Imperial War Museum (IWM) Department of Sound Records (Sound Archive).
5 Pte Frank Dunham, private records.
6 Terraine, John, The Western Front; 1914–1918 (London, Hutchinson, 1964).
7 Gibbs, Philip, Realities of War (London, William Heinemann, 1920), pp. 389–90.
8 Maj-Gen Sir Charles (‘Tim’) Harington; in conversation with Philip Gibbs following a press conference at the end of the Third Ypres (‘Passchendaele’) campaign. Quoted in Gibbs, Realities.
9 Jomini, Lt-Gen Henri Baron de, Summary of the Art of War (Paris, Anselin, 1838). Translation (Philadelphia, Lippincott, 1871).
10 Harington, Gen Sir Charles (‘Tim’), Plumer of Messines (London, John Murray, 1935), p. 79.
11 Neame, Western Front.
12 Quoted in Dr Terence Denman, Ireland’s Unknown Soldiers: The 16th (Irish) Division in the Great War (Black Rock, Co. Dublin, Irish Academic Press, 1992), p. 57.
13 SS135/SS143: For an excellent and detailed account of this evolution of tactics and the operational art, see Paddy Griffith’s study, Battle Tactics of the Western Front (London/New York, Yale University Press, 1994).
14 Private Recollections of Pte Victor Edgar Fagence, Western Front; Life and Operations, Reference No. 000327/08: IWM Sound Archive.
15 AWM (DRL2316 Item 79/3 (1934)), War Letters Of General Sir John Monash – Extracts from volume II, 14 March 1917 to 28 December 1918: Letter to his wife, dated 1 June 1917; (War Letters, p. 301).
16 Ibid., pp. 298–300.
17 Monash Papers (AWM DRL2316), Item [25] Personal Box No. 15: Period 1 April to 31 July 1917, including hand-written and typed draft orders and instructions.
18 Maj-Gen Sir John Monash, quoted in Pedersen, Peter, Australia’s Commanders (University of Melbourne Press, 1989), p. 98.
19 Second Army Operational Order for Messines; quoted in Harington, Plumer of Messines, pp. 85–96.