10
BREAD, CAKES, AND PASTRY
Guided Inquiry Activities (Web): 6, Higher Order Protein Structure; 7, Carbohydrates; 9, Fats Structure and Properties; 18, Starch; 27, Bread
10.1 INTRODUCTION
Few of us can walk by a bakery without being drawn to the aromas and visuals of freshly baked breads, pies, or cakes. At times, you might wish to bite into a chewy, dense wheat bread. On other occasions, you might be drawn to a flaky, buttery croissant. Perhaps on a third occasion, you might choose a light and fluffy piece of cake. Flour and water provide the basis for all of the foods, yet they have significantly different textures, aromas, and mouthfeel due to additional ingredients, treatment of, and structure of the dough or batter. In this chapter, you will learn about flour and its molecular components, the process of making a yeast-based bread, quick bread, sponge cake and pastry, and variations in other ingredients that help to yield the final baked product with the desired texture, aroma, and flavor. The flour that is used in most baked goods comes from wheat. Not only is wheat readily available, but it produces a flour that has the components and properties that are ideal for different types of baked goods, ranging from leavened breads to flaky pie crusts. Thus, most of this chapter will center upon wheat-based flours and baked goods. However, due to the fact that there are many individuals that are afflicted with celiac disease, we will also discuss some other flour options and characteristics of the disease itself.
10.2 WHEAT-BASED FLOUR, WHERE IT COMES FROM AND ITS COMPONENTS
All flours come from a grain that is milled or ground into a fine powder; however, different types of flours are produced when each component of the grain or various types of wheat are milled. First, let’s talk about the structural components of a grain.
A grain (or seed) consists of three major structural components: the germ (or embryo), the endosperm, and the bran (Fig. 10.1). The endosperm makes up most of the bulk of the grain and contains cells that are filled with carbohydrates and proteins. Carbohydrates, in the form of starch, make up about 70–80% of the endosperm. The protein component (about 7–15%) consists of both soluble and insoluble proteins. The sprout of the plant emerges from the part of the grain called the germ or embryo. The germ is nutrient rich and contains fats, vitamins, and mostly soluble proteins. The bran makes up the outer shell of the grain; it contains some minerals (~7%), soluble proteins (~16%), and carbohydrates but mostly consists of the structural, insoluble carbohydrate called fiber. In a seed, fiber has a primary role of protecting the endosperm and germ components.
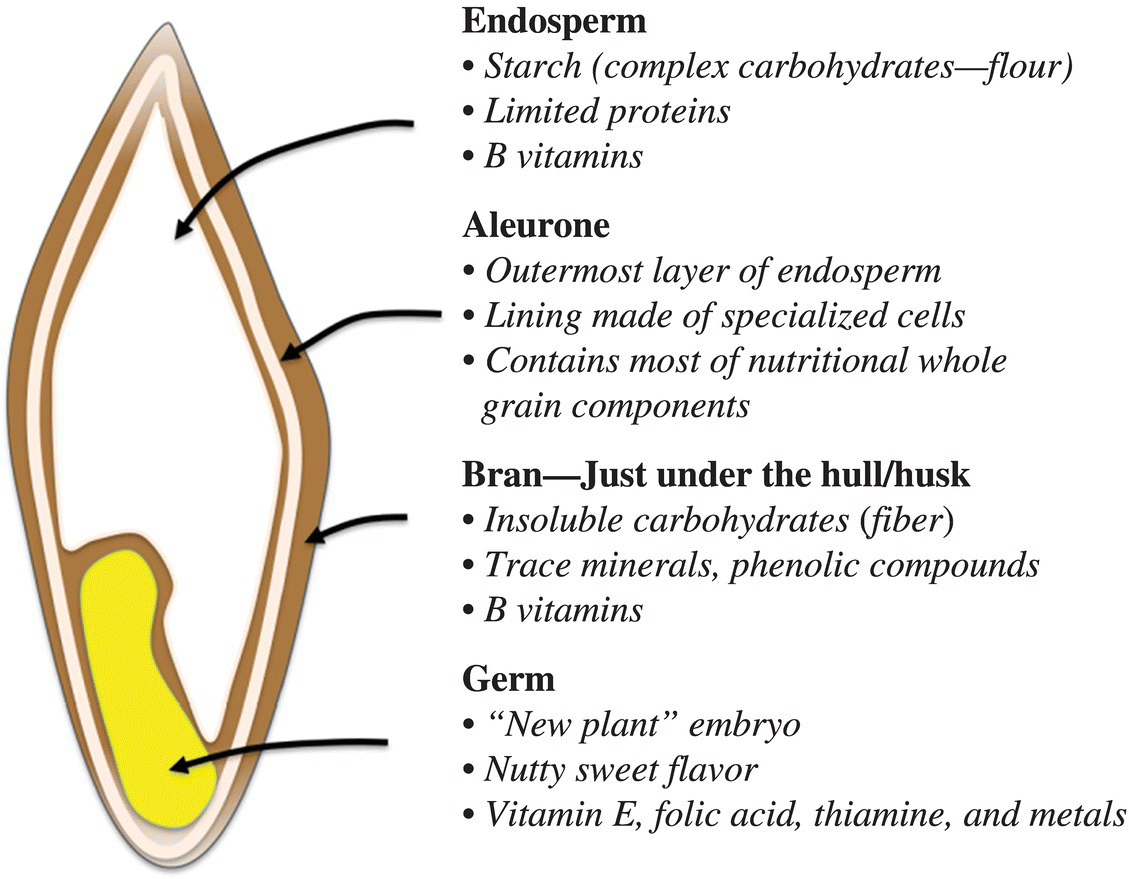
Figure 10.1 Anatomy of a grain. Flour is primarily composed from starch and proteins found in the endosperm.
You might be asking, what do the structural components of a seed have to do with flour? Different types of flours are distinguished by the component of the grain that is milled during the production process. For example, white flour comes almost solely from the endosperm portion of a grain of wheat, while whole wheat flour contains the ground bran, germ, and the endosperm. You have probably seen or used other types of flours as well, including all-purpose, bread, cake, semolina/durum, pastry, and instant. These white, wheat-based flours are distinguished by their protein content (Table 10.1).
Table 10.1 Protein Content and Use of White, Wheat-Based Flours.
| Flour Type | Protein (% of Total) | Primary Use in Cooking |
| Cake | 7.5–8.5 | Cakes, quick breads, muffins, and pancakes. Produces a tender crumb |
| Pastry | 8–10 | Pie crusts and pastries |
| Instant | 9.5–11 | Sauces and gravies |
| Bleached, all purpose | 9.5–12 | General use flour for all cooking and baking purposes but contains a little too much protein for the best pie crusts, muffins, and pancakes and too little flour for the best yeast breads |
| Bread flour | 11.5–12.5 | Yeast breads, pasta, pizza |
| Durum wheat (semolina) | 13–13.5 | Pasta |
Wait a minute, protein content! How do you get flours of different protein content when these flours all come from wheat? Each component of a wheat grain contains a different amount and type of protein (soluble and insoluble). Moreover, differences in wheat type, growing climate, and soil conditions will all impact the amount of protein present within a grain of wheat. The endosperm of spring-sown wheat is more brittle, disintegrates readily on milling, and tends to have a higher protein content; thus spring-sown wheat produces “hard” flours. “Soft” flour is usually obtained from winter wheat, as these flours have a protein content of less than 10%.
Try this at home. Place a few tablespoons of bread flour, all-purpose flour, and cake flour in different unlabeled dishes. Feel the texture of each. Can you tell the difference between the softer flours (low-protein content) and the hard flours (high-protein content)?
The “all-purpose” white flour that you purchase in the grocery store is usually a blended flour to give a more consistent product in terms of protein content. Most flours typically do not contain any other additives, aside from drying agents to prevent the flour from forming lumps when exposed to moisture in the air, unless the flour is designated as “self-rising.” Self-rising (self raising in some countries) flour contains a raising agent like baking powder; these flours are sometimes called for in quick bread, biscuit, or cake recipes.
There is clearly a lot to learn about the protein in flour. However, you can’t consider protein in the absence of carbohydrates. Let’s learn more about the carbohydrate and protein components of a flour and how each impacts the characteristics of a loaf of bread, pie crust, or cookie.
10.3 CARBOHYDRATES IN FLOUR
10.3.1 Starch
You already know a lot about carbohydrates and their importance in cooking, food, and nutrition. To refresh your memory, glucose is a carbohydrate (it contains carbon, hydrogen, and oxygen atoms) in which five of the carbons and an oxygen are most commonly arranged in a “ring” or cyclic structure (Fig. 10.2). When glucose is not bonded to any other carbohydrate molecules, it is a monosaccharide.
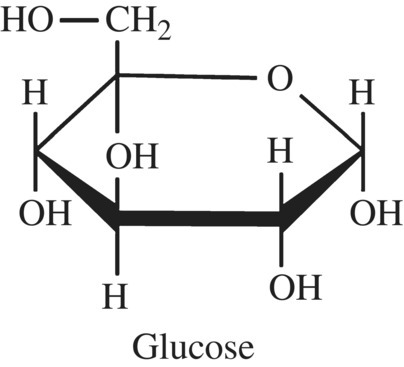
Figure 10.2 The structure of glucose.
However, most of the glucose molecules in flour don’t exist in this monosaccharide molecular form; they are present in the form of a glucose polysaccharide that is called starch. You have likely heard of the term “starch,” used the term “starch,” and maybe even try reducing “starch” from your diet, but have you ever thought about what starch looks like at the molecular level?
Starch is composed of two different types of glucose polysaccharides, amylose and amylopectin, both of which consist of glucose molecules that are covalently bonded to one another via glycosidic bonds to make long molecular chains of glucose (Fig. 10.3). A single molecule of amylose may contain up to several thousand glucose molecules that are bonded together via 1 → 4 glycosidic links. An amylopectin polysaccharide can contain many more glucose molecules (on the order of a million) that are bonded via 1 → 4 glycosidic links and 1 → 6 glycosidic bonds.
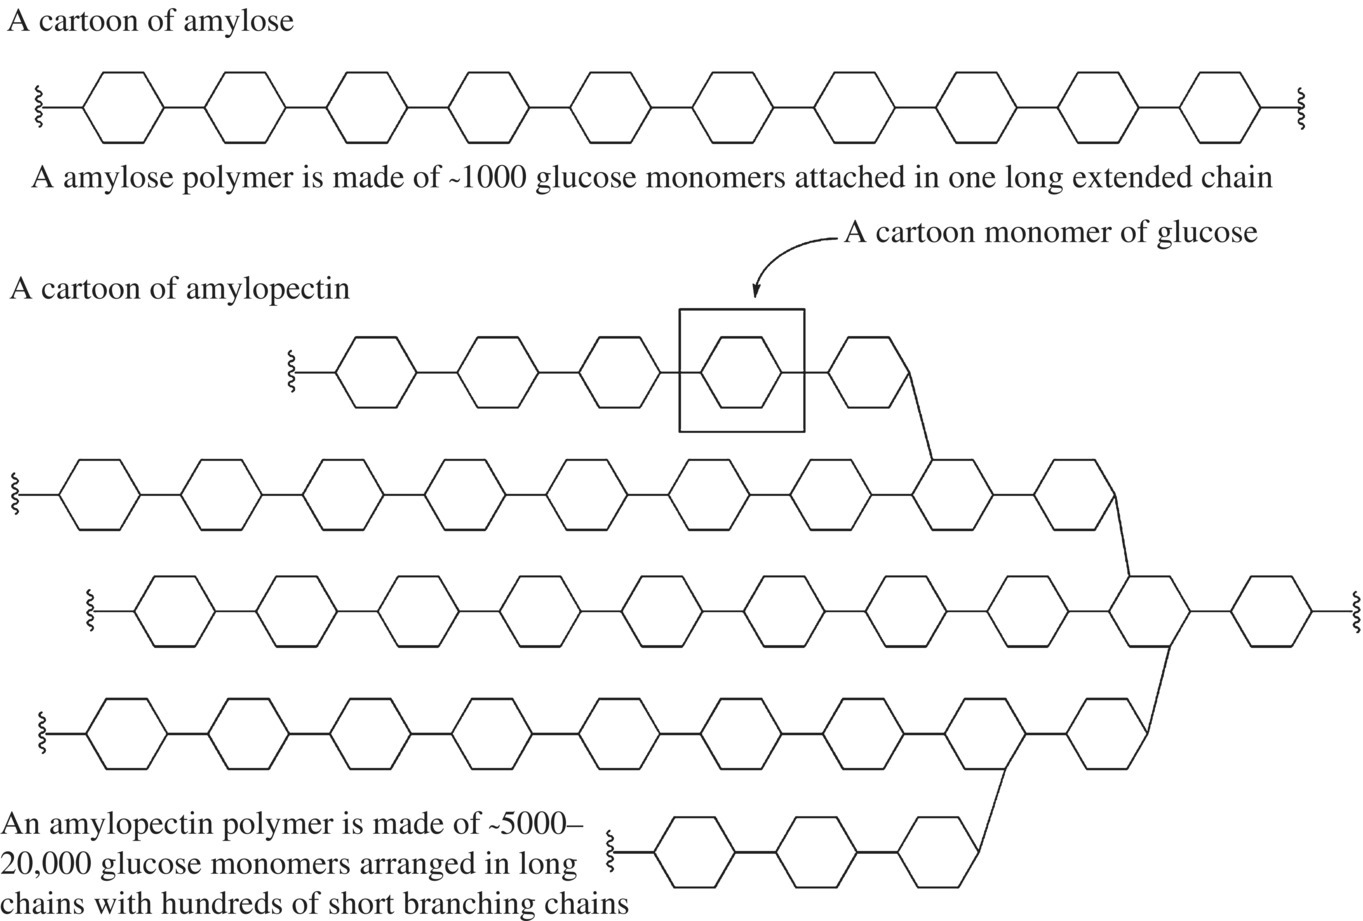
Figure 10.3 Starches of flour. Amylose and amylopectin are both polymers of glucose monomers. The branched amylopectin has two types of glycosidic bonds and provides many “ends” for the storage and quick release of glucose by digestive enzymes.
A starch granule in flour, which contains many individual molecules of amylose and amylopectin that make up 98–99% of the total molecular components, has a size of 2–40 µm and consists of 10–20% amylose and 80–90% amylopectin. Amylose has a more linear three-dimensional structure, while the 1 → 6 glycosidic links in an amylopectin molecule result in a branched structure that kind of looks like a bristled brush. The different polysaccharide molecules interact loosely via intermolecular interactions with themselves, with one another, and with any small amount of protein that is present within the flour. However, because of the differences in three-dimensional structure, amylose molecules pack more tightly against one another and any interacting protein molecules than amylopectin. Thus, amylose molecules and any interacting proteins that are present in the starch granule are more resistant to degradation by enzymes, since the enzymes have a difficult time accessing the molecules to break them down (Box 10.1).
There are two additional classes of proteins that make up approximately 75% of the total protein content of a wheat grain that are key to the structure of the starch granule and the behavior of flour in cooking and baking. These proteins are the water-insoluble, structural proteins known as gliadin and glutenin. You may recognize the name similarity to “gluten,” the term that is associated with products made from wheat-based flours. In the following section, you will learn that gluten is not a protein but is formed when the two classes of proteins, the gliadins and glutenins, interact with each other (Fig. 10.4).

Figure 10.4 The muscle of flour. Two of the key proteins (not the only proteins) in flour, glutenin and gliadin, combine to form gluten, called the muscle of flour.
10.4 WHEAT PROTEINS AND GLUTEN FORMATION
How significant is the impact of gliadin and glutenin proteins in baked goods? Huge! The behavior of these proteins can lead to a flaky, tender, or dense, chewy pie crust. Interactions of the proteins can result in a loaf of bread with a tender and light crumb or a dense, heavy, chewy texture. If you are a baker, it is very useful to have some knowledge of the structure and behavior of these proteins so that you can treat them appropriately for the baked result that you desire.
The gliadins are proposed to be small, tightly coiled proteins that fold in a compact, spherical three-dimensional structure. Each gliadin protein molecule can fold and is stable in a monomeric form due to the presence of internal (i.e., within the same molecule) intermolecular interactions such as hydrogen bonds and electrostatic interactions (aka ionic interactions). A single variety of wheat may have over 40 different types of proteins that are classified as “gliadins” that have small differences in sequence and structure.
Although glutenin proteins also have coiled, helical structural components, the structures are much less tightly packed and individual glutenin molecules interact with other glutenin protein molecules to form much larger protein aggregate complexes. These complexes have some very distinctive structural and protein sequence features that contribute to their physical properties and behavior. Like what? The complexes have a large center section (called a domain) containing 440–680 amino acids that is formed from short, repeating amino acid sequences with a high relative proportion of the uncharged side chains of amino acids, glutamine and proline (abbreviated Q and P), and a low relative proportion of negative charged amino acids (abbreviated D and E). See Figure 10.5 to analyze the high quantity of Q and P versus D and E amino acids in the amino acid sequence for glutenin [1].
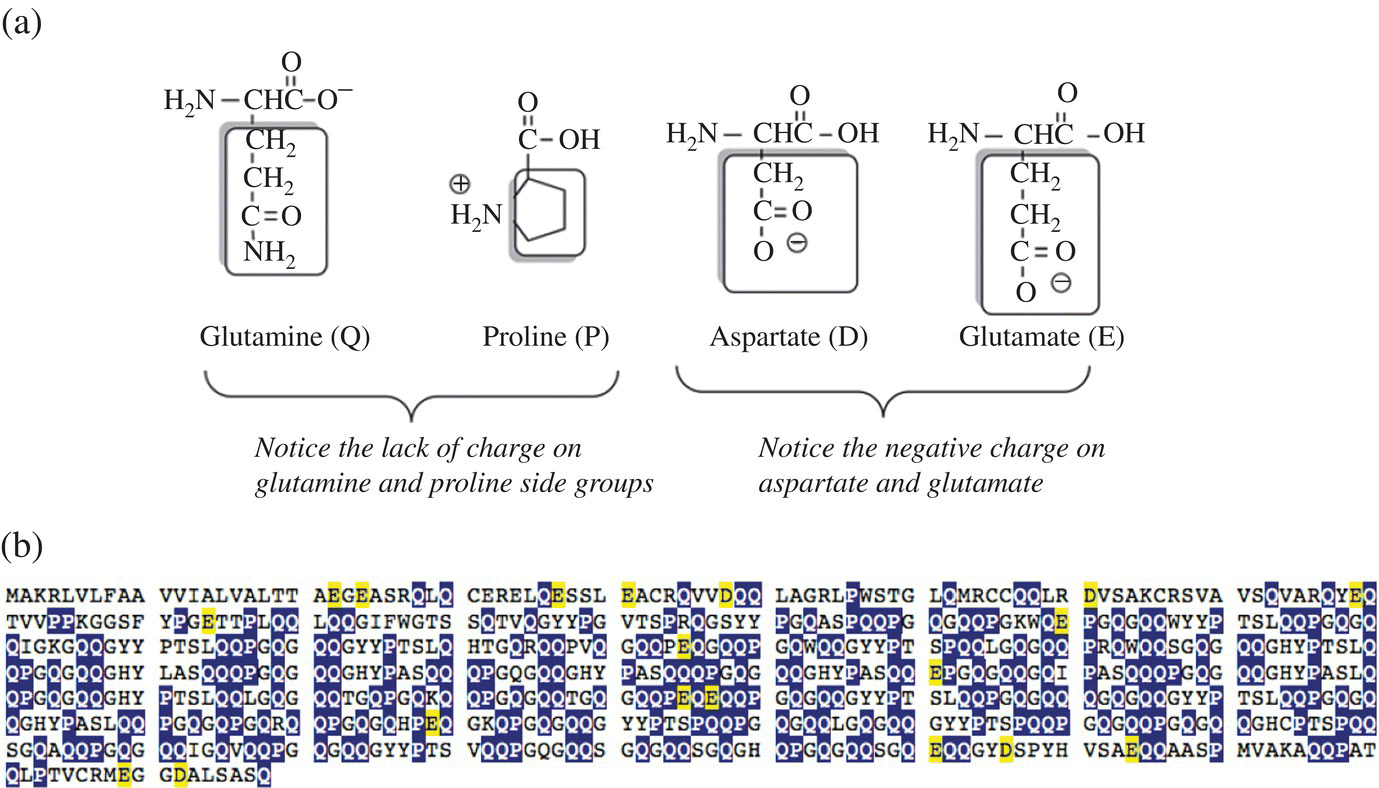
Figure 10.5 The nature of glutenin. (a) The amino acid structures of glutamine and proline possessing noncharged side chains (the nitrogen on proline is tied up with the peptide backbone in a protein) and the acidic, negative charged amino acids of aspartic acid and glutamic acid. (b) The protein sequence in single letter amino acid abbreviations for glutenin. Notice the high proportion of Q and P (highlighted in dark shading) and the low abundance of charged D and E (lightly shaded).
The glutamine residues have two important roles. They act as an important nitrogen source for a germinating grain of wheat, and, structurally, the amide side chain of glutamine (R NHR′) allows for formation of hydrogen bonds between different glutenin molecules and between glutenin and water (Fig. 10.6). However, even though glutenin can hydrogen-bond with water, the glutenins remain insoluble due to the low relative proportion of charged amino acids within this center domain of the protein complex.
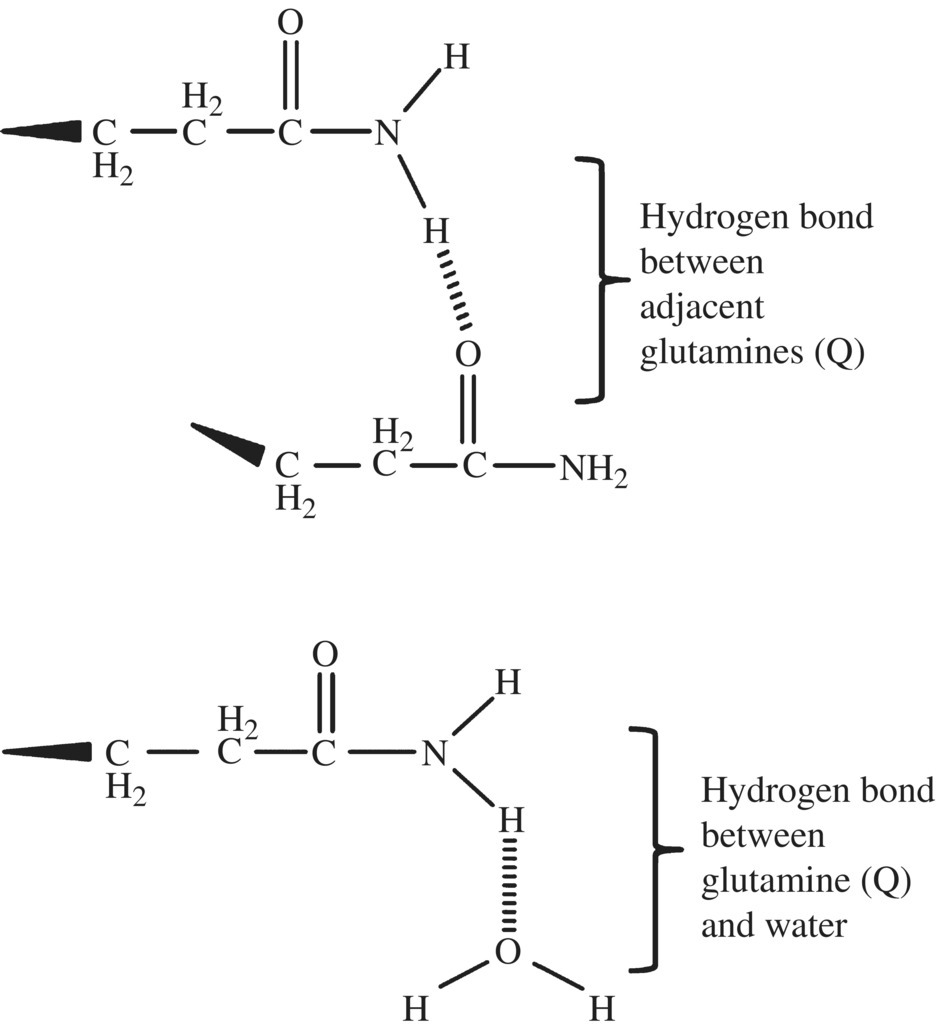
Figure 10.6 Glutamine of glutenin. The amine side group of glutamine can hydrogen-bond with another glutamine forming cross-links between strands, within strands and with water.
Are there any other structural domains within the glutenin complex that impact protein behavior? Yes, the glutenin central domain is surrounded by N- and C-terminal domains that contain a high proportion of the amino acid, cysteine (Fig. 10.7). Remember cysteine? It has a sulfur-containing side chain and readily forms strong, covalent, disulfide bonds with other cysteine residues in oxidizing environments (Fig. 10.8).
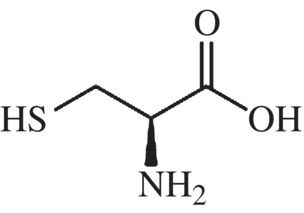
Figure 10.7 Cysteine.
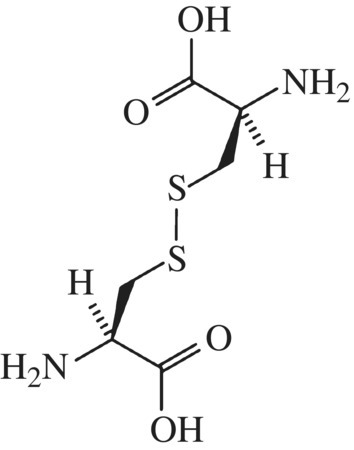
Figure 10.8 Cysteine disulfide. Two cysteine amino acids can bond through the S atoms. In bread this cross-links proteins making them more stable and mechanically rigid.
When you have dry flour or a “just-combined” flour/water mixture, the gliadin molecules and glutenin protein complexes do not significantly interact with one another, starch molecules or water molecules; they have a random and disorganized arrangement. However, once a flour/water mixture begins to be worked, through stirring, mixing or kneading, the gliadins and glutenin complexes begin to interact with one another via intermolecular interactions. How and why does this happen? Well, as you work with the dough, the gliadin and glutenin proteins are stretched out, literally. They no longer are balled up in a spherical structure because the mechanical action of stirring or mixing extends and stretches the proteins out, kind of like a slinky. As they are stretched, the proteins have more opportunity and space to interact with other protein molecules; correspondingly they align against one another in orderly, stretched, interacting protein sheets that have a new name: gluten. Thus, gluten is the complex network of interacting gliadin and glutenin proteins that has properties distinct from either of the individual proteins including strength, elasticity, and stretchiness. Gluten is of the utmost importance in baked goods. To make a good bread, you desire gluten formation. In a pie crust, you want to avoid the formation of gluten. Let’s apply and expand our basic understanding of gluten to something that you can really chew on: bread.
10.5 YEAST-RAISED BREAD
The ingredients and steps of baking a fresh loaf of bread are pretty simple: mix flour, water, yeast, and salt; knead the dough; let the dough rise; and bake. Yet, anyone who has made bread can attest that a perfect loaf is not easily attained. The bread may be dense, flavorless, or have a pale and soft exterior. In addition, there is some variation in ingredients and the specific instructions associated with a basic white bread. Your mother might mix yeast with water first and allow the mixture to sit (or proof) for a few minutes, while your uncle might first combine yeast with the flour, then add water to the yeast/flour mixture. Does it really matter? Yes! Let’s begin our discussion about bread by learning more about the organism that is key to it all: yeast.
10.5.1 Yeast
Humans have been eating raised breads for about 6000 years; however, we only began to understand the process of leavening through the work of Louis Pasteur in the 1850s. Now, we know that the CO2 and alcohol that are generated during yeast fermentation are key components to the taste, aroma, and texture of a bread. You have heard about yeast, metabolism, and fermentation in Chapter 4, but let’s review some of the basics again.
Yeast is a living organism, a fungus that is commonly used in baking and in the brewing of alcoholic beverages. Its Latin name, Saccharomyces cerevisiae, means brewer’s sugar. In bread dough, yeast consume starch and sugar that is present in flour and convert it to CO2 and alcohol through the process of fermentation. These yeast products give a baked loaf of bread its texture, flavor, and aroma. How do the yeast accomplish this? Can yeast just begin “chewing” up the starches and producing CO2 immediately when added to flour? Not exactly. Yeast actually can’t break down starch in its gigantic, polysaccharide form; it is too compact and tightly packed for the yeast enzymes to access it for metabolism. Thus, although there is a lot of potential, because the glucose molecules are stored in the form of the starch polysaccharide, the yeast can’t initially use it to support its own growth and reproduction. Fortunately, you might recall that flour contains soluble enzymes called amylases. When activated in the presence of water, the amylases carry out hydrolysis reactions, and use water to break the starch down into smaller molecular compounds: maltose, glucose, and other dextrins (smaller glucose polysaccharides) (Fig. 10.9). These smaller sugars can serve as a food source for the fermenting yeast. Isn’t it great that flour contains precisely the enzymes that yeast need to thrive?
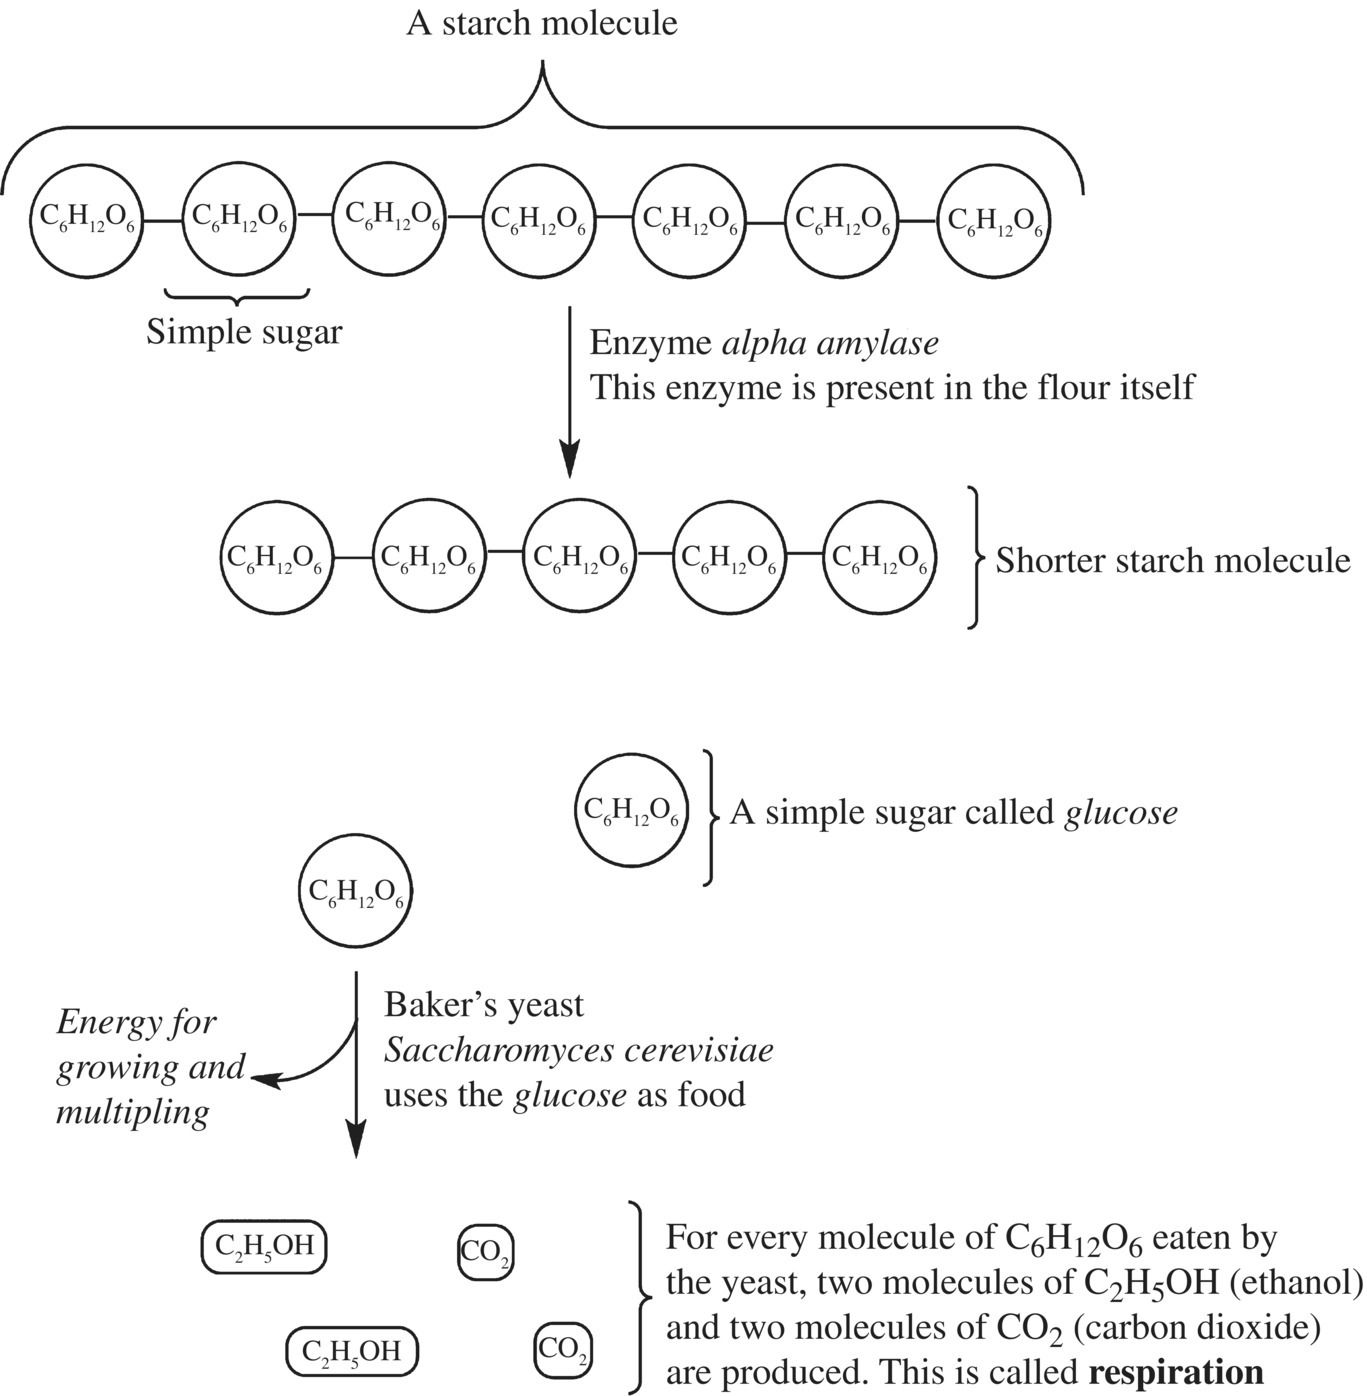
Figure 10.9 Yeast metabolism. Yeast utilize its enzyme, amylase, to break down complex starches to the simple sugar, glucose. Glucose and not starch is then converted to carbon dioxide and other compounds via respiration.
Once yeast have a useable food source, they begin to carry out glycolysis, an anaerobic (i.e., no oxygen is required) metabolic process that is essential for the yeast organism’s growth and reproduction. In Chapter 4, you learned about the importance of glycolysis to all organisms, as it is the primary metabolic pathway whereby organisms can generate the energy source molecule, ATP. After an organism carries out glycolysis, however, it needs to do something with the products of the pathway, by breaking them down further or by repurposing them into molecules that are essential for the function of the organism. Yeasts have the enzymes necessary to accomplish both of these tasks in the process called fermentation (Fig. 10.10). In fermentation, yeast break down the pyruvate generated by glycolysis via two reduction reactions, converting it first to acetaldehyde and carbon dioxide and then ethanol. NADH is used as the reducing agent and is converted to NAD+. Thus through fermentation, the yeast generates ethanol and carbon dioxide gas and regenerates the NAD+ that is necessary to allow glycolysis to continue. What does this have to do with bread? Pretty much everything! The ethanol and carbon dioxide products are key to a great loaf of bread, as you will find out later in this chapter. But before we move on, we have a couple of other yeasty things to touch upon that may affect how you approach your next loaf of homemade bread: the different types of yeast and the order of addition of the yeast.

Figure 10.10 Ethanol production in yeast. Continued respiration (glucose metabolism to pyruvate and carbon dioxide) requires a regeneration of NAD+ from NADH. Yeast use alcohol dehydrogenase for this step. The by-product (from the yeast’s perspective) is ethanol.
10.5.2 Different Types of Yeast
The three most common forms of baker’s yeast (Fig. 10.11) that are used in the home kitchen (and are readily available on the grocery store shelf) are active dry, rapid-rise, and instant yeast. All these forms are dried versions; this is useful for the home baker, as they have a refrigerator shelf life of 1–2 years. Commercial bakers tend to use a fresh or wet yeast; it is more dependable but has a shelf life of only about 2 weeks, making it less ideal for the home baker. However, in order to become active, the yeast needs heat and moisture, which occurs through the addition of warm water or milk, as well as the baking process (for heat). The differences between the three types center on particle size, treatment in recipes, and the type of rise provided by the yeast.
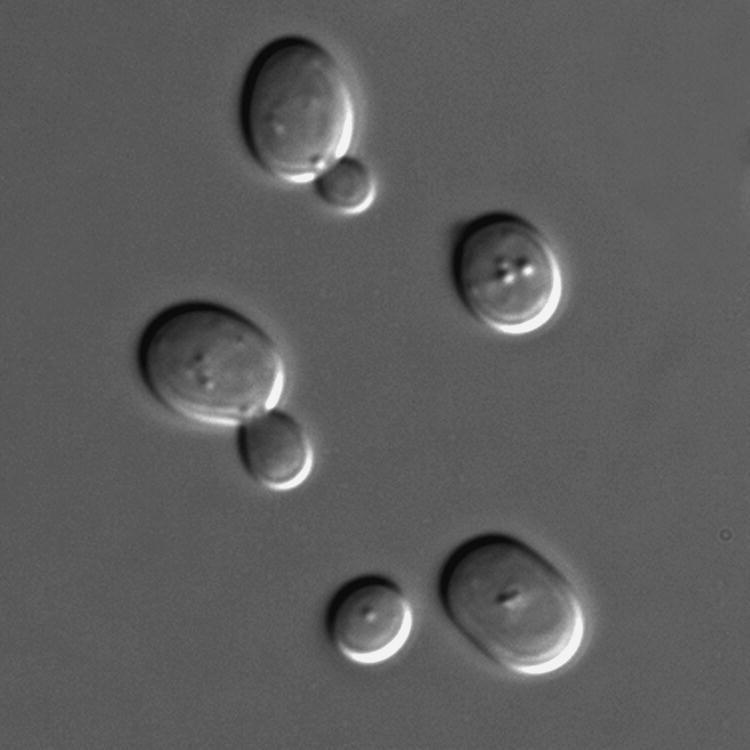
Figure 10.11 Baker’s yeast. Saccharomyces cerevisiae (baker’s yeast) in DIC microscopy. “S. cerevisiae under DIC microscopy” by Masur.
Active dry yeast is the yeast that most people think of when they picture “yeast” in their heads. It is dry and granular, having the consistency of cornmeal. Active dry yeast begins as a wet, compressed cake of yeast that is pressed through screens to make strands of yeast. The strands are cut into pellets, dried (via exposure to high temperatures), and ground into granules. In order to use it, you dissolve it in a tablespoon of warm water and add it to the rest of the ingredients. This yeast will remain active (i.e., continue producing CO2 and ethanol) for two rises, so these breads require a rise immediately after kneading and a second rise in the bread pan.
Rapid rise yeast is dried at lower temperatures and is milled into smaller particles than the active dry version. Because of this, it doesn’t need to be dissolved in water and can be added directly to the dry ingredients. Typically, rapid-rise yeast has other additives (like enzymes) that also help to make the dough rise faster. With this yeast, you only need to do one rise. In other words, right after kneading, you can shape the dough into the bread pan, let it rise, and toss it into the oven for baking. However, what you save in time, you lose in flavor and structure. Your final loaf will be fairly bland and commercial tasting. If substituted for either the active dry or the instant yeasts, you will see a difference in the final bread product in the rise (or fall) of the bread or in its taste/texture.
Instant yeast is also known as bread machine yeast. It is milled into finer particles than active dry yeast, so it doesn’t need to be dissolved in water. However, unlike rapid rise, it will give you two separate rises and can be used interchangeably with active dry yeast.
10.5.3 First Steps: Yeast Proofing
Most home bakers use the active dry version of yeast, thus “proofing” the yeast by combining with a warm liquid, along with a little sugar or honey is a necessary step for a good rise (Fig. 10.12). Following a resting period of 5–10 min, you should see a foam or bubbly liquid, as the yeast begin to ferment the added sugar if the yeast are active. The added sugar, although not absolutely necessary, jump-starts the activation of the yeast. If there are no bubbles or foam, something has gone wrong—the yeast may have expired, the liquid may be too cool to awaken the yeast, or too hot and it may have killed them. The optimal temperature for the liquid (which is typically water, milk or some combination of the two) during proofing is 105–110°F. For rapid-rise yeast that is added to the flour first, you will want your liquid to be at a slightly higher temperature (120–130°F/49–54°C). Once the yeast are activated, you are ready to add the liquid to the other ingredients (typically flour and salt), which is where the yeast and the molecular components of the flour come together to yield a great loaf of bread.
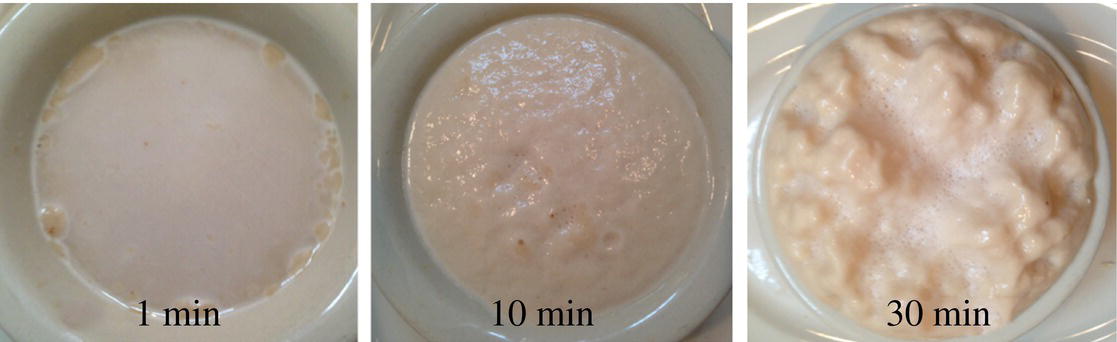
Figure 10.12 Proofing yeast. Baker’s yeast incubating in sugar and water.
10.5.4 Next Steps: Mixing, Kneading, and Gluten Formation
Mixing may seem like an unimportant afterthought relative to the yeast and kneading processes. However, there is more to mixing than simply combining the physical ingredients. When water is added to flour, the water is absorbed by the starch granule. What does this mean? The glutenin and gliadin proteins on the exterior of the starch granules generate intermolecular interactions with the water molecules (and vice versa), thus the proteins become hydrated. Remember that the proteins were already involved in intermolecular interactions with themselves to create their three-dimensional, compact, spherical structures. By involving water in the intermolecular interactions, the overall three-dimensional structure of the proteins is loosened and less compact. This loosening allows for new intermolecular interactions to form with neighboring protein molecules. As these new interactions are created, so are the first strands of gluten. However, that is not all! As the proteins become hydrated, so do the starch granules that the proteins are a part of. Thus, the individual starch granules that were separate entities in dry flour become sticky and bind together; you have experienced this with your eyes and hands if you have ever mixed a bread dough. And that is still not all! As water gets absorbed by each starch granule, the amylase enzymes now have the water needed to break down starch into smaller molecules, specifically maltose and glucose. The yeasts that were activated during proofing can use these sugars as a food source and begin to carry out the processes of glycolysis and fermentation. Wow! Who would have thought that all of this is happening during the mixing of a bread dough: hydration, enzyme activation, yeast fermentation, and the beginning stages of gluten formation? However, this is only the beginning of the process. Let’s bring together some concepts as we learn more about kneading.
Have you ever tasted bread that has been kneaded for one minute and one that has been kneaded for 10 min? Not only is there a difference in the final product but also in how the dough feels to the touch. What happens at a molecular level during kneading that promotes the formation of gluten, which impacts dough texture, rising, baking, and taste? As mentioned previously, during mixing, the starch granules bind together and the proteins change structure as they begin to have intermolecular interactions with water and each other.
During kneading, the “bound” starch granules are moved apart, which forces the proteins to unwind and become even more linear (while still kinked and coiled), allowing for interactions with other protein molecules in different and more ways via both intermolecular interactions (like hydrogen bonds) and covalent bonds (like disulfide bonds; Fig. 10.13). As the dough continues to be kneaded, these interactions are broken and reform in new and different ways, which eventually results in glutenin protein molecules that are interacting with one another end to end, forming long, coiled protein chains that might be a few hundred glutenin molecules in length, kind of like a slinky (Fig. 10.14). This arrangement leads to a nice elastic dough, so it stretches but it doesn’t break unless you stretch it apart really far. As the dough is stretched, the proteins uncoil and lengthen; when you release the stretch, the dough bounces back to its original shape as the proteins recoil and reform the disulfide and hydrogen bonding interactions with the neighboring glutenin proteins. You can recognize when this happens during kneading; the dough becomes less sticky, smoother, and more elastic, yet it remains firm.
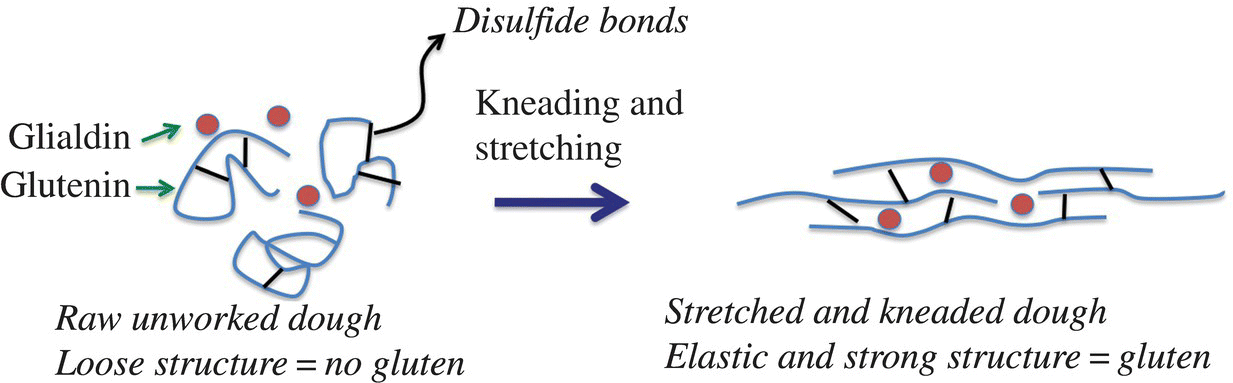
Figure 10.13 Gluten forms during kneading dough. Stretching and kneading flour dough lengthens the proteins where they can then cross-link with each other forming long, stronger gluten complexes.

Figure 10.14 Molecular details of gluten formation. The cross-linking of gluten comes from the disulfide bond between strands of glutenin. The high glutamine (Q) content supports the helix by forming many hydrogen bonds.
You might be thinking, what are the gliadin proteins doing as the glutenin proteins are stretching out into these long coils? The gliadins contribute to a dough property called plasticity. Remember that the gliadins are typically compact in their native structural state, so they actually interfere with or limit the intermolecular interactions between glutenins. You may be thinking, but doesn’t this reduce the strength of the gluten network? Yes, it does. If the network is too tight (i.e., the proteins are held too strongly or tightly together via intermolecular interactions), then the dough wouldn’t stretch, it would not deform under the pressure of your kneading hand, and it wouldn’t mold into a ball for rising. Thus, the gliadins help to prevent a gluten network that is too strong.
We have a couple of questions left to address about gluten. What additional factors (besides kneading time) affect the quality of the gluten network? Can you break a gluten network, once it has been created? What happens when the gluten network becomes too strong?
10.6 CONTROL OF GLUTEN FORMATION
There are multitudes of ways to control gluten formation that do not require an excessive amount of time or money. A relatively easy way to control gluten formation is by adjusting the type of flour that you use for a particular type of baked good. Since bread flour has a higher protein (i.e., more gliadin and glutenin) content than all-purpose flour, you will create a stronger gluten network with the same amount of kneading and ingredients in a dough made from bread flour versus all-purpose flour. Secondly, the presence of oxidizing agents or air enhances gluten formation. This may seem a bit unusual, but there is a scientific basis for this statement. Because disulfide bonds are more likely to form in an oxidizing environment and the formation of gluten involves the creation of disulfide bonds, you will have a stronger gluten network if more air (i.e., oxygen gas) is incorporated into the dough. While on the subject of disulfide bonds, aged flour also makes a better yeast-raised bread than fresh flour, as the thiol groups are more oxidized in aged flour (again, aged flour has been exposed to oxygen for a longer period of time). The disulfide bridges are more likely to form, leading to a stronger gluten network. The fourth factor has already been addressed: the kneading time. The more kneading, the better the gluten network to a certain point. If you are hand kneading, your hands and arms will tire long before you have reached the point of kneading too long. However, overkneading can happen, particularly if you are letting an electric mixer do the work for you. When dough is overkneaded, the gluten network is so tight, it feels very dense and tough, it tears apart when it is stretched, and is even difficult to knead because it doesn’t flatten and fold easily.
If you are using unbleached flour, the dough color might even change when you reach the point of overkneading, as the excessive oxidation causes the flour to bleach. One thing that you can do to prevent overkneading and reduce your kneading time is a technique that was developed by a French breadmaking authority named Raymond Calvel in the 1970s. In this technique, called autolysis, the flour and water are first mixed and allowed to rest before kneading. As the mixture rests, the protease enzymes in the flour begin to break down/cleave the glutenin and gliadin proteins into smaller pieces. These smaller proteins are more easily straightened and aligned during the kneading process, so an organized gluten network is created more quickly. The autolyzed bread dough requires a much shorter kneading time.
Clearly, gluten formation is important. The question is, why is it important? The formation of a strong, elastic gluten network is key to the leavening or rising step of bread baking; this is where the fermenting efforts of the yeast and your kneading efforts come together.
10.7 THE RISING BREAD
Any bread baker visually knows what happens when bread rises; it gets bigger, often doubling in size after sitting in a warm location for about 60–90 minutes. You already know that it has something to do with the yeast, but what exactly is happening at the molecular level? During the rise, the yeast really go to work, reacting with the sugars produced from the breakdown of starch (carried out by the amylase enzymes in the flour), releasing carbon dioxide (CO2) and ethyl alcohol. Both of these molecules (and alcohol byproducts) are really important to bread; the CO2 is particularly key to the rising phase. Why? Remember the CO2 is a gas. Gases can bubble out of a solution, similar to what you see in a carbonated beverage. However, a gas can also be trapped inside a mixture. If your bread dough has a strong gluten network, the sheets of gluten become blown up with the CO2 gas like a balloon. As the gas molecules are captured, the dough rises. However, in order for the CO2 to be captured, the gluten sheets need to be robust enough to not break as they expand and plentiful enough to capture the CO2 gas molecules as very small bubbles. If the gluten sheets are weak, the CO2 will burst out of the gluten network, rather than being captured, and the dough will not rise properly. If the CO2 is captured in large, rather than small bubbles, you have gaping, large holes in the final loaf. Thus, formation of a strong, elastic, and plastic gluten network actually allows a bread to rise. With production of a greater amount of and smaller gas bubbles, you will have a tenderer product because of the interruption in the gluten network with air pockets.
Bread rising typically happens in a warm space. Why is there a temperature dependence? If the yeast are not happily duplicating, growing, and fermenting, you will have less CO2 production over a period of time. This is why refrigerated bread dough requires a rising time of 8–12 h; it just takes longer for the yeast to produce the same amount of CO2 at 39°F/4°C relative to 73°F/23°C. The optimal temperature for bread rising is 27°C (81°F). Yeast actually reproduces more rapidly at 95°F/35°C, but the yeast, which may give your bread a less desirable bitter flavor, releases bitter metabolites (Box 10.2).
Some bakers do not disturb a rising bread dough, while others incorporate a turning step into the dough rise. Turning involves delicately folding the dough over several times at one or multiple points during the rise. Turning the dough stretches it and builds strength to the gluten network, as it helps to align any misaligned gluten sheets. In addition, turning removes some CO2 from the dough, an excessive amount of which inhibits yeast activity, to ensure the maximum rise and production of flavor molecules. What are these flavor molecules? You know that one product of fermentation is ethanol, but as the yeast proliferate, they also synthesize proteins, aldehydes, ketones, diacetyl, and other aromatics that contribute to that scent and flavors of a raised bread dough and final product. We will discuss the specifics of the flavor molecules later in the chapter.
When is a bread raised enough? Most cookbooks tell the baker bread has raised enough “when it is doubled” but it is sometimes hard to know when enough is enough. Rising is complete when you can poke your finger into the dough and the hole doesn’t immediately close (Fig. 10.15). At this point, the gluten has been stretched to the limit of its elasticity. If you try to raise the bread any more, the gluten network will break and the bread will deflate, releasing all of the captured CO2. Rising time for a typical dough that sits in front of a sunny, draft-free window is 60–90 min.
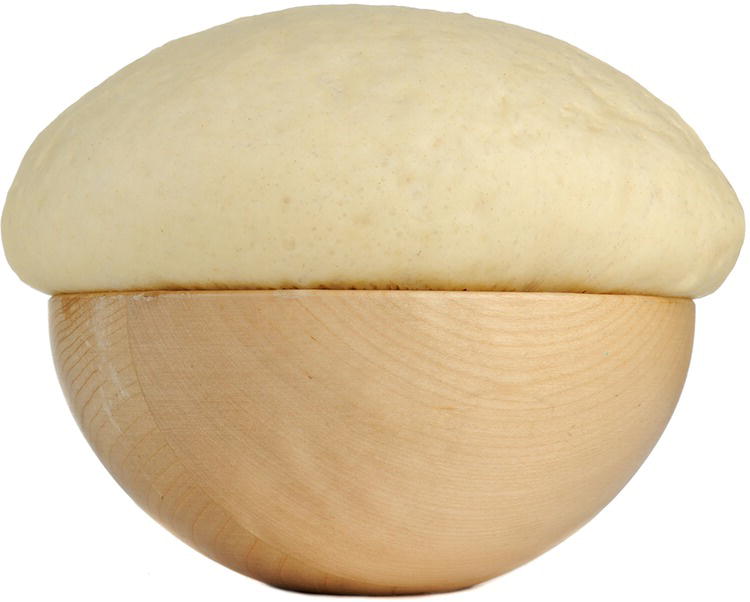
Figure 10.15 Rising bread dough. Dough rising with the production of CO2 gas.
10.8 THE PUNCH AND SECOND RISE
In many bread recipes, after the first rise, you knock down or punch the dough and let it rise again. Is this a step needed to relieve aggression or does it have some purpose? To start, the punch is not actually a punch but more of a push down, also known as degassing. As the degassing term implies, when pressure is put onto a raised dough, some of the CO2 bubbles are expelled from the dough and those that remain break into smaller gas bubbles. These smaller bubbles can be blown up again during a second rise, giving a final bread product a fine, light texture. The yeast cells, the sugars, and the products of fermentation are also redistributed throughout the dough during the punch, which leads to better growth during the second rise. Interestingly, the temperature of the dough is also equalized during the punch. The inside of a raised dough is warmer than the outside because of the activity of the yeast; in equalizing the temperature the second rise is more evenly distributed in a punched dough relative to one that is not punched. Finally, by punching down the dough, the gluten network has a chance to relax before it is stretched again, so the dough will be easier to shape. Thus, there are scientific and culinary reasons why you need to punch down the dough; although it seems like anyone could do it, there is some technique associated with the process (Fig. 10.16).
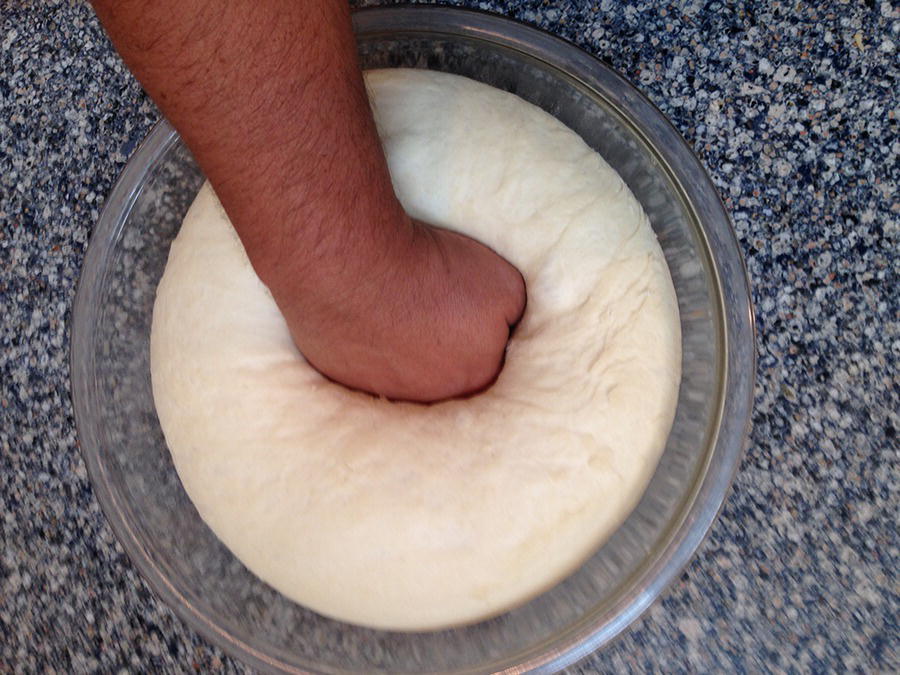
Figure 10.16 Punching down dough.
For a final bread product with a fine crumb (like a sandwich bread), first, push your fist quickly but gently into the center of the dough. Then, pull the edges of the dough to the center. Take the dough out of the bowl, pat it, turn it over, and do two or three kneadings to release any additional air bubbles. For a coarser crumb with better chew, turn the dough (gently folding it over) to reactivate and redistribute the yeast and sugars without pressing out as much air.
Once a dough has been punched accordingly, it is shaped into the form of the final loaves and then left to sit and rise in a warm place. This second rise is sometimes called “finishing” or “appret” as it is the final opportunity for the yeast to do their work before they succumb to the heat of the oven during baking. Some bakers slit the tops of the shaped dough before or after the second rise, which ensures that the gluten network is not stretched to its limits during baking, reducing the presence of unattractive tears in the crust (Fig. 10.17).
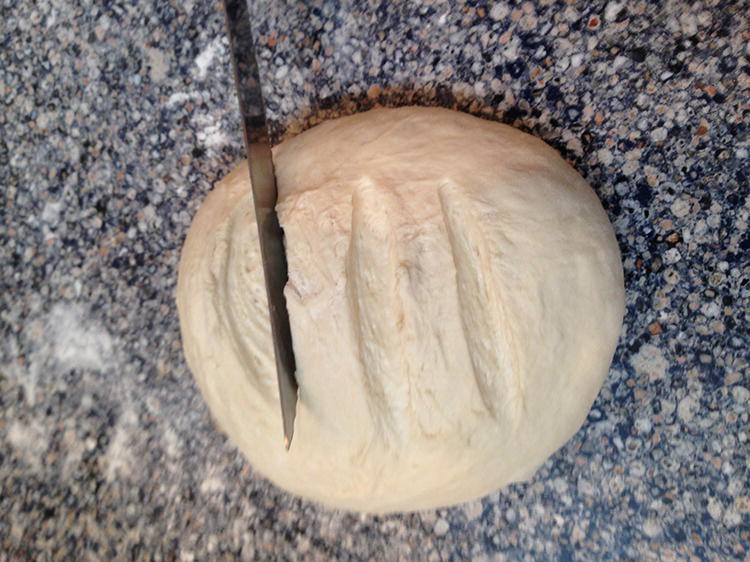
Figure 10.17 Appret. Slightly slicing the surface of a growing dough to limit tearing by allowing a “pleat” to stretch.
10.9 BAKING
You may view the baking process as simply “cooking” the dough, but there is so much more to it!
First, let’s talk about why the bread expands (even more) during baking. Remember that the raised dough is like a gluten balloon filled with yeast-generated carbon dioxide and air that was introduced into the dough during mixing and kneading (Fig. 10.18). Your experiences (in the kitchen and in life) tell you that gases expand when heated: a balloon left in a warm car explodes, the air pressure in your car tires decreases in the winter. The scientific law that tells us that gases expand when heated is known as the ideal gas law: PV = nRT.
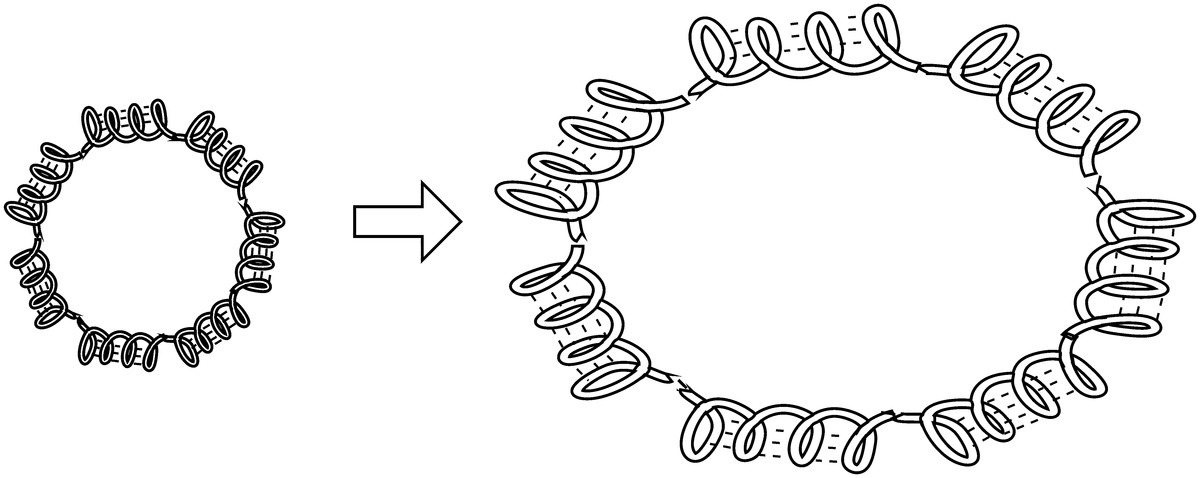
Figure 10.18 Expanding gases are held in place by stretched gluten protein cages.
The letters in the ideal gas law stand for: pressure (P), volume (V), amount in moles (n), a gas constant (R, which doesn’t change in value), and temperature (T). The behavior of most gases is consistent with this equation, including the gases present in rising dough. Thus, if the amount of gas that you have is the same in the prebaked and the baking dough (i.e., n is constant), then the increase in temperature that occurs during baking causes an increase in the overall value on the right-hand side of the equation. If the right-hand side of the equation increases in value, then the terms on the left-hand side the equation must, together, account for this temperature increase. The gas pressure inside the baking loaf does increase but so does the volume of the bread. How does this happen? As the gas bubbles expand, the dough, which is still soft during the initial stages of baking, is pushed aside and visibly expands. If the starch and gluten networks are too rigid, the bread doesn’t expand because the gluten network cannot move.
When does the bread become more rigid? In other words, what happens to make the bread fully “cooked”? During baking, the starch granules in the bread’s interior absorb water, swell, and create a permanent solid structure that is a spongy network of starch and protein filled with tiny air pockets called alveoli. Bakers use the term “crumb” to describe the characteristics of this network. In contrast, the outer surface (also known as the crust) develops a dry, dense texture. Clearly, we have different things going on in the crumb versus the crust; let’s look at what is happening in each component.
As the dough heats, it becomes more fluid due to the increased movement of the molecules, the gas bubbles expand, the gluten stretches, and the dough rises. In addition to the expansion of gas bubbles, at about 60°C/140°F, more gas is generated in the expanding bread due to vaporization of the yeast-produced ethanol and water; this expands the dough by as much as half of the initial dough volume. This expansion stops when the crust becomes too firm and stiff to be pushed around anymore, at about 90°C/194°F. At 100°C/212°F, the water in the bread’s interior and on the exterior fully evaporates. In the interior, the generated steam is redistributed into the bread because it cannot escape. However, on the bread’s surface, the water fully evaporates, resulting in a drying and hardening of the bread’s crust. As the temperature continues to rise in the bread’s interior to about 150–180°C/300–350°F, the starch begins to “gel” into a more solid state due to the absorption of water vapor and resulting swelling of the starch granule. Moreover, the gluten proteins, which are now denatured due to high temperatures, form even stronger intermolecular and disulfide bond interactions with one another. In essence then, the starch and protein network becomes much tighter and stronger and the gas bubbles have no more space for expansion. Pressure builds as the gas bubbles try to expand until they rupture, turning the structure of the loaf from a network of separate gas bubbles into an open, porous network. During the end phases of baking, the starch continues to form an even more solid, gel-like structure. However, even after baking and during cooling, the starch granules continue to become more firm, making the bread easier to slice when cool than when piping hot.
What about the crust? The crust’s color and aromas are a result of Maillard reactions. You have heard about Maillard reactions before. These reactions, discovered by Louis Camille Maillard in 1911, occur between sugars and amino acids (Fig. 10.19). Because there are 20 different amino acids and hundreds of different sugars, the Maillard reactions are best described as a group of reactions rather than a single one. The first step of any Maillard reaction occurs between the carbonyl group of a sugar molecule and an amino group, resulting in the formation of a new covalent double bond between the original molecules and a molecule of water. The reactive amino group may be part of a free amino acid or an amino acid that is still part of a protein chain.
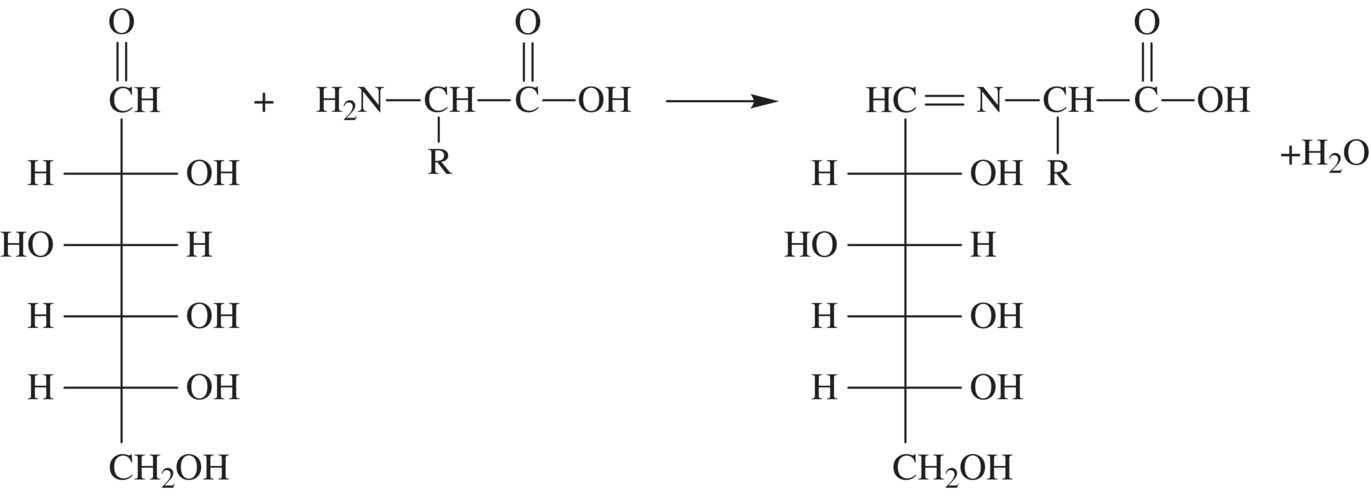
Figure 10.19 Maillard reaction browning bread crusts. Sugar, shown on the right in the straight chain form, will condense with the nitrogen of an amino acid releasing water starting the first step of the browning reaction.
What types of Maillard reactions occur in bread and what do they do? Well, they certainly contribute to the brown color of a bread crust, but they also contribute substantially to the flavor and aroma of the bread. You already know some of this chemistry, but let’s look at a few of the hundreds of Maillard reaction products that are generated in the dough, crust, and crumb of a great loaf of bread.
In an early scientific study on the aroma compounds of wheat bread, 372 compounds were identified in the crust and 86 in the crumb of a wheat-based white bread. In the crumb, non-Maillard molecules including aldehydes, alcohols, and ketones predominate, while in the crust, the Maillard products predominate, including pyrazines, pyrroles, and furans. Wow! all of these aromatics (Fig. 10.20), it is no wonder that bread smells so good!
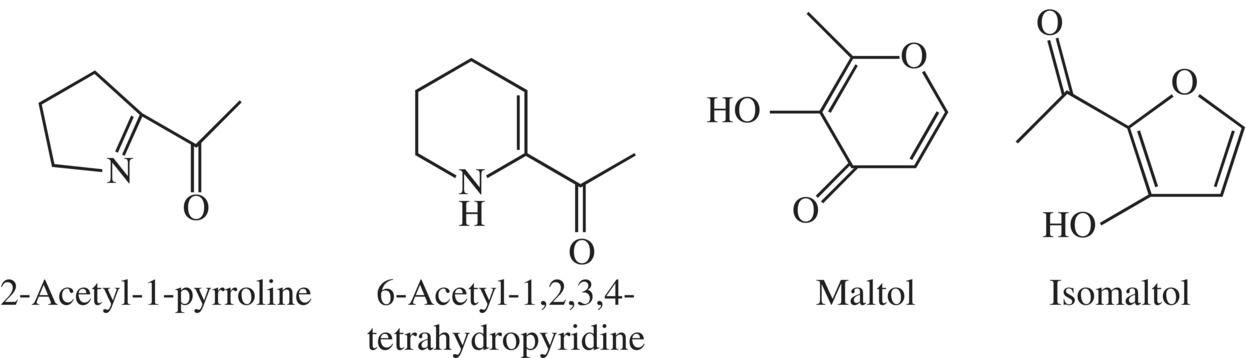
Figure 10.20 Aroma compounds from baked bread.
Two Maillard products associated with bread flavors and aromas are 2-acetylpyrroline (roasty, bread crust-like) and 6-acetyl-1,2,3,4-tetrahydropyridine (roasty, cracker-like flavor), while maltol and isomaltol contribute to the freshness of baked bread.
In short, the aldehyde group (CHO) of the sugar and the amine group of a free amino acid or amino acid that is present within a protein react to form a compound called a Schiff’s base (it has the C N) group. Schiff’s bases are not stable compounds, so this compound rearranges itself to a more stable compound called an Amadori compound. All of the chemistry up to this point is fully reversible and is the same chemistry for all Maillard reactions. What happens next, however, varies widely depending upon the exact conditions of the reaction. The Amadori compound can rearrange, condense with another compound, isomerize, polymerize with another like compound, cyclize, or undergo degradation reactions. It is the products of the Amadori intermediates that give us the extensive array of color, flavor, and aromatic compounds associated with baking or freshly baked bread. However, one of the major pathways produces a compound called a 1,2-eneaminol, followed by 5-hydroxymethyl-2-furaldehyde. From 5-hydroxymethyl-2-furaldehyde, the brown, melanoidin pigments associated with a brown crust form. A more minor pathway produces a 1,3-enediol to eventually produce various alpha-dicarbonyls. A third pathway is called the Strecker degradation, which produces aldehydes (Fig. 10.21).
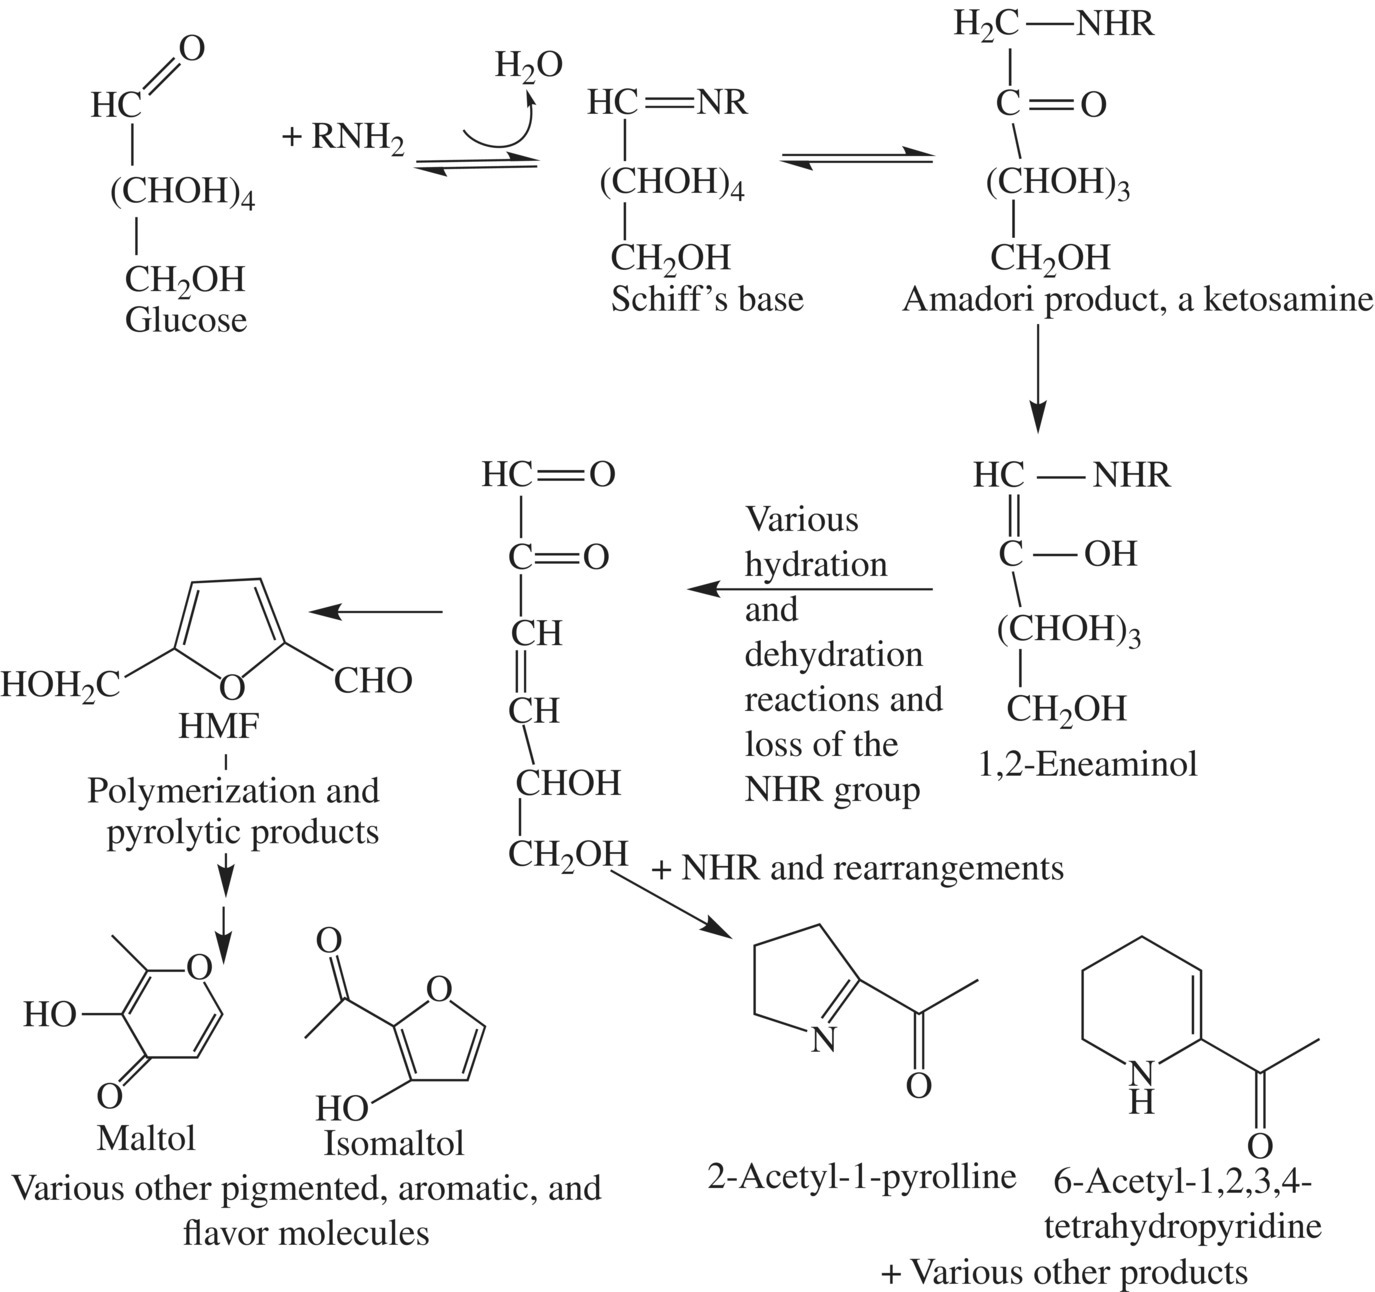
Figure 10.21 The browning reactions forming brown crusts of bread.
In addition to the flavor molecules produced by the Maillard reaction, the products of yeast and bacterial fermentation can also contribute to bread flavor. For example, sourdough and breads derived from “starters” are much more tangy and flavorful than the typical homemade white bread. What is a starter? A starter consists of a small amount of dough that was saved from the last time a loaf of bread was made. The baker adds a little more water and flour to the starter, and then allows the mixture to ferment for a longer period of time (i.e., 2–24 h) before adding the other components of the bread. The increased acidity of a sourdough, due to lactic acid production by bacteria and yeast, along with other distinctive flavor components produced in the dough, give sourdough its tanginess and lack of brown color (because acidity slows the browning reactions). Because of the increased resting period and time, the carbohydrates, fats, starches, and other sugars have more time to break down to produce/yield many more flavor molecules than those generated during the typical (shorter) bread dough preparation and rising.
10.10 OTHER INGREDIENTS IN BREAD
Now that we have talked about the aspects of bread ingredients and baking that are common to most bakers, what about possible variations and how will that affect a finished loaf?
Most bakers add salt and fat during the preparation of the bread dough. In addition to the added flavor, salt modifies the activity of the yeast and strengthens the gluten network. If you add too much salt, the yeast will die. Too little salt and the yeast may multiply more rapidly than normal, giving the final product a strong “yeasty” flavor. The charged nature of the ions in salt (i.e., Na+ and Cl−) allows the ions to interact with and stabilize any charged amino acids that are present within the gliadin and glutenin proteins. This will decrease any possible charge repulsion between individual protein molecules (e.g., two positively charged groups repelling one another), allowing the two salt-bound protein molecules to bond (covalently and via intermolecular interactions) more extensively.
Fats inhibit formation of the gluten network, increase the volume and lightness of a dough, and slow the staling process. Fats like to bind to other fats and other hydrophobic species. The glutenin and gliadin proteins do have hydrophobic components, thus the fat molecules bind to the proteins, preventing them from interacting with one another. However, fat also helps to stabilize the walls surrounding the gas bubbles, preventing them from rupturing, which lead to a lighter, more voluminous bread. If you have ever tried to crunch your way through a 2-day old baguette loaf, you likely know that fat prevents bread staling. What happens when bread stales anyway? Although staling is an issue of water loss, the loss of water is due to a change in the starch. With time, the amylose and amylopectin molecules in a starch begin to associate with one another and thus stop interacting with water. The term used to describe this phenomenon is retrogradation and it occurs in most any starch-based food including potatoes and pastas. During the first phase of staling, which begins to take place within a few hours of baking, amylose molecules begin to associate and crystallize with one another, while in the second stage of staling, amylopectin molecules retrograde. These phenomena result in a more crystalline and solid structure of the starch-based food, and loss of the water molecules that were involved in intermolecular interactions with the starch granule.
Staling can be reversed (in part anyway) by “melting” the crystals through heat and moisture. Fat protects against retrogradation, as it coats the starch granules, preventing the amylose and amylopectin from interacting with one another. By placing your bread in the freezer, you also prevent the crystallization of the starch molecular components and water migration.
Although a small amount of sugar is important in “jump-starting” the yeast, in a dough containing a substantial amount of sugar, the sugar is really problematic for gluten development. Because sugars bind to water, water is unable to form intermolecular interactions within the gluten network, yielding a weakened gluten structure. Thus, a rich dough (containing a high sugar and fat content) are quite fragile and relatively soft. Some bakers overcome this challenge by kneading in the fat and sugar after the gluten network has been established within the dough.
10.11 GLUTEN AND CELIAC DISEASE
Most grocery stores and college cafeterias now have a large number of products and areas that are designated as gluten free. You (yourself) or your friends may have adopted a gluten-free diet for medical or nonmedical reasons. What is the medical basis behind celiac disease? How does a baker prepare a high-quality, tasty baked dough without gluten?
Celiac disease is an autoimmune disease. In any autoimmune disease, the body recognizes a molecule as foreign and utilizes its immunological system to attack the foreign molecule. In most cases, the immune system can recognize harmful foreign species (e.g., bacteria) from nonharmful species (e.g., foods, human biological molecules), thus helping to protect us from harmful foreign species. However, in the case of celiac and other autoimmune diseases, the immune system triggers an abnormal response against a molecule or organ. In celiac disease, gluten is the recognized foreign molecule. Thus, when a person with celiac disease eats gluten, the lining of his or her intestine becomes inflamed and damaged, leaving the intestine unable to properly digest and absorb nutrients from other foods.
An estimated 1% of people worldwide are thought to have celiac disease; a gluten-free diet is the only treatment for those afflicted, which is problematic given that gluten is present in so many common and nutritious foods. Gluten is found in wheat (of course), barley, rye, bulgur, farro, and some suggest oats, all of which are a good source of vitamins, minerals, and fiber to one’s diet. Thus, in order to eat a healthy, nutritious diet, a celiac-afflicted individual must avoid most breads, crackers, cereals, pastas, pastries, and a number of processed foods but can indulge in eggs, meat, fish, fruits, and vegetables.
In addition to those individuals diagnosed with celiac disease, you may have friends who are gluten sensitive or have made a dietary decision not to eat gluten. What should you do if you would like to serve bread at your next dinner party? The easy response is to go to the gluten-free aisle in the grocery store. But maybe you would like to experiment with baking a gluten-free bread. How can you achieve a chewy, light texture without gluten?
Often gluten-free flours are supplemented with (or you can add) xanthan or guar gum or other emulsifiers. These products can contribute elasticity (the gums), stabilization of, and reduction in the diffusion of the gas bubbles (the emulsifiers). It is tricky, but with some experimentation with different flours, gums, and emulsifiers, you can still bake a great loaf of bread.
10.12 MUFFINS AND BATTER BREADS
Perhaps on a given morning, you desire the tender structure and sweet taste of a blueberry muffin or a lemon poppy seed loaf rather than a piece of chewy, toasted sourdough. Although still “bread,” these breads are a lot more like cake, they are quickly prepared (hence the name quick bread), use chemical leavening agents, and have a completely different texture from yeast-based breads. In muffins and batter-based breads, you do not want to generate the chew of a good gluten network but a nice, tender, porous crumb; the ingredients and the techniques help to accomplish this.
The ingredient list for a muffin is expanded relative to a yeast-based bread and includes more sugar and fat, eggs, baking soda or baking powder or a combination of the two, and in some recipes buttermilk, sour cream, or milk. In addition to providing richness, sweetness, and body, the “extra” eggs, fats, and sugars all interfere with gluten formation by interacting with the gliadin and glutenin proteins themselves, thereby preventing the molecules from interacting with one another to form the gluten network. However, even in the presence of these interfering molecules, simply stirring the mixture can generate a gluten network. Therefore, any muffin man knows that you should combine the dry ingredients, add all of the wet ingredients in one swoop (often making a “well”), and fold the wet into the dry with a rubber spatula only until the dry ingredients are barely wet and the batter is still lumpy (Fig. 10.22).
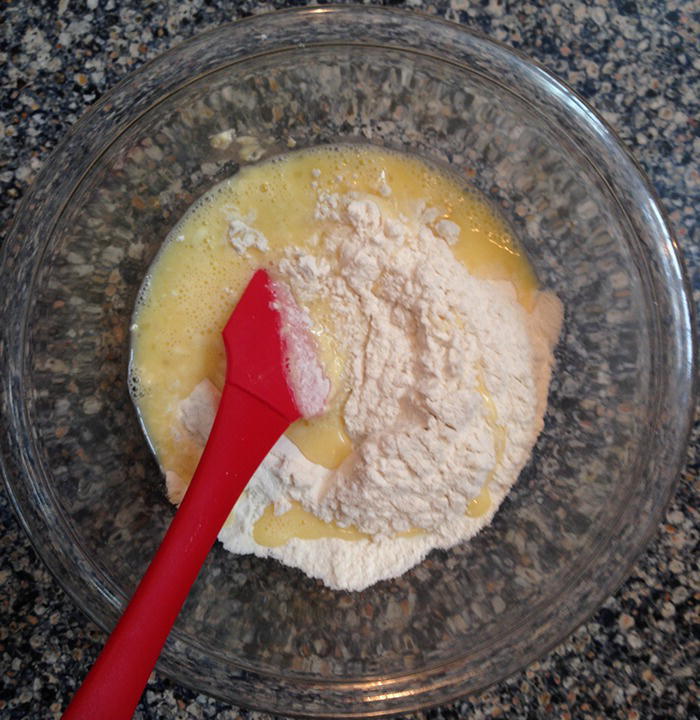
Figure 10.22 The wet and the dry. Keeping the two sets of components of a cake or muffin mix separate until needed is a secret to avoiding excess gluten formation.
Using this method, your muffins will be tender and have a nice porous interior but will stale quickly due to the lack of an even distribution of the fat to coat the starch particles. However, if you make a good muffin, the entire batch will be eaten within a day so staling won’t be a problem.
10.13 CHEMICAL LEAVENING AGENTS
If you have ever forgotten to add the baking powder to a batch of muffins, you know the importance of a leavening agent to the final product. Your unraised muffin probably felt as heavy as a pool ball and certainly did not have a porous, honeycomb-like structure. Under the right conditions, chemical leavening agents produce carbon dioxide gas, the same gas bubbles that are released by yeast during fermentation. The two most commonly used chemical leavening agents are baking soda and baking powder. Although they both produce carbon dioxide, they do so under different conditions and over a different time frame, thus if you try to interchange them in a recipe, you will probably be underwhelmed with the resulting product (Fig. 10.23).
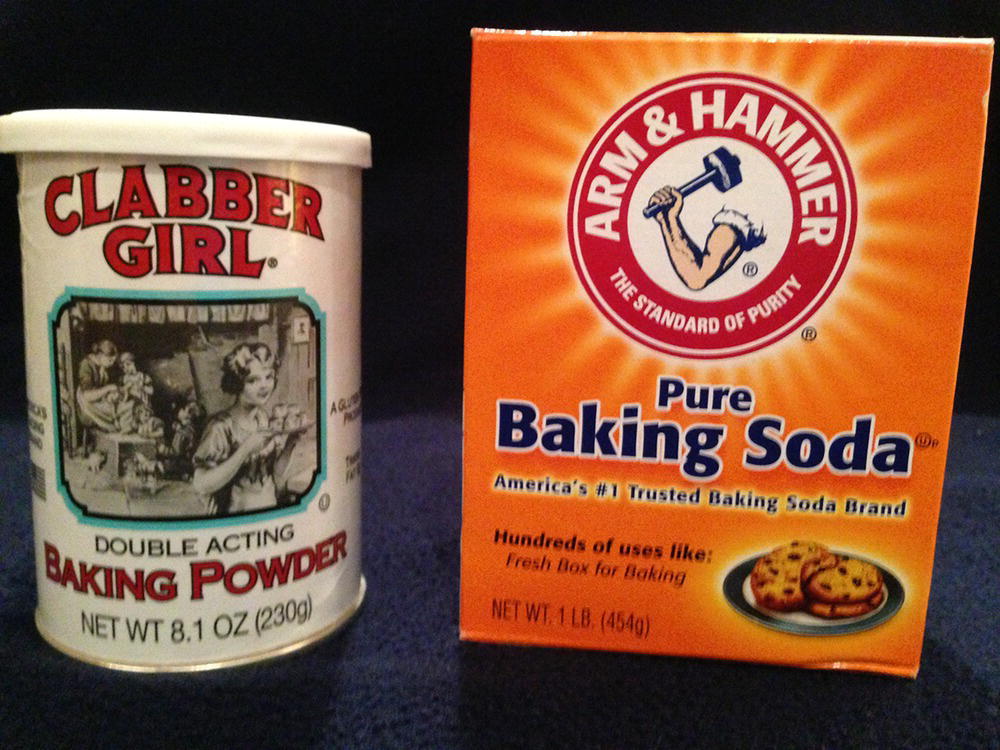
Figure 10.23 Baking soda versus baking powder. Baking soda is a pure sodium bicarbonate, while baking powder has other components added to the sodium bicarbonate.
10.14 BAKING SODA
Baking soda causes the reddening of cocoa powder, hence the name devil’s food cake. So what is baking soda all about? Baking soda consists of a single, basic chemical called sodium bicarbonate (NaHCO3), which produces carbon dioxide, water, and a salt in the presence of an acid (H+) (Fig. 10.24)

Figure 10.24 Sodium bicarbonate reaction in acid.
Wait a minute! An acid? What type of acid is available and safe to use in the kitchen? Buttermilk or sour cream (lactic acid), molasses (various acids including acetic, propionic, aconitic), lemon juice (citric acid), or cream of tartar are the most common additives to a baking soda leavened quick bread or muffin. The great thing about this reaction is that it will cause the production of millions of tiny carbon dioxide gas bubbles in the thick muffin batter. If these expanding gas bubbles can be captured in the structure of the batter as it becomes firm in the hot oven due to its transition from a foam into a sponge, you will have a tender, porous baked good. The problem with this reaction is that it is initiated immediately when the bicarbonate and acid are exposed to liquid water. Thus, as soon as you add the wet to the dry, carbon dioxide begins to be produced. Thus, you need to get that batter into the oven as quickly as possible so that it reaches a firm state before all of the carbon dioxide gas is lost to the air (Box 10.3).
Interestingly, baking soda is a base, thus the acid not only assists in production of CO2 but also helps to neutralize the mixture so that your final product doesn’t have the bitter taste associated with alkalinity (basicity). Thus, make sure that you are adding the exact amount of baking soda that is called for in a recipe. Baking soda is probably the only leavening agent used in your favorite chocolate chip cookie recipe (it causes the cookies to brown due to Maillard reactions and spread out), while in other recipes (e.g., buttermilk pancakes) baking soda is used in combination with baking powder.
10.15 BAKING POWDERS
Baking powder contains a mixture of three components: baking soda (sodium bicarbonate), one or more acids (e.g., cream of tartar, monocalcium hydrogen phosphate, dicalcium hydrogen phosphate, sodium aluminum sulfate, or sodium aluminum phosphate), and a filler/diluent. What is a filler? Given the baking powder is primed to produce carbon dioxide as soon as it gets wet, it is prone to losing its effectiveness particularly under warm, humid conditions. Cornstarch is added as a filler to keep the molecules of acid and bicarbonate physically separate from one another. However, even with the presence of cornstarch, baking powders will degrade over time and have an expiry date (that should be paid attention to). You have probably figured out several perks associated with the use of baking powder in a recipe: (i) you don’t need an acid within the ingredients list of your recipe; (ii) baking powders are preneutralized, thus they do not have an “off” taste that might sabotage your recipe. However, there are even more advantages associated with a baking powder due to its double acting nature.
What is a double acting baking powder? Double acting baking powders actually have two acid additives; acid 1 (e.g., monocalcium dihydrogen phosphate) is soluble in the mixture and immediately reacts with the available sodium bicarbonate to produce carbon dioxide, much like the reaction and behavior that you see with baking soda. However, as we talked about earlier, in order for these gas bubbles to be retained within the structure of the baking batter, the batter needs to set relatively quickly in the oven. In reality then, only a portion of the gas bubbles will actually be retained to leaven the final product, and the work of acid 1 really just gives the batter some body before it cooks. The second acid (e.g., sodium aluminum sulfate) in a baking powder only becomes reactive in the presence of heat because it is insoluble (or slightly soluble) in the batter mixture at room temperature. Thus, when the muffins are in the oven and the batter is not yet set enough to hold onto the expanding carbon dioxide bubbles being produced by acid 1, acid 2 dissolves and begins to react with the remaining sodium bicarbonate, producing more carbon dioxide that will be able to be retained within the quick bread structure as it sets. Thus, a recipe that utilizes baking powder will typically yield a larger rise than a recipe that uses baking soda, even if the baking is delayed by 15–20 min. Since much of the reactivity of acid 1 is complete within a few minutes (~2–5 min), most of the rise is due to the work of acid 2.
10.16 BAKING SODA VERSUS BAKING POWDER
Some recipes call for one, some recipes call for the other, some recipes call for both. How do you decide? It depends upon the desired characteristics of the final product. Baking powder will give you a better rise, but if you want a flatter or browner structure, as seen in a chocolate chip cookie, baking soda will be used as the leavening agent. The baking soda will cause the cookies to brown and spread out on the pan and not up into the air. Because of the rise, baking powder cookies will taste more cake-like than a baking soda cookie. If you are a fan of the cake-like cookie and would like to carry out an experiment in the kitchen, remember that you will need to add more baking powder to a baking soda-based cookie recipe, given that baking soda comprises only about a third of the same amount of baking powder.
If a recipe calls for both baking powder and soda, the baked good is actually being leavened by the baking powder, which contains the correct proportions for all of the acids to react with all of the basic bicarbonate, while baking soda is added to neutralize any acid (like buttermilk) that is present within the ingredients list to prevent a sour overtone. What is the point of buttermilk in the first place if you don’t need an acid? Why not use milk? In addition to providing the milk proteins that interfere with gluten formation, which are common to both milk and buttermilk, buttermilk is thick. When you add a thick liquid to your batter, then you don’t need to add as much flour, also reducing the development of gluten.
10.17 CAKES
Cakes are similar to quick breads and muffins in many ways. Most cakes have a tender, porous, and moist texture; they have a similar basic ingredients list including flour, eggs, sugar, fat, and a chemical leavening agent; however, a cake is much lighter, finer, and spongy than a muffin (some cakes are formally called sponge cakes). You already know that “lightness” is generated by the retention of gas bubbles within the molecular structure of a food, but what does this structure look like in a cake and does the structure come from the ingredients or their treatment? In short, a cake is an egg foam. However, you need a lot more than eggs to make a great cake; let’s take a closer look at the ingredients list and techniques with an eye toward the science.
10.17.1 Generation of the Foam
You already know about foams and egg foams from Chapter 9, where you learned what happens when you whip egg whites to make a meringue. The egg foam for a sponge cake needs to be more robust than that of a meringue; it has to withstand the weight of the cake and any fillings after all. Thus, there is more to a cake than just the egg foam. In fact, the generation of the foam begins right at the start through the incorporation of air bubbles into the batter. You probably have the first step on a cake recipe memorized, “cream butter and sugar together until light and fluffy.” Although you might want to skip this step, it is actually one of the most important steps in cake baking as it strongly influences the final texture. By beating the butter and sugar, you incorporate air bubbles into the mixture that will eventually expand in the heat of the oven (along with the steam and baking powder-generated carbon dioxide bubbles) to make a properly risen cake that is light and fluffy, along with evenly distributing the sugar. How exactly does this incorporation happen? The solid sugar crystals, along with your mixing beaters, carry air molecules into the semisolid (crystalline/liquid) room temperature structure of the fat. The air bubbles are retained in the fat, thus, as it is creamed and the color of the mixture becomes lighter and the volume increases (i.e., it becomes fluffier) (Box 10.4).
The next step typically involves addition of the eggs and other liquid-based ingredients (e.g., dairy products, flavorings). Obviously, the eggs are important to development of the foam, but they also provide moisture, richness, and flavor to the cake. If you don’t recall what an egg foam looks like, remember that eggs are made of protein molecules. As you begin to beat eggs, they undergo mechanical stress that causes the proteins to denature. The hydrophilic parts of the proteins organize themselves to interact with other water-based molecules, while the hydrophobic parts of the proteins stick to the fats so that they can avoid the water. With continuous beating, the incorporated air becomes enclosed in a protein/fat bubble with the hydrophobic parts directly toward the inside where it can interact with the nonpolar air molecules (like oxygen), while the hydrophilic parts are directed toward the outside where they can interact with the hydrophilic sugars. With more beating, air continues to be incorporated and the air bubbles within the foam get smaller, which will make the cake more tender (Fig. 10.26).
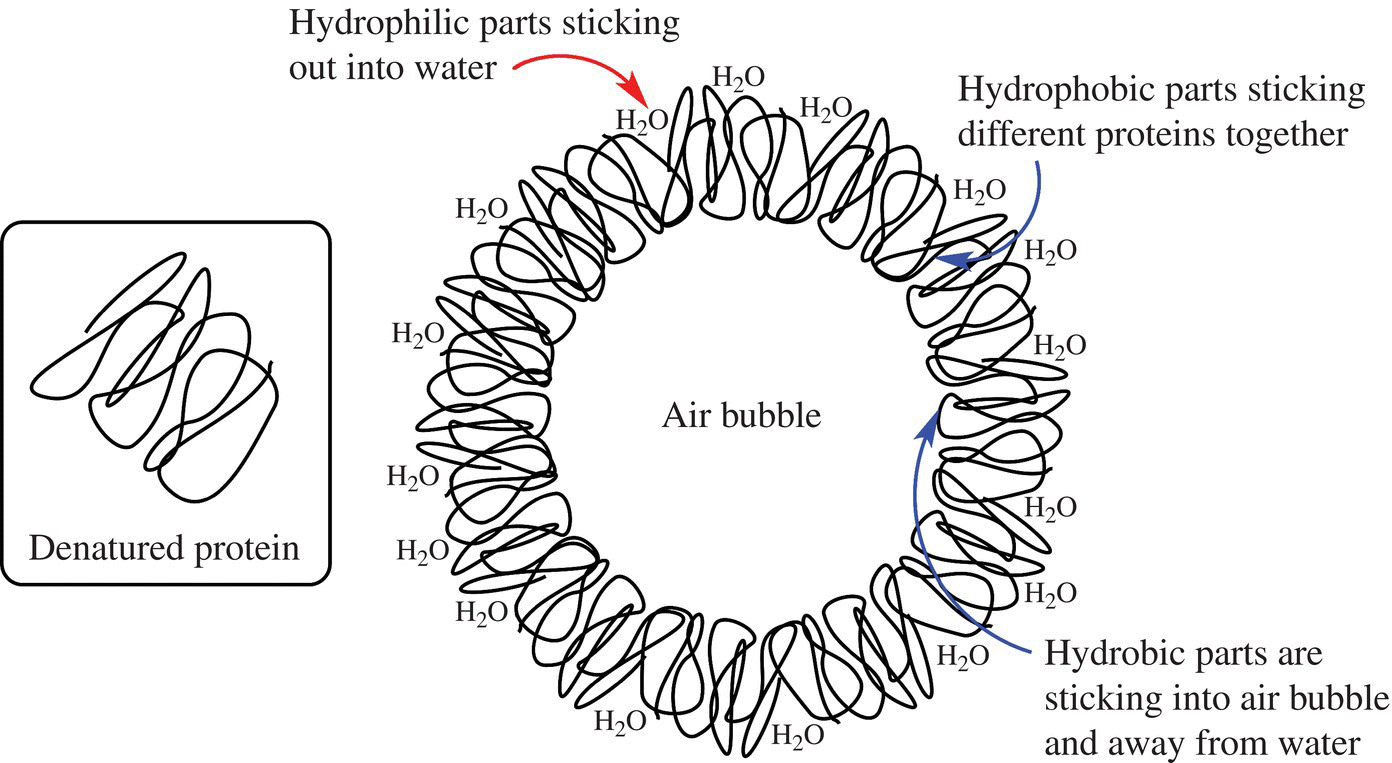
Figure 10.26 Proteins and foam. The denatured proteins will form a cage around air mixed with protein and fat (not shown here).
10.17.2 Flour
Although there are recipes for flourless cakes, almost all cakes contain flour. A flour is important to a cake, as it helps to stabilize the egg foam and prevent it from collapsing in the oven. However, you don’t want to generate gluten nor do you want to pop all of your air bubbles and break down the egg foam. Therefore, it is best to gently fold the flour (and other dry ingredients) into the eggy, voluminous batter with a rubber spatula, particularly with an unleavened cake (see in the following). As soon as all of the dry ingredients are incorporated, you stop folding. In a cake that utilizes a leavening agent, you may fold in the flour (as aforementioned) or mix your batter slightly to generate a limited amount of gluten. The gluten development will make the batter a little more elastic for the capture of some of the leavening agent-generated carbon bubbles and you will have a well-raised cake. The problem with gluten generation is that your cake will not have as tender a texture.
10.17.3 To Use a Leavening Agent or Not?
Many, but not all cakes use leavening agents. A Genoese sponge cake provides an excellent example of a cake that does not use a chemical leavener. As was discussed previously, if you cream sugar and eggs properly, you will generate a stiff egg foam that can retain the incorporated air bubbles. Sugar is necessary at this point (as opposed to just starting with the eggs) because it increases the viscosity of the eggs. Without the sugar, the speed of beating that would be necessary to create a stable egg foam would not be achieved without using heat to assist with the denaturation of the egg proteins. The careful folding of the flour and melted butter into the mixture is key to ensure that you do not destroy your foam and to give it additional strength. Even in the absence of a leavening agent, the cake rises a little during baking due to the expansion of the air bubbles and steam generation that is captured in the denatured egg and flour protein structure. The key aspect of a nonleavened cake are the air bubbles; they must be small and you must generate a lot of them, as measured by the stiffness of the egg foam prior to addition of the flour/butter. The fat also begins to “melt” the egg foam relatively quickly, thus this is a cake that you want to bake as quickly as possible.
Baking powder (as opposed to baking soda) is the most common leavening agent for a cake because you desire a good rise and do not desire browning reactions.
The key thing about the use of baking powder as the leavening agent is that you need to keep the generated carbon dioxide bubbles small. This can be promoted in a number of ways: (i) preparing a “thicker” batter (relative to a Genoese sponge cake) and (ii) controlling the baking conditions. If you are using a double acting baking powder, you will get some generation of some small carbon dioxide bubbles as soon as the “wet” ingredients are added to the “dry” ingredients. A substantial increase in carbon dioxide production (due to the “slower acting” acid) will occur when the temperature of the batter reaches approximately 120°F/50°C; at this temperature the previously made CO2 bubbles will grow much larger. Large gas bubbles, particularly when generated in a runny batter, may come to the surface of the cake and be lost like a popped balloon. If a lot of gas is being lost in this way, there will be less carbon dioxide in the cake and your cake may not rise adequately. At about 140°F/60°C, protein denaturation occurs, which stabilizes the batter and retains the air bubbles in the batter. These bubbles can expand to a certain point, but if there is still a substantial amount of new carbon dioxide being produced from the baking powder, eventually the bubbles will burst. With all of these competing factors, many of which are out of your control, some bakers think that making a sponge cake without a leavening agent is actually less complicated and more likely to be successful than sponge cakes that contain leaveners. You will have to judge for yourself which type of cake is preferred to bake or eat.
10.17.4 The Woes of a Collapsed Cake
If a cake is undercooked, it will collapse. As you know from the discussion previously, baking stabilizes the structure of the cake by increasing protein denaturation and the formation of more protein–protein intermolecular interactions (in the egg and flour proteins). How do these interactions help with stabilization? As the proteins that surround the air bubbles denature, they unfold and stretch out. When a protein stretches or linearizes, it has more of an opportunity to interact with other protein molecules that are also denatured. When the denatured protein molecules form intermolecular interactions and covalent cross-links (e.g., disulfide bonds) with one another, they become much more rigid and less fluid in their behavior. Thus, a baking cake makes a transition from a viscous liquid batter into a more solid, sponge-like structure and the foam structure that had been holding the air bubbles is strengthened enough to withstand the increasing pressure associated with the expansion of the gas and vaporization of water. If baked properly, the structure of the cake should hold even as the cake cools, the air bubbles contract, and the vapor condenses. Why does a cake collapse in the middle? Cakes are more cooked along the edges because that is the section that interacts with the metal pan; the pan conducts heat and structurally supports the edge of the cake. This is why a cake is gooier in the middle and more crusty/crisp along the edges (Fig. 10.27).
Figure 10.27 Pie crust.
10.18 PASTRIES: FLAKY PIE CRUSTS AND PUFF PASTRIES
What did your grandmother always tell you when you were making pie crusts? Handle the dough as little as possible, and now you know the reason why. Mixing, working with, and kneading dough generates gluten, and you definitely do not want gluten if you desire a flaky, tender pie crust. However, there are a few other aspects of preparing a pie crust or pastry that make these baked goods quite distinct from a yeast-based bread, a muffin, a cookie, or a cake. The ingredients for a pie dough are simple: flour, water, and butter. You don’t need an electric mixer or even a whisk, just two knives or a pastry cutter. Simple? Hmmm… most bakers would tell you otherwise.
In a typical bread dough, flour and water are the primary ingredients used to make the thick, hopefully nonsticky, mass that we call a dough. The fat or any other ingredients are not present at a very high concentration. In pastry dough (by contrast), the high-fat content is necessary for the flaky texture that we associate with a pie crust. Why? The fat separates the starch particles present within the flour from one another and prevents water from accessing the starch, thereby preventing gluten formation. This separation begins right at the beginning of the preparation of a pie crust. In most recipes, you first “cut” the cold fat into the flour, preferably one with a low-protein content, using two knives, a pastry cutter, or your food processor until the pieces of fat are pea sized. In order for the fat to be distributed evenly among all of the starch granules, it needs to be in small pieces. The smaller the pieces, the more separated the granules, the less likely water will access the granules (remember that water and fat don’t mix) and the flakier the crust. You might ask, why can’t you just melt the butter and mix it into the flour such that it is evenly distributed? Remember that butter is made of fat, milk proteins, and water. When melted butter is added to flour, the water from the butter penetrates the starch granules and the granules stick together before the molecules of fat can surround them. Therefore, you end up with water-filled starch aggregates (i.e., gluten alert!) rather than individual starch particles. Moreover, when cold butter goes into a hot oven, the water evaporates immediately. When warm, soft butter goes into a hot oven, the butter water seeps into the structure of the crust, resulting in a soggy mess. It is the same rationale for using cold butter to make a crust, rather than one at room temperature.
Once you have your fat-separated starch granules, you add the moisture to make a cohesive (but not a pretty) mass. Adding a cold liquid is important (remember the aforementioned point about warm butter), but the exact liquid will vary depending upon the recipe. It may be icy water, cold buttermilk, or even vodka (see Box 10.5); the key part about the cohesion mass is that you should not try to make it homogeneous and pretty. The more moisture, the more chance for gluten development, thus typically a recipe will suggest that you sprinkle in the liquid in tablespoon amounts until you have just enough for the dough to coalesce. You basically want to get just enough moisture into all of the dry ingredients so that you can make a disk-shaped mass that can be wrapped and placed into the refrigerator or freezer. Because you have already coated the starch granules with fat, the starch granules will be unable to swell, and the starch proteins will be unable to interact with one another and with water. At colder temperatures, proteins also absorb less water (because solubility is temperature dependent). Keeping everything as cold as possible will reduce the hydration of the granules and further prevent gluten development. However, if you start to knead or work with the dough extensively or the dough begins to warm, the gluten that will make the crust chewy and tough will begin to develop.
In the next step, the pie crust dough (and you) has a chance to relax. The dough goes into the refrigerator; you might go to the couch. In addition to making the dough cold, the rest period gives the protein molecules a chance to relax, such that if any were stretched out during mixing, they have the chance to shrink back without forming the intermolecular interactions that stabilize gluten formation.
Once the dough is in the fridge, you might be thinking that you are home free. You have followed all of the directions, so now you just need to roll it out, put it into the pan, and bake it. Not so fast! During rolling, you stretch the dough and flattens the fat chunks into sheets. With any stretching, some gluten develops, thus you need to work to keep the gluten at a minimum. How? The pie dough also needs to be kept cool during rolling so that the fat doesn’t start melting on you. Some professional baking kitchens have a marble or metal countertop for rolling pastry doughs. Metal is the best surface for conducting heat, followed by marble, and then very distantly come wood or plastic countertops. Why do the properties of the rolling surface matter? Metal and marble will stay as cold as the pie dough because both will remove the rolling pin-generated heat energy readily.
In addition, during rolling, you quickly learn if you added the correct amount of water or generated gluten in your pie crust preparation by the elasticity of the dough. Elastic, sticky dough that readily bounces back to its original shape and size when rolled out has a high gluten content and excess water. Add a little extra flour to the work surface during rolling to try to get the dough to the right consistency. Drier pastry dough will be very stiff and won’t hold its shape upon rolling; you may even have chunks breaking off during rolling. You will need to add a little more water to these doughs in order to get a dough that can readily be rolled to approximately 3–4 mm thick.
Is it ready for the oven? Not yet. Once made and rolled, it is important to let the dough stand for another 10–20 min. The dough has just undergone a lot of mechanical stress, which will (again) promote gluten formation due to the stretching of the proteins. As the dough relaxes, the rolled sheet will contract and any stretched proteins that had not yet formed fully into gluten will relax. The amount of contraction will depend upon the elasticity of the dough; the more elastic the dough, the more contraction you will see. If the dough is not allowed to contract on the counter, the dough will contract during the baking, potentially spilling your pie filling contents over the edge of the crust. You want the dough to keep its shape when cooked and you actually want to know what that shape will be!
10.18.1 Baking the Crust
You have your pie crust rolled out on the counter and you have a choice of an aluminum foil, glass, or metal pie plate. Which one should be chosen? Any shiny metal pan will reflect heat away from the pie; your pie will take longer to cook. Heat will readily pass through a glass dish and your pie crust will cook and brown quite evenly. Of particular note, avoid the flimsy, aluminum foil pan at all costs. Your crust will not cook evenly and the pans are so thin that they will not retain any heat, so the crust will cook slowly. You know this if you have ever picked up aluminum foil wrapped bread directly out of the oven with your bare hands. If you hold onto the edges of the foil, you will not get burned.
You know during baking that your crust gets “cooked,” but by now, you also know that there must be some science behind the baking process. During baking, you want the crust to become firm, crisp, and brown. This state is achieved by baking at a high enough temperature that the dough heats up quickly, which causes the internal moisture (from added water or butter) to be converted to steam and evaporate out of the crust. If this works well, as the steam evaporates, it will make layers in the crust, giving it its characteristic flakiness. But, as you learned during the dough preparation, if the butter melts slowly, that water will seep into the starch granules, leaving you with a soggy crust. You have the same “soggy crust” problem when your crust is cooked with a filling; you know the characteristic soft, soggy bottom crust of Aunt Ruth’s pumpkin pie. How do you avoid this when you want to actually eat a filled pie and not just a pie crust? Prebake the crust. You can throw the pie crust in the oven, filled with dried beans or pie weights to ensure that the crust doesn’t develop air pockets, and bake it until the edges are barely golden (~15–20 min), then brush an egg wash onto it. This technique is known as blind baking a crust. Then, you add the filling and finish baking. The protein layer of the egg will prevent the filling from seeping into the crust. You can also make that bottom crust a little more firm and browned by baking your pie on the lowest oven rack.
There you have it. All that you needed to know to make a great pie crust. The trouble with it is that you might make a great pie crust on one occasion with the perfect balance of structure and flakiness, then on another occasion, it doesn’t turn out quite right. If you have already figured this out, pie crusts are finicky things; one extra teaspoon of water, a humid day, or variation in the protein content in your flour can all be the culprits of a crust disaster. However, with knowledge and practice, you will be able to make the necessary adjustments to make a great crust every time.
10.18.2 Puff Pastry
A puff pastry is a dough that has flaky layers. Baklava provides the perfect example of the flakiness of a puff pastry; it is so flaky, flakes of it drop onto your plate as you take a bite (Fig. 10.28). Interestingly though, although puff pastry is flaky, each layer of the pastry has a high gluten content. Hmm, how can this happen when you just learned that gluten makes pie crusts chewy, not flaky? A layer of fat separates all of the gluten-rich pastry layers. Thus, when it is baked, the moisture in each fat layer is converted to steam, which causes separation of each layer, each of which has its own gluten network, none of which is connected.

Figure 10.28 Saint Honore cake with chocolate and raspberry. Notice the flaky layers of cooked dough. The lack of interactions is due to “shortening” or fat that breaks up the cross-linking of proteins in flour.
In order to achieve this type of structure, you prepare a dough of flour, water, and sometimes a little bit of fat, and mix it minimally. You roll the dough into a square or rectangle and let it rest to allow the gluten to relax. You pound out a large piece of butter (by hitting it with your rolling pin) and place it on the dough (Fig. 10.29).

Figure 10.29 Folding puff pastry.
The dough is turned onto itself (over the top of the butter), is rolled out again, and the steps are repeated five more times. Throughout the process, you develop layers of gluten that are separated by layers of fat, 729 and 728 layers to be exact, respectively.
As you can imagine, if the butter-generated steam is critical to the preparation of a puff pastry, you need to keep everything cold. Don’t try a recipe for puff pastry on a hot day; you will have better results making it in your friend’s kitchen who doesn’t turn the heat on in the winter. You could also store the rolled pastry in the refrigerator during the resting periods. After the final turn, the dough rests for about an hour, then is rolled out to about 1/4 inch/6 mm and baked in a very hot oven. The escaping steam causes the layers to puff to a height that is at least four times the starting height of the unbaked pastry.
REFERENCE
- [1] Anderson O.D., Greene F.C., Yip R.E., Halford N.G., Shewry P.R., Malpica-Romero J.M. (1989) Nucleotide sequences of the two high-molecular-weight glutenin genes RT from the D-genome of a hexaploid bread wheat, Triticum aestivum L. cv RT Cheyenne. Nucleic Acids Res. 17: 461–462.