CHAPTER 3
January
January is all about planning for the next season, while it’s still cold, dark, and probably damp outside. Getting hold of some seeds now can remind you that spring really is on its way.
My Balcony at the Start of January
Plants still alive and growing:
Herbs: rosemary, thyme, bay, oregano, chives, and parsley (both flat and curly). One basil plant inside on a sunny windowsill.
Salad vegetables on the railing: sorrel, bronze arrowhead lettuce, rocket.
Salad vegetables in the other cold frame: bronze arrowhead lettuce, rocket.
Some slightly pathetic-looking pak choi.
Seeds and cuttings:
Several pots with broad bean and pea seedlings in. Starting to grow.
Four sprigs of mint: two looking healthy, two not.

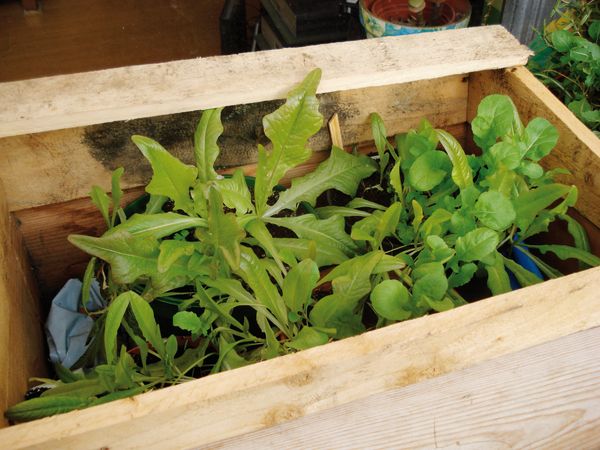
Green salad veg in the coldframe in January; still cropping nicely.
Things to Do in January
- Acquire seeds.
- Plan your growing season.
- Plant rhubarb or berries.
- Order citrus trees.
Seeds
Before you can get plants, you’re going to need seeds (or in some cases, baby plants or cuttings – see the various individual plant sections for discussion about which method is best for which plant). Seeds are fairly cheap even if you get them all from your nearest garden centre. However, if you want organic seeds or non-hybrid open pollinating seed so that you can seed save (see later on this section for more on this), you may be better off ordering online.
There are other ways to get hold of seeds rather than buying them, too.
Seed swaps
Seed swaps are where you get together with a bunch of other gardeners, and exchange the seeds that you don’t need. This can be particularly useful if you’re gardening in a small space, as you’ll almost certainly have more seeds in a packet than you want to use. Gardening or allotment clubs or other gardening groups in your area may run seed and plant swaps, or you could get together with any friends who garden. To be even more organised about it, talk to gardening friends before the start of the season, and get a bunch of seed packets to share out between you. You can also get hold of cuttings this way, and if you meet up again in April or May, you may even be able to swap seedlings with one another (it’s very common to end up with more seedlings than you really have room for – I end up trying to give away a handful of tomato plants every year).
Seed saving
From your second year onwards, if you want to, you can start saving the seeds from the previous year’s plants, and using those for next year. In theory, this means that for any plants suitable for seed saving, you only buy one lot of seeds (your first year), after which you can grow from those plants. This has the advantage of being cheap, but also the advantage that you can do a bit of selection. You can pick the seeds from the plants that have done best (most vigorous, tastiest fruit, highest yield), plant those, and then choose the best ones again next year to save their seed. This way, you gradually breed plants that do particularly well in your own conditions.
Bear in mind that you don’t have or need to do this! If you’re interested, it can be fun; but there’s nothing wrong with getting all of your seeds from shops or from friends. If you’re inclined to give it a go, start out with some of the easiest seeds, like tomatoes or rocket.
If you do want to try seed saving, you’ll need make sure that the seeds you get in the first place are for plants that will breed true. The vast majority of garden centres sell what are called F1 hybrid seeds. These are a cross between two different and very heavily inbred parent plants, which are bred to produce particular results, often aimed more at large industrial farms than at the home grower. The seed companies are often selecting for uniformity of shape or colour, while most home growers are more interested in taste and suitability for their own specific conditions. In addition to this, the seed produced by F1 plants will usually be sterile (so you can’t seed save), or if not sterile won’t breed true to the parent. (Which means that the only way to get the same thing again is to buy more seed from the seed company...)
If you want to seed save, then, you need to make sure that you’re buying ‘real’ open-pollinated seed, from someone like the Real Seed Company.
Some plants are easier to save seeds from than others are; for example, some plants are quite hard to breed true, especially in a small space. Plants that are air-pollinated can cross with anything within a quarter of a mile; so if you’re trying to save chard seed and there’s any other chard, beets, or spinach within that distance, your seeds won’t breed true, and you’ll get something unpredictable (and in most cases, probably less tasty) next year.
Also, some plants are biennial, and only set seed in their second year (this includes carrots). You can lay them aside over the winter, then replant and wait for the seed, but you may decide that it’s easier just to buy more seeds next year, especially if your space is limited, as these plants won’t provide an actual crop to eat.
Cuttings
A cutting is a piece taken from an existing plant, which then (given the opportunity) will root and turn into a brand new plant, identical to the old one. Some herbs do very well from cuttings, but most vegetables need to be grown from seed. For all the plants described in this book, I’ve mentioned if it’s possible to grow them from a cutting. It’s best to take cuttings in either autumn or spring.
Planning this Season
If this isn’t your first year of growing, hopefully you’ve been able to keep a few hardy green things or some herbs going into January. Even if it is your first year, maybe you’ve got a tray or two of microgreens on a windowsill by now that are providing you with a few cheering shoots over the darkest part of the year.
If you’re starting from scratch right now, while January may not be a good time for most sowing, it’s a great time for planning for the start of the growing season. By March you can be starting off seeds, and if you have a sunny windowsill, you may even be thinking about getting a few going in February. So to make the most of your time once spring sidles finally into view, it’s good to have everything planned, set up and organised in advance.
If you’re just starting out, there’s lots of information in the Introduction on basic provisions – pots, compost, water, and tools. Now is a good time to start getting hold of the pots and the containers you want, as you’ve got a couple of months to find the right things, and can avoid spending a fortune because you’re buying in a hurry. For compost, you can get a wormery going at any time of year, and start making your own free compost from your kitchen scraps. Admittedly this is unlikely to produce all that much over the next couple of months, so you’ll need to acquire some from elsewhere anyway.
Now is also a good time to acquire seeds, once you’ve worked out what you want to grow. If you’re buying seeds and you leave it too late, you may find that some types of seeds have sold out – particularly if you’re interested in rare or unusual varieties, and/or are buying from a small organic supplier like Real Seeds. In addition, if you’re ordering online, there’ll be a time lag between order and delivery which can be very frustrating when the days are getting longer and you’re keen to get going. Starting now also gives you time to find seeds through other means, as discussed in the previous section.
Of course, the first step has to be deciding what you want to grow! Start by thinking about what you most enjoy eating, and what your space is best suited to growing. The sunnier your space, the easier it’ll be to grow more or less anything you fancy. Even if you want plants that do better in part-shade, you can create that by stacking plants up and using the shade created by other, taller, plants and pots.
South-facing patio

But even a damp, north-facing space can have promise. Land cress grows well in shade during the summer (less well in winter), and wild garlic (ramsons) also thrives in shade, being a woodland plant. Wood sorrel and the various varieties of mint will all grow in shade. Other options include chard, winter lettuce, mustard greens, alpine strawberries, and autumn raspberries.
Now is the time to start making sketches of how you’d like your space to look this year. Your plans may not work out exactly as you intend, of course. Plants have a mind of their own, and accidents happen (sometimes happy ones!). But a good plan gives you a starting point to work from, and something to aim towards.
Once you’ve decided what you want to grow, it’s time to order or otherwise acquire the seeds, and to create a sowing timeline. This should be a note of what you want to sow, where (inside or out?) and when. It doesn’t need to be absolutely accurate – ‘early April’ or ‘late February’ is good enough. See opposite for an example of mine for one year.
North-facing space outside a front door
West-facing window boxes
Small north-facing space by front door
Sowing Timeline
January
Nothing
February
Early peas
March
Rocket (one early sowing, one late sowing)
Bronze arrowhead lettuce
Parsley
Mangetout
Tomatoes on the windowsill inside
Peppers on the windowsill inside
Thyme on the windowsill inside
April
Rocket (two sowings)
Bronze arrowhead lettuce
Parsley
Carrots (two sowings)
Basil (on windowsill inside)
May
Mizuna
Carrots (two sowings)
Plant out tomatoes
Plant out peppers
Plant out thyme
Courgettes on the windowsill inside
Plant out basil
June
Carrots (two sowings)
Mizuna
Plant out courgettes
July
Mizuna
August
Mizuna
Rocket
September
Mizuna (for overwintering under cover)
Rocket (for overwintering under cover or outside)
Now sit back and relax before the start of the growing season!
Growing Fruit in Pots
It’s not just salad vegetables and herbs; even fruit can be grown in pots. Some fruits will do better than others, but here’s a run down of a few that may work well. Perennial fruit like raspberries will need a good-sized pot (bigger than you might think for the size of the cane) as they tend to have spreading roots which they need to crop well, but some fruit is also suitable for smaller pots. Even apple or pear trees can be grown in containers, but you will need a suitably large container and a dwarf variety of tree. The barge gardens at Downings Road moorings on the Thames near London Bridge have a variety of trees, including some apples, all growing in 40cm deep containers in the barges – an impressive achievement!
Strawberries
Strawberries are among the easiest fruit to grow in pots. They do well in reasonably small pots or troughs – try a long window box-style container, or one of the hanging strawberry pots you can buy. You could construct your own version from a larger plastic container by cutting some holes in its sides.
Most strawberries are grown from suckers, in early autumn; but Alpine strawberries can be grown from seed in spring. Alpine strawberries are also tolerant of shady conditions, unlike most regular strawberry varieties which need 6-8 hours of sunshine per day. Note that Alpine strawberries are not a variety of the regular domestic strawberry, but a different plant with much smaller fruit and very different growing conditions. The fruit is tiny, but very tasty and very intensely strawberry-ish.
Different varieties of strawberries also crop at different times: early varieties produce fruit for three weeks around June, and ‘everbearing’ produce both an early and a late crop. Choose one, or pick two different varieties to extend the season and maximise your crop.
Raspberries and blackberries
Raspberries and blackberries (and assorted crosses like tayberries and loganberries) can be grown in pots, although I admit that I’ve never had much luck myself in doing this. Other gardeners have, though, so if you like berries, it’s worth a go.
Cane fruit like this isn’t grown from seed, but from a fruit cane. You can buy these from a shop or an online grower, but they tend to want to sell them in multiples, and you may only want one or two at most. See if you can band together with a friend, or alternatively, if you know anyone who has a garden or allotment with fruit canes, ask them in the autumn if they can spare a cutting. Raspberries spread like mad underground (blackberries do the same, but overground via stolons), and your friend will likely spend a fair amount of time hacking unwanted suckers/stolons out of the ground. They will be happy to rehome one of them with you! Ask your friend to get as much of the root system as possible out of the ground with the sucker, to give it the best chance of surviving once transplanted.
Raspberries come in a multitude of varieties. Autumn Bliss is one good option as it’s fairly restrained in terms of foliage, so it won’t take over your space too much, and it crops for a very long time. It’s an autumn raspberry, so it’ll start slightly later than summer raspberries – August or thereabouts – but I’ve experienced it cropping into November in my allotment, and it’ll certainly still be doing well in late September. The fruit are large, and it gives a bigger yield than my earlier raspberries. It’s also easier to manage because it fruits on that year’s canes, so you just cut it back at the end of the season (see below). If you have a bit more room and can get a couple of single canes, it’s a good idea to get one early and one autumn variety, to extend the season as far as possible.
Put the cutting in a pot at least 38cm in diameter, and make sure to provide plenty of food during the growing season, and then to mulch well with fresh compost in March. Water well during dry periods. Use garden canes to train the stems up as they grow, or tie them into points on a wall if growing them up a wall. They’re much easier to tie in if you do it little and often, when the canes are still thin.
Other than the annual tying in and cutting back, the plant will mostly look after itself, which is one of the joys of perennial fruit. Provide plenty of water and some food, and let it get on with fruiting. Summer raspberries won’t set fruit their first year, as they grow the canes in one year, then set fruit on them the next. Autumn raspberries, or blackberries, ought to give a crop from year one, although it is likely to be a small one initially. Tie the canes back or in as they grow, to avoid them getting out of hand and generating a small jungle on your balcony.
In the autumn, after the fruit has finished (in warmer climes this may not be till November with autumn raspberries, if you’re lucky!), cut back the previous year’s canes for summer raspberries (i.e. the canes that fruited this year), and all the canes for autumn raspberries. They’ll grow more the next year. Blackberries are treated like summer raspberries: cut out the fruit-bearing canes. You should also thin blackberries in early spring, prune side branches to about 30cm, and then tie the canes back. With blackberries in particular, gloves are strongly recommended when pruning!
It is possible to get an early spring crop from autumn raspberries if you leave last year’s canes through the winter. Feed the plant well if you’re going to do this, so it still has the strength to grow the new canes and fruit on them. Cut the old canes back once they’re finished fruiting in the spring/early summer, to give the new ones a bit more space.
Rhubarb
To grow container rhubarb, put a single crown (a section of root) in winter (when the crowns are dormant) into a pot at least 30cm in diameter. It may well do better in a 38cm or even 45cm pot if you have the space. You may be able to get a crown from a friend who’s dividing theirs in the winter (see below), or you can buy online or from a garden centre.
Once it’s planted, avoid disturbing it for at least 3-5 years. It likes full sun, and well-drained moist soil. Always water at the base of the plant to avoid the stems rotting or rusting. Apply fertiliser a couple of times during the growing season. It’s very frost tolerant; and indeed, is incredibly tough and long-lived in general.
Do not harvest in the first year – the plant needs time to get established. Just leave it and let the leaves die back in the autumn. To harvest once the plant is old enough, simply twist the stems away at the base of the plant. Leave 3 or 4 stalks on the plant to feed it for next year. Twist off the leaf (it makes good compost!), and cook the stem. Rhubarb crumble is one traditional cooking option, and stewed rhubarb is also nice. Rhubarb and ginger jam will preserve it if you have too much.
After a few years (possibly as many as ten), the plants will start to decrease in vigour. At this point, you should wait till the winter, dig them up, and divide each crown with a spade into 2-4 crowns. Replant the new crowns into separate pots, and leave for a year before harvesting again.
Blueberries
Blueberries will often do better in pots than they would in the ground. They’re ericaceous (lime-hating) plants which require an acidic soil or ericaceous compost (available at any garden centre). This is much easier to handle in a pot than in open soil. Their shallow root systems also make them a good plant for container growing,
You get blueberry plants as young bushes. Put into a reasonably large pot (50-60cm, though it can survive in a 30cm pot but probably won’t do so well) in ericaceous compost, and water regularly. Blueberries need plenty of water but hate having wet feet, so make sure the container drains well. An old ceramic sink can be a good option, as blueberries tend to have spreading rather than deep roots. Do NOT feed blueberries with any nitrate-containing fertiliser; you’ll need to get hold of something specific for high-acid plants, or you may kill your plant. It should crop in midsummer, around July, although the exact time depends on your variety. Your first year’s crop is likely (as with all fruit plants) to be small, but it should pick up thereafter. If you have birds around, net the plant or you’ll lose the crop.
Over the winter, check the pH of the soil (pH is a measure of how acid or alkaline something is; lower values are more acidic, and 7 is neutral) with a soil testing kit, and add more of the acidic compost if the pH is above about 4.5 or 5 in order to lower the pH. You can also water with 1-2 tablespoons of vinegar in a gallon of water to change the pH.
Once it’s well-established, you should also prune it during the autumn or winter. Aim to remove any overlapping branches/canes, and after the third year, you can start to remove the oldest branches, and any that look spindly or weak. You should remove about 15% of the old growth each year, to make way for new growth.
Citrus trees
Finally, you can even grow citrus trees in pots. Citrus generally are self-fertile, which means that you’ll get fruit from even a single plant; so they’re suitable for growing in small spaces. (Do confirm with the nursery that your specific species and variety is self-fertile before buying.)
Be warned, however, firstly that they’re largely not very cold-hardy (if you’re growing outside, pick a variety that is one of the more cold-hardy ones), and secondly, that in any given year you may or may not actually get a crop. My satsuma tree has flowered for two years in a row but so far none of the baby fruit have survived to maturity. I am hoping for better in future years! If you live somewhere moderately warm, and/or your space is south-facing; and you have a warm microclimate available, and you’re able to cosset it a bit over the winter then it might be worth the effort. Alternatively, like me, you may simply be sufficiently keen on the idea that you feel that it’s worth a go anyway.
Citrus trees can be bought online. You order them around this time of year to be delivered in mid-to-late spring, which is when they need to be planted out. Once established in their new home, water carefully but not too much – most citrus trees prefer to get a lot of water once in a while, rather than little and often. They may also require feeding. Check whatever information your tree came with for its specific requirements (lemon trees, for example, require frequent nitrogen-rich feeds between March and October). Make sure you site it in the warmest possible place, then keep your fingers crossed for some fruit.
Remember that even a hardy citrus tree will need to be pro-tected over winter. A further protection for citrus trees is to avoid watering them between about December and March, as the worst thing for plants isn’t so much cold as it is cold plus wet. The tree will survive the drought and recover in spring when you water it again and the weather warms up. You may also wish to fertilise it in the spring. You should expect it to take several years (or longer...) before you get a crop.

The very beginnings of a satsuma fruit; unfortunately it didn’t last (maybe next year...).