CHAPTER 5
March
By March, things are starting to kick off again in earnest. There are lots of seeds to start, early seedlings to harden out and plant off, and potatoes to chit. This is the first of the busiest few gardening months!
My Balcony at the Start of March
Plants and seedlings:
Herbs:
Rosemary, thyme, bay, oregano, and parsley (both flat and curly), all still in the large cold frame, but nearly time to move them all out again.
Chives just starting to grow back (chives die down over winter).
Basil still hanging in there on the windowsill, looking a little sorry for itself.
Mint cuttings doing well.
Salad vegetables on the railing and in the small cold frame:
Bronze arrowhead lettuce.
Rocket.
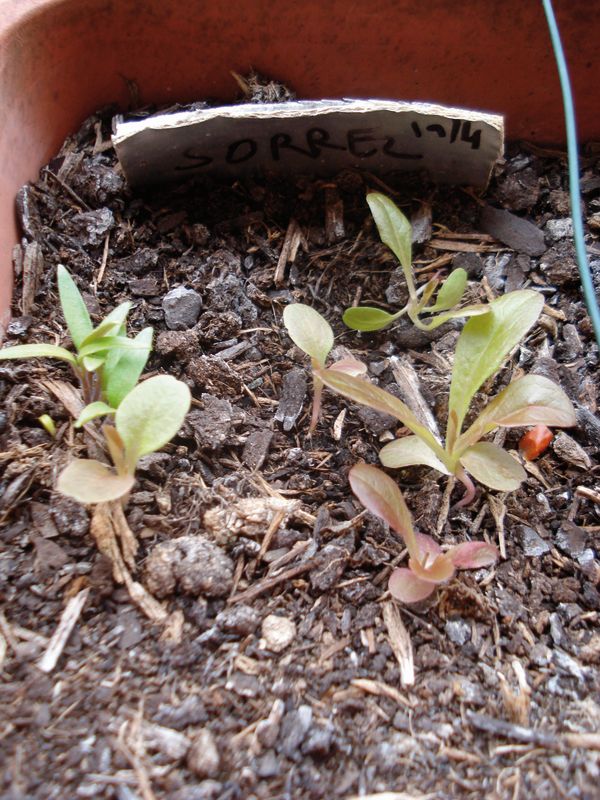
Sorrel unfortunately died in February.
Pak choi: a couple of plants looking a little sad.
Bean and pea seedlings.
Seeds and cuttings:
Bronze arrowhead lettuce seedlings.
Rocket and lettuce seedlings showing.
Miscellaneous Other:
Black plastic sack of leaves, in the process of becoming leafmould: these were quite dry when I checked on them and needed a little dampening down.
Wormery: lots of compost, worms looking a little dry so I added some water – this shouldn’t need to be done very often, since as long as the contents are slightly damp the worms will be OK.
Self-watering containers awaiting tomatoes and peppers.
Things to Do in March
- Pack away the cold frames.
- Regenerate your potting compost.
- Plant out any overwintered peas and beans.
- Further succession sowing of lettuce and rocket.
- Sow carrots.
- Sow first sowings of spinach beet and chard.
- Sow chillies, peppers, and aubergines on a windowsill.
- Chit potatoes.
- Sow tomatoes on the windowsill if you’re in the south.
- Herbs: sow sage indoors, oregano indoors, chives indoors or outdoors, basil indoors, ginger indoors.
- Chive division.
Potting Compost
The potting compost you tidied up in November has now been sitting around in its plastic bag all winter, and probably drying out a bit. It’s time now to revitalise it so you can use it for this year’s crops. Although compost manufacturers will tell you to buy new compost every year, in fact experiments carried out by gardening magazines found that you can use compost at least two years in a row (though you may need to add more liquid feed the second year). Mix it through with some new compost and you can keep it going for longer. However, you may need to get its water content back up a bit before putting plants into it, if it’s dried out over the winter.
Some people (myself included) are happy to keep reusing their compost indefinitely, mixing each year with a healthy quantity of fresh compost, either from a shop or from your compost heap or compost worms. Others prefer to use it for at most two or three years and then switch it in for new. Your preference may in part depend on whether you can readily dispose of old compost (e.g. if you have access to an allotment or someone with a garden).
If you have any diseases in your plants, you must get rid of the compost in those pots or risk transferring the disease to the next year’s plants. It is also a good idea to mix the compost around a bit (i.e. don’t just keep planting tomatoes in the same pot of the same compost year after year) to reduce the chances of incubating a plant-specific disease.
If you’re lucky, your worms have been working busily away all winter, and you can pull out a quantity of nice fresh worm compost. Once you’ve got it out, open up the bag of last year’s compost, and mix in the new worm compost a trowelful at a time. While you’re doing this, if the compost feels dry and dusty, tip in a little water with each trowelful of worm compost. You’re aiming to get the compost back to roughly how it felt when it was new (damp and tending to stick to itself), as well as boosting its nutrient level. Once you’ve mixed it all through, add a little more water, and leave it to sit for a day or two. If it’s dried out a lot, you may have to add more water again after a couple of days. Dry compost won’t hold the water that your new plants will need.
If you don’t have worm compost, you can do the same thing by adding a little new potting compost to the old. Throwing the whole lot away and replacing it simply isn’t necessary, and is very wasteful (not to mention expensive).
Do, however, remember that firstly, if you’ve grown anything with a tendency to self-seed (rocket is particularly notorious for this, as is parsley), you may find that you get volunteer seedlings in your pots. If you’re bothered by this, buy a small bag of fresh sterile compost to start seedlings off in. Once they’re well established, sharing their larger pot with the odd volunteer won’t matter too much (and you can just snip the volunteers out).
Secondly, some of the goodness (fertility) of the old compost will have been used up last year. The worm compost will help with that, but you will also need to feed more than you might with fresh compost. You can buy organic plant food from a garden centre, or you can make your own from nettles or comfrey.
If you’re making a compost mix for pots from scratch, rather than just mixing in a little new compost with your old mix, see the discussion of potting mixes on.
Getting an Early Start
By the start of March, anything you’ve overwintered in cold frames (or even out of them, in the case of some hardy lettuces) should be starting to perk up a bit. One of the major advantages of overwintering plants is that you get a head start on their production for the next year, even if you can’t crop all that much over the winter itself.
In the south of the UK, the last frost date isn’t until late April. This means that you need to be careful with sowing or moving delicate plants outside until late April. Tomatoes, peppers, and other similar plants may all be killed by a late frost. However, there are plenty of plants that are sufficiently hardy to cope with the sort of mild frosts that are all you’re likely to get by late March. Additionally, depending on the layout of your space, you may find that you have a microclimate that is a little warmer than the general temperature – for example, a protected or south-facing balcony. Being above ground can reduce the chance of frost, as the air tends to be a little warmer than the ground, but certain weather conditions can produce an ‘air frost’, so you shouldn’t rely on this.
By mid-March in southern areas you can start to dismantle your cold frames, to get the plants used to life in the outside world. If you’re a long way north, you may want to leave this until a little later. Basically, you should be able to get your plants out of the cold frames a month or so before your last frost date, or a couple of weeks after you notice them starting to perk up more than they were over winter.
Peas and Beans
Planting out seedlings
If you sowed peas or beans in November into small pots, it’s definitely time now to plant them out into larger pots – indeed, you may even want to think about doing this at the end of February, in areas further south. You can put three or four pea or bean plants in a 35cm pot, if you’re careful to feed and water them regularly.
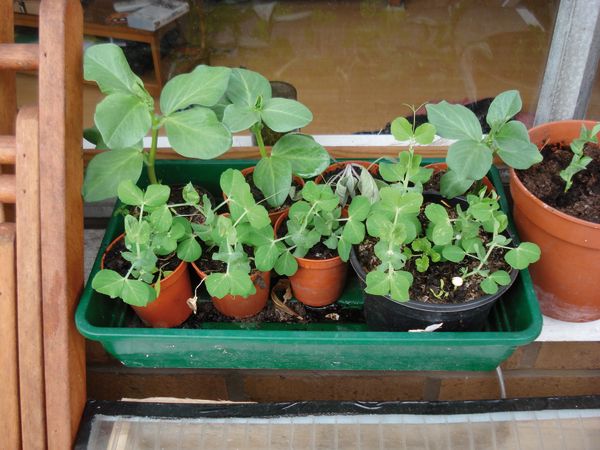
Overwintered peas and beans ready to be moved into larger pots.
Before you take each pea seedling out of its pot, first prepare its larger pot. Put compost in until the surface of the compost is roughly the height of the small pot below the top of the larger pot. So if your seedling is in a 10cm tall pot, fill in your larger pot to about 11cm below the top of the pot. Compost tends to settle, so in the end you’ll want to fill the larger pot fairly close to its top.
To get the seedling out of its pot without damaging it, spread your fingers around the base of the plant, just above the earth, and cup your hand over the surface of the pot. Turn the whole thing upside-down, and gently pull the pot off. If the roots are showing around the edges of the earth, very gently tease them out just a little, without breaking them, to encourage them to grow outwards when they’re in the new pot. Put the whole thing on top of the compost in the middle of the larger pot and then start filling in around it with more compost. When it’s all the way to the top, water it in well, and make sure you add a label! Ideally, labelling it with the date of planting out is good, but at the least, it’s best to give it an identity, especially if you have lots of different varieties of a particular plant. Later on, you may want to know which brand of pea was the best-producing, for example.
If you have several seedlings in one pot, you can very gently move the earth away from around them and tease them apart from each other. Do your best to do as little damage to the roots as possible – this is one good reason for using single small pots for seedlings you intend to plant on. In this case, you’ll probably want to fill the larger pot all the way up to the top, and then make a hole in it for each plant. Make sure the hole is much bigger (in both width and depth) than the root system of the plant you’re putting into it, and then fill in around the plant to keep it upright.
If your seedlings have been living inside, you’ll need to harden them off before you put them out full-time. You do this by putting them out for a few hours each day for a few days, then taking them back inside, before leaving them out overnight for the first time. If you just put them straight outside, the shock of the temperature change (particularly overnight) will slow their growth, and may even mean that you lose the benefit of having planted them early.
Harvesting
Towards the end of April, your peas should start getting big enough to harvest. One of the very nice things about peas and beans is that the more you harvest from them, the more they’ll grow – if, on the other hand, you let the pods stay on the plants, they’ll stop producing more. This is generally true for most fruiting plants and cut-and-come-again plants: the more you harvest, the more they’ll grow. Peas, of course, despite counting as ‘vegetables’, are in fact a seed, so they have more in common with fruiting plants than they do with root vegetables.
You may find that very early peas can be eaten pod and all; but they won’t be so nice for this as mangetout (you’ll want to plant out your mangetout seedlings this month but won’t be harvesting until next month). It’s better to wait a week or so until the pods plump up a bit, indicating that the peas inside have grown to a decent size. Fresh peas can be steamed or boiled very briefly; or you can just eat them neat. The pods, of course, go straight back into the compost.
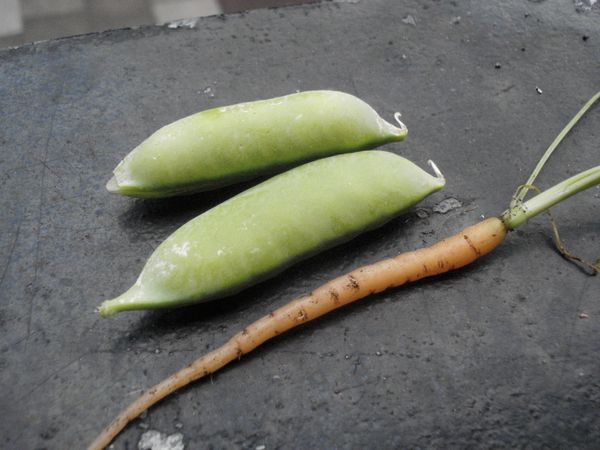
Freshly harvested peas with a baby carrot.
Lettuce and Other Green Leaves
Even if you overwintered some of your lettuce, and certainly if you didn’t, you’ll probably want to start sowing some fresh seeds now, so you can keep on getting fresh leaves as the overwintered plants (especially the rocket) go to seed in a few weeks.
Types of lettuce
For the purposes of the home gardener, there are two important distinctions between different lettuce types: loose leaf (cut-and-come-again) lettuce, and hearted lettuce. With hearted lettuce, the plant grows and matures all at once, so you pick the whole thing and eat it at one time. Cos, romaine, crisphead (such as Iceberg) and butterhead are all hearted lettuces. Loose leaf lettuce, on the other hand, does not form a heart, but instead just grows a succession of loose leaves. You can take a few leaves from the plant at a time and it will keep growing; hence ‘cut and come again’. There are a huge number of varieties of loose leaf; lollo rosso is particularly well known, but one of my favourites for home growing is bronze arrowhead lettuce. Royal oak leaf also has good writeups for taste.
For growing in pots, loose leaf lettuce, in one or several of its many varieties, is far and away the best choice. You can pick leaves over a longer period, and the plant will keep producing; with headed lettuces, it’s an all or nothing deal. This also means that you can give them less space – the plants will stay small, but they’ll keep producing leaves (just small ones), whereas a hearted variety would struggle to succeed at all. However, if you’re particularly fond of headed lettuce, by all means give it a go!
Lettuce of all sorts is at its best in cooler weather, so get it started as early in the season as you can to maximise the yield before the weather gets too hot and it starts to bolt.

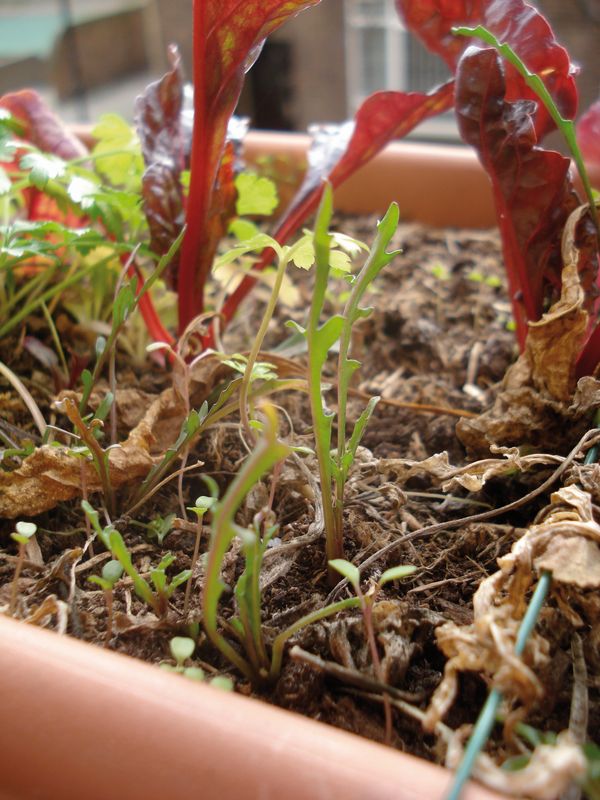
Baby greens going to seed.
Lettuces aren’t the only green leaf salad veg plant available, either. One of the best things to grow in a small space is rocket. It costs a fortune in the shops, comes washed in chlorine with half its flavour gone, and grows as a weed in this country, so it’s pretty easy to grow! It was brought over by the Romans around 2,000 years ago and has been thriving here ever since. You can buy either wild or domestic rocket seeds (domestic has a slightly milder flavour), and you can treat them much like lettuce when sowing.
You could also try sorrel, which is, as a rule, perennial (although mine died over a particularly cold winter). Its lemony leaves have a lovely light flavour, and it’s another prolific cropper, given half a chance. A couple of sorrel plants are likely to be plenty.
Young chard leaves can be nice in salad. You can also try land cress, or some of the more exotic green leaves such as mizuna. Check the seed packet for specific growing instructions, but in general all of these green leafy plants can be treated in much the same way as described for lettuces.
Sowing green leaves
Self-seeded rocket seedlings.
Lettuces and green leaves of all sorts are sown in much the same way: sow the seed fairly thinly (see below about thinning later on) and cover very lightly. A good rule of thumb is that the seed should be sown at about its own depth; so tiny rocket or lettuce seeds barely need to be covered at all. Water in and keep moist. Most green leaves are fairly quick to germinate, so you should see signs of life in a week or so (a bit longer if it’s cold). They are happy to germinate outside or inside – I always sow mine outside to save any transplantation hassle. If you don’t have any overwintered leaves, you may prefer to start inside to get going a little earlier. In this case, be careful to harden them off gradually when you move them outside.
Spacing and thinning
You have two choices when you’re sowing lettuce (or indeed any other plant): sow straight to the desired spacing, or sow more thickly and then thin out later on once they’ve come up. Sowing straight to the desired spacing has the advantage that you avoid both more work later on, and wasting seeds; but if you’re sowing something like lettuce that is edible as soon as it starts to grow, thinning isn’t so much ‘work’ as it is ‘harvesting’, and indeed ‘food’.
Given that, I usually sow lettuce more thickly than I’ll want them when they reach their final size, and aim to thin them out and eat the thinnings as they grow. You should always use a pair of scissors to thin out plants, by cutting them off just above the ground; if you just pull them out, you may uproot or damage the roots of other plants that you wanted to keep, especially if they’re particularly thickly sown.
When thinning, decide the spacing you want to have when you’ve finished, and then choose the strongest plant and thin those around it until you reach the desired spacing. With lettuce, and other plants with edible thinnings, you can thin more than once to maximise the food yield. Take out some extraneous seedlings at a very early stage, and leave the rest of the plants to grow a little more. Then thin again when they start to look crowded, and eat this more robust second set of thinnings. If you thin all at once early on, you won’t get this extra harvest. Very young lettuce and other green leaf plants are known as ‘microgreens’ and are quite trendy right now (as well as very tasty!). Microgreens can in fact be grown all year round on a windowsill and can also be used as a catch crop. Scatter a few seeds in the pot where, for example, you intend to put your tomatoes later on, and you’ll have time for a crop of microgreens before it’s time to move the tomatoes in. You may even be able to leave some of the lettuce plants in around the foot of the tomato, when you do plant it out.
It’s also worth bearing in mind that the spacing given on the packet may be quite generous anyway, especially since if you’re growing cut-and-come-again lettuce, they don’t need the space to form a big ‘heart’ that hearted varieties do. Thicker plant coverage also means less bare ground and thus less room for weeds (even balconies can end up with weeds from air- or bird-borne seeds). You can also always thin further later on if the plants begin to look overcrowded (and again, eat the thinnings). I tend to sow loose leaf lettuce within 7.5-10cm of one another even when they’re fully grown, and take more plants out only if they seem overcrowded (or just eat the leaves faster). In a shallow pot, where their growth will be restricted due to the restrictions on their roots, you can reduce that a little further. Do remember though that they’ll need plenty of food and water.
Carrots
Growing in pots isn’t particularly good for large carrots – it’s possible, but you need deep pots and won’t get many carrots per pot. It’s great, however, if you’re after baby carrots, and you can also get some dwarf or stumpy varieties that can get reasonably big in pots. It’s best to think, before making a decision, about your carrot preferences and the best use of your space. You’ll get a higher number of baby carrots per pot, and as you pull them up, you can start sowing new ones, so over the season you can get a consistent supply. Main crop carrots need longer to grow, so this approach won’t work so well for them – you can expect only a single crop per pot. Baby or dwarf carrots are also more expensive to buy in the shops, and the freshness of home-grown just-pulled carrots is more likely to show up in these varieties. Having said all that, if you don’t eat raw baby carrots then there’s no point in growing them!
Sowing and germinating
I confess that I’ve always had trouble with carrots, both in the allotment and on the balcony, although the year I was writing this book I finally managed a carrot harvest in both locations. Carrot gemination seems to be surprisingly challenging for such a staple crop. Part of the problem is that they are slow to germinate – up to three weeks before the shoots will emerge from the ground. So do be patient! This can make them more vulnerable to slugs and snails, as well. One advantage of growing in pots is that it’s easier to keep them away from these pests (try a hanging container, or use copper tape around the edge of the pot, if necessary); and on a balcony or roof, slugs are usually just not a problem at all. Carrot germination can also be spotty, as well as slow. In my experience it’s well worth sowing more thickly than you want, to allow for this erratic germination rate, especially since carrot seed only lasts a single season anyway (so you may as well use the whole packet). Finally, in order to germinate, carrot seeds must be kept moist, so make sure you keep an eye on them and water regularly so that the soil doesn’t dry out.
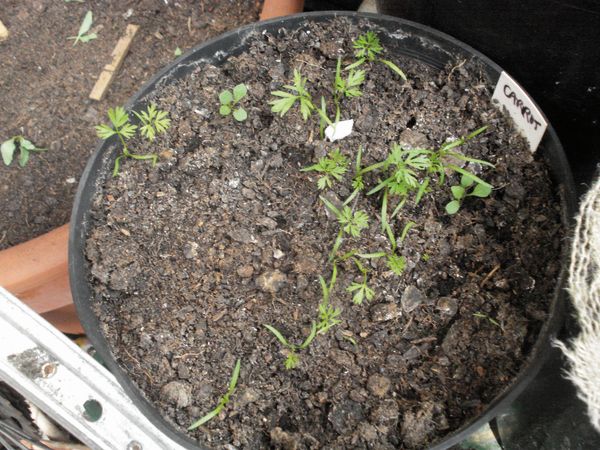
Carrot seedlings just coming up.
Another tip is to freeze the seeds before sowing them (so they experience a greater ‘warmth’ when sown, which encourages germination). In my not entirely scientific experiments this year, this didn’t seem to make a difference in the germination rate, but it’s an easy thing to try so may be worth a go.
Carrots, like most root vegetables, don’t like to be disturbed once they’ve started growing, as this will break all the tiny rootlets that emerge from the surface of the main root (the carrot itself). So you need to sow them in situ, or to start them in seed plugs and move them as a whole block (earth and all) when you plant them out. If you like, you can experiment with both.
As carrot seeds are so tiny, they barely need to be covered after sowing. Just sprinkle a very little compost over them and water in well. If sowing directly into a pot, sow fairly thickly and be prepared to thin them once they come up. As mentioned above, the seeds must be kept moist while they’re germinating. One way I’ve seen suggested to make this a little easier to manage is to moisten the soil after you sow them, and then cover it with something to keep the moisture in (plastic, old carpet, old T-shirts, skip-rescue plywood...anything that will prevent the soil from drying out). Keep checking for germination, and remove the covering once the plants are starting to show. I did try this, but didn’t see any difference in germination success compared to my uncovered pots.
Once the seedlings are an inch or two high, thin to an inch or so apart, keeping the strongest seedlings and using a pair of scissors to cut out the weaker ones (don’t just pull them out, as this risks disturbing the remaining seedlings, and the thinnings won’t be worth eating at this stage). Later, you can gradually thin them out further, before they start crowding one another but after the thinnings are worth nibbling at, by pulling every other carrot.
Harvesting
If you want to keep your carrot provision going for a bit longer, you can try sowing more seed in the gaps left as you harvest a handful of carrots at a time. Carrots can be sown for most of the spring and early summer, although won’t do so well over the hottest part of the summer. Indeed, some people recommend sowing in early summer to maximise germination rates. In theory, you can also sow again in late summer for an early autumn crop, if you have any seed left, but I haven’t myself had great success with this.
Carrot fly
If you’re growing on a balcony, you shouldn’t have problems with this notorious pest, since carrot fly don’t get more than 60cm above the ground. If you’re growing on a patio, you may want to consider using a plank of wood and a couple of bricks (or tin cans) to put your carrot pots on, to raise the carrots above fly level. You can also net the carrots, but you need a very fine net to stop the flies. There are no organic pesticides available for carrot fly (although a nematode treatment is new on the market), so you’re far better off trying simply to avoid the problem. Sow thinly and in early summer to minimise problems if you do experience difficulty with carrot fly, or try interplanting with other veg to confuse the flies.
Beetroot
Beetroot is another root that can be readily grown in containers, although you may not get such large beets as you might in the ground. To maximise your crop, you can also eat the beet greens, but see below for members of the beet family that are grown specifically for greens. As with carrots (and any other root vegetables that you want to grow), you’ll need a reasonably deep pot to grow worthwhile beets, although you can grow baby beets in troughs or shallower pots.
Sowing and thinning
Like carrots, beetroot are best sown directly into the pot which is their final destination. They germinate more reliably than carrots, though, so you can sow them more thinly. Sow them in mid-spring (they’re not frost-hardy, so wait until after the final frost), to about the depth of half a fingernail (1-1.5cm) and around 5cm apart and cover over with soil, then water in. The bigger you want your beets to be when you harvest them, the deeper the pot you’ll need. Very shallow pots aren’t suitable at all.
Beetroot will normally take a couple of weeks to germinate. Beetroot seed come up in little clusters, so shortly after they first appear you’ll need to snip out all but one plant from each cluster. Thin them again when they’re about 7cm tall, to a spacing of 10-15cm apart.
You can keep succession sowing every couple of weeks until mid-summer (and possibly a little later in mild areas) to get an ongoing crop.
Keep them well-watered, and feed a little if your compost needs it. Don’t over-water, or you’ll get more greens and less root.
Harvesting and eating
Beets take 8-10 weeks to mature, and you should be able to see how big the roots are getting as they poke up above the ground a little. Pull from the base of the leaf cluster and they should come up easily. As mentioned above, you can also eat beet greens, treated much like spinach when cooking.
Seed saving
Beet is wind-pollinated and will cross with other beet-like plants, so you can only reliably save seed if you aren’t growing any other types of chard or beet yourself, and there are no other similar plants within ¼ mile (this distance may be a little less in heavily built-up urban areas with few gardens around). In practice, this often makes seed saving impractical, but it may be worth a go if you’re not growing anything else. Alternatively, you can try fastening a large paper bag over the flower heads to protect them from cross-pollination. To improve pollination if you’re doing this, shake the bags up regularly to move the (very light) pollen around within the bag.
The seed will set the year after sowing, so keep the plants sheltered over the winter, and wait for the seed heads to grow in late spring or early summer the next season. In southern areas beet should survive the winter easily (the leaves are likely to die down over the coldest part of the winter, then return in the spring); in northern areas it may need a cold frame or other protection.
Be warned that the flower heads can grow to well over a metre! You’ll probably need to stake them. Once the seeds have set, harvest the stalks as they dry and collect the large round seeds.
Spinach Beet and Chard
Spinach beet and chard are both members of the beetroot family that are grown for their leaves rather than for their roots. They’re cut-and-come-again plants, so are very well-suited to growing in pots, because you maximise the return you get per plant. Chard in particular is also cold-hardy, so once you have the plant going, you may be able to keep it going right through the winter and into the next season.
The size of the leaves is dependent on the depth to which the root can sink, so if you sow chard or spinach beet in shallow troughs, the plants will grow, but you’ll get only small leaves. If you pick these early, they can be nice in salads. If you want larger leaves, you’ll need deeper pots.
Sowing and thinning
Like carrots and beet, chard and spinach beet are best sown directly into the pot which is their final destination. They germinate more reliably than carrots, though, so you can sow them more thinly. Sow them to about the depth of half a fingernail (1-1.5cm) and around 5cm apart and cover over with soil, then water in. If you use a deep pot, you’ll get larger leaves, as the root has more room to grow; if you want small leaves, you can sow in a trough or shallower pot.
The time taken for the plants to start to come up varies according to temperature, from 6 weeks at 5ºC to only a couple of weeks at around 15ºC. However, chard are cold-hardy, so there’s no need to worry about sowing too early – the worst that will happen is that you’ll have to wait longer for them to germinate.
When the plants do start to come up, you may find that you get multiple plants apparently from the same seed, or at least very close together. If this happens, then when the baby plants start showing their first proper leaves, pick the strongest plant from each cluster, and carefully snip the others off using nail scissors. Don’t just tug them out, or you’ll disturb the root system of the plant you want to keep.
If you want small leaves, you may not need to thin them any further. However, if you thin every other plant when they reach 15cm or so in height, you can eat the thinnings, then leave the rest to use as cut-and-come-again plants. Chard is quite tolerant of overcrowding, so you should be able to get away with 10cm between plants even once they’re quite large. Plants in a shallower pot, which will grow smaller leaves, can be significantly closer together than this.
You can keep succession sowing every few weeks until the early autumn, or just keep harvesting leaves as needed and the plant will keep producing more. Water regularly to avoid the leaves becoming bitter.
Harvesting and eating
Harvesting is easy: once the leaves are large enough (around 7.5cm), simply take hold of the leaf as low down the stalk as you can reach, and twist it off. Harvest from the outside, and more leaves will grow from the inside. Later on in the season, if outer leaves become damaged by frost, the inner leaves will be protected and can still be eaten, which is great during autumn and winter. Mark the best plants for later seed saving if you may want to do that.
One of the best ways to eat larger chard or spinach beet leaves is to flash fry them. Separate the leaves from the stalk, and chop them both crossways into strips about a centimetre thick. Dice a little garlic and ginger finely, and heat some oil. Throw in the garlic and ginger, then the chopped stalks. Add the leaves after about a minute, and after another minute, splash in a tablespoon of soy sauce, stir quickly, and serve.
Small leaves can be eaten as salad.
Seed saving
As with beet, chard is wind-pollinated and will cross with other chards and beets, so you can only reliably save seed if you aren’t growing any other types of chard or beet yourself, and there are no other similar plants within ¼ mile (this distance may be a little less in heavily built-up urban areas with few gardens around). In practice, this often makes seed saving impractical, but if you aren’t growing any other chard, spinach, or beet yourself and aren’t near other gardens, it may be worth a go. Alternatively, you can try fastening a large paper bag over the flower heads to protect them from cross-pollination. To improve pollination if you’re doing this, shake the bags up regularly to move the (very light) pollen around within the bag.
The seed will set the year after sowing, so keep the plants sheltered over the winter, and wait for the seed heads to grow in late spring or early summer the next season. In southern areas chard should survive the winter easily; in northern areas it may need a cold frame or other protection.
Once the seeds have set, harvest the stalks as they dry and collect the large round seeds.
I’ve never successfully seed-saved chard seeds that breed true (I haven’t yet tried the paper bag technique), but I’ve had some interesting self-seeded chard/spinach crosses show up in my allotment from time to time! They tend to run to seed much faster than their parents and the quality of the leaves unfortunately varies widely.
Chillies, Peppers and Aubergines
It’s possible to grow chillies, sweet peppers, and aubergines in pots in the UK, but unfortunately we don’t really have the climate to make it easy. The problem is that these plants need a extended period of long and sunny days for their fruit to ripen, which they may not get in the UK. If you sow at all late, they certainly won’t get this, and you won’t get a crop.
To maximise your chances of success, sow as early as possible, on a sunny windowsill, and let the seedlings grow on inside for a while. In the UK, you really need to sow an early variety, and by the middle of March at the latest, to have a chance of a decent crop. (Real Seeds sell some good early varieties.)
If you have any kind of cover available (such as a mini-greenhouse), chillies in particular will do much better there. However, Real Seeds do have a couple of ‘outdoor’ varieties which are a bit easier to ripen, and if you have a sunny, south-facing space then an early-ripening chilli may well fruit well anyway. Alternatively, you could just keep them on a sunny windowsill throughout the summer.

Chillies will do better under over.
If you’re going to grow the plants outside, don’t move them out until the seedlings are a decent size, and definitely not until well past any danger of frost is past. It’s also important to make sure that you harden them off. Put them outside for only a couple of hours in the middle of the day at first, then bring them back in. Gradually extend the time they stay out over the next few days, until you leave them outside overnight for the first time, after which they can stay outside.
The good news is that once your plants are established, in the right conditions, both sweet peppers and chilli peppers are in theory perennials. In cold UK conditions, they will usually die over the winter, but if you protect them or bring them inside then they ought to survive. I have once managed to overwinter a couple of sweet pepper plants outside, which meant that they started producing fruit much earlier in the season in the second year, and I got a fairly respectable crop of smallish peppers. Unfortunately the next winter was just a little too cold for them.
I’ve only tried growing an aubergine once, and the single tiny fruit I got didn’t encourage me to have another go. Other people have been more successful, and it is possible to get a few aubergines from a plant in the UK (if you’re in the far north, this is likely to be harder, as they really do need warm conditions). Your success rate is likely to be related even more than usual to the weather conditions (a cold or a hot summer), so it’s very hit and miss unless you have a mini-greenhouse, which will make a crop much more likely. If growing outside (even in a warm microclimate) expect one fruit from a large-fruited variety, and maybe three from a small-fruited variety. If you can grow them inside a mini-greenhouse you may be able to double this.
Sowing and planting out
Sowing any of these plants inside is exactly the same as for tomatoes. Sow either one seed to a compost plug, or a couple of seeds to a small pot, and then plant them up into bigger pots as required. You’ll probably want to move the plants to 7.5cm pots in April, and then into 20 or 23cm pots once they reach the four leaf stage, when they’re a few cm tall.
Starting the seeds off in an airing cupboard can also help them, especially for chilli peppers (I’ve grown a chilli pepper which required a temperature over 24ºC to germinate). Once germinated, they’ll be fine on a sunny windowsill. Aubergines may germinate better if you soak the seeds in warm water and leave them for 24 hours before sowing.
Make sure you harden the seedlings off, as discussed above, before you finally move them outside, and feed them once the first fruit has set. (If your potting compost is a bit weak, you may want to feed when you first pot them out, as well. Make sure that the plants don’t dry out.) For aubergines, pinch out the top of the plant at about 45cm tall to encourage bushiness, but remove any side shoots once you have three or four fruits set. There should be no need to do this for peppers.
Harvesting
Peppers can be harvested when still green, but they get sweeter as they ripen and change colour. Varieties exist which are red, orange, yellow, or even purple. Aubergines and hot chilli peppers should be harvested only when fully ripe.
Growing Potatoes in Containers
Potatoes are pleasingly easy to grow, and the good news is that they’re not only for people with gardens – they can also be grown very successfully in containers. Some gardeners swear by containers for potatoes even if they have access to open ground!
Containers
There are many possible options for housing your container potatoes. A straightforward one is a large pot, the larger the better. However, this is a bit of a waste of space, in that the potatoes will only be in there for a few months (but the pot will always be taking up space); and it can be harder to harvest from a pot. A better option could be a thick heavy duty black plastic sack (punch a couple of holes in the bottom), or a cardboard box (line with a plastic sack – an old compost sack is ideal – with holes punched in the bottom). A stack of tyres is a possibility: use a sharp Stanley knife to cut out the inside part of the tyres, then stack them on top of one another. This, however, like the large pot option, has a fairly large footprint, and unless you put some kind of bottom (a black plastic sack again?) on the base of the tyre stack, you’ll end up with a big pile of soil to sweep up at the end of the season. However, tyres can be easy to get hold of if you live anywhere near a garage, so may be cheaper than a pot.
You can also use several smaller buckets – one per tuber. Note that earlies (see below) won’t necessarily fill up all the vertical space that you give them, so if sowing earlies you may be better off with smaller containers anyway.
Finding seed potatoes
Once you’ve found your container, the next thing is to get hold of a couple of seed potatoes. Friends who have allotments may be able to spare some, or you could try just letting a potato from the local farmers’ market sprout. It’s best not to do this with supermarket potatoes, as you can’t be sure that they are pest and disease free. However, growing in pots is less risky for this than growing in open soil, because if you do see signs of disease you can get rid of the contaminated soil afterwards. So if you can’t get hold of ‘real’ seed potatoes, try the supermarket ones. Definitely do not save seed potatoes from these for use the year after, however. Some garden centres may sell seed potatoes by weight, which is good as you’ll only want a couple of them. Garden Organic have in the past done a potato growing day in early January when they sell single seed potatoes from lots of different varieties.
Types of potato
There are four basic types of potato:
- First earlies: can be sown in the south of the UK from mid-March (end of March or early April in the north), and will be ready about 10 weeks later.
- Second earlies: sown around the same time as first earlies, and take around 15 weeks to be ready.
- Main crop: sown a little later (early April in the south of the UK), and take around 18 weeks to be ready.
- Late main crop: sown around the same time as main crop, but take about 20 weeks to be ready.
The main differences are in the time taken to be ready, and the space needed for the potatoes. Main crop and late main crop need more room, but they also store best, so are the potatoes to sow if you have an allotment and want a large crop. In the context of a small urban space, and growing in a container, you’ll probably want to grow first or second earlies. Feel free to try main crop if you have a large container, though!
Tiny salad potatoes (usually second earlies) are best grown in a container even if you have access to regular soil, as they’re easier to get out of a container than if you sow them in the ground. These may therefore be your best choice for container growing. Otherwise, earlies are another good option.
Chitting, sowing and earthing up
Once you have your potatoes, you need to chit them, which means putting them somewhere warm and light so they can start to sprout. Egg cartons are good for putting potatoes in to chit, or you can line them up in an old pizza box. If you look at the potato, you’ll see it has a little dimple at one end. This is its bottom, from where the roots will sprout. Put that bit downwards, if possible, when chitting. They should be somewhere warm and light. I usually just put mine out on the living room floor near the window, but this may not always be popular with housemates.
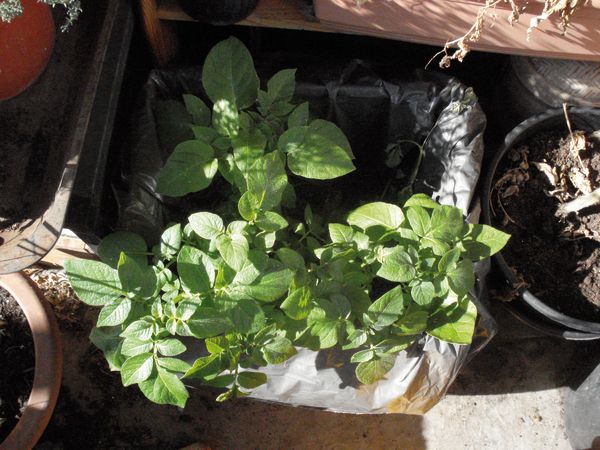
Potato plants growing well later in the season.
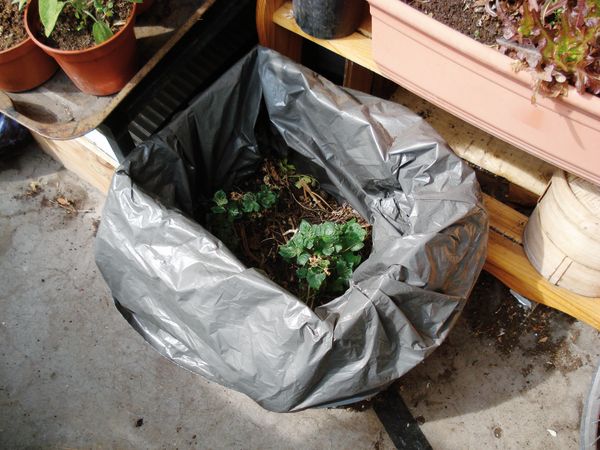
Potato plants first showing their heads, at the bottom of a box lined with a plastic bag.
Once they’ve chitted, it’s time to sow them out. Easter Sunday is traditional, but a little earlier in March is fine if you’re past the risk of frost. Put a few centimetres of stones in the bottom of the container for drainage, then about 15cm of potting compost. Put the potatoes in with their bottoms facing downwards, and cover them over until they’re just buried. Unless you’re sowing earlies, don’t cover right to the top of the container! Just make sure you can’t see any of the potato shoots. If you’re using a plastic bag, you should fold the bag down to just above the level of the compost; if you’re using a tyre stack, you should only have the bottom tyre in place now; if using a bucket or dustbin, don’t worry about this. Water well, and leave them to grow (making sure you carry on watering).
Again, you can probably get away with a smaller spacing than is given on the label. Each plant may crop a little less, but you’ll have more plants. I got four potato plants in a 12 bottle cardboard wine box, and harvested a couple of handfuls of (very tasty) potatoes from it.
When the shoots start to show above the surface, let them grow a bit, then earth up around them by adding more compost or other organic material. Straw is often recommended, but you can use more or less anything organic. I’ve found this to be a great way of using shredded paper! You’ll need to mix in some compost as well to help thicken it up a bit. Fill up to just below or even just above the level of the top of the shoot (roll up the bag or add another tyre, as necessary), and let it grow a bit more. Keep repeating this process until your container is full all the way to the top, then just let the potatoes grow. You should get potatoes growing all the way down the shoot that you’ve covered up, which is a great way of using vertical space to maximise your crop. Note, however, that earlies only set potatoes once, so this isn’t a useful strategy for them, only for main crop.
Another important way of maximising your crop is to water copiously at the right time, which is when the flowers have just appeared. In general, potatoes need a fair amount of water, but watering heavily at this time is when you’ll get the best return for the watering effort. You could also add a little plant food at this point to increase your crop.
Harvesting
After a few weeks, the plants will flower, and you can harvest your first handful of tiny new potatoes. Stick your hand into the soil just around the plants, and see what you can pull up. Take only a couple of potatoes per plant, and leave the rest to get a bit bigger. Boil immediately and eat with a little butter or oil (and some parsley, also from your balcony), and appreciate. Potatoes fresh out of the ground are a mindblowingly good experience!
If you want, you can harvest the lot now and get salad potatoes, or you can leave the rest of the potatoes further down to grow a bit bigger, and keep grubbing around every time you fancy a potato or two. As in the list above, maincrop potatoes should be ready to eat in 18-20 weeks, by which time the haulms (stalks) will have died down, while earlies are ready sooner.
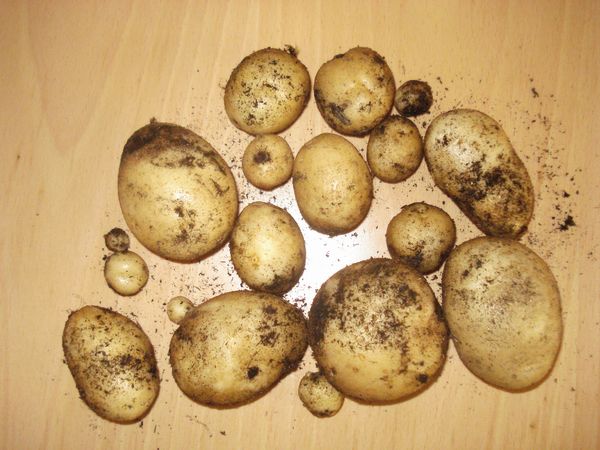
New potatoes fresh from the box.
Potatoes can of course be stored (best results with maincrop potatoes), but you’re unlikely to grow enough in a container to worry about this too much. If you aren’t using them straight away, though, make sure you put them away dry and keep them somewhere dark.
You can keep a couple of potatoes to use as seed potatoes next year (unless you used supermarket potatoes in the first place). Again, store them somewhere dry until it’s time to start chitting them.