CHAPTER 10
August
More harvesting and eating the produce in August, and hopefully more enjoying the sunshine. You can also experiment with a late potato sowing, if you have a couple of spare seed potatoes; and you’ll need to think about seed saving as various plants go to seed.
My Balcony at the Start of August
Plants growing:
Eight tomato plants, with plenty of ripening tomatoes.
Herbs: sage, mint, rosemary, bay, thyme, chives, oregano, basil, parsley, dill, papalo, coriander.
Bronze arrowhead lettuce: a few new plants coming up.
Microgreens along the edge of the railing.
Two pots of carrots (first baby carrots already eaten).
Courgette plant, without as yet any courgettes.
Satsuma tree putting out plenty of leaves, but no sign of fruit.
Nasturtiums and marigolds
scattered in various pots.
Late sowing of mangetout doing well.
Pepper plant without flowers or peppers yet.
Seeds and cuttings: none.
Things to Do in August
- Keep an eye on the courgettes and fertilise them by hand if need be.
- Harvest potatoes.
- Harvest tomatoes, carrots, and courgettes as they fruit.
- Succession sowing of rockets and other greens.
- Potential late sowing of potatoes.
- Other experimental late sowings.
- Seed saving as plants run to seed.
- Preserving any glut of produce.
Harvesting and Preserving
Growing things is great, but if you’re lucky, you may also face the question of what to do with them. In most cases, in a small space, you’ll to be able to keep up with eating what you produce as you produce it, most of the time. However, some vegetables tend to show up all at once (tomatoes may do this, depending on which varieties you chose and how many plants you grow), and you can also end up with a lot of green veg which are about to go to seed all at once, and so instead you prefer to harvest them all at once. The solution to this is preserving, which can take various forms.
Freezing
The most straightforward way to preserve food is to freeze it, which is particularly good for soft fruit. Raspberries, strawberries, blackcurrants, and blueberries all freeze well, and getting out a spoonful of frozen home-grown strawberries for your morning muesli in December is both satisfying and cheering. Dry the fruit as much as possible before freezing it, to avoid freezer burn.
To get individual frozen fruit rather than a huge lump of frozen fruit, you need to flash freeze the fruit. Get a baking sheet, or a sheet of tinfoil, and lay the fruit out in a single layer on it, not touching. Put it flat in the freezer for 24 hours. Once the fruit have frozen, take them off the baking sheet and put them into a labelled box – they’ll now stay separate and you can eat however much you want at a time!
Frozen fruit are nice in smoothies, porridge, muesli or yoghurt, or just on their own. You can also use them to bake with (try crumble or stew).
Blanching
A good option for green veg such as chard or spinach is blanching, followed by freezing. Blanching destroys various enzymes and bacteria, helping to keep the food fresh, and also maintains its colour and texture.
Use a pan with a lid, so that you can get the temperature back up to boiling as fast as possible. Fill the pan with water and bring it to the boil, and put your clean produce to be blanched into a sieve or chip basket (this is just to keep it all together). Once the water is boiling, plunge the sieve into the water, and put the lid back on the pan – the water needs to be back to boiling in under a minute. If necessary, you can blanch smaller quantities at a time. Courgettes (sliced) should be blanched for a minute, chard or spinach for two minutes.
Once the time is up, remove the sieve and plunge into a bowl of cold water for a few seconds, then into a bowl of water with icecubes in. This stops the cooking process (if the veg are left to cool by themselves, they’ll carry on cooking in their own heat). Once it’s cooled, dry and put into the freezer. See above for how to flash freeze if you want to keep the veg separate; otherwise, just freeze in appropriate portion sizes.
Bottling/canning tomatoes
Finally, with tomatoes and some other vegetables, you can try bottling (also known as canning). The downside of this is that you’ll need to invest in a certain amount of kit – at the very least, sufficient jars and lids to hold your crop, and a pan large enough to boil the jars in (this seals them). Reusable lids are available and are worthwhile in the long run, but do cost more in the short term. You can either bottle your tomatoes whole (blanch them first, for one minute) or turn them into sauce first. Making sauce has the advantage that it shrinks the tomatoes down a bit and therefore you need fewer jars. If you decide to try bottling (I have never quite had enough tomatoes yet to be worth it!), there’s plenty of further information available online. Be aware that since bottling doesn’t use sugar or vinegar to help with the preservation, you need to be more careful about sterilisation of your equipment and making certain that the jars come up to temperature. Jam or chutney is more forgiving as the sugar content makes it harder for any nasties to survive.
You can also turn green tomatoes into green tomato chutney or just leave them in the fridge to ripen slowly.
Jams and jellies
Another option for preserving fruit is to make jam or jelly. The basic approach is to use the same weight in sugar as fruit, put it all into a heavy-bottomed saucepan, and leave on a low heat, stirring often, while it first melts and then thickens. Meanwhile, wash some jars and put them (but not their lids) into the oven at 100ºC to sterilise.
When making jam, you use the whole fruit and leave it in; jelly is made in much the same way but with the fruit juice only.Chutney is also a form of savoury jam, again made in much the same way;
If making other jams, you should remember that some fruit needs added pectin (blackberries, raspberries and other berries) in order to set, whereas others (such as rhubarb and apple) have their own pectin. If you’re adding pectin, you should only need to cook the jam after the sugar has melted for a short while. Follow the instructions on the pectin packet for best results. You can also chop up an apple (whole, including skin and core) and suspend it in the jam in a muslin bag to make your own pectin. However, I’ve had limited success with this. I did come out with some very nice rosehip syrup-ish stuff; it just didn’t really set.
If you’re making jam without added pectin, you need to boil it for longer, and test it intermittently for setting. Put a saucer in the fridge to get cold, then drop a teaspoon of jam onto the saucer and leave it to cool for a moment. If when you drag a finger across it, it has formed a skin, it has set, and you should take the jam off the boil and pour it into the sterilised jars. (I strongly recommend using a funnel to avoid making a terrible mess.) Place a circle of greaseproof paper on top (you can buy packets of circles specifically for jam making) and put the lid on. Label the jars with contents and date once cool.
Saving Seed as Plants Run to Seed or Die Off
The big advantage of growing your plants from ‘real’ seeds (i.e. seeds that have been open pollinated and which will breed true) rather than from the F1 hybrids you’ll get in garden centres is that it enables you, if you wish, to save seeds from the plants that you grow.
Seed saving is definitely optional, especially if you’re a beginner gardener. If you’re not interested or don’t fancy it, it’s fine to stick with buying seeds from a shop. But if you do want to try out seed saving, it does mean that you can both save money by buying fewer seeds next year, and that you can select seeds from plants that grew particularly well in your space, or that tasted particularly good. Effectively you’re selecting for success: so next year’s plants from those saved seeds should also do slightly better, and then you can again save seed from the best of that crop. Over a period of years, you can select for any characteristics you like: early (or late) cropping, particularly sweet tomatoes, resistance to bolting... it’s up to you!
Bear in mind that not all plants are easy to save seed from. Tomatoes are easy, as they always self-fertilise so will always breed true. Rocket, parsley, chives, and dill are also easy to save the seeds of. In other cases, such as chard, the plants are wind-pollinated, so may be inclined to cross with plants from elsewhere. This means that it’s nearly impossible to be sure what you’ll get in the next generation. The seeds should grow something, though, so feel free to experiment if you want! I’ve made a note in the discussion of each plant whether seed saving is or is not possible.
It’s important to find a way to keep track of which plants have been particularly successful. If you’re selecting for the tastiest tomato, for example, it’s too late to decide to save seeds when most of the tomatoes have gone, because you may not be able to identify the best taste any more. If you’re selecting for quantity produced, then you’ll need to label each plant right at the start, and then track the weight (this is more useful than number) of fruit obtained from each plant. (This is, admittedly, a bit of a hassle for the home gardener.) If you’re selecting for resistance to bolting, the easiest way to do this is to watch for the first handful of plants to bolt, then tag all of the ones that have not yet done so. As each plant bolts, take its tag off: the last tag to stay on identifies the plant you want. Otherwise, by the time they’ve all bolted, you won’t be able to tell which one was which.
Bruschetta with Salad
Cherry tomatoes can pretty much be eaten as is, and they go very well with a random assortment of microgreens or full sized leaves, especially rocket.
Another option is to slice them into quarters and make bruschetta. Mix the chopped tomatoes with some chopped garlic, olive oil, and vinegar, and set aside. Toast the bread, then rub a clove of garlic on one side, and drizzle a little olive oil on. Top with the tomato mixture and some basil leaves, and serve with green leafy salad on the side.
Sowing Potatoes for Christmas Dinner
By now, your earlier-planted potatoes should have been dug up and eaten; and hopefully they were tasty! It’s not too late now to sow a very early (or possibly very late) batch of seed potatoes to come up for Christmas dinner, or at least for sometime in the late autumn or early winter. Remember that potatoes take about 16 weeks to be ready to pull up (and will grow a little more slowly in the late summer/autumn), so depending on the variety you have and when you’d like to eat them, you can either go ahead and sow them now, or wait until early September. Given that the days are getting shorter at this time of year, you’re better off sowing a bit early and leaving them in the ground once they’re grown, than sowing them bang on time, as the plants are likely to take a bit longer to get growing at this time of year.
While writing this book I tried a second sowing of potatoes once I’d dug up the first ones (and dealt with the ants’ nest that I found in the bottom of the box). They grew normally, and I earthed them up as they got bigger, and watered regularly. I eventually dug the potatoes up the following New Year. I got only a bare handful of smallish potatoes, but it was enough for a meal for me and they were very tasty! The seed potatoes would otherwise have been thrown away, so it was worth the (minimal) effort. It wouldn’t have been worth acquiring seed potatoes specifically for this, however, unless you’re very enthusiastic about the idea.
Remember with all of these characteristics that other factors will also affect the outcome. Were all the pots the same size and made of the same material? Did you water all of the plants evenly (and were any of them in self-watering containers)? Did you feed them all evenly? Were some in more shade than others? My most successful tomato plant the year I wrote this book was in the sunniest spot on the balcony, against a brick wall, in a self-watering container. I am pretty sure that its success was more down to these factors than to genetics; although I saved some seed anyway, and will certainly grow another plant or two in that spot next year!
For fruiting plants, you also need to remember that you want to save some seeds before you eat all of the fruit. Save seed from a healthy, successful-looking fruit, not from a small weedy one. Saving seed from green leafy plants is easier, because you won’t be eating them after they’ve bolted; although bear in mind that you may want to make sure you do leave one or two plants to bolt after you’ve eaten the rest, so don’t crop the whole lot.
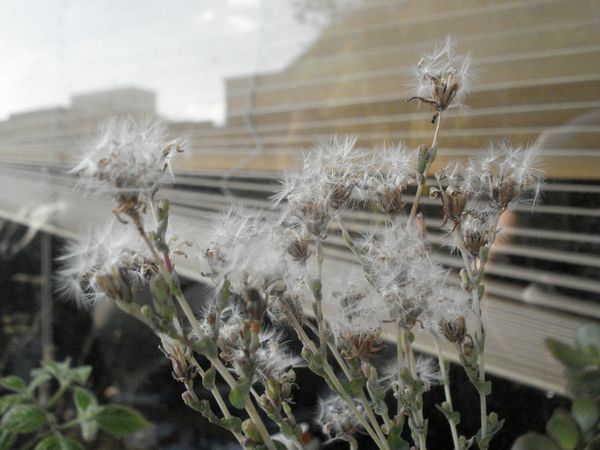
Bronze arrowhead lettuce seedheads.
With green leafy plants, keep an eye on the plants after they’ve flowered, until you see the seed cases developing and starting to dry out. It’s best to leave them on the plant for as long as possible, but do take them off and finish the drying process on the windowsill before they’re entirely done, or they’ll self-seed all over your pots instead. Parsley and rocket are both particular culprits for this, in my experience; happily I very much like both plants so am not too bothered by their ubiquitous vigour! If they spread too much, I just eat more of them. Alternatively, if you prefer a more laissez faire approach, just let them self-seed and don’t bother saving any. I prefer to do both, so I have some seed for the next year if the self-seeding was insufficient or in awkward places.
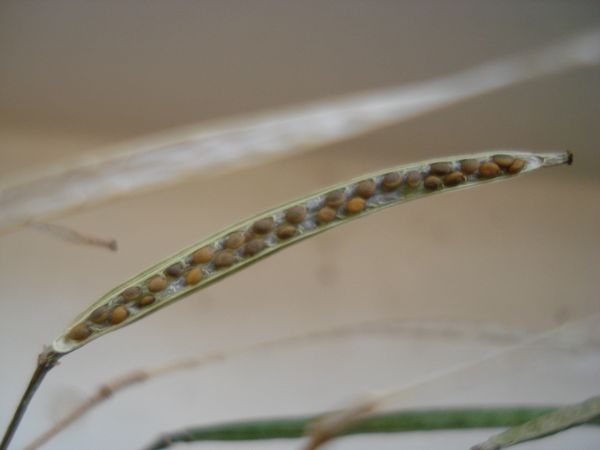
Seed inside a rocket seedpod.
With fruiting plants such as tomatoes, just cut the seeds out and spread them on a plate to dry (don’t use kitchen towel, or they’ll stick). Alternatively, you can put the tomatoes in water for a bit to ferment, which will help to separate out the seeds, and also help them to germinate faster next year. Just scoop the seeds out and put them in a jar with some water, stir, and leave for a few days. Cover the jar with a piece of kitchen roll, held on with an elastic band, to minimise fruit fly problems. The fermentation is finished when there’s a layer of mould on the top, and/or the seeds have all settled to the bottom of the mixture. Strain the seeds into a sieve, and rinse well. Drain them and spread them on a plate to dry.
Once your seeds, of whatever type, have fully dried, you can extract them carefully from their seed cases or pick them off the plate, and put them into a sealable packet of some kind (both paper and plastic are fine). Label the packets with plant, date, and location, and put them somewhere cool, dry, and dark until spring.