 DESIGNED BY MARLY BIRD
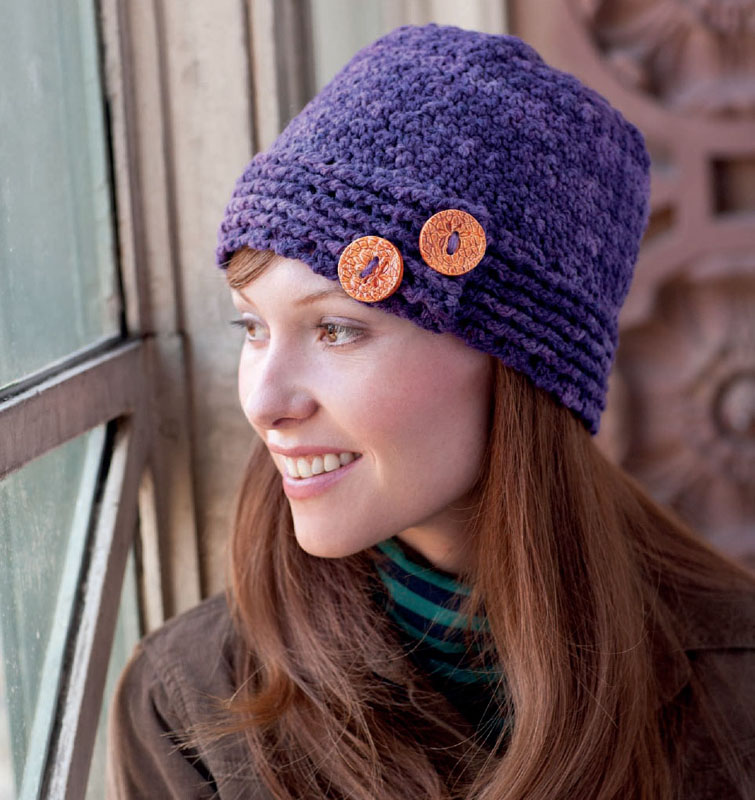
A good basic cap that fits just right is hard to find—but your search is over with this pattern! Fitted enough to keep you warm but not so tight that it will ruin your hair, with a comfy buttonband to frame the face, this crochet cap will be your go-to all winter long. Stitched in a yarn blended from yak and Cormo sheep, the cap has a texture that is delightfully soft and reminiscent of chenille.
21" (53.5 cm) circumference.
Laceweight (#0 Lace).
Shown here: Bijou Basin Ranch Bijou Bliss (50% yak, 50% cormo; 150 yd [137 m]/1.98 oz [56 g]): #Regal, 2 balls.
Size G (4.5 mm) or hook needed to obtain gauge.
Yarn needle; two 1" (25 mm) buttons; stitch marker.
16 sts and 16 rows = 4" (10 cm) in Griddle-stitch pattern.
Take time to check gauge.
Dc2tog (Double crochet 2 sts together)
[Yarn over, insert hook into next st, yarn over draw up a loop, draw through 2 loops on hook] 2 times, yarn over, draw through all 3 loops on hook.
Sc2tog (Single crochet 2 sts together)
[Insert hook into next st, yarn over draw up a loop] 2 times, yarn over, draw through all 3 loops on hook.
FPdc (front post double crochet)
Yarn over, insert hook from front to back to front around post of corresponding stitch below, yarn over and pull up loop [yarn over, draw through 2 loops on hook] 2 times.
BPdc (Back Post double crochet)
Yarn over, insert hook from back to front to back around post of corresponding stitch below, yarn over and pull up loop [yarn over, draw through 2 loops on hook] 2 times.
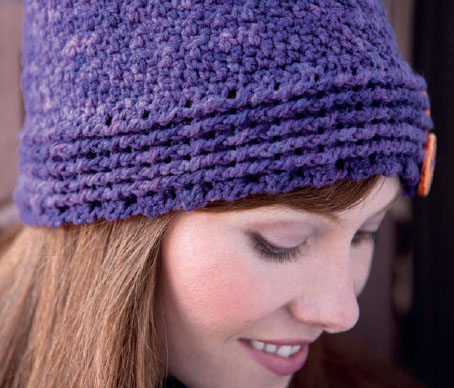
Griddle-Stitch Pattern in Rows (Multiple of 2 sts + 1)
Set-up Row: Sc in 2nd ch from hook, *dc in next ch, sc in next ch; rep from * to last ch, dc in last ch, ch 1 (does not count as st), turn.
Row 1: *Sc in next dc, dc in next sc; rep from * across, ch 1, turn.
Repeat row 1 for Griddle-stitch pattern.
NOTE
 Work band flat, then work sts into side of the band.
Instructions
Band
Ch 12.
Set-up row (WS): Dc in 3rd ch from hook and in each ch across, turn—10 dc, ch 2 (does not count as st).
Row 1 (RS): Dc in 1st dc, *FPdc in next st, BPdc in next st; rep from * to last st, dc turn, ch 2 (does not count as st), place marker to mark RS.
Repeat row 1 until band measures about 22" (56 cm) ending with RS row. Do not turn, ch 1, turn band 90 degrees to work along the side edge.
Body
Foundation Rnd (RS): Work 80 sc evenly along edge to 2" (5 cm) before end, overlap the two ends of the band 2" (5 cm) for button (see photo at beginning of pattern) and work sc through both edge sts. Join with sl st to first sc, turn.
Rnd 1 (WS): Ch 1, sc in first st, dc in next st, *sc in next st, dc in next st; rep from * around join with sl st in first sc, turn—80 sts.
Rnd 2: Ch 1, *sc in next dc, dc in next sc; rep from * around, join with sl st in first sc, turn.
Rep Rnd 2 until body of hat measures 5.5" (14 cm) from beginning, ending with WS rnd.
Crown
Rnd 1 (RS): Ch 1, *[sc in next dc, dc in next sc] 3 times, sc2tog, dc2tog; rep from * 7 more times, join with sl st in first sc, turn—64 sts.
Rnd 2 and all WS Rnds: Ch 1, *sc in next dc, dc in next sc; rep from * around, join with sl st in first sc, turn.
Rnd 3: Ch 1, *[sc in next dc, dc in next sc] twice, sc2tog, dc2tog; rep from * 7 more times, join with sl st in first sc, turn—48 sts.
Rnd 5: Ch 1, *sc in next dc, dc in next sc, sc2tog, dc2tog; rep from * 7 more times, join with sl st in first sc, turn—32 sts.
Rnds 7 and 9: Ch 1, sc2tog, dc2tog around—16 sts, then 8 sts.
Fasten off, leaving 12" (30.5 cm) tail.

Finishing
Whipstitch the opening at top of the hat closed, sew buttons into place on band.
