
 DESIGNED BY LINDA PERMANN
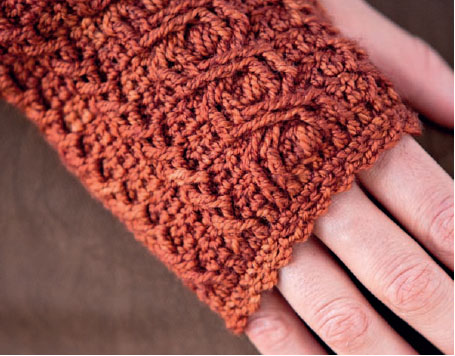
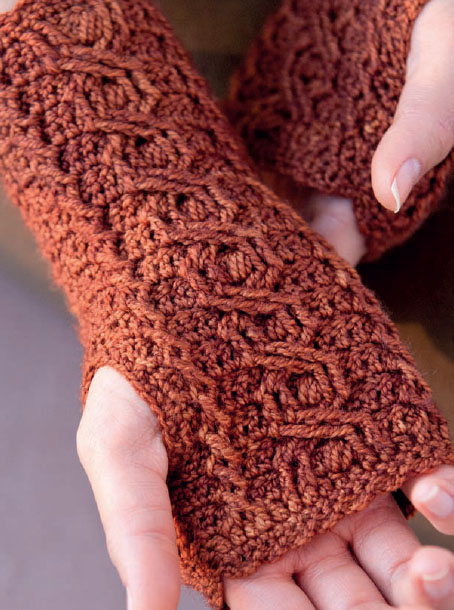
Keep your hands warm and your fingers free with these delicate cabled mitts. Worked in sock yarn, this set is guaranteed to be comfortable—and they’re reversible, too, so you never have to worry which hand you put them on. The cables are worked only when the right side is facing you, making it easy to get the hang of the pattern. You won’t want to stop at just one pair!
7½" (19 cm) in circumference by 8¼" (21 cm) long, each mitt.
Fingering weight (#1 Super Fine).
Shown here: Madelinetosh Tosh Sock (100% superwash merino wool, 395 yd [361 m]/4 oz [110 g]): #Violin, 1 hank.
Size D-3 (3.25 mm) or size needed to obtain gauge.
Yarn needle; 2 stitch markers.
22 stitches and 16 rows = 4" (10 cm) in single (sc) and double crochet (dc) stitch pattern.
Take time to check gauge.
Puff St
(Yarn over and insert hook in stitch, yarn over and draw loop through stitch, bringing loop up to height of current row) 4 times, yarn over and draw through all 9 loops on hook.
FPtr (Front Post treble)
Yarn over twice and insert hook from front to back to front around post indicated stitch, yarn over and draw up a loop, (yarn over and draw loop through first 2 loops on hook) 3 times.
FPdtr (Front Post double treble)
Yarn over 3 times and insert hook from front to back to front around post of indicated stitch, yarn over and draw up a loop, (yarn over and draw loop through first 2 loops on hook) 4 times.
NOTES
 When working post stitches, skip one stitch along the working row as the post stitch counts as that stitch.
All post stitches are worked in stitches two rows below the working row.
Instructions
Gloves (make 2)
Ch 41.
Row 1 (RS): Dc in 4th ch from hook (skipped ch-3 counts as dc) and each ch across—39 dc, ch 3 (counts as dc throughout), turn.
Row 2 (WS): Dc in each of next 8 sts, puff st in next st, dc in next 19 sts, puff st in next st, dc in remaining 9 sts—37 dc and 2 puff sts, ch 1, turn.
Row 3 (set-up row): Sc in first 2 dc, *(FPtr in 5th dc along Row 1, sc in next dc, FPtr in 3rd dc along Row 1—small cable made), sc in next dc, FPtr in both 7th and 8th dc along Row 1, sc in next 3 sts, FPtr in 12th and 13th dc of Row 1, sc in next dc, (FPtr in 17th dc along Row 1, sc in next dc, FPtr in 15th dc of Row 1), sc in next dc, (FPtr in 21st dc of Row 1, sc in next dc, FPtr in 19th dc of Row 1), sc in next dc, (FPtr in 25th dc of Row 1, sc in next dc, FPtr in 23rd dc of Row 1), sc in next dc, FPtr in both 27th and 28th dc of Row 1, sc in next 3 sts, FPtr in both 32nd and 33rd dc of Row 1, sc in next dc, (FPtr in 37th dc of Row 1, sc in next dc, FPtr in 35th dc of Row 1), sc in each of last 2 dc—39 sts, ch 3, turn.
Row 4: Dc in each st across, ch 1, turn.
Row 5: Sc in first 2 dc, (sk 1st FPtr in Row 3, FPtr in 2nd FPtr (two rows below), sc in next dc, FPtr in FPtr just skipped), sc in next dc, *[sk next 2 FPtr (two rows below), FPdtr in each of next 2 FPtr (two rows below), sc in next 3 dc along working row, FPdtr in each of 2 FPtr just skipped—large cable made], sc in next dc,* [sk next FPtr (two rows below), FPtr in following FPtr (two rows below), sc in next dc, FPtr in FPtr just skipped, sc in next st] 3 times; rep from * to *, [sk next FPtr (two rows below), FPtr in following FPtr, sc in next dc, FPtr in FPtr just skipped], sc in last 2 sts, ch 3, turn.
Row 6: Rep Row 2, ch 1, turn.
Row 7: Sc in first 2 dc, [sk next FPtr (two rows below), FPtr in following FPtr, sc in next dc, FPtr in FPtr just skipped], sc in next dc, *FPtr in each of next 2 FPdtr in Row 5, sc in next 3 sts along working row, FPtr in each of next 2 FPdtr (two rows below), sc in next dc, [sk next FPtr (two rows below), FPtr in following FPtr, sc in next dc,* FPtr in FPtr just skipped, sc in next dc] 3 times, rep from * to *, FPtr in FPtr just skipped, sc in last 2 sts, ch 3, turn.
Row 9: Rep Row 5, ch 3, turn.
Rows 10–29: Repeat Rows 6–9 five times.
Rows 30–31: Repeat Row 6 and 7, ch 1, turn.
Top Edging
Row 1 (WS): Sc in each sc across, ch 3 turn.
Row 2 (RS): Sl st in 3rd sc, *ch 3, sk next sc, sl st in next sc; rep from * across—19 ch-3 loops. Fasten off.
Bottom Edging
Row 1 (WS): With WS facing, attach yarn at corner in 3rd ch of t-ch, ch 1, sc in each ch across—39 sts, ch 3, turn.
Row 2 (RS): Rep Row 2 of Top Edging.
Blocking and Seaming
Wet block pieces to about 7½" (19 cm) wide by 9" (23 cm) long and let dry completely.
Place a stitch marker 2" (5 cm) from top looped edge of rectangle and a second marker 1½" (3.8 cm) below first marker. Fold rectangle in half lengthwise with right sides together. Sew side seam from top of mitt to first marker and from second marker to bottom of mitt, leaving 1½" (3.8 cm) space between markers open for thumbhole. Turn glove inside out.
Thumb Edging
Round 1 (RS): With RS of mitt facing, join yarn in seam near bottom of thumb, ch 1, work 20 sc evenly around thumbhole, join with sl st in first sc. Fasten off.
Finishing
Weave in the ends.