

 CHAPTER 7
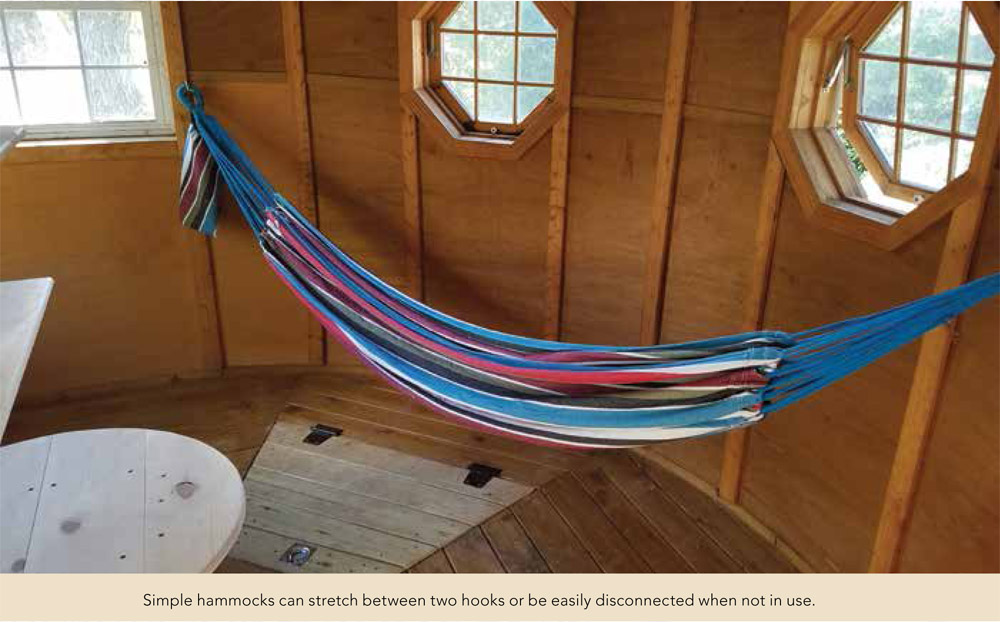
Most of the time you spend building your treehouse will be on the main structure. However, most of the time you spend enjoying your treehouse will be on the various accessories and options that you can add on to the project. I have spent more time napping in my hammock than I ever spent building my treehouse.

By far the most requested accessory on a backyard treehouse is the bucket and pulley. The typical configuration is a simple 1:1 pulley with the pulley mounted to a tall railing post or an overhanging tree branch. I like to tie one end of the rope to the bucket and the other end to the railings so that the rope does not slide all the way through the pulley. I have seen kids fill up the bucket with rocks and then run around the tree, up the ladder, out the door, down the porch, and then hoist up the rocks, only to dump the rocks overboard and run down to repeat the process. For a $2 pail, a $4 pulley, and $10 of rope, every treehouse designed for kids should have one of these.

All ages of people can enjoy tree swings. They go very well underneath a treehouse or on a nearby branch. This is why swings are the most popular accessory for kids’ and adults’ treehouses.
Double Rope Swings
A typical play set swing has two ropes (or chains) that hang down about 18 inches to 36 inches apart. The ropes can be fastened to a structural member of the treehouse, such as a beam or floor joist, or connected to a branch that is close to horizontal. These swing seats are commonly wooden or rubber. The rubber ones come in residential and commercial quality, which affects how long they will last. Commercial swings often have metal inserts that reinforce the attachment holes and are made with thicker material. When you sit in a rubber belt-style seat, the two ropes angle in to fit the outside of your waist. However, with wooden plank seats, the width of the seat is fixed. This is important to note when hanging the two ropes, because you want the distance of the two ropes at the top to be slightly wider than the width of the seat at the bottom. This will make both ropes angle inward slightly, which will limit twisting during normal use. Of course, if a seven-year-old wants his friend to twist him up so he can spin all the way down, causing the seven-year-old to be unable to stand up straight or possibly throw up, then you can install the ropes to angle wider toward the bottom if desired.


Single Rope Swings
Sometimes called the “monkey swing,” these wild rides can go in any direction and be attached up to about 80 feet off the ground. But the wild-and-crazy factor is mostly a function of how tall the swing is and how big a push you get, as the shorter ones can be quite tame. A single rope is attached to a tree branch, and a loop of rope or a round seat with a central hole is tied onto the bottom. You need to have a branch that extends over an open area, because while the swing can move in any direction back and forth, it tends to shift to an elliptical or circular pathway. Running into tree trunks or treehouse support posts can really hurt. The space requirement is the reason these swings don’t work particularly well on play sets with the familiar A-frame supports.


Safety Alert: Rope does not last forever outdoors. Make sure to use a high-quality synthetic rope and regularly inspect the rope for wear or damage. Serious injury and death happen every year when old ropes break unexpectedly. Never use natural fiber ropes such as manila or hemp outdoors where they can get wet. Always start with a rope that is over 5,000 pounds breaking strength, and preferably over 10,000 pounds, so that it will remain strong enough for a longer time.
Attaching Ropes to Trees
Attaching ropes to a treehouse can be done with off-the-shelf swing hangers or with knots. Hangers either go back and forth for two rope swings, or in all directions for monkey swings, tire swings, and spider swings. Hangers should be attached with heavy-duty galvanized lag bolts, hex bolts, or timber screws. Ideally you want to use fasteners that are ¼ inch in diameter or greater. Remember that pressure-treated wood is corrosive to fasteners, so use hot-dipped galvanized fasteners or other fasteners approved for all types of pressure-treated lumber. You can also skip the hangers and tie a knot around a main beam of the treehouse or other suitably strong attachment spot. I prefer to tie a running bowline knot around the beam with the slip knot area underneath the beam. To improve rope life, sand or round over the sharp edges of the four corners of the beam where the rope will contact over time, and monitor the loop of the bowline knot for wear, as that is where the rope is most likely to eventually break.
There are two main methods for attaching ropes to tree branches. Most arborists have an opinion, but here are the pros and cons of each.
The first method for attaching ropes is to drill a vertical hole through the branch and install a large eyebolt (at least ½ inch but preferably ¾ inch diameter) with the eyelet pointing downward. Ropes are then tied onto the eyebolts. This method does more initial damage to the tree and creates a weak spot where a branch will be more likely to break under heavy load. However, as long as the tree remains healthy, branches can usually respond well to such wounds over time.
The other method is to tie a running bowline around the branch. I have found that this does not girdle tree branches when a large diameter rope such as ¾ inch or greater is used, and a nonconstricting knot is used. The branch can push the rope outward as it grows. The downside is that for trees with thin or soft bark, the slight abrasion can do more damage in the long run than initially installing a bolt.
Motion of Swings
When attaching to tree branches, it is normal for a swing to move the branch it is attached to, or to even shake the whole tree a little bit. All tree parts are good at dampening movement from wind forces, so as long as the swing doesn’t move the branch more severely than the wind does, then seeing the tree dance a little bit with the swing is probably OK. Keep in mind that certain tree species have more brittle branches. I would be happy to swing on a 5-inch-thick oak branch, but I might be concerned about a tulip poplar branch at 5 inches, depending on how far I was attaching the rope away from the trunk. The closer to the trunk, the more reliable the branch is.
When attaching a swing to a treehouse, keep in mind the forces that use of the swing will apply to the platform. For example, if you have a treehouse centered on a single tree, then swinging in a tangential direction will cause the platform to rotate around the tree. In some situations, where the movement is significant, it could cause parts to wear out over time. With other styles of treehouses, diagonal bracing can reduce the amount of movement from the operation of the swing. A traditional swing set frame can be added to the side of a treehouse if there is not room underneath. The A-frame design will help hold the treehouse still when people are swinging back and forth.
Of the several ways I have seen monkey bars constructed, my favorite for backyard treehouses is the simple screw -or bolt-on handles. They come in four colors, and you can adjust the spacing as desired. We connect these with 3-inch RSS screws. Sometimes you can directly attach the bars to the underside of the floor joists or to a flat 2x4 “track” that you first cross the joists with. But if the track is too high, then you have to drop it down to a safe height for the activity.

Zip lines are a fun addition to a backyard, with or without a treehouse. But there is significant crossover between the outdoorsy imaginative people who want a treehouse and the thrill-seekers who like zip lines. They do seem to go together. In 1990 the movie Home Alone showed Kevin making a zip line escape into his treehouse, only to get the drop on the bad guys when they attempted to follow him. That zip line wasn’t the safest one I’ve ever seen, but it certainly had us all thinking that Kevin was a pretty cool little daredevil. So let’s talk a bit about how backyard zip lines work, how to install them, and how to minimize risks of injury.

Slope
In order for the rider to roll down the wire at a fun speed and get most or all of the way to the other end, there must be a negative slope between the wire attachment point at either end of the line. However, in order to avoid crashing at the end, the slope cannot be too steep. For most backyard zip lines, we find that the ideal slope is somewhere around 2 to 3 degrees downward. Longer zip lines must have steeper slopes because of friction on the wire and air resistance. If the slope is less, it makes for a slow ride and may not get the rider all the way to the end. If the slope is steeper, then you need to introduce a braking method to prevent crashing. In order to achieve the proper slope, an elevated platform is usually needed at the start. On flat ground, for a 100-foot zip line, we usually build a launch platform about 6 feet high with a ladder built in. In rare cases, the topography of the land allows a start without a platform, such as if you have a ledge or cliff at the start, and a flat plane or slight bowl-shaped landing area near the end.
Sag
The zip line wire hangs in what mathematically is called a catenary curve, which to the untrained eye looks like half of an ellipse. However, most of us wanting to install a zip line in our backyards do not want to revisit our textbooks or hire an engineer to run numbers for us. To simplify, you can approximate with trigonometry, which is more accessible to some people, though a little less accurate. The nonmathematical explanation is that a load applied downward on the middle of a zip line wire is magnified by the amount of tension on the wire. The tighter the wire is, the higher the tension when loaded. Therefore, the wire must sag enough or it could break. I know it seems unbelievable that you could break a wire that is 14,400 pounds or more with just the weight of a person, but under some conditions it is possible. When you terminate a wire with cable clamps, 20 percent of the wire strength is lost, so you are down to 11,520 pounds. Next, you should use a safety factor of 5:1, which means that the zip line should be designed to hold five times the expected load. Now you’re down to 2,304 pounds. The safety factor will help riders stay safe in the event of shock loading and will compensate over time for strength loss due to wire rope that rusts or becomes worn. I have a tool that measures wire tension, and I have seen some backyard zip lines with over 2,304 pounds of tension on the wire while in use. These wires were obviously very tight and would have been overtightened with a come-along or winch when installed. One way to decrease tension is to introduce more sag into the wire. This might require raising the attachment points at both sides to maintain the proper slope without bottoming out in the middle of the ride. This all may sound very complicated, but short zip lines can usually be figured out by taking a guess, temporarily setting it up, testing with a sandbag or other test weight, making adjustments, and then retesting it until it looks ready for a live human ride.
Zip Lines and Safety
There is always a risk of injury with zip lines. People are at heights, in motion, and using their judgment. The risks are similar to riding a horse or a mountain bike. There are no codes that currently apply to backyard zip lines. The challenge-course industry has a lot of standards that apply to commercial-use zip lines, which include trained staff to operate each ride and engineers to mathematically justify the safety level and approve each zip line. You can take those steps in your backyard if you wish, but it would be less expensive for you to visit your nearest adventure park and let the professionals handle it. But if you do build your own zip line, here are a few ideas that will keep it as safe as possible.
1.Wear safety harnesses instead of or in addition to telling riders to sit on a seat or hold onto handlebars.
2.Ensure the pathway is clear of branches or other obstacles and the line of sight is sufficient to tell if anything may enter the path while riding. Once you launch, there is no stopping if a car or person enters the pathway.
3.Keep grass and bushes cut underneath, remove rocks, and spread thick wood chips. Pay special attention to these recommendations near launch and landing areas.
4.Treat the zip line with respect for safety as you would a swimming pool, gun, car, or table saw. This means adult supervision, putting the trolley away when not in use, and staying alert and focused while operating the zip line.
Following these recommendations will prevent most accidents from ever happening.
Materials and Kits
For the first-time zip line installer, it is best to buy a kit that comes with everything you need in one box with instructions. The kits are a good starting point for most situations. My supply company offers a very good backyard kit that comes with instructions and a free telephone support number. When we install zip lines for customers, we normally use slightly different materials so that we can customize the installation and cut the exact amount of wire needed right off a large spool. You can get your own materials, but if you go with new materials, it won’t save you money unless you purchase materials in bulk. Be careful with used materials, because you never know the full history of used parts. If a wire rope clip is overtightened, then it could be partially fatigued. If metal is dropped, then it can have very small fractures.
During installation be careful with all of your materials and do not use carabiners or other metal parts that are dropped from a height, especially if they may have landed on rock, concrete, or other hard surfaces.
Immediately retire materials that do not function as new, such as sticky carabiner gates, significantly rusty or worn wire ropes, trolleys that don’t roll smoothly, wire rope clip nuts that are stripped, and any parts that are significantly harming the trees by limiting growth or rubbing. Using the right materials and regularly inspecting and replacing them will help keep your zip line safe and fun for years to come.

Small climbing walls are a creative way to ascend a treehouse. If sturdy they also can add some structural support to part of the platform. The rocks can be purchased online, and they are screwed or bolted into a wooden surface. The wooden surface can be ¾-inch plywood or decking boards. I prefer to keep decking boards tight so that fingers cannot get pinched between boards. With plywood, you should apply a solid-color stain or paint to the top and especially the edges to limit weathering; most plywood will not last a year out in the rain without treatment.
When adding a 4-foot-wide climbing wall to the edge of a treehouse, we typically build four frame boards that look like rafters or a ship’s ladder stringers. Four frame boards will provide support that is 16 inches on center, which is sufficient for normal decking surfaces. At the top of the wall, I like to leave both horizontal rails intact. The lower one makes a nice grab bar, and the upper one adds some safety for people up on top. You can put nets or gates over the openings, but they are challenging to open when you’re at the top of the wall trying to get in.


Slides are a staple for children’s treehouses, but the excitement tends to fade around eight years of age, when kids start having more fun climbing up the slide as an entrance instead of using it as an escape route. Simple inexpensive slides are usually available in season at big-box retail stores, but these are made for platforms that are 4 or 5 feet high, which is lower than a typical treehouse. A small one-piece slide is a good item to search for secondhand. Many people take down swing sets and throw them away, but the slides have a much longer lifespan, and you may be able to get one free or cheap on a website like Craigslist. If the treehouse is 8 feet high, you can build a 4-foot ground platform next to it and put two ladders to climb up, and a slide downward from the ground platform in the middle of the ladders. Another option is a sectional slide, where you buy an entry and exit piece, and then add inserts to get the desired length of the slide. Our store has a sectional slide that installs on two wooden side rails. It only takes about an hour for an experienced person to assemble it, but you may want to plan two to three hours and have a friend help lift it if your slide is going on a platform 8 feet high or taller. Long one-piece metal slides can still be purchased, but they are custom orders, and they cost about three times more than the sectional ones and take at least a couple months to order.

Nets serve many functions with treehouses. You can fashion them into hammocks, use them for climbing, or even fill railings with them. Ordering nets can be a bit confusing, because there are many choices and elements to consider.

For climbing nets, the first decision you need to make is what size material to use. Most custom cargo nets for climbing use ½-inch or ⅝-inch rope that is usually woven and spliced into rectangles, although any shape is possible. Safety nets are typically between ⅛ -and ¼-inch material size. The rope is usually white, tan, or black, but other options are sometimes available. The nets can have loops at the ends or just woven boarders. As an installer, it is nice to have loops at the top and bottom of the net. At the top, I can run a 2.5-inch diameter pipe or a 2x4 through the loops to connect the net to the nearest railing posts. At the bottom, I can drive stakes through the loops into the ground to anchor the net. Some cargo nets are installed onto wooden frames, which keeps them more taut during use. However, these frames need to be sturdy pieces of wood, or they will bend inward with the net. I made the mistake of using 2x8s the first time I tried this, and they looked like bananas after a few climbs. We now use 4x6 as a minimum size for climbing frames.
Nets and Entrapment
Entrapment is a safety concern for any structure with openings that people can partially fit through. Building codes reflect this danger by requiring that railing spindle spacing be under 4 inches. Small children can fit their hips through a 4-inch space, and their heads can get stuck, possibly leading to death. As a result, no cargo net manufacturer will produce a cargo net with mesh size between 4 inches and 9 inches. The rationale is that if the mesh is 10 inches, then if someone slips through, they will pass completely through instead of becoming entrapped.
Other Nets
Lately our company has gotten a lot more creative in the many uses for netting. Netting can be used for safety barriers, custom hammocks, and for climbing. The most common safety barrier is as railing fill. Try stapling netting up instead of using wooden spindles on the railing frame for a more nautical or adventurous look. For climbing, there is the typical cargo net, the vertical tunnel climb, and various ramp or layered access levels. My personal favorite is the large group hammock. I like to install them early on a big treehouse project, and then enjoy them at lunch break—sometimes I skip the lunch and the guys wake me up when it’s time to work again.


The Greybeard Treehouse at Treehouse World is a triple decker treehouse with all of the walls made of netting. The first level is tricky to navigate as it swings back and forth as you walk, and then you crawl through a cargo net ramp up to the second level. The design is to mimic an old man’s face with an islander look to him. The netting bridge attaches to eight other platforms in the children’s grove and is next to the tiki-themed birthday party treehouse. Netting is an incredibly versatile material.

Our nets are typically either tan or black. Tan is the most natural-looking color, but black is more like a shadow. If you want your eye to focus on the netting, get tan, but if you want to see right through it, get black.

Fire poles allow for a quick escape from the trees. They are also possible to climb with sufficient upper-body strength. The authentic brass fire poles are custom made and cost over $3,000. I have found, however, that flag poles will do the job well. Flag poles can be custom ordered at various diameters and lengths. A 3-to 5-inch pole is our most common choice for backyard treehouses. You can also choose a brushed or polished finish. The brushed has more friction, so you don’t have to squeeze it as hard to control your descent speed, but some people say that it is too rough on bare skin and prefer the polished. These custom poles are still somewhat pricey, and shipping is high because they are a solid piece. The lowest-cost option is to use a sectional flag pole kit. The kits come with multiple poles about 5 feet long that stack on top of one another. Our kit is a steel kit with a powder-coated finish. I do not recommend the cheapest possible aluminum kits. We used to install them, but we had to replace several of them because they were damaged during use.

For more elaborate treehouse projects, bridges to multiple tree platforms add a lot of fun and make a treehouse feel a lot bigger. The drawbridge can be a good way to join multiple clubhouses or otherwise restrict access. There are basically two styles of bridges that we use between tree platforms: rigid-beam bridges and tension bridges.
Rigid-beam bridges make use of wooden or steel beams that are rigid enough to build a walkway across. The load in the center of the bridge is transferred to each side of the bridge and onto either the platform on each side or directly onto the tree trunks. As with any type of connection between two trees, the bridge must have flexibility to allow the trees to sway. We typically do this either with floating-style brackets directly on the TABs or with a sliding plate on one side of the rigid bridge.


Tension bridges, however, have built-in flexibility because they are made with wire rope, synthetic fiber rope, or chain and therefore can wobble, sink, and lift in response to wind and people walking on top of them. The chief engineering problem is that a significant tension force is created when someone walks on the briidge. This has the effect of pulling inward on whatever the tension members are connected to—either the tree platforms or the trees. The trees are typically a better choice because they are stronger. However, with shorter bridges under 20 feet, we have been able to attach them directly to the platforms. We have built larger tension bridges up to 120 feet, but these require very strong attachments to large trees or large ground anchors on either side to handle the tension.

Our favorite bridge style is built on two wire ropes beneath the floor, two rope handrails at the top, and netting to form a basket to fill the sides. We then put wood down to walk across. We offer kits for this style of tension bridge that include materials and instructions. They are available online. Every situation is not the same, however, and it is usually best to call first if you are doing anything unusual or working on a bridge over 20 feet long. Other styles include horizontal treads. Both are safe, but move differently underfoot when walked upon. Whatever style you choose, the materials should be kept lightweight but strong, and the platforms on either side need to be able to support all of the loads.
BUDGET
The materials and labor budgets should be significantly higher for treehouse projects with bridges. This is due partly to the extra cost of building extra platforms, and partly that bridges take a while to build when working on ladders, scaffolding, and climbing ropes. The higher the bridge, the longer it takes to build.
Running electricity to the treehouse is one of the marks of an over-the-top treehouse, but it may not be all that complicated or expensive to achieve. To run permanent power, I prefer to dig a trench toward a support pole or the base of the stairs, and run the power up a pole or stair stringer and into the floor system. From there, it is just like wiring a ground house. An alternate method, if you want to avoid the hard work of trenching or expense of permitting, is to consider the treehouse “temporarily electric.” To do this, you wire the treehouse like normal, except that you put a reverse receptacle at the base of the stairs. When you need power, run an extension cord to the stairs and plug the treehouse in. Suddenly you have light switches, a minifridge, and a place to charge devices. I dare say you could even have a television and play poker up there on Saturday nights.


The simplest way to get lighting is with battery lanterns. Lanterns are affordable and perfect for campouts and after-dark adventures. Solar lights also can be installed for additional lighting. Many railing post caps have small built-in solar collectors that will glow for several hours after dark. Larger collectors can be mounted on the south-facing wall of the treehouse, which can power small lamps as needed.
The personalization of treehouses is a big part of what makes them special. Every year we design treehouses around objects that are special to our clients. During a design session in 2005, I asked my clients what kind of treehouse they wanted, and the four-year-old boy went and got his favorite toy, a little boat. So we found some rescue buoys, fish netting, seahorses, and other paraphernalia from the Jersey Shore, and built a boat-shaped treehouse. Another dad had us build a custom gun rack and design the treehouse around it. One woman was grieving for a friend that had just passed away, and so we placed one of her friend’s paintings at a focal point in the interior and created a deck facing an amazing view of the mountainside.
Other times the decorations are more of an afterthought, where we build a functional treehouse, and then our clients paint, furnish, and move in. Sometimes we are even invited to the treehouse-warming party! When we have donated projects to the Make-A-Wish Foundation and the Kids Wish Network, the organizations generally reserve a budget to get tables, chairs, toys, video game systems, hammocks, mattresses or sleeping bags, and other accessories to add color and fun to the projects. Those last finishing touches are important and make each treehouse unique and memorable.