The beauty of a CD burner is that it frees you from the stifling restrictions put on your musical tastes by the record companies. You can create your own “best of” CDs that play in any CD player—and that contain only your favorite songs in your favorite order. The procedure goes like this:
Click the Burn tab. Insert a blank CD.
If you’ve inserted a rewriteable disc like a CD-RW, and you’ve burned it before, right-click its icon in the navigation tree. Then, from the shortcut menu, choose “Erase disc” before you proceed.
GEM IN THE ROUGH: Auto Playlists
Auto playlists constantly rebuild themselves according to criteria you specify. You might tell one playlist to assemble 45 minutes’ worth of songs you’ve rated higher than four stars but rarely listen to, and another to list your most-often-played songs from the ’80s.
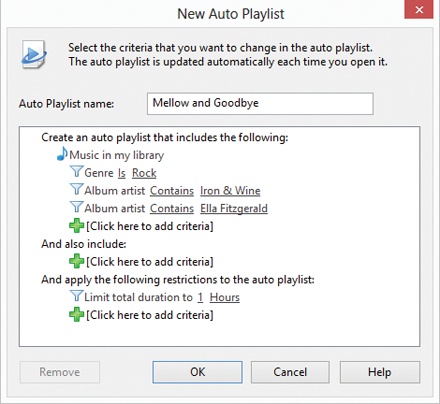
To make an auto playlist, choose “Create playlist”→“Create auto playlist” (on the toolbar). The dialog box shown here appears. The controls are designed to set up a search of your music database. Click “Click here to add criteria,” click the first criterion (like Artist), and then click each underlined phrase (“is”/“is not”) to build a sentence. For example, “Artist” “Is” “Beatles.”
The last set of controls in this dialog box let you limit the playlist’s total size, playback time, or song quantity.
When you click OK, your auto playlist is ready to show off; it appears in the navigation tree like any other playlist. The difference, of course, is that it updates itself as you work with your music collection. This playlist gets updated as your collection changes, as you change your ratings, as your play count changes, and so on.
(To edit an auto playlist, right-click it; from the shortcut menu, choose Edit.)
Specify which songs you want to burn by dragging them into the Burn List (where it says “Drag items here”).
You can add music to your CD-to-be in just about any kind of chunk: individual songs, whole albums, playlists, random audio files on your hard drive, and so on. You drag them into the Burn list, just as you’d drag them into a playlist like the one shown in Figure 18-8.
To add a whole playlist to the Burn List, drag its name right across the screen from the navigation tree. To add a file that’s not already in Media Player, drag it out of its Explorer window directly into the Burn List. Drag tracks up or down in the Burn list to change their sequence.
As you go, keep an eye on the time tally above your list of tracks. It lets you know how much you’ve put on your CD, measured in minutes:seconds. If you go over the limit (about an hour), Media Player will have to burn additional CDs. (“Next disc” markers will let you know where the breaks will come.)
Tip
Media Player adds 2 seconds of silence between each song, which might explain why you may not be able to fit that one last song onto the disc even though it seems like it should fit. It also applies volume leveling, which is great when you’re mixing songs from various albums that would otherwise be at different volume levels. (You control both the gaps and the volume leveling by opening the Burn menu and choosing “More burn options.”)
Click “Start burn” above the list of songs.
It takes awhile to burn a CD. To wind up with the fewest “coasters” (mis-burned CDs that you have to throw away), allow your PC’s full attention to focus on the task. Don’t play music, for example.
POWER USERS’ CLINIC: CD and DVD Format Fun
Most of the time, you’ll probably want to burn a regular audio CD, of the type that plays in the world’s 687 quintillion CD players. But you can also use the Burn tab to make a data CD or DVD—a disc designed to play in computers. That’s a good way, for example, to make a backup of your tunes.
Actually, most recent CD players can also play MP3 CDs, which are basically data CDs filled with MP3 files. That’s a great feature, because a single MP3 CD can hold 100 songs or more. (A few can even play WMA CDs, meaning CDs containing files in Microsoft’s own audio format.)
You specify what kind of disc you intend to burn by choosing
its name from the “Burn options”  menu (upper-right).
If you’re ever in doubt about how you burned a certain CD (audio or data?), here’s a trick: Insert it into your PC, open its window, and examine its contents. If you see files with the suffix .cda, you’ve got yourself an audio CD; if it’s full of other kinds of files, like .mp3, .wma, or even .jpg and .doc, it’s a data CD.
If you have a pocket gizmo that’s capable of playing music (like a SanDisk Sansa) or a Windows Phone, then the process for loading your favorite material onto it is very similar to burning your own CD. The only difference in the procedure is that you do your work on the Sync tab instead of the Burn tab.
If you attach a player or phone with a capacity greater than 4 gigabytes, Media Player automatically copies your entire collection onto it, if possible. If it’s smaller, or if your whole library won’t fit, Media Player switches into manual-sync mode, in which you handpick what gets copied.
Connect the player or phone. Media Player announces that it will perform an automatic sync. Click Finish. Smile. Wait.
From now on, just connecting the player to Media Player brings it up to date with whatever songs you’ve added or deleted on your PC. As your library grows, shrinks, or gets edited, you can sleep soundly, knowing that your gadget’s contents will be updated automatically the next time you hook it up to your PC’s USB port.
Connect the player or phone. Read the dialog box. Click Finish.
In Media Player, click the Sync tab. Drag songs, videos, playlists, or albums into the List pane, exactly as you would when preparing to burn a CD. Click “Start sync.”
Tip
If you’d like to surrender to the serendipity of Shuffle
mode, you can let Media Player choose the songs you get. From
the Sync options () menu, choose the name of your player or
phone; from the submenu, choose “Shuffle list.” Each time you
sync, you get a different random selection from your collection.