Chapter 12
Creating an Effective Instagram Ad
IN THIS CHAPTER
 Learning different ways to create an Instagram ad
 Testing ad types, images, and audiences to maximize effectiveness
 Measuring your ad’s results
After you decide what type of ad will work best for you, it's time to find out how to create the ad. In this chapter, we walk through the various ways you can create an Instagram ad, including creating it directly through Instagram’s mobile app and two options from Facebook (Ads Manager and Power Editor). If you're planning on running the same creative campaign on Facebook, it’s helpful to understand Facebook Ads Manager or Power Editor so your Instagram and Facebook campaigns are synced.
 Facebook optimizes campaigns run on both platforms. Whichever platform is performing better (based on the objective you set) will get more ads shown.
We also cover the important topics of testing your ads and measuring the results. By making simple tweaks based on the data uncovered through testing and measuring, you can make a huge difference in the effectiveness of ongoing and new campaigns.
Using the Instagram Mobile App to Create an Ad
Photo ads and video ads can be created by using the Instagram mobile app. Carousel and Stories ads must be created by using Facebook Ads Manager, Facebook Power Editor, or Instagram’s API (an area that developers use and that is beyond the scope of this book).
Here are the steps for creating a photo or video ad by using the Instagram mobile app:
- Post your photo or video with a caption, hashtags, and a location to Instagram as you normally would for a general post.
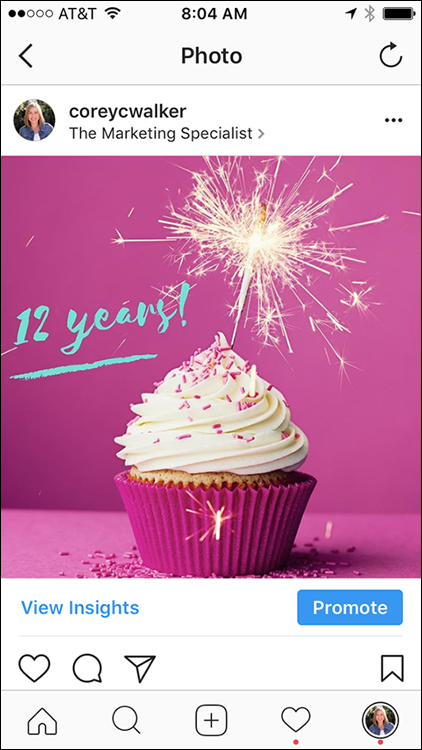
Click the blue Promote button, as shown in Figure 12-1.
A pop-up appears, asking whether you want to Choose what you want this promotion to do.
To follow along with this example, choose Get More Profile and Website Visits.
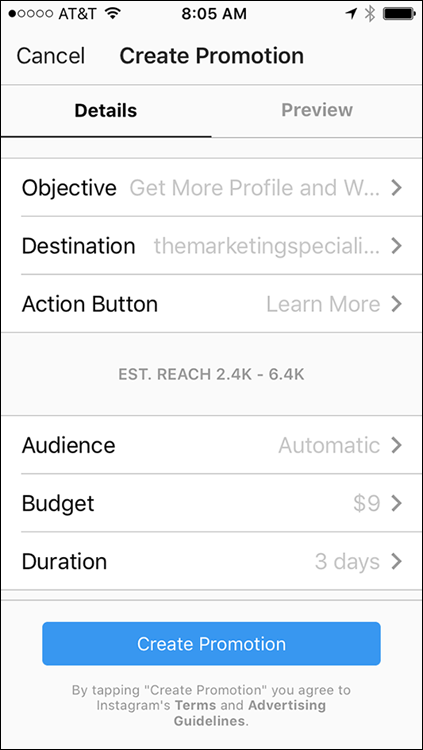
The Create Promotion page shown in Figure 12-2 appears.
- Tailor your campaign.
- Objective: This field displays the option you just chose, either Get More Profile and Website Visits or Reach People Near an Address. You can change the objective by tapping the Objective field and choosing the other available option.
- Destination: This field displays the website currently linked to your Instagram profile page. To change this to another website or to your Instagram profile page, tap the Destination field and type the new website address or tap the other available destination. Your chosen destination will sport a blue arrow.
- Action Button: Choose a link phrase by tapping the Action Button field to display a list of call-to-action link phrases. Select a link phrase, and then tap Done.
- Audience: This field displays Automatic when Instagram chooses an audience for you. To create your own audience (which we recommend), tap the Audience field and then tap Create Your Own. On the next page, New Audience, name your audience, choose a location, interests, and age ranges, and decide whether you want to target men, women, or both. Then tap Done.
- Budget: Choose a budget by tapping the Budget field and selecting a total budget for your entire campaign. You can select an amount suggested by Instagram, or tap Set Your Own to choose a different amount. Instagram informs you how your budget breaks down into a daily budget based on the Duration (up next). After you've selected a budget, tap Done.
- Duration: Change the duration of your campaign by tapping the Duration field and selecting a suggested duration or by tapping the Set Your Own field and selecting a different duration. Then tap Done.
After you have selected all your choices on the Create Promotion page, click Create Promotion.
That’s it — pretty easy, right?
Using Facebook to Create an Ad
Facebook offers two ways to create Instagram ads: Ads Manager and Power Editor. Facebook Ads Manager, which is the default, is easier to use than Power Editor. If you're unfamiliar with Facebook ads, we suggest that you start by using Ads Manager.
 You must have a Facebook business page and an ad account to run ads on Instagram.
Creating a photo, video, or carousel ad in Ads Manager
To create a photo, video, or carousel Instagram ad by using Ads Manager, follow these steps:
Go to your Facebook business page. Click the small triangle at the top right of the screen and choose Create Ads from the drop-down menu. You can also type www.facebook.com/ads/manager.
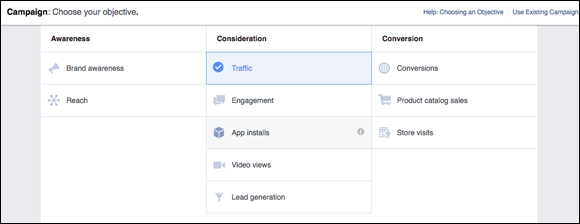
The Ads Manager page appears, as shown in Figure 12-3.
- Choose your objective for the campaign and enter your campaign name.
Choose where you would like to drive traffic. To follow along with the example (and keep things simple), choose Website or Messenger.
The Ad Set page appears.
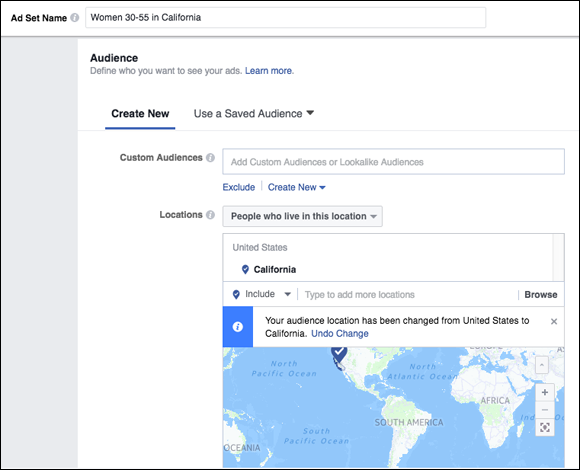
In the Ad Set Name field, type a name for your new ad set.
The name should represent your target audience. We entered Women 30-55 in California, as shown in Figure 12-4.
- In the Locations drop-down (under the Audience heading), do the following:
- Choose whether you want to include people who live there, have recently been there, or have traveled there. Most often you want people who live there, but sometimes you might want to target people who have been there recently, such as a promotion to bring them back to your location.
- Type the cities, states, or countries that you are targeting. You can click the city, state, or country to display a drop-down and slider. Then choose a 10- to 50-mile radius around the city, depending how far from the city’s center you want to target.
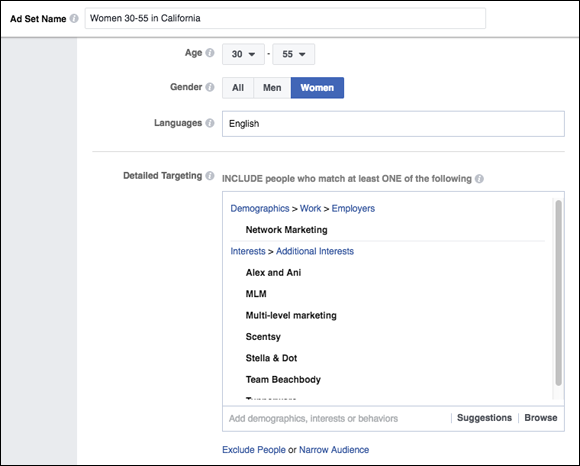
- In the next area, choose the age, gender, and language of the people you're targeting.
In the Detailed Targeting area, shown in Figure 12-5, choose interests or employers of people that relate to your brand.
You can also list other Facebook business pages that relate to or compete with yours. For instance, if you own a weight-loss center, you might target people who like the Weight Watchers Facebook business page. You can also exclude people with certain interests or who like certain pages if you think they would be a bad fit for your ad.
- (Optional) In the Connections area, add different connection types, such as people who already like your Facebook page.
Click Save Audience.
You can use this audience again in future campaigns and avoid the setup process. You are now shown a summary of your choices and are taken to the Placements and Budget & Schedule section.
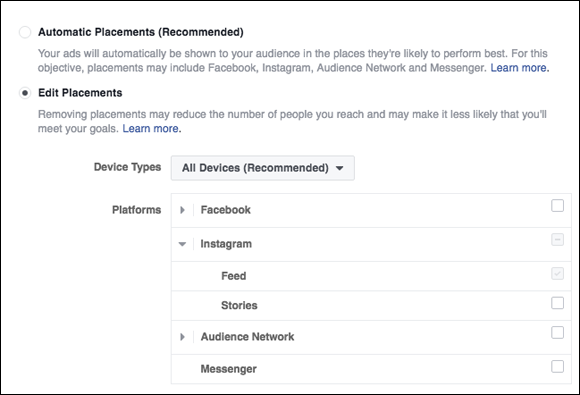
- Choose where you want to run your ad:
- To run your ad on Instagram and Facebook: Choose Automatic Placements.
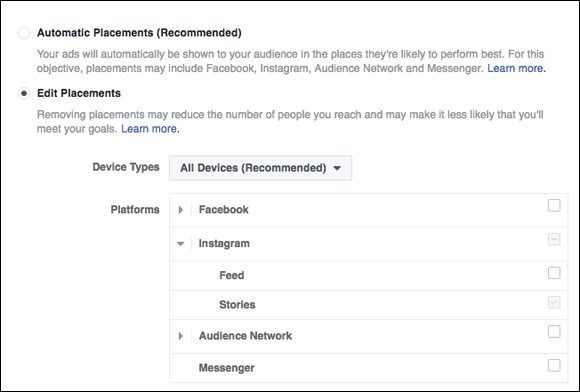
- To run your ad only on Instagram: Deselect everything except Instagram, as shown in Figure 12-6.
Scroll down to the Budget & Schedule section, and make your selections.
You should already have an idea of how much you can spend for the entire campaign, and the length of the campaign.
Choose Daily Budget (the default setting) and enter your daily campaign spending amount in the field.
 Enter the daily amount, not the entire campaign amount.
- Choose the days you would like to run the campaign.
- Click Show Advanced Settings.
In the Optimization for Delivery drop-down menu, choose Link Clicks.
Leave all other fields at their default settings.
Click Continue.
The Page & Post page appears, with two options: Select an Existing Post and Create New Ad. Carousel ads must be created as a new ad.
- If you want to use an existing post (on your Facebook business page):
Select Use Existing Post, and then select the Facebook business page that is connected to your Instagram page.
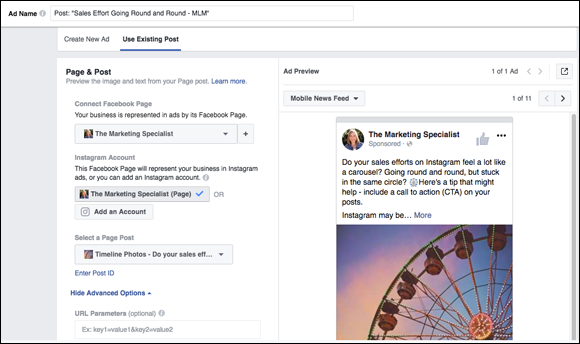
If you haven’t added your Instagram account to Facebook Ads Manager yet (see Figure 12-7), click Add an Account, log in to that account, and accept the request.
- Use the Select a Page Post drop-down menu to select the post you want to use, and it appears to the right for your review. If it is okay as is, click Confirm to submit the ad. If you need to make any changes to it, unfortunately you must edit it on your Facebook business page.
If you instead want to create a new ad:
- Choose Create New Ad at the top of the Page & Post Page.
- Choose whether you would like to create a carousel, single image, single video, slide show, or collection.
- Depending on which option you chose, upload an image, a video, or multiple images and videos.
- Enter your caption text, choose a call-to-action button, and enter the website in which you’d like to link the ad.
- Check the preview on the right, and then click Confirm to process the ad.
 If you don’t have an Instagram account yet (maybe you are doing your homework first by reading this book), you can use your Facebook business page and it will represent you on Instagram using your Facebook business page name.
Running an Instagram Stories ad in Ads Manager
At the time this book was written, Instagram Stories could be created only in Facebook Ads Manager, not in the mobile app.
To run a Stories ad by using Facebook Ads Manager, follow these steps:
- Follow Steps 1-9 in the preceding section on creating a photo, video, or carousel ad.
- In the Placements section, shown in Figure 12-8, select Edit Placements, and then select only Instagram Stories as your placement.
Scroll down to the Budget & Schedule section.
You should already have an idea of how much you can spend for the entire campaign, and the length of the campaign.
Choose Daily Budget (the default setting), enter your daily campaign-spending amount, and choose the days you want to run the campaign.
 Be sure to enter the daily amount for the campaign, not the entire campaign amount.
In the Optimization for Delivery drop-down list, choose Link Clicks.
Leave all other fields at their default settings.
Click Continue.
The Page & Post page appears, where you can upload your ad. When choosing a Stories ad, you have only one option: Create New Ad.
Upload a photo or an image, or upload a video.
Because Stories are vertical, the recommended image size is 1,080 x 1,920 pixels for an image, or filming in the vertical format on your phone for video.
- Type your caption text, choose a call-to-action button, and enter the website in which you’d like to link the ad.
- When everything looks good in the preview on the right, click Confirm to process the ad.
Running an ad in Power Editor
Facebook Power Editor was introduced as a way for larger advertisers to upload and manage multiple ads at once. If you're new to the ad game, we suggest sticking with the easier-to-use Instagram mobile app or Facebook Ads Manager.
If you're confident in your Facebook Ads Manager skills and want to give Power Editor a try, these instructions are for you!
Go to www.facebook.com/powereditor and click Create Campaign.
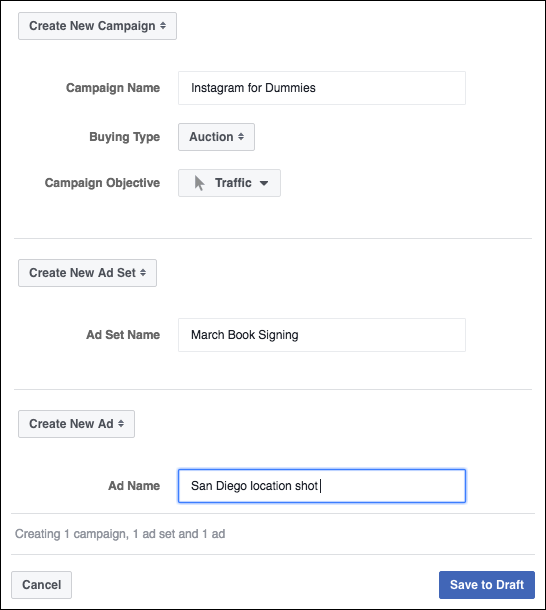
Unlike Ads Manager, Power Editor doesn't have a drop-down on Facebook. The screen shown in Figure 12-9 appears.
- In the first section on the page:
- In the Campaign Name field, type a campaign name.
- Leave the Buying Type as Auction so that Facebook will get the best price for your ad.
- Choose your campaign objective. You can choose from the following: Brand Awareness, Reach, Traffic, App Installs, Video Views, Lead Generation, Post Engagement, Page Likes, Event Responses, Messages, Conversions, Product Catalog Sales, or Store Visits. To follow along with the example, choose Traffic.
Type a name for your ad set.
If you have only one ad set under the campaign name, you can give it the same name as the campaign. If you have multiple ad sets under one campaign, be specific when naming. For example, the campaign might be “Jenni’s Thanksgiving Fundraising Campaign,” and then the ad set would be a subset that includes targeting, placement, budget, and schedule. You might have several ad sets with different targeting, placement, budget and schedules, but they can all be under the same campaign. (You can go back to Create Campaign at any time and choose Existing Campaign, choose Create New Ad Set, and type a new name.)
Type your ad name.
If you have multiple ads under one campaign or ad set, be specific when naming. Similar to the ad set, you can have multiple ad names that can include different pieces of creative or post text.
Click Save to Draft.
Another screen pops up confirming your choices and asks for a campaign-spending limit.
Enter your campaign limit, and click the Ad Set Link to the right.
The next page asks for the same information as the one in Ads Manager.
Complete the information on the Creating the Ad Set page.
Enter the budget and schedule, locations, age, gender, languages, detailed targeting, and connection types. For detailed information about this section, refer to the directions in Steps 5 through 8 in the “Creating a photo, video, or carousal ad in Ads Manager” section, earlier in this chapter.
Click Save This Audience.
The next section that appears, Placements, is also the same as the one in Ads Manager.
- Decide where to run your ad:
- To run the ad on all available ad sections on Instagram and Facebook, leave Automatic Placements selected.
- To run the ad only on Instagram, select Edit Placements and deselect everything except Instagram Feed.
- To run a Stories ad, select only Instagram Stories.
In the Optimization & Delivery section, leave everything as automatically selected. Click the 1 Ad link on the top right of the pop-up.
The Ads page appears.
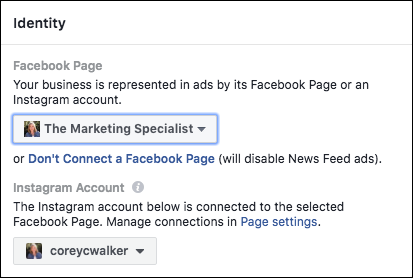
Make sure the correct Facebook and Instagram accounts are listed in the Identity section.
If another account appears for Facebook, choose another page in the drop-down list. Take a look at Figure 12-10, which shows the Identity area.
- In the next section, choose whether to use an existing post or create an ad:
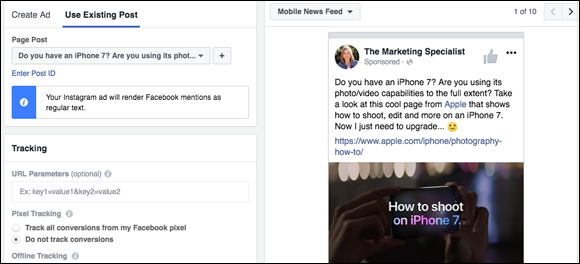
- If you've already created and posted the image and text on Facebook, click Use Existing Post and then choose the post from the Page Post drop-down list. (See Figure 12-11.) The ad appears in the Ad Preview section to the right.
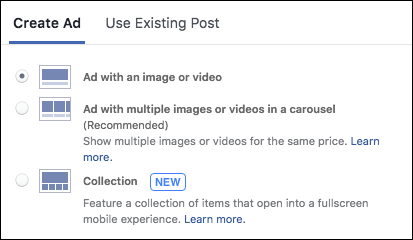
- If you want to create the ad in Power Editor, select Create Ad. (See Figure 12-12.) Select one of the three options. From here, you can add images and videos, a website URL, text, a headline, and a newsfeed link description, and choose your call-to-action link. A preview of your ad appears on the right.
Click the arrow at the top left of the Create Ad page to go to the main Power Editor dashboard.
Your ad campaign information is saved as a draft for your review.
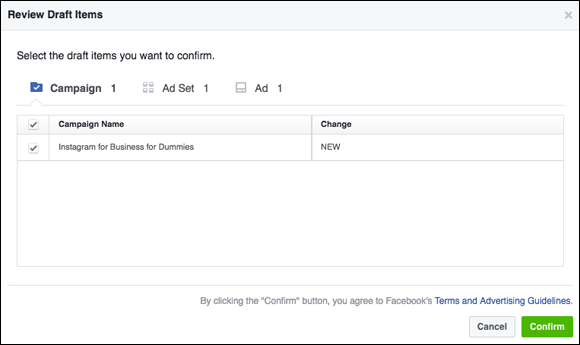
Click the blue Review Draft Items button at the top right of the page.
The Review Draft Items screen appears with the name of your campaign, as shown in Figure 12-13.
Click the green Confirm button.
If there are no problems, an approval notice appears, and your ad is ready to run! If there are problems, you are notified, along with instructions for correcting them. You can always return to your ad from the dashboard and click Edit to make changes.
 You can make an ad inactive before it’s finished running by going to the main dashboard, scrolling to your ad set, and sliding the blue tab to the left of the ad’s name, turning it grey.
Monitoring your Instagram ad
After you finish your ad placement, be sure to monitor your Instagram notifications and engage with your audience!
You'll start seeing many more notifications than you normally would — don’t ignore them. Tap the heart at the bottom of your screen to see all notifications, and then tap the image from your ad to access your ad’s post. From there, you can respond to comments and questions. It may be tempting to tap the heart icon to simply like a comment, but it’s best to add a short comment. Doing so makes a difference to the people receiving a personal acknowledgment from you, and it may lead to further conversation about how you or your product might help them.
A/B Testing
After you have designed your first ad and created that perfect caption, you may want to consider A/B testing. In A/B testing, you schedule two or more ads, switching one of the ad elements to test which version performs better. In this way, you can hone in on what your audience prefers. Marketers often choose a small budget and time frame to A/B test, and then spend more money and time on the winner of the test.
Here are some examples of A/B tests:
- Use the same image in two ads, switching out the caption. This could be a complete switch, or you could switch only hashtags, or switch only the call to action, or switch between asking a question and telling users to tag a friend.
- Use different images in two ads, keeping the same caption.
- Use the same image and caption, switching the call-to-action ad link from, say, Learn More to Sign Up or Shop Now.
- Use the same image, caption and call-to-action link, switching your audience to test who responds to the ad more frequently.
Anything that can be swapped out can be tested, but be sure you know the type of results you're looking for. The goal of the test is simply to find the best converting image, caption, call to action, or audience so you can put your ad budget toward the winner.
 Run the test during the same time period with a similar audience if you're testing the ad image, caption, or call-to-action link to prevent seasonality from affecting your results.
You can run the A/B test by scheduling the two ads separately in the Instagram mobile app and then monitoring the results. Creating the ad in the mobile app is discussed in detail previously, in the “Using the Instagram Mobile App to Create an Ad” section, and results measurement is discussed next.
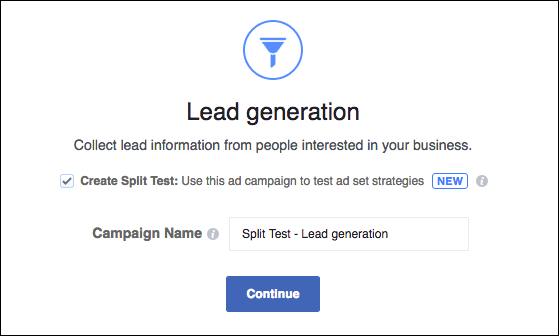
Facebook offers a way to split-test your Instagram ads via the Facebook Ads Manager (see Figure 12-14), but it won’t let you A/B test in the ways discussed earlier. The split test uses the same image, caption, and call-to-action link, and then allows you to test the way Facebook delivers it. You can test audiences, optimizations (link clicks versus conversion objectives), or placements (such as running only on Instagram versus only on your Facebook feed or mobile). To split-test an ad in Facebook Ads Manager, click the Split Test box after you’ve selected your objective and follow the instructions.
If you would like to use Ads Manager to A/B test your image, caption, or call-to-action link, you'll need to set up the ads twice in Ads Manager and manually monitor the results.
Measuring Your Ad Results
After you’ve created and placed an ad, the next task is to measure your ad results. Many businesses overlook this step, but you're smarter than they are! Tracking the effectiveness of a campaign sets you up for future success and saves you money and loads of time. Why would you want to keep running an ad that barely converts to a sale when you could be running a winner?
In this section, you discover how to measure your ad results using Instagram and Facebook Ads Manager.
Viewing Insights via Instagram
Insights include data from your posts about impressions, reach, likes, comments, and more. They are easy to receive via the mobile app. Follow these steps to access them:
- On your Instagram profile page, tap the Insights bar graph icon at the top middle of your phone screen.
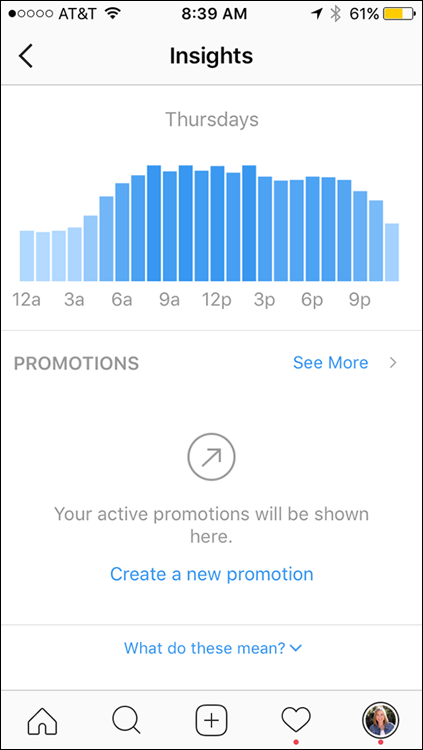
- Scroll down to the Promotions area, shown in Figure 12-15.
Click the See More link, if necessary, to see your results.
If your promotion is still in progress, you don't need to click the See More link. Any promotions that have run are listed with a thumbnail photo of the ad.
- Review the link clicks that your promotion received (listed to the right of the thumbnail) and jot down that information to store with other data later.
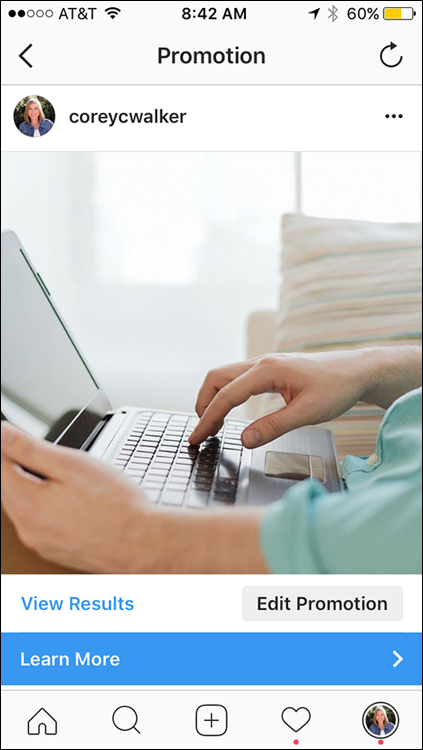
- Tap anywhere in the field where your promotion is listed to view the ad as it was originally shown to your audience (see Figure 12-16).
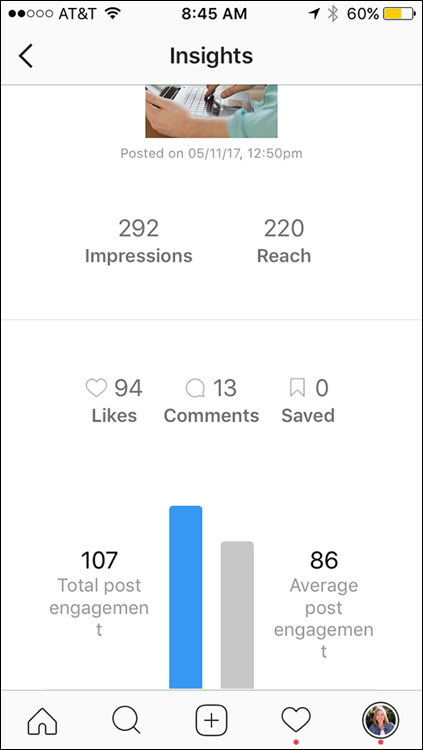
Tap View Results.
The Results page appears, as shown in Figure 12-17, with a smaller version of the image, your impressions, reach, likes, comments, and saves. It also displays the total post engagement for your ad versus what one of your typical unpaid posts gets.
 Now that you've collected this data, store it in a spreadsheet so you can compare it to one of your typical post’s results as well as future campaigns. This data is important to use for comparison if you plan on A/B testing other images, captions, text, audiences, or even ad types.
Viewing Insights via Facebook Ads Manager
Ads Manager provides more data on your Instagram ad than Instagram’s mobile app. You can see campaign results in Facebook Ads Manager whether you created the ad in Facebook or in Instagram. If you're tracking results closely, Facebook Ads Manager is the better bet because it shows more information about the money you spent and the cost per result. It also allows you to export the data to a .csv or .xls file.
Follow these steps to view your results in Facebook Ads Manager:
Go to Ads Manager by clicking Manage Ads in the drop-down list to the right of your Facebook page or by typing www.facebook.com/ads/manager.
All current and completed ads appear on the dashboard.
View a summary of the results by looking to the right of your campaign name, as shown in Figure 12-18.
Scroll right to see everything!
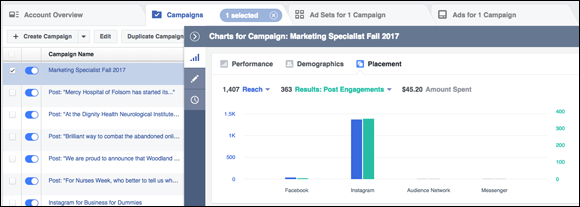
Drill down into the campaign by hovering your cursor over the campaign name and clicking View Charts.
Figure 12-19 shows the Charts screen.
- Toggle between all three Chart screen options (Performance, Demographics, and Placement) to get the information you need.
(Optional) To export the results of your campaign:
- Click the box to the left of your campaign name.
- At the top right of the screen, under Filters, click Filter by Selection.
- Click Export.
That’s all there is to it! Check your web traffic and any other conversions taking place on your website. Include this information with your other Instagram campaign results data so they're part of your final data analysis.
 Learning different ways to create an Instagram ad
 Testing ad types, images, and audiences to maximize effectiveness
 Measuring your ad’s results
 Facebook optimizes campaigns run on both platforms. Whichever platform is performing better (based on the objective you set) will get more ads shown.
 You must have a Facebook business page and an ad account to run ads on Instagram.
 Enter the daily amount, not the entire campaign amount.