FIGURING OUT WHAT TREES TO TAP, when to tap them, and just where and how to drill the hole and set the spout are important parts of backyard sugarin’. If you do these things carefully, it will increase the amount and quality of sap you’ll get, yield a higher ratio of syrup to sap, which means less boiling, and may save you a lot of struggling through deep snow to taps that aren’t worth the effort.
First off, let’s talk trees. Naturally you wouldn’t mistake a white birch for a maple, nor would you hang a bucket on a telephone pole (although I’ve seen that done to get a rise out of city folks). But, there are four different kinds of maple trees native to the northeastern United States, all of which produce spring sap flows, can be tapped and will produce maple syrup. These four trees are the Sugar Maple (Acer saccharum), also called the Hard Maple by furniture makers; the Silver (or White or Soft) Maple (Acer saccharinum); the Red Maple (Acer rubrum), also known as the Swamp Maple; and the Ash Leafed Maple (Acer negundo), more popularly known as the Box Elder.
The important fact is that the sap from the Sugar Maple contains about 3% sugar, whereas the saps from the other contains half to two thirds as much. Also, the syrups made from these other saps are darker and less flavorful, so that in total, confining your sugarin’ to sugar maples means less boiling and better syrup.
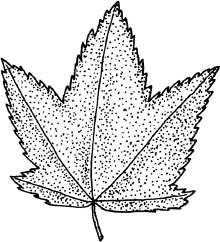
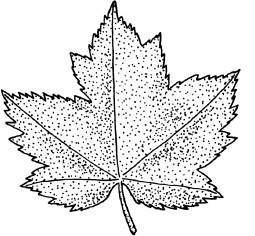
The best way to identify the different maples is by comparing their leaves. This points up the advantage of selecting your trees in the summertime. On the next page I’ve included some simple drawings of the leaves of the four trees. The box elder is easily spotted, because each leaf is actually a cluster of 3–5, maybe 7 little leaves instead of a single, multilobed leaf. Next easiest to eliminate is the Red Maple. Its leaf has basically three lobes, with maybe another small pair at the bottom, and it is quite serrated (jagged edged). But the most prominent thing about the Red Maple is that it has something red going for it just about all year—reddish outer branches, bright red fall color and fairly large red buds at the end of the branches right through the winter.
The more difficult comparison, usually, is between the Silver Maple and the Sugar Maple, because both have five-lobed leaves, and are about the same size. The tipoff is that the Silver Maple’s leaves are more serrated, and there is a definite V sinus between the lobes. The Sugar Maple’s leaves have few serrations, and there is a definite U sinus between the lobes, like those between your fingers.
If you have to pick your sugar maples after the leaves are down and buried under the snow, there are two ways it can be done, but they’re too complicated to get bogged down with in this book. Best thing to do is to invite someone over for refreshments who does know. You’ll find that sugarin’ people are a gregarious bunch, full of free (if sometimes conflicting) advice. If you’re still undecided after all that, try to use those big old maples you find rather evenly spaced along the sides of most back roads. It’s a sure bet they were planted there generations ago by a farm family that in those days relied on maple sugar for their sweetening needs. Look closely—you may even find the scars of old tapholes long since healed over.
In picking out your Sugar Maples, assuming you’ve got more than enough to give you the taps you’re going to need to meet your production goal, keep these things in mind, too:
• The sap flows best in healthy trees with an abundance of branches. Avoid sparsely limbed trees or ones with a lot of dead branches.
• Pick trees that will be the easiest to get to, come sugarin’ time, when there may be several feet of snow on the ground. That’s why old timers put them along the roads.
RED MAPLE
3–5 lobes, well serrated, tapering slightly to ends. Bottom lobes nearly as wide as upper. Definite V sinus. Reddish hues.
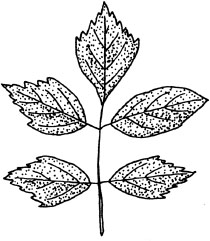
ASHED LEAF MAPLE
(Box Elder)—3-7 leaves in clusters. Usually serrated, some-times not.
SILVER MAPLE
5 lobes, well serrated, definite V sinus. Silvery undersides. Top lobe tapers somewhat inward at base.

SUGAR MAPLE
5 lobes, little if any serration, definite U sinus.
• Since the sap will flow best on warm, above-freezing days, particularly sunny days, following below-freezing nights, pick trees, if possible, with open southern exposures, (e.g., the north side of east-west roads) so that the warm sun on the trunk of the tree will get things running as soon as possible each morning.
Sugarin’ time is that time of late winter, call it early spring if you wish, when the temperatures drop below freezing at night, but climb well above freezing during the day, pushed up there by a sun which is now climbing higher in the sky, getting up earlier in the morning and lasting longer in the afternoon. The alternate freezing and thawing of the slowly disappearing snow gives it a granular texture, which skiers call corn snow and which they love to ski on in the warm sun. And, the native folk up country grumble about “mud season,” get all worked up over the annual Town Meetin’ and start tapping trees for their annual sugarin’. The arguments about just when to tap (combined with sage observations on the weather and past experiences) can be just as heated as the politics. If you tap too early and get an extended cold spell the taps can dry out, and you may have to rebore your holes. Or, if you wait too long, you may miss the first big sap run, which is prized for its high sugar content and fine quality.
I’d say the smart thing to do is to set a spout in one of your trees fairly early, and when you start getting sap flow on a day you figure is fairly typical for that time of year, go ahead and set the rest of the taps.
Here are the things you should pay attention to when you select where to drill the hole and how to set your spout:
• Since the sun’s rays speed up the thawing out process each day, you’ll get better runs on the southeast to southwest sides of the trunk.
• Try to drill directly over a large root or below a large healthy limb since that’s where a lot of the sap is headed from and to, and stay away from tap holes of years past.
• If there’s a lot of rough bark, it doesn’t hurt to knock off an outer piece so you can get good wood to drill into.
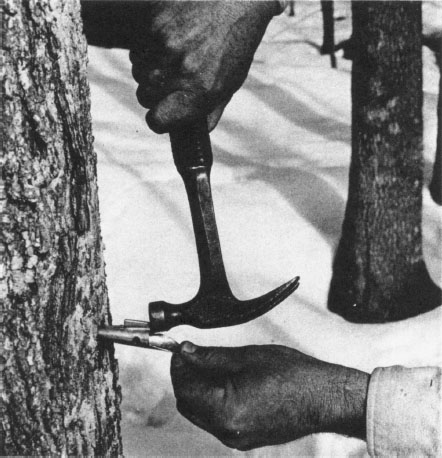
• Use a 7/16" bit to drill the hole. This is the right size to take the standard metal sap spouts you can buy at hardware stores in sugarin’ country, or a spout made out of a whittled down 1/2" dowel with a hole drilled down the center.
• Drill your taphole about 1-1/2" into good wood, which means maybe 2-1/2" including heavy bark. This isn’t a critical measurement. Just be sure you’re into good wood, where the sap flows, and have a hole deep enough to accommodate your spout. Drill the hole slightly uphill, so the sap flows outward, and keep turning the drill forward as you pull the bit out, in order to get as many shavings as possible out with the bit. On days the sap is running, you’ll see it running out at you almost before you can get the spout in.
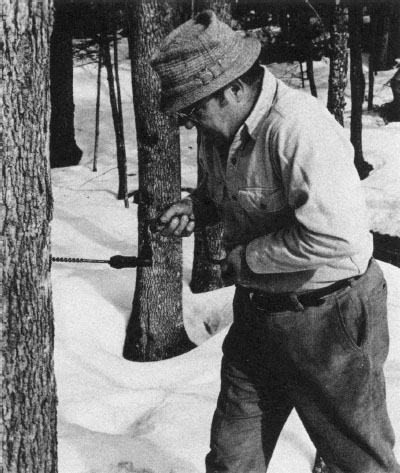
• Set the spout in the hole and tap it home with a light hammer tap (on the front of the metal crest, if you’re using a metal spout). The idea here is to set the spout snugly so it won’t fall out of the tree, yet without splitting the maple wood above or below the taphole, where the sap would leak.
• Remember that if you’re standing on top of a four-foot snowbank when making your tap holes at the beginning of the season, those taps may be seven feet off the ground near the end of the season when the snowbank has melted. It’s hard to collect sap from buckets seven feet off the ground.
• Stop collecting sap and pull your taps when you: a) have made enough syrup to satisfy your needs; b) have run out of storage cans and/or your spouse’s patience; c) find that the syrup is getting dark colored (the result of warm or fermenting sap) or less sweet; and/or d) notice that the sap has become cloudy or yellowish (although a cold snap can cause a return of clear sap). After awhile the sap just quits coming. There are no specific rules for pulling your spouts. Don’t worry about the holes. They’ll heal up by themselves, as they’ve done for generations.
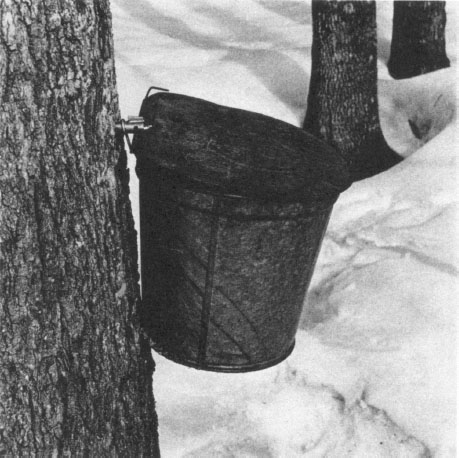
Conventional sugarin’ calls for 13- or 16-quart sap buckets made of galvanized steel (in the old days, English tin, and before that wooden buckets). Galvanized buckets come with either flat or bowed covers to keep rain water and debris out, and they have a hole in the upper edge where you hang the bucket from a small hook that comes with the metal sap spout. Since you’re going to get enough sap from each bucket to make about one quart of syrup, conventional buckets can be a hefty investment, unless you’re ready to commit yourself to their use over and over again for many years ahead. Most backyarders, therefore, get around this expense by using almost any old container that will hold sap, from peanut butter cans to children’s beach pails.
One of the most important developments in the backyard sugarin’ industry was the advent of the one-gallon plastic milk bottle, known affectionately hereabouts as the Idlenot Dairy Low-Fat Sap Bucket (since that happens to be the dairy that supplies our milk). If you’re any sort of milk drinking family, you can save up more than enough of these gallon milk bottles to provide you with all the sap buckets you’ll need. Just rinse them out and hang them out in the garage by a rope threaded through their handles.
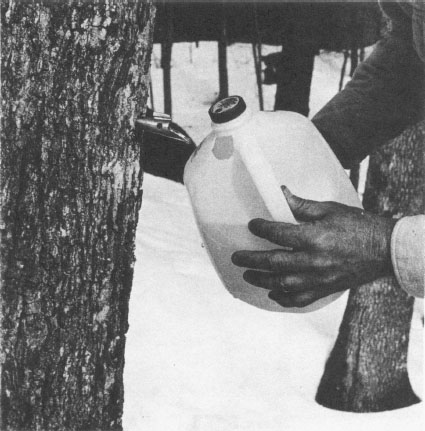
The way you hang one of these low-fat sap buckets is to cut a hole with a utility knife about 3/4" square just below the collar, which is just under the bottle top, and hang the bottle with the sap spout entering this hole and the bottle set down over the back of the metal crest on the spout. Leave the cap on. The bottle will hang there nice as you please, even in a strong March breeze.
Apart from eliminating the high cost of buckets, the Idlenot Dairy Low-Fat Sap Bucket has some very real advantages over conventional buckets. For one thing, except for the 3/4" hole, it is completely enclosed, so you don’t get any debris or unwanted predators in the sap. For another thing, it’s semi-transparent, so you can see from a distance whether or not it will be worth slogging through the snow to empty it. And, maybe best of all, when the season is over, you don’t have to go to all the bother of washing and storing your buckets. You can just drop them off at your local recycling center and start with a fresh set of buckets next season.
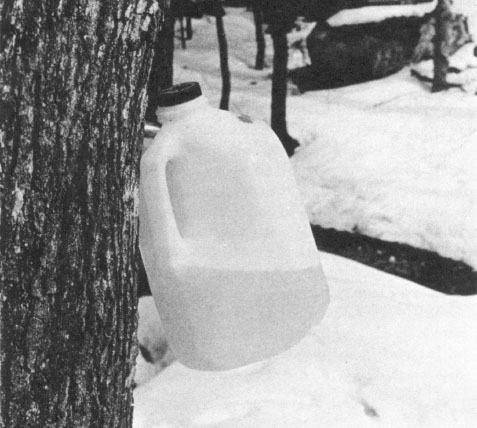
The only drawback of the Idlenot Dairy Low-Fat Sap Bucket is its 4-quart size. However, on the kind of days you may have to make more than one collection—when the sun is bright on the snow and warm on your back, and the sap is drip-dripping like crazy—you’ll welcome the extra trip back to your sugar maples.
Since the maple sap flows when it freezes at night and thaws out in the day-time, you can expect to find frozen sap in your buckets if you leave sap in them overnight. Frozen sap presents both problems and opportunities.
The problem comes if you’re using milk bottle buckets—the ice won’t come out through that small bottle top. The problem is resolved by doing your collecting late in the day. That way there will be very little sap in the bucket to freeze up. If for some reason you forget and find your buckets frozen up solid, have a good extra supply of milk bottle sap buckets so you can swap empties for the full ones. It’ll take the better part of a warm day for the frozen ones to thaw out.
Having extra bottles, incidentally, is a good way to do your collecting. You can carry in six empties and bring out six full ones, empty those in your holding tank and take them back in for six more full ones.
The opportunity in frozen sap is the opportunity to reduce your boiling time, and if you come out some morning and find a good layer of sap ice in your holding tank, you should take advantage of it. The ice actually is very spongy and is made up of frozen crystals of water that have separated out from the sugar, trapping the more sugary sap within the ice, something like a honeycomb. One of the ways the Indians and early settlers used to make syrup was by successive freezing of the sap, each time throwing away the ice, until the remaining liquid was usable as syrup. The problem with this method is that some sugary sap is always thrown out with the ice, so that this method is much less efficient than boiling. In any event, if you do find a couple of inches of ice in your holding tank, prop it up over your holding tank in some way so it drains well back into the tank, then pitch it out. You’ll have saved yourself some boiling time.
Maple sap, like cider or any fruit juice, can spoil, and care must be taken to keep it as cool as possible and not to store it too long before boiling it down. Sap which has “spoiled” has an unclear, slightly milky look, and if boiled down it will produce a dark syrup. Professional sugarers generally boil down sap within a day or two of its collection, if not the same day. If you’re a backyarder, with other things to do during the week and no real desire to sit up all night tending the evaporator, you’ll need to figure out not only how much storage capacity you’ll need for the sap collected during the week, but also where to store it with the least chance of spoilage.
Returning to the original example of wanting to end up with 5 gallons of syrup by the end of the season, and assuming now that you will fire up your evaporator for one boildown on each of five successive weekends, count on producing one gallon each weekend, for which you will need 33 gallons of sap. Therefore, you will need at least that amount of storage capacity, and it would be wise to have 50 gallons of holding capacity to accommodate heavy sap runs.
A couple of plastic trash cans can make good holding tanks for an operation of this size, if they can be spared from their normal duties. Naturally, they should be cleaned out well, but be careful not to use harsh soaps or chemical, which might affect taste. Remember that your sap will undergo extended boiling, which will take care of bacteria. If you use plastic trash cans or liners, however, you should be sure they are appropriate for water (sap) storage–that is, that no toxic substances might be released from the plastic into the sap. One major manufacturer of plastic trash cans informed me that while certain of its containers are made from materials which meet federal requirements for contact with food, others are made from recycled materials and are clearly marked with a warning against use with food or feed. If you are in doubt about your containers, call the manufacturer’s consumer affairs department. If you opt for galvanized trash cans, make sure there are no leaks and watch out for oily residue on the can that might end up in your syrup.
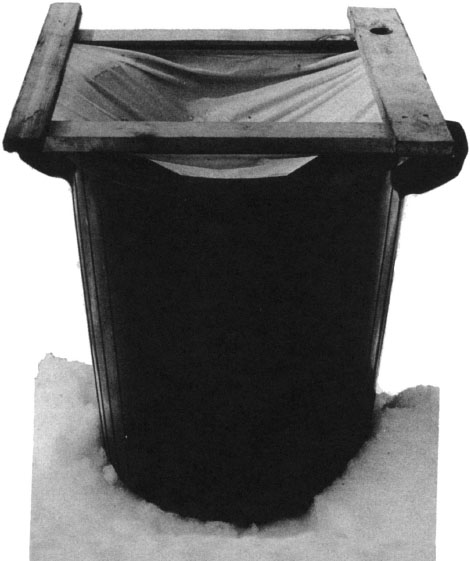
Other good holding tank ideas include fifty-gallon drums, if you can find good clean ones which haven’t been used for some toxic material, or discarded water pressure tanks, which can be cut open, wire-brushed and painted with a lead-free rust proofing paint. I once saw a discarded bathtub being used as a holding tank. It was strung up between two trees, like a hammock! Whatever you do use, have a top for it. One tried-and-true kind of top can be made from a piece of cheesecloth over your holding tank. It keeps stuff from falling into the sap, like flying ashes from your evaporator, or bugs, which have a suicidal habit of diving into the sap. It can also be used to filter out bugs and debris which may have fallen into the sap during collection. Wet cheesecloth can be difficult to control, and unless you have plenty of hands to pour sap and hold the cheesecloth, you may want to nail or staple the cloth to a simple wood frame, as shown below.
And a final word of advice: always keep your holding tanks in a location that will be shaded all day long. The idea is to keep the sap as cool as possible, just as though you were dealing with milk. At the beginning of the sugarin’ season, when the temperatures are still rather cool day and night, there’s little problem, but by late March or April, as the weather warms up, it’s something to be mindful of.