
NOW THAT WE’VE DISPOSED of the task of collecting all that slightly foamy, faintly sweet and rather colorless looking sap, the next order of business is to convert it into that gooey, mystically sweet and golden substance called pure maple syrup. The process involves boiling the sap so that the water in the sap evaporates off in the form of steam, leaving the sugar behind in the boiling pan. Sounds simple, doesn’t it, and it really is, although at certain stages of the process, particularly as you’re getting your brew close to being syrup, there can be terrifying moments.
Remember, we’re talking about starting with, say, 33 gallons of sap and ending up with 1 gallon of syrup. That’s about 32 gallons of water to get rid of, which is a lot of steam, which is why wives can get angry at husbands who try boiling sap on the kitchen stove, which is why you’re probably better off figuring out a way to do all or most of the boiling outside.
While it is possible these days to find small, ready-made evaporators for backyard sugarin’, they are generally the same sort of rig you can put together yourself for far less money. I’ve seen 50-gallon drum evaporators, just like the ones in this book, selling for upwards of $950. Quite a bundle, if you’re only interested in producing a few gallons and have a little ingenuity.
As you know by now, this book deals with how to get the job done without investing a small fortune—in fact, any money to speak of—in evaporating equipment or other fancy apparati. Therefore in this part of the book, we’ll examine a selection of homemade backyard evaporators in the hope that the reader will find, or be inspired to invent, some rig that will satisfy his production requirements and/or meet his aesthetic or mechanical standards.
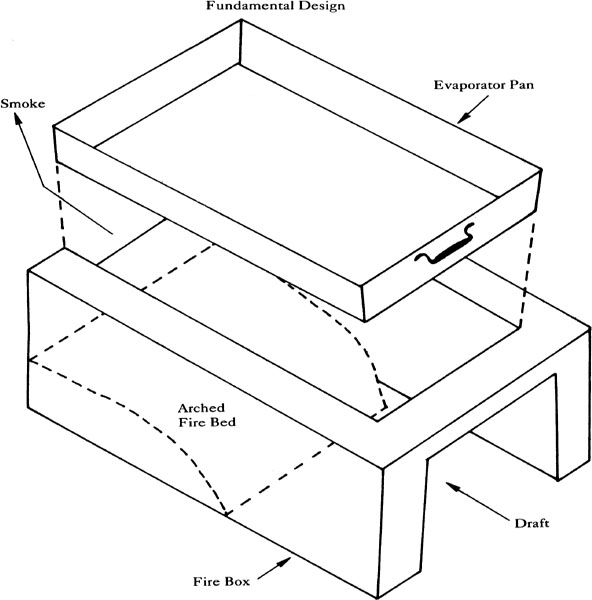
In boiling down sap, the idea is to get the job done fast by maximizing the amount of steam coming off the surface. You do that in two ways. First, you use an evaporator pan that’s relatively shallow (6" – 8") but with a lot of area, so as to have a large boiling surface area relative to the amount of sap in the pan. Second, you design the firebox to get as much flame as possible playing directly on the bottom of the pan. That means the firebox should be relatively shallow, too. And, since the flames tend to be swept backward toward the flue by the draft, rather than upwards against the pan, many backyarders build up the rear bottom of their fireboxes with sand so that the flames are forced to arch up against the pan, just like with professional rigs.
The firebox is constructed so that the pan (or pans) sits on the top, supported by the edge of the firebox, but sometimes it’s built so that the pan can nestle down into the firebox. The reason for nestling is to protect the edges of the pan from the cold breezes, thus hastening the process. Or, if the pan does sit on top, you often find a row of bricks or something, set down along the edge of the pan to serve the same protective purpose.
How big a firebox you’ll need depends on how much sap you want to boil down and how much time you can spare to do the job. The more sap you want to boil down in a given period of time, the more surface boiling area you’ll need, the bigger the pan (or pans) and the bigger the firebox. (My own new backyard evaporator, which has 864 sq. in. of boiling surface, seems to produce a consistent 1 quart of syrup per hour of boiling time.)
However, there is one thing that should be pointed out. If you plan to boil your sap all the way to syrup on your backyard rig, the pan your syrup ends up in should not be so large that your syrup level is too shallow, thus risking scorching your syrup after all that patient work. As an example, our weekender who plans to end up with one gallon should probably not use a pan much over 14" x 17", since his syrup will be only one inch deep in a pan of that size (there are 231 cubic inches per gallon).
On the other hand, if he uses an evaporator pan only 14" x 17", and assuming for a moment that my own experience is reliable, it would take him close to 14 hours to boil down his 33 gallons of sap.
There are two solutions to this dilemma. Our weekender can use a single large pan to speed up the main boiling and do his final boiling elsewhere (maybe in the kitchen if the wife is gone for the day), or he can use two pans atop his firebox, one, say, 12" x 16", which would give him some decent depth for the final boiling, and the other, 16" x 24" for boiling fresh sap at the back of the firebox. The combination would give him 576 square inches of boiling area, requires a firebox opening of 16" x 36", and gives him a 6-hour boil down period, if my own evaporation rates are any indicator.
I put all this down not to get into an argument over whether or not you can make a gallon of syrup from 33 gallons of sap in 6 hours on 576 square inches of evaporator pans, but rather to show you the kinds of calculations you have to go through to build a backyard sugarin’ rig to meet your needs.
Then too, you may have to approach the problem from the opposite direction and size your rig (and/or how you use it) to a pan or set of pans that are the only ones available to you or already in hand.
Therefore, before we get into specific examples of backyard evaporators, it’s appropriate to discuss how you might come by a suitable evaporator pan without having to spend a lot of money.
If all that talk about special size evaporator pans and needing maybe more than one is discouraging you, don’t let it. Professionally made pans, with drawing of spigots, fluted bottoms and so forth are frightfully expensive, but you’ll find it surprisingly easy to pick up unneeded bake pans at hotels or restaurant auctions that are sized close enough for your needs.
My first evaporator pan was an oversized 18" x 24" hotel lasagna pan that nobody wanted. It was covered with “old” lasagna, but after a good cleaning I found I had an excellent steel pan of old-time quality, and it has served me well ever since.
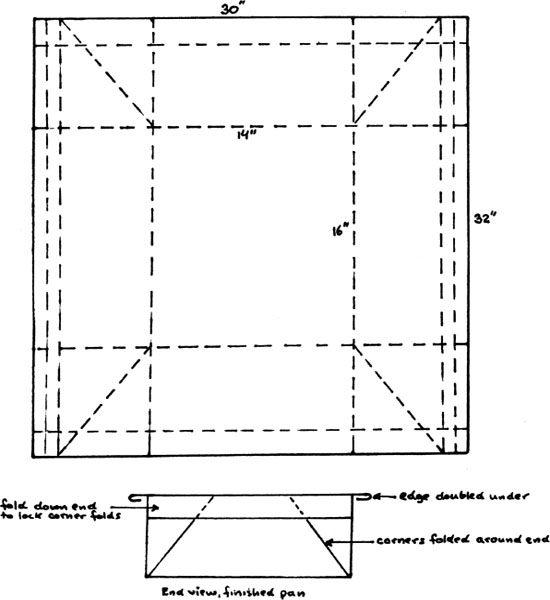
Then too, it’s not too hard to make your own pans out of sheet metal. On the previous page is a pattern for making a 14" x 16" pan out of a 30" x 32" sheet of metal. A pan like this, with corners mitered, folded around the ends and locked in place, needs no welding and very little cutting. The bending, particularly working out the corners, takes some doing and a lot of hammering, and while the heavier gauges of metal make better pans, it takes a lot more pounding to get them into shape.
You shouldn’t try to copy the exact design shown on the preceding page. The best way is to work out your own design with a large piece of brown wrapping paper. You can try folding it different ways until you’ve got what you want.
Experimenting, improvising, modifying. That’s what backyard sugarin’ is all about.
Making your own backyard evaporator is a process of sizing up what materials you have lying around your place, what you can scrounge up elsewhere, and putting together something that will get a lot of hot flames against the bottom of your evaporator pan or pans with a reasonably efficient use of firewood and with some degree of fire control.
If you’re related to a building supply dealer, maybe you can get him to give you some “irregular” cement blocks to build your evaporator out of, or a local plumber might have some discarded water pressure tanks out behind his shop. With an emery blade on your electric saw or a cutting torch, you can make a very professional acting (if not looking) evaporator. Then too, a heating contractor might have an old oil storage tank he’ll let you have, which would make up into a nice fire box, and some rusty old stove pipe, which might be just the ticket for your smokestack.
The local dump is well worth canvassing, if they’ll still let you in to scrounge around. In my own case I found two very serviceable water pressure tanks for myself, a third for a fellow backyarder, and about 8 ft. of serviceable 8" stove pipe for my evaporator. Fifty-gallon drums make good evaporator fireboxes, and (if you can find reasonably clean ones) sap storage tanks. I like to think that finding such items in the local dump and putting them back into useful service is a very commendable aspect of backyard sugarin’.
Each backyard sugarer differs not only in his production goals—and therefore in the size evaporator he will need—but also in the materials available to him and in his skills in making do with what he can get. On the next pages, we’ll look at an assortment of backyard sugarin’ rigs I’ve come across, so that the would-be backyarder can pick one that best suits him or, better still, be inspired to invent his own model.
Widely used in the construction of simple, homemade backyard evaporators is the cement block. Construction can range from simple open hearths, laid up without mortar, to more sophisticated set-ups, with various kinds of smokestacks, damper and draft controls.
The cement block is a good building material, because it is symmetrical, not too heavy to work with and permits great latitude in the size and shape of the firebox. This can be important if you have to build the firebox to suit a certain evaporator pan you already have.
Too, the cement block’s thickness and interior holes provide good insulating values, holding the heat within the firebox and against the bottom of the pan where it belongs. It is also possible to arrange the blocks in such a way that a chimney of sorts can be made out of cement blocks and be an integral part of the firebox.
The principle disadvantages of cement blocks are that they may have to be purchased (representing an undesirable investment expenditure), and they frequently crack under the extreme heat of the firebox (which may not affect that year’s operations but makes it difficult to rebuild the following year).
On the following pages are four examples of backyard sugarin’ rigs built with cement blocks. Take your pick—and there are endless other variations.
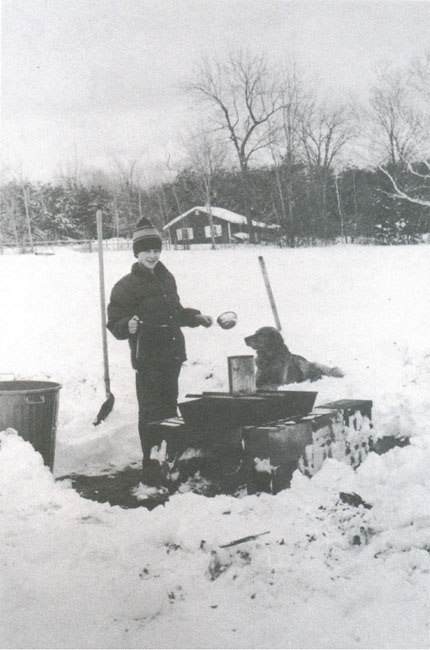
The rig shown on the following page is a basic evaporator made of 12 cement blocks set up on a flat, graveled driveway surface, just far enough apart to support the evaporator pan, a reclaimed hotel bake pan. There is no smokestack and no enclosure. A plastic garbage can holding tank is evident, along with a shovel for digging out after snowstorms and a patient friend (background), who adds a protective note to the operation.
Typical of backyard sugarin’, fresh sap is continually added to the boiling batch to replace the water boiled off as steam, until the sap is used up. In this instance, rather than pouring cold sap directly into the batch, which might kill the boil, it is poured into a large tin can supported by two rails over the evaporator pan. Here it is partially preheated before entering the pan in a small but constant trickle from a nail hole near the bottom of the can.
Since the fire bed is open at both ends, the flames are carried one way or the other, or both ways, depending on the whims of the wind. Snow must be shoveled all the way around the rig so that the batch can be tended to regardless of wind direction.
SPECIFICATIONS
Type: Basic Block
Fuel: Misc. scraps of wood and cord wood
No. buckets served: 19
Season production: 22 quarts
Smokestack: none
Enclosure: none
Special feature: automatic sap injection
Owner: Ted Donovan, New London, NH
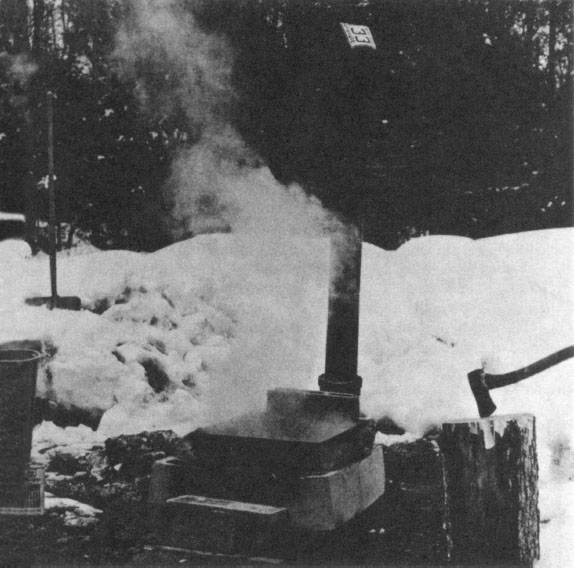
Pictured to the right is the author’s first backyard sugarin’ rig, improvised on short notice after loss of kitchen privileges. Essentially a basic block arrangement, a smokestack is added to get better draft and to keep smoke away from the syrup (it can affect taste), and the draft is somewhat controlled by the block and board arrangement at the door to the firebox (foreground) and by the bent license plate in lieu of a stack damper, on top of the stack.
The stack is conventional 6" stovepipe, set in a discarded 6" cast iron water main elbow, which happened to be exactly the right size.
It should be noted that in firing up a basic block evaporator, the heat will often thaw out the ground, posing the threat of unstable conditions which in turn might lead to total collapse of the firebox. The picture here shows the author’s rig has developed an inward list of 5° due to this effect, not yet serious enough to imperil the evaporator pan but still a cause for concern.
SPECIFICATIONS
Type: Basic Block with Stack and Damper Controls
Fuel: Owner-cut cord wood
No. buckets served: 14
Season production: 14 quarts
Smokestack: 6" Stovepipe in Cast Iron Elbow
Enclosure: None
Special features: Arched fire bed and stack controls
Owner: Rink Mann, New London, NH
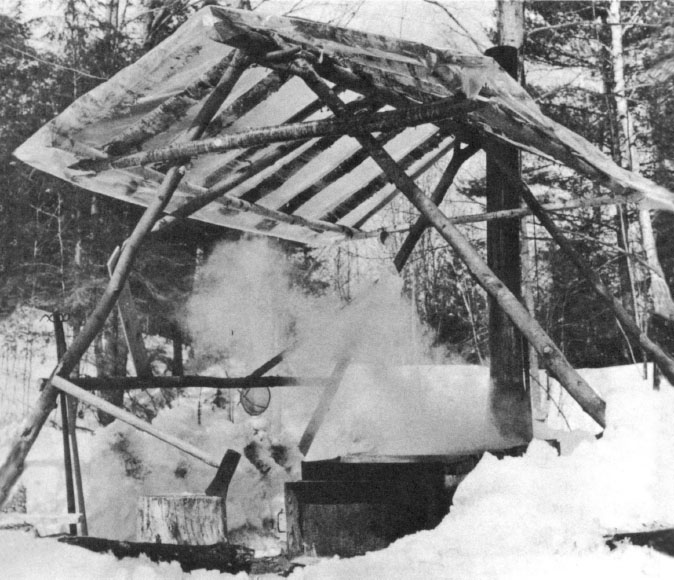
This attractive backyard sugarin’ operation was designed to accommodate a fairly large number of buckets (70) and is an excellent example of self-sufficiency.
The roof, which provides cover against snowfall (and sometimes rainfall), is made of rough poles and plastic and is a veritable school course in truss design. The smokestack is 8" stovepipe, sized to accommodate the larger fire needed to boil the four pans shown.
The method used here is to add fresh sap to the front pan, where it is brought up to a boil. It is then ladled progressively to the second, then third and finally the back pan, where the batch is finished.
The multi-pan system has the advantage of adding much boiling surface to the operation and can improve the quality of the syrup by not constantly adding fresh sap to a single pan, a practice that tends to darken the end product.
SPECIFICATIONS
Type: High Capacity Block with Multiple Pans
Fuel: Owner-cut cord wood
No. buckets served: 70
Season production: 70 quarts
Smokestack: 8" stovepipe with standard elbow
Enclosure: Pole and plastic roof only
Special features: Homemade evaporator pans
Owner: Jonathon Ohler, New London, NH
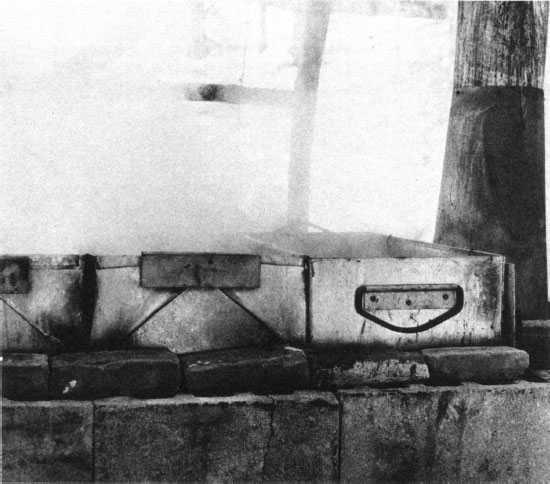
A commendable feature of the Ohler operation is the use of homemade evaporator pans, which would represent a crippling investment if conventional evaporator pans were to be purchased for an operation of this size. Shown below, the pan to the right was cut from galvanized sheeting and soldered by a local artisan. The two pans to the left were folded in a manner similar to that discussed in an earlier section of the book, but with the flaps being held in place with a wooden handle at each end, secured with bolts.
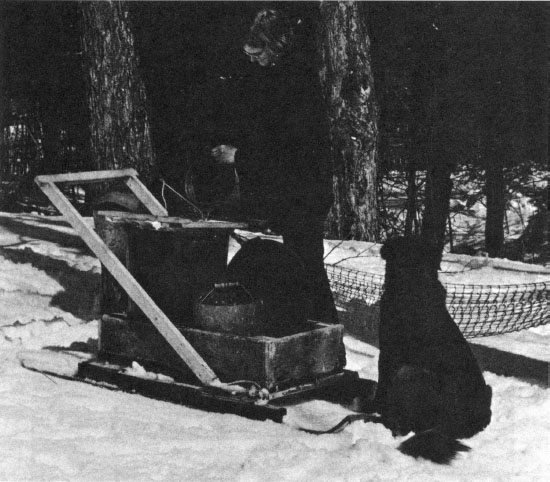
Since the Ohler operation serves maples which are further afield, this homemade conveyance is used to transport sap from the sugarbush to the evaporator. It’s an old pair of skis with a box mounted on top, plus the pushing handle. Here shown with only one collecting tank, the sap sled can accommodate two tanks if necessary. The golden retriever is wondering when someone will figure out how to harness him up to the sled.
If you have the time and are handy with a mason’s trowel, you might decide to build a more or less permanent evaporator, like this one, which has an arched fire bed and is made out of cement blocks properly mortared in place. The chimney, too, is of mortared cement block construction. With any mortared structure you must have a solid foundation. Otherwise the frost will heave it up and undo all your fancy mortaring. This one is built on a poured concrete base.
Sitting on top of the rig is a professional evaporator pan, made to order by a leading supplier of professional sugarin’ equipment. It’s a thing of beauty with its own spigot so you don’t have to ladle or pour the syrup out of the pan (pouring a big pan like this requires steely nerves and a juggler’s balance).
Note the use of plastic all around the operation to ward off chilling breezes, but the roof here is made of plywood and an old panel door to strengthen it. A good solid roof is a sensible precaution if it’s to be a flat one. Heavy wet snows, which are not uncommon during sugarin’ time, can cause a plastic roof to sag or collapse.
SPECIFICATIONS
Type: Laid up block arch on concrete base
Fuel: Owner-cut cord wood
No. buckets served: 106
Season production: 72 quarts
Smokestack: Laid up block integral to arch
Enclosure: Miscellaneous wood and plastic
Special features: Professional evaporator pan
Owner: Timothy Cook, New London, NH
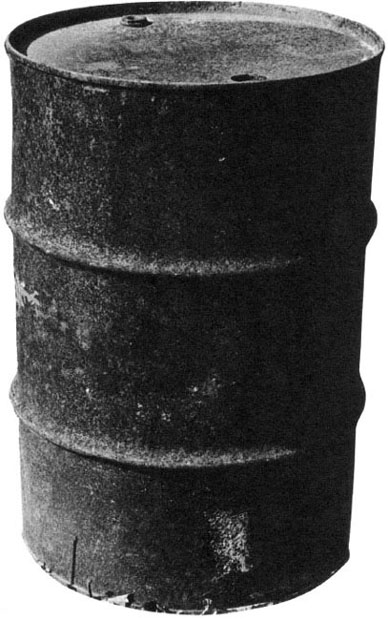
50- and 25-gallon oil drums make good off-the-ground evaporators
A growing number of backyarders are building their fireboxes out of discarded steel drums, defunct water pressure tanks and old oil storage tanks, and there’s much to be said for this approach. For one thing, a steel drum or tank can be mounted (usually horizontally) up off the ground so that your evaporator pan is at a convenient working level, and you don’t have to worry about your fire thawing out the underpinnings. For another, once you’ve got a firebox that works well, you can store it away each year and not have to rebuild it year after year, as you do with cement block rigs.
Fifty gallon and 25 gallon oil drums make good fireboxes for single pan evaporators, and the cutting necessary to modify them is not too difficult. However, too much cutting makes them a bit flimsy, and they will rust out sooner than heavier tanks, especially if you pick one that’s already got a few years behind it. Defunct water pressure tanks and old oil storage tanks make excellent fireboxes, particularly for multi-pan operations, and they’re rugged, so the cutting comes harder. In either case, tank or drum, the necessary cutting is done with a cutting torch or an emery blade in your circular saw. I’ve seen oil drums modified by hand with a hacksaw blade, but that’s doing it the hard way.
On the next few pages we’ll examine five steel drum or tank fireboxes in various styles and sizes. These will no doubt lead the reader to design even more inspirational rigs than the modest efforts shown here.
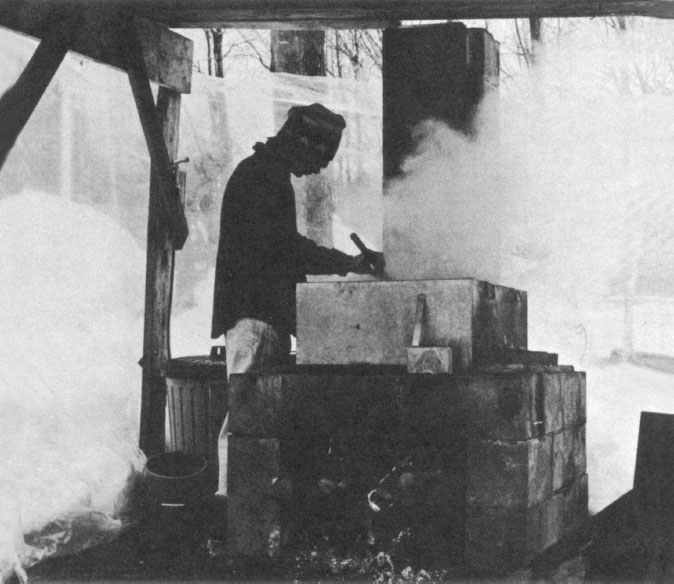
The smallest backyard sugarin’ rig I’ve ever seen was this 25-gallon modified oil drum mounted in a stone wall. The hole for the small evaporator pan, the door and the stovepipe hole were cut by hand with a hacksaw blade.
Mounting the evaporator in a stone wall is a good example of backyarder ingenuity. It gives the evaporator good solid support without having to make special legs, and at the same time it insulates the firebox from excessive heat loss, making for more efficient fuel consumption.
The pan seen to the rear of the evaporator is warming the sap preparatory to adding it to the pan, so as not to kill the boil.
An interesting aspect of this particular operation is that at the end of the season, the smokestack can be lifted for garage storage, and by adding a few rocks to the wall, the firebox is completely hidden from view, neatly concealing it until its unveiling the next season.
SPECIFICATIONS
Type: 25 gallon drum evaporator, wall mounted
Fuel: Sticks and branches
No. buckets served: 9
Season production: 5 quarts
Smokestack: 6" stovepipe
Enclosure: none
Special feature: Concealable wall mount
Owner: Wilfred S. Davis, New London, NH
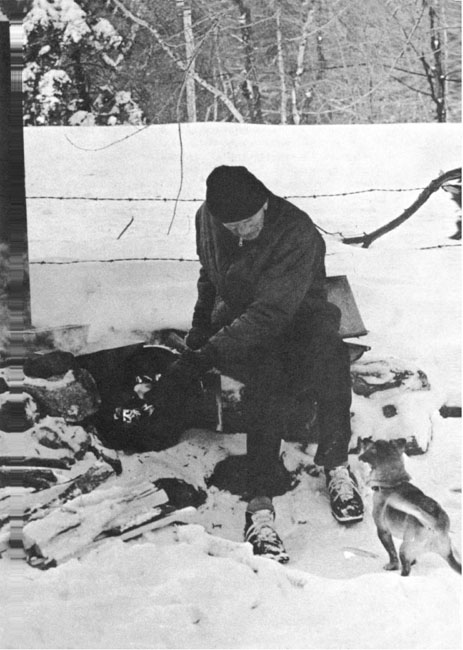
The mini-drum evaporator shown on the previous page was improvised by Wilfred S. Davis, a retired member of the U.S. Forest Service. Slim’s “sugar orchard” is a woodlot next to his house, and his interest in sugarin’ is only part of his efforts to bring the woodlot under sound forest management practices.
Sugarin’ is a natural outgrowth of good woodlot management, because selective thinning and pruning not only results in better maple sap flows but also provides the fuel for the evaporator—a convenient and efficient way to put the deadwood to productive use.
On the opposite page, Slim shows how he solved his bucket and cover needs. That’s an inexpensive plastic paint bucket you can pick up for next to nothing at most hardware stores. The cover has been cut from some leftover asphalt shingles, a good cover idea, because it’s heavy as well as waterproof and won’t blow away.
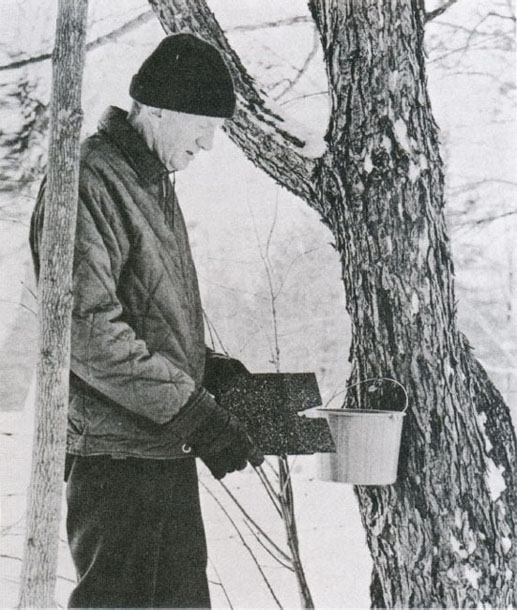
Plastic paint pail bucket with notched asphalt shingle top
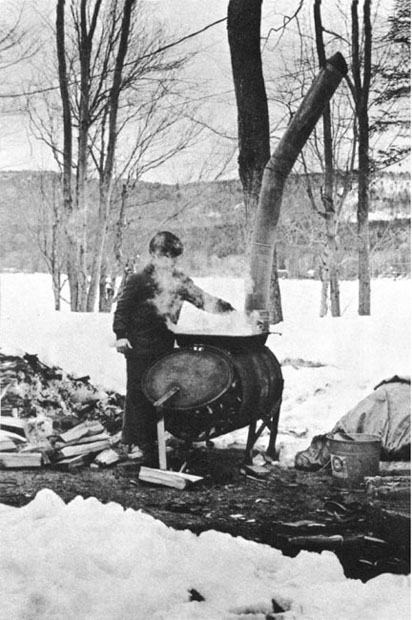
The first time I ran across this rig, I did a double take—figured that stack must have been bent around by a stiff nor’easter. Not so. By putting a bend in the stack and another at the top, and by being able to rotate the stack so that it always leans downwind, this backyarder has created a venturi effect (extra draw) which increases the draft without increasing stack height. Now there’s some innovation for you.
This is a neat little rig in other respects, too. A well-designed pipe stand holds things steady and well off the ground, for easy wood loading and pan management. And, everything can be taken down easily and stored away until next year.
SPECIFICATIONS
Type: Horizontally mounted 50-gallon drum evaporator
Fuel: Owner-cut cord wood
No. buckets served: 30
Season production: 20 quarts
Smokestack: Bent 6" stovepipe
Enclosure: None
Special features: Portability and venturi stack
Owner: Tony Dow, New London, NH

A closer look at the Dow horizontally mounted 50-gallon drum evaporator shows the combination door and draft regulator—simply the original drum cover hinged at the top. This door can be latched shut, left ajar or propped open in various degrees to provide a full range of draft control. Note the carrying rails for the evaporator pan. These provide a more level seat for the pan and add strength to the whole rig. Had these been wider—perhaps simply a portion of the cut-out drum folded back—they could have also served to support a row of insulating brick to help protect the pan from the cold air.
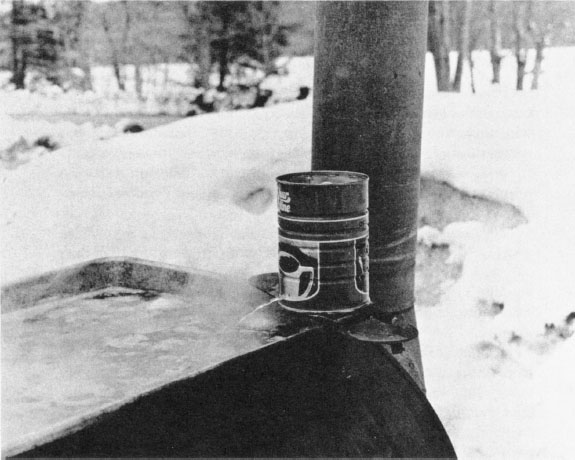
Sap injection and preheating are accomplished with a bottom-pierced coffee tin perched on a piece of flat metal at one corner of the evaporator pan. As the can slowly empties, it is refilled with a ladle.
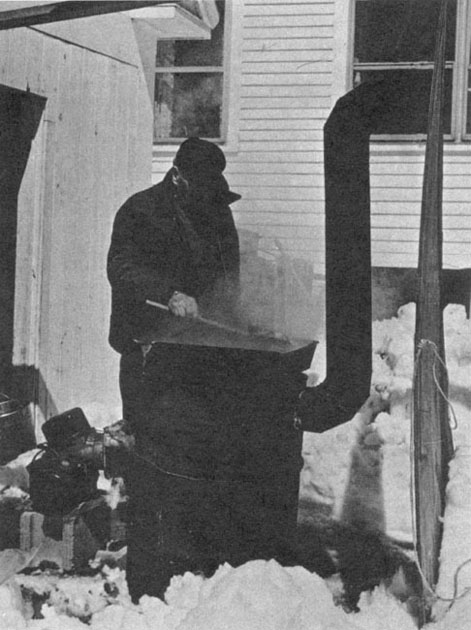
Wes Woodward put together this dandy sugarin’ rig just outside his garage door back of the house. It’s a 50-gallon oil drum set upright, with most (but not all) of the top cut out to accommodate his rectangular pan, and a hole in the rear to receive its 6" stovepipe stack. It’s fired, as you can see, with a second-hand furnace oil burner. A drum evaporator set up like this would be near ideal if you were using a round washpan evaporator pan.
If you can lay your hands on one, an old oil burner is a convenient way to fire up your evaporator, provides better fire control under the pan, and is probably more economical to operate than a wood fire, if you don’t have your own woodlot and have to buy wood. So far as I can tell, too, neither the flavor nor the quality of the end product is impaired.
Because of the intensity of the flame from an oil burner and the desirability of keeping the heat concentrated on the pan, this evaporator is lined with fire brick, loosely laid up. Another method for conserving heat is to wrap the firebox in fiberglass building insulation, glass side in.
SPECIFICATIONS
Type: Vertically mounted 50-gallon drum evaporator
Fuel: Home heating oil
No. buckets served: 17
Season production: 28 quarts
Smokestack: 6" stovepipe
Enclosure: Plywood roof and windshield
Special feature: Lined with fire brick
Owner: Wes Woodward, New London, N.H.
Engineered by the son of a leading heating and plumbing contractor, this evaporator shows the influence of one’s vocation on one’s avocation. What you’re looking at here is one-half of an oil storage tank, lined with fire brick and topped with an old but authentic professional double-compartmented evaporator pan, complete with a spigot for drawing off the syrup. The rig is fired with a salvaged oil burner, like Wes Woodward’s, and the whole operation is enclosed in a board and plastic structure to keep the cold breezes off the pan.
Note the galvanized ash can being used to hold sap. It’s worth mentioning that some ash cans are galvanized before fabrication and may leak at the bottom seam. Best check on this before buying one for this purpose. Apparently this one is OK.
SPECIFICATIONS
Type: Half tank oil fired evaporator
Fuel: Home heating oil
No. buckets served: 30
Season production: 24 quarts
Smokestack: 8" stovepipe
Enclosure: Board and plastic
Special feature: Finishing rig (see next page)
Owner: Arthur Miller, Elkins, N.H.
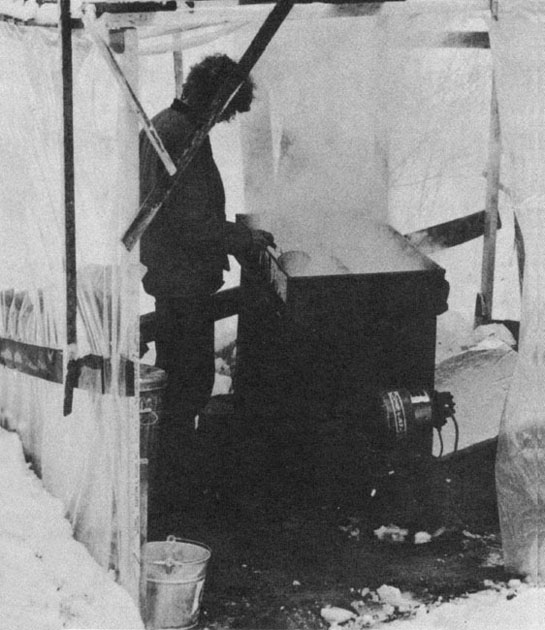
As boiling sap gets close to the syrup stage, it has a confounding tendency to rise up in the pan, like boiling milk, and boil over unless you quickly turn down the fire. For this reason, many backyarders prefer to “finish” their syrup in the kitchen or in a separate backyard rig, where they can get better fire control. Here, Arthur Miller is finishing his syrup on his father’s plumber’s stove (used for melting lead). It works fine, thank you. Another trick is to add a dollop of margarine or butter to the boiling syrup.
This backyard sugarin’ rig, assembled by the author and fired with wood, utilizes two defunct water pressure tanks, one as a sap storage tank (the one suspended between the trees), the other as a firebox for two 18" x 24" evaporator pans. The firebox is supported by two pieces of pipe suspended between two sets of cement blocks, and the whole operation is under a sloping roof made of two overlapping sections of corrugated steel roofing found, along with the pressure tanks, at the local dump. The only out-of-pocket costs involved were the purchase of a sheet of galvanized metal to fabricate the rear pan, a small payment to the mechanic who did the necessary cutting of the tanks with his torch (I could have done it better and cheaper by buying an emery blade for my circular saw), and purchase of the valve under the storage tank and the two hinges for the front door. Even the 8" stovepipe stack materialized out of the dump, complete with a very important looking but unnecessary backdraft preventer.
This backyard rig, capable of producing about one quart of syrup per hour of boiling, will be used in the following section of this book to take the prospective backyarder, step by step, through the boiling down process. Therefore we will hold back on some of the more interesting details of this operation until that time, showing it here only to properly catalogue it among the others and to touch on a few construction details.
SPECIFICATIONS
Type: Double pan, converted water pressure tank evaporator
Fuel: Owner-cut cord wood
No. buckets served: 24
Season Production: 20 quarts
Smokestack: 8" stovepipe with stack damper
Enclosure: Sloping corrugated roof only
Special feature: Gravity sap feed from storage tank
Owner: Rink Mann, New London, N.H.
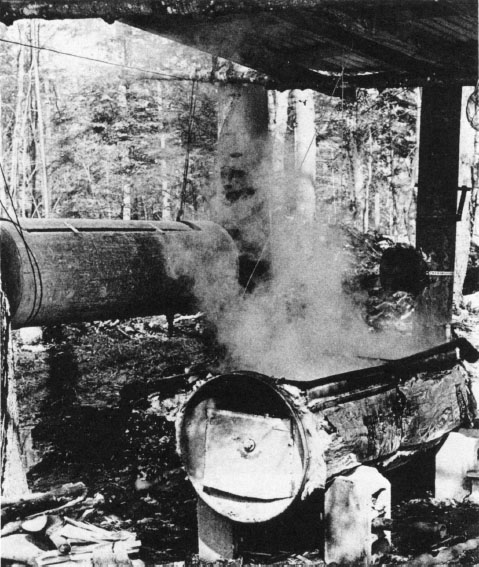
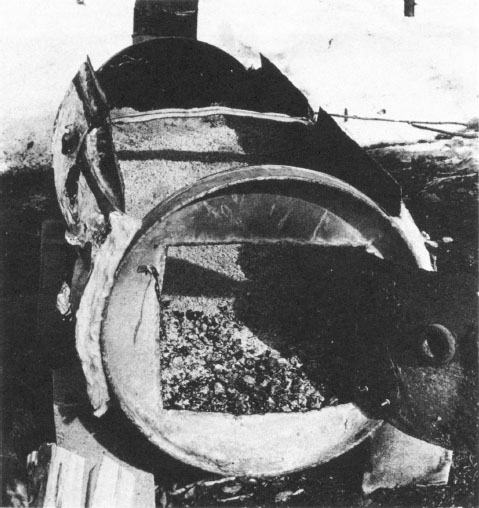
This view of the converted water pressure tank evaporator shows more clearly the various cuts that were necessary to provide a front door, an 8" hole in the rear for the stack and the two large top openings sized to accommodate the two pans. Note also how sand has been used at the rear of the firebox to force the flames to arch up and against the bottom of the rear pan.
A strip of ordinary fiberglass building insulation has been placed along each side of the firebox to prevent heat loss, being secured there by three strands of wire running around the firebox.
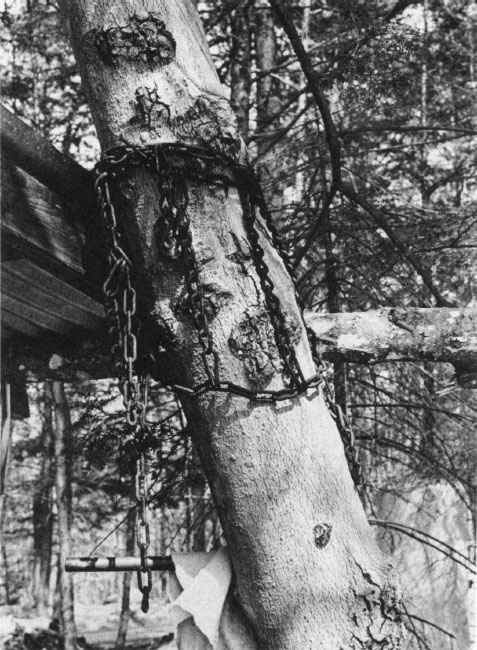
The two green hardwood poles supporting the corrugated roof sections were slung between four trees with two pairs of worn-out tire chains. The chains were tightened around the tree with their regular draw-fasteners so they will not slide down the tree, and the poles are inserted in one or two of the loops of the chains, as shown here. It proved entirely unnecessary to use any nails to support the roof.
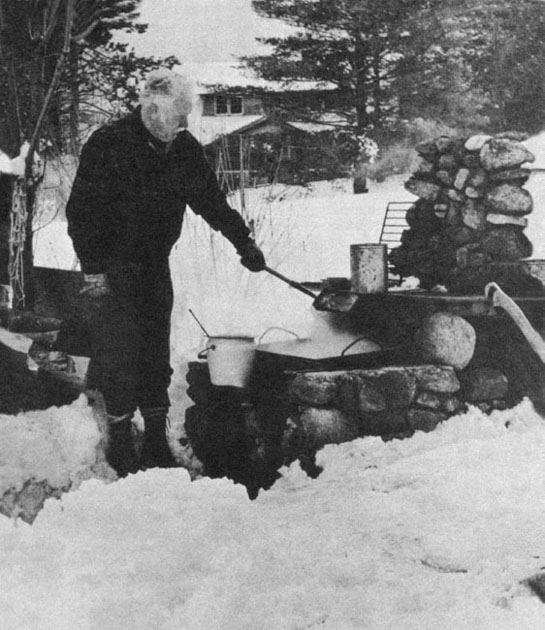
Improvisation, again, is the key to successful backyard sugarin’. For instance, if you already have some sort of outdoor cooking facility, don’t overlook the possibility of putting it to work for you, making maple syrup.
Here, backyard sugarer H. Sumner Stanley is beating the high cost of living by happily, and cleverly, making his own syrup on the family barbecue, excavated from a snowbank for the occasion. During a typical season Mr. Stanley produces about 6 quarts of syrup from maybe 7 taps at virtually no out-of-pocket cost and with a lot of fun and satisfaction thown into the bargain.
Notice the usual trappings of the backyarder—sap warming in a white pail forward of the evaporator pan and a bottom-pierced sap injection can on the upper level.
SPECIFICATIONS
Type: Backyard barbecue conversion
Fuel: Owner-cut cord wood
No. buckets served: About 7
Season production: 6 quarts
Smokestack: Integral to structure
Enclosure: None
Special feature: Old wood stove built into stone barbecue
Owner: H. Sumner Stanley, New London, N.H.
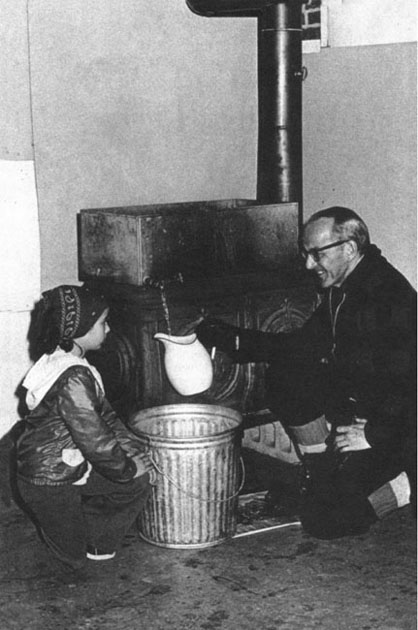
Here’s another good example of how to make do, come sugarin’ time, with an already existing firebox. In this case, it’s an old wood burning box stove, set up more or less permanently in one corner of the garage, and that’s our former Congressman, Jim Cleveland, and his daughter, Susan, drawing off a batch of syrup. Even when he was still in Congress, Jim liked to tend to his syrup-making personally whenever he was not too busy tending to the problems of his New Hampshire constituents.
Jim has had an evaporator pan made that fits just right over the stove opening after the stove lids and other top parts are removed, and the pan has a handy drawing-off spigot.
The 6" stovepipe stack finds its way into a nearby chimney, which draws a good draft for the stove.
SPECIFICATIONS
Type: Converted box stove evaporator
Fuel: Owner-cut cord wood
No. buckets served: 30
Season production: 32 quarts
Smokestack: 6" stovepipe into a chimney thimble
Enclosure: Garage
Special feature: Custom evaporator pan
Owner: James C. Cleveland, New London, N.H.
