Still following the example from the previous subsection, we will be looking into how to finally create and interact with a PyCharm project. Let's get started:
- Click the Create button to finalize the process. PyCharm will take you to another window where your newly created project is. The following screenshot shows what I obtained from my PyCharm:

- To add a new file to our project, right-click on the project in the left panel and choose New | Python File. You will notice that there are quite a number of other file types that you can create. For our purposes, we will choose the Python File option for now.
- A prompt will pop up, asking for the name of this Python file, as shown here:

- Here, I'm using test.py to name my file. Notice that we do not actually have to put in the .py file extension while naming the file since we have already specified that it is a Python file. Click OK to generate this file.
- After clicking OK, PyCharm might ask you whether you want to add this newly created file to Git or not. Git is the version control manager that's integrated with PyCharm so that we can use it within our PyCharm projects. We will go into further details regarding version control with Git in Chapter 5, Version Control with Git in PyCharm; for now, simply choose not to do this in the prompt.
- We will see that our test.py file has been successfully created and is now opened in the editor. As per tradition, we will print out a Hello, World! message in this Python file. Input the following into your own test.py file:
if __name__ == '__main__':
    print('Hello, World!')
- To run our first program in PyCharm, we have several options. First, we can go to the Run tab at the top and choose the second Run option (instead of the first Run), as shown here:

- Another prompt will appear after this; choose test (or the name you use for your file) to run our program. Here, we will see a panel appear in our PyCharm window (most likely at the bottom), printing out the output of our program, Hello, World!. This is the Run panel of PyCharm, which displays various information regarding the Python program we just ran. For example, the information I have in my Run panel is the following (which includes the location of the Python file and the exit status, in addition to any printed output):
/usr/local/bin/python3.7 /Users/quannguyen/PycharmProjects/PyCharm-Book/Chapter02/FirstProject/test.py
Hello, World!

Process finished with exit code 0
That is how you run a Python program in PyCharm. Additionally, you may also notice, to the left of the Run panel, that there is a green run button, as indicated in the following screenshot:
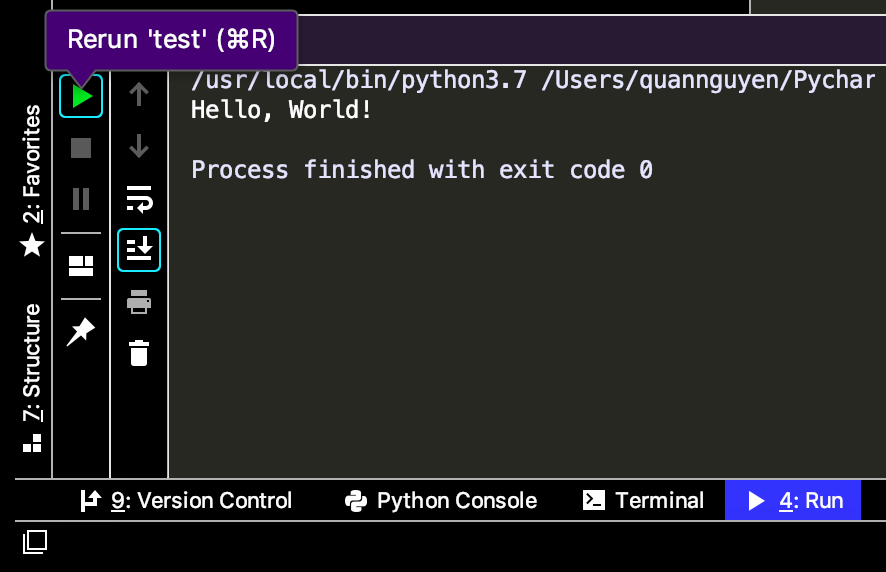
You can click on this button (or use its shortcut– R in the case of macOS – when the cursor is in the Run panel) to execute the file again. Specifically, this functionality reruns the last file executed, so you can use it to run a file multiple times in a row. However, this is not possible when you are switching between executing multiple files.
Another way to run a Python file is by using the Run context configuration action, which can be invoked when your cursor is on the line of the file you'd like to run (in the editor). This action has the default shortcut of 
 R (Ctrl + Shift + R) for macOS, and Ctrl + Shift + F10 for Windows, and can, again, be changed using the Keymap settings that we discussed previously. Move your cursor to test.py in your editor and try the shortcut to run the file.
With the functionalities that we have discussed, it is possible to begin developing Python projects in PyCharm—we can now create a new blank project, create Python files, and run them. However, we are merely scratching the surface of what PyCharm can do, and future chapters of this book will go into more detail regarding various aspects of using PyCharm.
For example, immediately after this chapter, we will learn more about other types of PyCharm project, as well as the management of virtual environments and interpreters, both of which topics we have skipped over in this chapter. However, before we move any further, let's begin the process of downloading the code examples that will be used in this book from GitHub.