In this subsection, we will finish the share feature for our blog application by configuring the underlying protocols for Django's emailing APIs. First of all, we will need to add a number of variables to the main settings.py file of our Django project, namely the following:
- EMAIL_HOST: This variable specifies your SMTP host server
- EMAIL_PORT: This variable specifies your SMTP port
- EMAIL_HOST_USER and EMAIL_HOST_PASSWORD: This pair of variables specifies the credentials for the SMTP server
- EMAIL_USE_TLS: This variable specifies whether a Transport Layer Security (TLS) protocol should be used
The values of these variables depend on your Simple Mail Transfer Protocol (SMTP) usage. If you already have, or will have, your own custom SMTP server set up and associated with this web application, you can simply input that custom information in the aforementioned variables.
If you are like me and would like to use the SMTP server of your email provider (in my case, Gmail), then you don't have to set anything up. Instead, you will specify those variables, as follows:
# SMTP credentials for emailing
EMAIL_HOST = 'smtp.gmail.com'
EMAIL_HOST_USER = ...  # your own Gmail address
EMAIL_HOST_PASSWORD = ...  # password to the Gmail address
EMAIL_PORT = 587
EMAIL_USE_TLS = True
Coming back to the code where emails are actually sent out, we now need to change the post_share() view in the blog/views.py file. Specifically, when the send_mail() method is called, change the sender address to the same address that the EMAIL_HOST_USER variable holds:
send_mail(subject, message, 'EMAIL ADDRESS GOES HERE', [cd['to']])
Note that if you are indeed using Gmail as your SMTP server, you will need to go into the settings of that specific Gmail account and allow external applications to access the account. This is required because Gmail automatically blocks unrecognized applications from signing in to its accounts; more information can be found at https://support.google.com/mail/answer/7126229.
Now, with everything set up, go back to the form and try submitting it again, this time sending it to an email account that you also have access to so that you can verify the receipt of the email. After the form has been submitted successfully, you will see the following message:

Note that the current page is still at the same address as the initial form (for me, it was blog/1/share/) and that this is the output that's produced by our template when a form is successfully submitted. Again, by using the if statement inside the view function, as well as in the template, we can handle the two cases we mentioned in one web page.
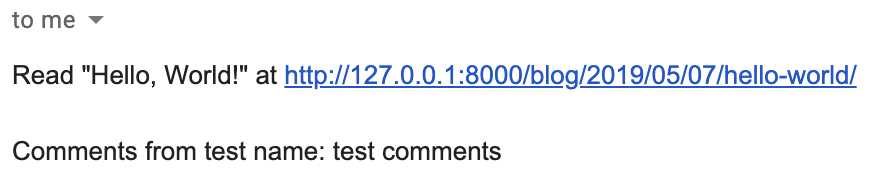
Furthermore, if you check the recipient email that you used in the form (in response to the To: question), you will also see the corresponding email that was generated by the submitted form. For example, I received the following email from a Gmail SMTP server:
And that is how a sharing feature is implemented in a Django project. Now, when a reader of your blog would like to share your content with others via email, he or she can do that using this feature via Django's SMTP protocols.
Note that, so far, we have only worked on and examined our web project in our local server (localhost or 127.0.0.1). In the next and final section of this chapter, we will discuss the process of deploying a complete Django web application online.