FORGOTTEN SKILLS |
16 |
SPINNING WOOL, macramé, knitting, crochet and dressmaking. Once common, probably up until the late 1960s, and even taught in schools, these are many of the skills performed by our mothers and grandmothers that have been lost in the current generation or two.
I remember as a boy we had, in our suburb, a baker (actually two), a bootmaker, an iron foundry, corner store, local garage and mechanic (where I worked during some school holidays actually serving petrol to customers and doing basic car services), a fruit and veggie man that drove from house to house, as well as the usual doctor, dentist, hairdresser, police station and local post office. How things have changed.
I also had a holiday job at one of the bakeries that specialized in pastries. I learned how to make pies, pasties, cinnamon buns and other cakes and goodies.
Most teenagers these days work for a fast food outlet or are “checkout chicks” (and I include boys in this too). Teenagers rarely learn how to prepare and make real food. I learned how to wash, peel and cut potatoes, but most fast food employees simply open the packet of frozen precooked food. And while schools do give children a taste of some of these skills, it just isn’t to the same depth of training young people for employment as it once was.
You might think that in my day where girls at school learned how to cook, sew and knit and boys learned woodwork and metalwork that it all seems a little sexist. But learning these skills early in my life gave me the confidence and interest to build houses, repair structures and be a little inventive — skills I can now pass on during my permaculture courses.
I love all of my grandchildren, but all many of them seem to do is play video games, watch TV, “text” messages on their iPhones, and be so absorbed in social media that they seldom climb a tree, go for a forest walk, build a playhouse, make a simple raft or canoe and paddle down a local creek, or ride their bikes with their pals over the “jumps” they built down the road on a vacant piece of land. Yes, some play sport at various times of the year, but there can be so much more about being a kid. How times have changed.
We could write about a myriad of “forgotten skills” that more recent generations of people do not do, but here are ten simple things to start you in the right direction.
There are literally hundreds of different types of knots. A knot is basically used to tie two ropes or objects together. If we join a rope to another rope, we call it a bend, and if we tied a rope to a steel post then we describe the knot as a hitch.
To describe how a knot is tied we will use the following terminology. The “working end” is the end of the rope that is manipulated to make a knot — maybe the shorter piece. The “standing end” is the main length of the rope, maybe the longer piece, often under load.
The following five knots are very useful and easy to learn.
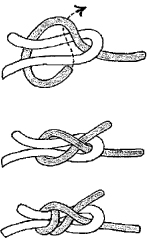
A simple knot to tie two different-sized ropes together. Sometimes you run out of rope and just need a little bit more. You can attach another type of rope of different thickness by using the sheet bend.
1. Form a loop in one end of your main rope (standing end). Pass the end of the other rope (working end) through the loop, around the back of the main rope and then back under itself.
2. Pull the ends of both ropes to tighten.
3. For additional strength, wrap two turns around the main rope (double sheet bend).

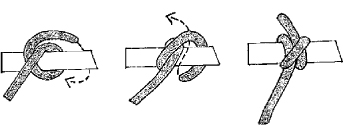
An all-purpose hitch to tie a rope to a post or rail, such as when you tie down a load on a trailer or pickup truck. The knot is easy to undo by a firm jiggle and enough of the knot is loosened to enable untying. If the tension is not maintained then occasionally this knot becomes unravelled.
1. Pass the end of the rope over the rail and then under itself. Pass the rope around the rail again.
2. On the second turn, slip the working end under the last wrap.
3. Pull both ends of the rope tightly.
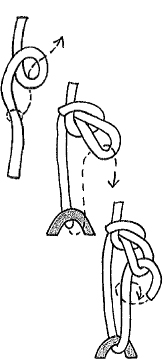
This is the best knot to secure a load on a trailer or truck. It allows you to tighten the rope, ensuring the load stays in place. The knot is then secured by using the clove hitch for the end of the rope.
1. Make a small loop about 3–6 ft from the end of the rope. Gather up another small loop and pass this through the first one. Gently pull down to tighten the first loop onto the second.
2. Pass the working end of the rope under and around the rail or post and thread it back through the loop.
3. Pull tightly to drag the standing rope downwards (using the loop as a pulley) to secure the load.
4. Tie off the working end by a clove hitch or other knot to prevent the trucker’s knot becoming loose.
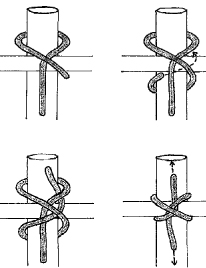
This is a lashing knot and ideal for tying two poles together (at right angles) when you are making a bamboo fence or erecting a tent. This can be a permanent knot and the ends of the rope trimmed as required.
1. Holding the poles at right angles, pass the working end around the back of the rear pole.
2. Pass the rope end across the front pole and then around the back of the rear pole again.
3. Before it becomes too tightened, feed the working end over the standing end but under the second turn.
4. Pull both ends tightly to secure poles together. Trim the rope, either side of the knot.
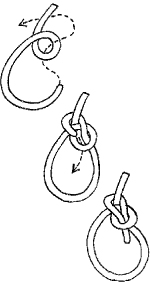
The bowline forms a secure loop that can be used to stake and hold a tree upright, tie around a handle of a bucket or tool to lower into a hole, and to place over a person or object to lift them out of a hole or off a cliff face. It is known as a rescue knot.
1. Form a small loop in the working end.
2. Bring the free end up, through the loop, around the back of the standing line and back again through the loop.
3. Tighten the knot by pulling on the free end while holding the standing line (so the new larger loop doesn’t slip too much).
Paper is made from the pulp of trees. In many large cities in the world it has been estimated that somewhere between 3,000–4,000 trees are used each week to produce the weekend newspapers. Trees are rapidly being depleted globally, leading to dehydrated landscapes, soil and wildlife habitat loss and streamline silting. Consumer demand has outstripped tree growth and replacement. Recycling paper, cardboard and tree material will be inevitable in many countries in the years to come.
Old newspaper can be used to make paper but if it contains excess ink, the paper produced will be stained a gray color. Computer or white paper pieces work the best. Glossy paper and magazines should be avoided because they are difficult to mash.
You can mash and shred plant materials such as the leaves and stems from bananas, but these are more time consuming and may require chemicals, boiling and physical mashing to make the pulp. If you want to give it a go, combine about 20–30% of banana pulp with the balance of recycled paper pulp.
The basic principles of this process can be easily demonstrated but you will need a deckle. This is a wooden frame that has a fabric (screen) stretched over it. A typical frame might use 1 in (width and height) timber and be about 5 in2.
The fabric needs to have holes in it to allow for water drainage. Window screen or even shadecloth is suitable. Secure the window screen or shadecloth by gluing or stapling it to the frame. The deckle should be constructed by keeping both the size of the tank and the size of the paper sheet you want in mind. The deckle should easily slide in and out of the tank or basin.
Beware of using colored felt or cloth. The colors may run and stain your paper. Commercially made paper is often bleached by chemicals that can damage our environment. This exercise uses no bleach or chemicals in the process.
Deckle
Waste paper
Electric blender or food processor
Large tank, pneumatic trough or baby’s bath
Felt pieces or cloth (e.g. old plain handkerchief), large enough to cover deckle
Option: electric iron, flat masonite or plywood, weights or bricks
1. Tear waste paper into small pieces and place into a food blender.
2. When the blender becomes half-full with paper add enough water to completely cover it.
3. Blend the paper until no more large lumps are visible, and the mixture is of a thin consistency.
4. Pour the mixture into a large tank or trough.
5. Add an equal volume of water to the tank.
6. Slide the deckle at an angle into the tank.
Hand mix the paper fibers in the water (to make an even mixture).
7. Lift the deckle upwards, with a slight sideways movement (or tapping) to filter the fiber and drain the water.
8. Turn the deckle over and place it onto a felt cloth or handkerchief.
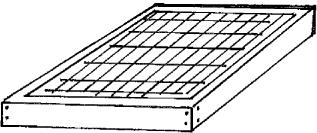
A deckle
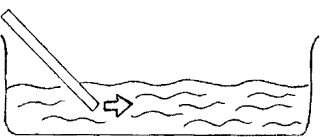
Slide the deckle into the pulp bath.
9. Wipe the underside (now top) of the deckle to remove excess water. Rub the wire to free the fibers so that the paper can be separated from the frame.
10. Carefully pull the frame off the paper. The paper should remain behind on the felt or cloth.
11. Cover the paper sheet with another piece of cloth to help the paper dry. Alternatively, after a piece of cloth or felt is placed on top of the newly formed paper, place a flat board, with or without weights, to flatten and help dry the sheet.
The drying process can be speeded up with the use of a hot iron. Do not iron the sheets directly; the paper sheet should be sandwiched between pieces of cloth.
12. Before the paper dries completely, gently pull the sheets off the felt — if left too long the paper sticks to the cloth.
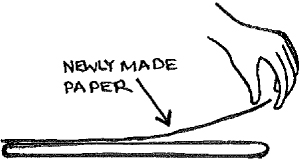
Lift the paper carefully off the cloth.
You could also try different screens. For example, compare steel wire with plastic window screen or shadecloth. Experiment by adding food color dye to the water. The paper produced is often patchy in color but still useable.
If you intend to write on your paper with ink, then you may have to “size” the paper. This means that the paper is immersed or covered with substances, such as starch or gelatine, to prevent the bleeding of the ink throughout the paper sheet.
» DID YOU KNOW?
Sizing is how paper is protected, so that inks are not absorbed and spread throughout the paper fibers (bleeding of inks). Particular chemicals are added to the cellulose fiber pulp and act as fillers or protective glazes (like a paint sealer) to strengthen the paper and allow dyes to dry on the paper surface.
Historically, alum has been used, but gelatine (animal) and starch (plant) solutions can be either applied to the paper surface with a brush, or sheets are soaked for a minute in a shallow tray. These are then removed, dried and pressed again.
Some people believe that soaps and detergents are essentially the same, and simply think of them as different types of cleaning agents. Other people suggest that soap is a solid while a detergent is a liquid.
While this is true, the main difference between these two substances is that traditionally soaps are made from natural substances while detergents are synthetic.
Most detergents are produced from oil. While soaps and detergents have similar functions, the chemical structure is completely different.
Soap can be made from waste fat or oil. Caustic soda (sodium hydroxide) is added to cooking lard or oil and after a series of steps and reactions soap precipitates out.
There are many recipes for soap. However, they all use sodium hydroxide, which is a corrosive and poisonous chemical. You will need to exercise care when using it. Sodium hydroxide should not be directly heated.
The process of soap making is called saponification. Organic esters of fatty acids are changed into sodium salts (carboxylates) by the addition of sodium hydroxide. Glycerol is a by-product in this reaction.
Soaps and the synthetic detergents are surface active agents, surfactants or wetting agents. All three terms refer to substances that permit water to combine with grease and dirt.
Dirty dishes or clothes are cleaned because one end of the soap molecule is non-polar and dissolves in grease while the other end is polar and will dissolve in water.
Soap flakes will lather in water. When a small sample of soap is added to water in a glass and the contents stirred or shaken vigorously, a lather (bubbles) can be observed.
Detergents characteristically produce a greater lathering action. You should perform this test to show whether you have been successful in your soap making venture.
The addition of calcium, magnesium or ferrous ions produces an insoluble salt with the soap molecules. These ions make the water “hard” as little lathering occurs when they are present.
The familiar “bath tub ring” is caused by the precipitation of these substances with soap.
Sodium hydroxide pellets
Lard (pig fat) or cooking (vegetable) oil. You can have almost any combination of oils, such as sunflower, canola and olive oils. Coconut and palm oils are normally solid at room temperature
Two saucepans — one small to fit inside a larger one. Use steel pots as caustic soda reacts with aluminum
Saturated salt (NaCl) solution (dissolve as much salt as you can in 7 oz of water)
Ice
You will also need a measuring cylinder, hotplate, stick (or immersion) blender (or wooden spoon), and some type of filter (filter paper or tea strainer).
This method only uses small amounts of ingredients. Once you have made soap successfully you can scale up the amounts of each ingredient.
1. Place about 2 oz of lard or 3 tbsp of oil in a small saucepan.
2. Melt the fat or heat the oil in a water bath. Use a larger saucepan for this purpose.
3. Use a water bath to heat the soap mixture. You can heat the oil or lard directly in the one saucepan, but having a water bath is safer.
4. Dissolve 1 oz sodium hydroxide in 7 oz of water in another container or cup. Be very careful. The reaction generates considerable heat. Add the sodium hydroxide slowly, bit by bit, and continuously stir to dissolve. Wear rubber gloves and safety glasses.
5. Slowly and carefully pour this solution into the melted lard. Mix thoroughly by stirring with a stick blender (or wooden spoon, which will take a lot longer).
6. You should notice that a solid starts to form. Continue to heat gently for another 10 minutes, stirring with the blender and occasionally stopping it and stirring manually to mix thoroughly. It should thicken.
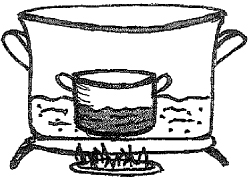
A water bath allows gentle heating.
7. Option: this is where you can add food coloring or perfume to your soap.
Add the coloring before you filter the soap flakes. Alternatively, experiment with plant pigments. For example, onion skin tea makes the soap yellow.
Add perfume to your soap. This can be done in two ways. Petals of roses or other perfumed flowers can be layered over the flakes as they dry. Alternatively, add a few drops of perfume from a bottle into the mixture as the soap is being made.
8. Remove the small saucepan from the water bath and allow it to cool. If little or no soap has formed add 1 cup of salt solution to help precipitate the flakes. This latter step is seldom necessary.
9. The soap flakes or lumps can now be filtered through a kitchen tea strainer.
10. Wash the soap several times with iced water (this removes excess caustic soda).
11. Push the flakes into a dish or mold and allow to dry and set. It may take overnight to harden.
12. When hardened, remove the soap bar from the mold, and test the soap for its ability to lather in water. Cut the soap into smaller, useable blocks unless the molds are already the right size.
Laundry soap or detergent is easy to make. Even though soap is different from a detergent, we don’t differentiate here. You can choose to make a powder form (more like a soap) or a liquid form (more like a detergent), but liquids are preferred. If you use the powder form, add this to the water in the machine to dissolve before you add the clothes. If the powder is not fully dissolved you may get powder marks on your clothes. It is always best to make the solution.
This recipe requires the use of borax, which may cause controversy. Borax is sodium tetraborate (also sodium borate), a mineral found freely in deposits in the ground. It is alkaline, and should not be confused with boric acid, which has completely different properties. Borax can be poisonous in very high doses (so it should never be eaten in foods), but is unlikely to cause any adverse reactions to people who use it to wash clothes. It has the same health rating risk as washing soda, which is also used in this recipe.
Washing soda is sodium carbonate and should not be confused with baking soda (sodium hydrogen carbonate). However, if you cannot source washing soda then you can convert baking soda into washing soda by heating in an oven at 400°F for about one hour. Carbon dioxide and water are given off, so open the oven door every now and again, and stir the powder on the tray.
½ cup of borax
1 cup of washing soda
1 bar of pure soap (or equivalent amount of soap flakes)
2.5 gal water (and bucket)
1. Shave or grate the bar of soap.
2. Add this to a saucepan with 0.5 gal of water. Heat and stir to dissolve soap flakes. If it does boil then lower the heat source and simmer until you have dissolved all the soap.
3. When cool, pour this solution into a 2.5 gal bucket, preferably one with a lid.
4. Add the borax and washing soda. Fill the bucket with water until near the top, and stir until everything has dissolved and mixed thoroughly.
5. Use one cup of this mix in every load.
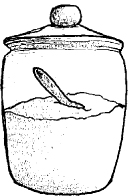
Powder detergent can be made rather than a solution.
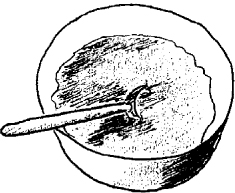
Stir thoroughly to dissolve the soap flakes.
Option: if you decide just to mix the dry powders together, then make sure the soap flakes are grated very finely and use about 1½–2 tbsp of powdered detergent for every load.
Bamboo is one of the strongest timbers, and the culms (poles or stalks) are used throughout the world in construction, building homes, reinforcing concrete, furniture, scaffolding and flooring. Bamboo is a multifunctional plant. So, besides the structural uses, some are used as food or fodder and others as shelter or a windbreak. Most bamboo species can be easily split as the wood “fibers” run longitudinally (and not radially), but some species are thick walled and require a lot more effort.
Bamboos are generally grouped into two types — clumping and running. Clumping varieties are the best for a backyard garden, and these tend to grow naturally in warmer tropical and subtropical areas.
Running bamboos generally come from temperate climates and are well suited to colder conditions. However, they can become rampant and spread throughout the garden (and into your neighbor’s yard). Running bamboos are best kept in pots where they can be managed.
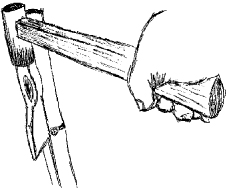
An ax head is a good wedge to split bamboo.
The culms to be split need to be somewhere between three to seven years of age, as these have the most lignin and strength. Fresh (“green”) bamboo works best as dry bamboo sometimes tends to be a lot harder and more difficult to split. Besides, dried bamboo may already have splits in some places, and possibly not where you want. Always cut the culm and culm slats in half.

A wedge will need to be used for large bamboo.
To split large bamboo culms (4 in or more in diameter), you need a machete or meat cleaver or a wedge (like an ax head).
The wedge is placed in the center of the culm and hit with a sledgehammer or gympie (bricklayer’s hammer). As it splits you should place the cutting blade across the diameter (width) of the culm so that both sides split at the same time, essentially cutting the culm in half lengthwise.
This process can continue to further split the bamboo into slats and then slivers.
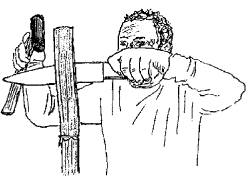
A smaller knife cuts thinner bamboo culms.
To split smaller bamboos you can use a thick knife and a hammer. Place the blade across the center of the culm and gently hit it with a hammer to start the split. Then use the knife to push downwards, moving the blade side to side to further cause splitting. You may need a little extra push or twist when you encounter a node.
For very thin sections use a utility knife. Start the slit and then push the bamboo through the blade (don’t drag the knife, push the bamboo).
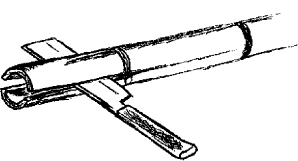
Thinner walled varieties can be easily split.
Kids love playdough, and unfortunately they love to eat it too, so it is important to make a nontoxic product. This recipe does require heating but is easy to make. For gluten-free playdough use rice and corn flour instead of wheat flour.
While you can find recipes that require no cooking or cream of tartar, the playdough made without these is less pliable and cohesive, and more crumbly and dry.
Heating causes the proteins in the flour to interact to become a stretchy, elastic mass.
The cream of tartar is often used to stiffen the mixture and provide some stability to the product. The oil acts as a lubricant, making the playdough soft.
1 cup wheat flour (or ½ cup each of rice and corn flour)
¼ cup salt
2 tbsp cream of tartar (potassium hydrogen tartrate)
1 tbsp vegetable oil (mild odor, not like olive oil)
1 cup water
Food coloring — yellow, red, green, blue
1. Mix dry ingredients in a small saucepan.
2. Place the oil, water and a few drops of one type of food coloring in a bowl. Blend.
3. Add the mixed liquid to the flour mixture in the saucepan. Mix thoroughly.
4. Heat the saucepan on a stove for a few minutes until the mixture thickens. Remove from heat.
5. When cool, turn out and knead on a lightly floured bench top. Kneading will improve texture.
Add additional flour or water to make right consistency, although this is seldom necessary.
6. Repeat this procedure but use a different food color.
7. Store in a sealed plastic container or a sturdy plastic bag that can be zipped to prevent the playdough from drying out.
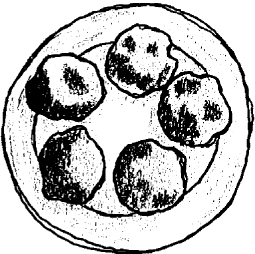
Playdough — make different-colored balls
We have briefly discussed seed saving in earlier chapters, but it is worthwhile to expand on this here. Everyone should save the seeds from the strongest and most prolific vegetable plants they grow each year. Saving seed doesn’t necessarily mean storing seeds for years, as the seeds from most plants have longevity of only a year or two.
Recalcitrant seeds, from subtropical and tropical plants, often have a viability of a few months, so those are typically planted as soon as they are picked.
You must remember that seeds are living things and eventually die if not planted. They have a finite lifetime. While many people tend to grow heirloom, open-pollinated plants, you can save the seed from hybrids.
Hybrid varieties are produced from crosses between different plants, and are bred for particular characteristics, such as good tasting fruit, disease resistance and bearing fruit earlier in the season.
Hybrid seeds are not the same as genetically modified organisms (GMOs), which tend to be produced so that they do not have viable seed, so new seed has to be purchased each year.
We are not going to discuss the seed saving techniques of individual plants, just make some general comments, so you can find out about the particular vegetables and fruits you grow when you need to.
Pollination is the process whereby pollen (male cells) is transferred and fertilizes the eggs of the female part of the flower. Seeds develop from fertilized eggs. If this process occurs on the same flower, then this is called self-pollination. If pollen is transferred from one flower to another, either on the same plant or between different plants, then cross-pollination has occurred. Pollination often needs insects, other animals (birds, mammals), water or wind to enable the pollen to move across to the female part.
• Some seeds can be harvested by securing a paper or plastic bag around the seed head and waiting until the pods open and seeds are ejected. This is a technique for the brassicas (broccoli, cabbage).
• Some seeds can be harvested by placing a large tarpaulin under the tree and then shaking the tree to dislodge seeds or their pods. This is a useful strategy for nuts.
• Seeds should be cleaned before storage. Remove any sticks, pods, leaf material. You may be able to use screens and sieves to accomplish this.
• Once harvested, seeds are often left to dry before storage. Larger seeds take longer to dry (a few days).
• Don’t dry seeds directly in sunlight. They tend to desiccate too much and die.
• Store seeds in paper bags or glass jars. Don’t place seeds in plastic bags as this causes the seeds to “sweat” and encourages mold to grow. Store in a cool, dry, dark place.
• There is no need to exclude air completely. Seeds, containing living cells, need a little bit of air to survive. While there is no need to put wax over jar lids, reducing air exposure prolongs seed life.
• It is important to exclude moisture from seeds as this causes fungus to grow, and to keep insects and other organisms out so that the seeds are not eaten. You can place a silica gel sachet in the jar to help control excess moisture.
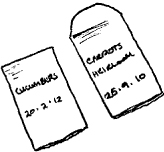
Store seeds in paper bags, and label.
• Seeds from some plants, such as tomatoes, are found in a mushy pulp. They need to be separated from this, and you can either wash the pulp and seeds in a bucket or scrape the seeds out as best you can. When washing, the pulp may float and the seeds will sink, where they can easily be retrieved. After scraping the seeds from the pulp, spread them over newspaper to dry out.
• Seed longevity is very sensitive to humidity (moisture in the air) and temperature changes. As a general rule, if humidity and temperature increase, then seed viability decreases.
• Some seeds can be stored in the freezer. You cannot store desiccation-intolerant (recalcitrant) seeds in a freezer as this destroys seed tissue when water expands as it freezes.
• Smaller seeds, which generally have a long viability, are ideal candidates for freezer storage, as long as they are dried correctly. Seeds stored in a freezer can be kept for longer periods.
• Consider swapping seeds with others. You can join a seed saving network or donate to a local seed bank. In this way, your seeds will be grown and good varieties dispersed throughout the neighborhood, and you can receive varieties that you might enjoy too.
• If you collect heirloom (traditional, heritage) seed varieties then they are mostly true to type. This means that they will produce plants that are the same as the parent plant.
• Hybrid seeds may not produce identical plants as their parent, so you may get a variety with slight differences in color, flavor or production.
• When seeds are stored make sure you label the container with information such as date of collection, place of collection (if not from your own garden), scientific name, common name and variety.
Community groups could set up a seed bank.
Seed saving is a rewarding task. Besides saving some money each year, there is great satisfaction in witnessing the cycle of nature.
Growing the seed, harvesting the plants for food or other uses and products, saving the seed and then regrowing them in the years that follow completes the natural cycles of nature.
Very few people ever become rich as basket weavers. However, the materials you use are almost free (many fibers from your garden plants) and as long as you have time, basketry opens up another world of materials, plants and artistic expression.
Suitable plants include the leaves of cordyline, banana, dracaena, flax, gladiolus, iris, pampas grass, watsonia, dianella, gymea lily, lomandra, bulrush, sedge and carex. The stems and twigs of willow, wisteria, grapevines, couch grass, honeysuckle and jasmine are also commonly used.
Fresh leaf and twig material is best, as it tends to be soft and pliable enough to pass around poles and each other. You may need to soak some leaf material for some hours or even overnight to permit weaving to occur. Dampen off the leaves with a cloth before you start.
There are lots of books about weaving, many providing patterns and clear instructions on how to make baskets, hats and many more items. Only a brief outline of some basic techniques is presented here.
There are many patterns for weaving, but here are three common ones that can be used to make simple baskets, hats and even garden fences.
This is a basic weave and is used as a base for bowls, hats, baskets and mats.
1. Lay leaves parallel to each other, with spacing the width of a typical leaf.
2. Place a heavy piece of wood or brick on one end to keep that end still.
3. Lift up every alternate leaf and place a new leaf across the remaining fibers.
4. Lift up the next alternating set and repeat the process.
5. Keep the overlapping leaves close together. It is possible to adjust the weave by pushing the fibers together to tighten it up.
6. To finish the “square” you could sew around the perimeter to hold the leaves together.
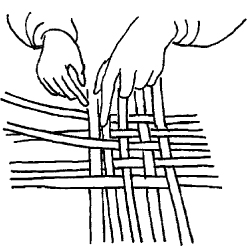
A square weave
A variation of the square weave is the diagonal weave, which adds variety to your project.
This is a simple under-and-over weave, where fibers are wound through stakes. This weave is ideal for bamboo and brushwood fences where stem material is passed through poles.
1. Place stakes or poles evenly apart.
2. Weave the fiber in and out, as close as possible.
3. For the next layer, start the fiber in the opposite position.
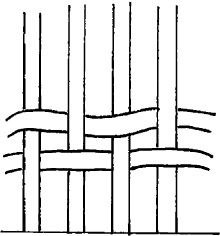
Randing
Twining or pairing is a closer weave than randing. It is also an under-and-over weave but two fibers are threaded at the same time so that they cross each other.
1. Place stakes or pole evenly apart.
2. Take a pair of fibers. Thread one around and through the poles.
3. The second fiber starts on the opposite side of the stake and is threaded under and over the first fiber, so that they cross between the stakes.
4. Once threaded, push the pair of fibers down to sit firmly on the previous weave.
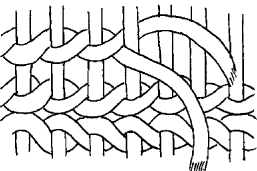
Twining
» DID YOU KNOW?
Rushes, reeds and sedges all make good material for weaving. All three are wetland plants and species of each type are commonly found throughout the world. Sedges are flat-bladed plants, rushes have cylindrical leaves (often with air spaces throughout), while reeds are from the grass family and include species of papyrus, carex, typha and phragmites.
Normal rope is usually three strands of material wound around each other. This is not the same as a braid or plait, where the strands are woven together.
Using plant material to make braided rope is easy. It is similar to weaving. The simplest rope is a weave of three fibers, but thicker rope can be made by using five or seven strand plaits. The fibers of sisal, hemp and jute are commonly used to make rope but many other plants can be used. Long strips of flat-bladed plants such as banana, sedges, carex, watsonia and dianella are suitable.
1. Obtain thin strips of leaves. Either cut the leaves with scissors or a utility knife into longitudinal strips (along the length of the leaf). You can also learn how to extract the fibers from the bark of some types of dead trees or use animal hair or sinew instead. If you want to practice the technique before you thrust into plant braiding, just use string.
2. Tie the three strands together at one end (with a simple knot, elastic band etc.).
3. To plait or braid, place two strands to one side. Always move the farthest strand (that is on the side with two strands) and pass it over the other (always across the center one).
4. Repeat this procedure until you have enough length in the rope. Tie the ends together so it doesn’t unravel.
5. When you run out of plant material just overlap one strand about 2–3 in from the end and underneath of the current piece, enough to enable a few braids to keep the new material in place.
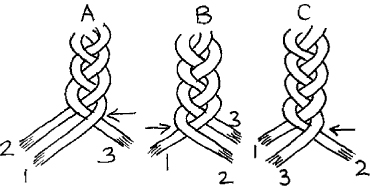
Three strand braid or plait
It is a bit tricky to hold the two overlapping pieces as one but you will get the hang of it.
You can use this braided rope to tie your bamboo fence or poles together, make a handle for your basket, produce a bracelet or leash, or for any other types of lashings.
Braiding allows you to join the leaves of onions or garlic together so that they can be hung as they dry out or stored until you need some for cooking.
Most candles that you buy in shops are made from paraffin wax. Paraffin is produced from petroleum as a by-product from oil refining. Occasionally you can buy candles made from beeswax, but many other waxes are suitable, such as soy and palm and many combinations of any of these.
All candles need wax that has a low melting point so as the flame ignites the wick, the wax slowly melts (and burns) and exposes more wick.
Eventually, all that is left is a small pool of melted wax, which solidifies and can be reused to make more candles. Please read the whole method before you start, as there are options and hints to help you decide how to best proceed.
Wax — soy, paraffin or beeswax
Twin saucepans — one smaller to fit inside the larger — for a water bath
Wick — braided cotton, paper core or zinc core, hemp cord
Mold — tin cans, ceramic jars, glass. You can purchase molds that you recover and use again or you can simply pour the wax into a glass or other container and leave it complete.
Option: dye or essential oil for scent
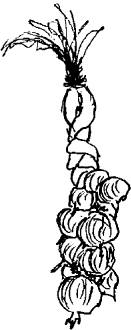
Braid onions together and hang to store.
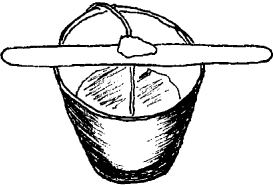
Suspend the wick and center it in the mold.
1. Prepare the mold with the wick suspended centrally. The wick needs to be kept in place when the molten wax is poured into the mold, so some wicks you can buy are zinc core and these stand upright already. Cotton and paper braid wicks are reasonably rigid too but these and other types of wick cord can be supported by wrapping the end around a pencil or other object on top of the mold. The base of the wick needs fixing in some way. You can buy pre-made wick clips but you can fix the end by placing a small dob of silicone glue (or hot gun glue) attaching the wick to the mold and allowing this to set overnight (see also step 6).
2. Work out how much wax is needed to make your candle. If your candle is a cylinder, measure the mold diameter (then half this for the radius) and height (both in centimetres) and use the formula:
v = Πr2 h
where v = volume, Π (pi) = 3.14, r = radius and h = height
As an example, if the mold had a diameter of 2 in (radius = 1 in) and a height of 5 in then the volume of wax, v = 3.14 × 1 × 1 × 5 = 15.7 in3. As wax has a density of about .55 oz(in3) you will need about 8.6 oz (1oz = 28g).
3. Place your wax, cut up as best you can into smaller pieces, into the smaller saucepan, and place this inside the large saucepan half-filled with water. Heat the water to melt the wax. While you can carefully heat the wax in the single saucepan directly on the stove there is a very high risk that the wax will catch fire. The water bath will provide the usual 140–175°F heat that various waxes need to melt.
4. Option. When the wax has melted you can add a scented oil or dye, but they need to be oil-soluble and not only soluble in water. Only about 10% of essential oil, at most, should be added. You only need about 2 cups of dye. Add a little dye, mix and see what color it is. Add more until you see the tone of color you want. Mix thoroughly as the oil may separate from the wax (different densities).
5. Pour your wax into the mold. If you can preheat the mold (in low temperature oven) then the mold and wax will cool at the same temperature. If hot wax is poured into a cold mold then it starts to set straightaway, and possibly unevenly.
6. If you purchase stiff wicks then you can place the wick into the cooling wax in the mold. Just as the wax makes a soft skin on the top push the wick downwards to the bottom and endeavor to center it.
7. Because wax shrinks when it cools you may have to melt some additional wax and fill the mold to the top again.
8. When completely cooled (depends on the type of wax — anywhere from half-a-day to overnight) trim the wick to about ¼ in.
9. Removing the candle from the mold can be difficult. Here are some options to try:
(a) You can purchase a mold release spray. Spray mold at step 1.
(b) Place the candle into a refrigerator for 10 minutes. Gently tug on the wick and it should release.
(c) Place the mold into a saucepan with hot water. The heat on the mold should be enough to slightly melt some of the wax, enough to enable you to pull the candle out.
10. Leave the candle to set for at least 2 days before you use. If you are giving your candle as a gift, label it with the ingredients you have used.
We could have discussed a lot of other useful skills that need to be reintroduced again, and these include mud brick making, sharpening tools, mixing and screeding concrete, making household cleaning and bathroom products (moisturizers, shampoos and toothpaste), grafting and budding, and making rammed earth walls and paths. Maybe in another book!
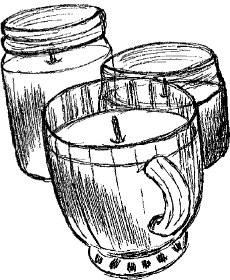
Candles made in glasses and jars