FLAKY
foods that shatter when bitten into
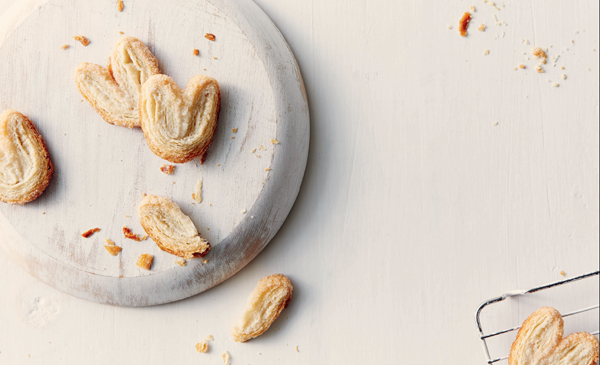
Pastry is like snowflakes—no two shattered bits are alike. Bite into a palmier, slice a tart, or break open a samosa and flakes will flutter to the table like ice crystals falling from the sky. You never know where they will land. Some fall straight and true in a neat pile on the plate below. Some waft about in an unfelt breeze drifting so far from your fork, you wonder how they got there.
Flour, butter, and heat make flakes possible. Consider them proof of a job well done.
FLAKY
SAVORY
| Mushroom, Leek, and Gruyère Tart | 57 |
| Roasted Butternut Squash and Sage Tart | 58 |
| Moroccan Lamb (or Beef) Bundles | 59 |
| Sweet Potato Samosas | 61 |
SWEET
| Chocolate-Orange Hazelnut Nests | 63 |
| Vanilla-Scented Palmiers | 64 |
| Cherry and Lemon Macaroon Meringues | 68 |
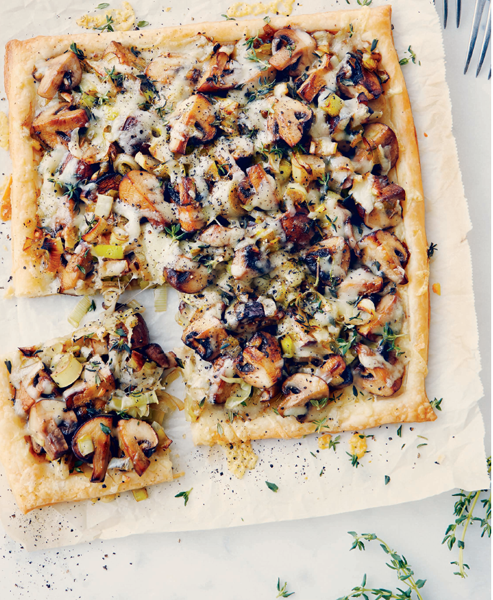
MUSHROOM, LEEK, AND GRUYÈRE TART
If vegetables were looking to elect a spokesperson, I’d nominate mushrooms. A bit of heat brings out the best in them. And when things get downright hot, they maintain their composure, refusing to dissolve into an incoherent mash. They work graciously with almost any herb, are effusively complementary to dairy, and are as comfortable with fancy-dress pastry as they are with a Casual Friday slice of toast. With a support staff of herbs, cheese, and garlic, this recipe lets the earthiness of mushrooms shine.
MAKES 4 TO 6 SERVINGS | COMMITMENT LEVEL: READY IN AN HOUR OR LESS
1 sheet commercial puff pastry or homemade Cheater’s Puff Pastry (page 44), defrosted
3 tablespoons unsalted butter
2 cloves garlic
2 sprigs fresh thyme, leaves only (see tip)
2 cups thinly sliced leeks, white parts only, sliced lengthwise and slivered into half moons
16 ounces cremini or portobello mushrooms, cut into 1” pieces
Ground black pepper (optional)
3 ounces grated Gruyère cheese
1. Preheat the oven to 425°F.
2. On a sheet of parchment paper cut to fit a rimmed baking sheet, roll the puff pastry sheet out to a 10” square. Using a sharp knife, gently score the pastry an inch inside the outer edge, being careful not to cut all the way through. Place the parchment with the scored pastry onto a rimmed baking sheet. Refrigerate while you prepare the filling.
3. In a large skillet over medium heat, melt the butter. When it bubbles, grate the garlic on a microplane into the pan. Add the thyme. Cook gently for 1 minute. Add the leeks and cook until they begin to soften. Add the mushrooms and cook until they are soft but not weeping juices. Place the mushroom filling into a strainer and let drain for a few minutes.
4. Spoon the mushroom filling onto the pastry, being careful to keep inside the score marks. Add a grinding of fresh black pepper, if using. Bake for 15 minutes. Remove the tart from the oven and sprinkle with the cheese. Bake for 5 minutes, or until the cheese has melted and the pastry is golden brown. Serve while hot.
NOTE: This tart is best eaten as soon as it is cool enough to handle. Leftovers can be wrapped and refrigerated, but the pastry will suffer. To reheat, pop under the broiler for a few minutes. Do not reheat in the microwave.
TIP: To strip the thyme leaves from the stem in seconds, simply grasp the top of the sprig between your thumb and index finger. Using your other hand, gently pull the stem through your pinched fingers. The leaves will strip right off, no chopping required. This also works for rosemary, although you might want to mince the rosemary leaves, depending on the use.
ROASTED BUTTERNUT SQUASH AND SAGE TART
Would a squash by any other name taste as sweet? Quite likely, especially if you roasted it. Roasting brings out the best in squash, as well as its natural sugars. It leaves the vegetable tender on the inside yet creates a bit of exterior texture when you bite. Add some sage, which I suspect was created specifically with roasted squash in mind, and you have a dish that’s poetry in a pastry shell.
MAKES 4 TO 6 SERVINGS AS AN APPETIZER OR 2 SERVINGS FOR A MEAL | COMMITMENT LEVEL: DONE IN STAGES
1 sheet commercial puff pastry or homemade Cheater’s Puff Pastry (page 44), defrosted
2 onions
2 generous cups peeled and cubed butternut squash (½” cubes)
2 tablespoons olive oil
1 clove garlic
Generous pinch of salt
4 ounces chèvre or feta cheese
4–6 fresh sage leaves, minced
Fresh ground black pepper (optional)
1. Preheat the oven to 500°F. Line 2 rimmed baking sheets with parchment paper.
2. Remove 1 of the parchment sheets from its pan, place it on your work surface, and roll the puff pastry sheet on it to form a 10” square. Using a sharp knife, gently score the pastry an inch inside the outer edge, being careful not to cut all the way through. Return the parchment to the baking sheet, being careful not to damage the pastry during the transfer. Refrigerate while you prepare the vegetables.
3. Cut the onions in half lengthwise, place cut side down on the cutting board, and sliver vertically. Place the squash and onions in a large bowl.
4. Into a small bowl, pour the oil. Using a microplane, grate the garlic into the oil and whisk until well combined. Drizzle over the squash and onions and toss to coat thoroughly. Spoon the vegetables in a single layer onto the second baking sheet, sprinkle with salt, and roast for 15 to 20 minutes, stirring occasionally, or until the squash is browned on the outside and soft on the inside. (The filling can be prepared up to 2 days ahead of time. Just refrigerate it, covered, and then bring to room temperature before baking.)
5. Reduce the heat to 400°F. Let the vegetables cool a bit before assembling the tart. They can be warm but not piping hot when they go on the pastry.
6. Sprinkle three-quarters of the cheese onto the chilled pastry, being careful to keep inside the score marks. Spoon the roasted squash and onions on top. Sprinkle with the sage and remaining cheese. Add a grinding of black pepper, if using. Bake for 20 to 25 minutes, or until the crust is golden brown. Serve while hot.
NOTE: This kind of tart doesn’t keep well, so eat up. Invite friends in or add a salad and make this a meal for 2. In the unlikely event of leftovers, wrap and refrigerate. Reheat under the broiler for a few minutes. Don’t reheat in the microwave. It will be hot but soggy.
TIP: Chèvre or feta? My samplers were split down the middle. Feta is sharper and saltier, with a more pronounced flavor. Chèvre is creamier and more subtle. If chèvre is hard to find, feta is a readily available alternative. Feta is also more often made from sheep’s milk; chèvre is always made from goat’s milk.
MOROCCAN LAMB (OR BEEF) BUNDLES
These bundles capture the eclectic mix of flavors and textures that make Moroccan food so captivating. Lamb is a classic Moroccan meat, but if you can’t find it, you can still enjoy the spices using ground beef.
MAKES 12 TO 16 | COMMITMENT LEVEL: DONE IN STAGES
FILLING
1 tablespoon vegetable oil
1 onion, finely chopped
2 cloves garlic, grated on a microplane
1 pound lean ground lamb or beef
1 tablespoon ground cumin
1 teaspoon dried coriander
½ teaspoon ground ginger
½ teaspoon paprika
½ teaspoon ground cinnamon
½ teaspoon ground turmeric
½ teaspoon red-pepper flakes
½ teaspoon fine sea salt
Peel of ½ lemon, finely grated (about 2 teaspoons)
½ cup packed finely chopped cilantro
¼ cup chopped dried apricots
¼ cup toasted pine nuts or toasted sliced almonds
WRAPPING
1 package (16 ounces) phyllo sheets, defrosted
½ cup vegetable oil or melted butter
Sesame seeds, white or black (optional)
1. To make the filling: In a large skillet over medium heat, heat the oil. Cook the onion until golden and soft. Add the garlic and cook for 1 minute. Add the lamb or beef, cumin, coriander, ginger, paprika, cinnamon, turmeric, pepper flakes, salt, and lemon peel. Cook until the meat is no longer pink. Transfer to a fine mesh strainer over a bowl to drain. When the meat filling has cooled, stir in the cilantro, apricots, and nuts. Because beef tends to be drier than lamb, add 1 to 2 tablespoons of the drippings back into the mixture if using beef.
2. Preheat the oven to 350°F. Get out a rimmed baking sheet. No need for parchment.
3. To make the wrapping: Lightly dampen a tea towel and place on top of the opened phyllo sheets to prevent the pastry from drying out. Remove 1 sheet at a time and, using a pastry brush, brush lightly with oil or butter. Fold the sheet in thirds by bringing the short sides toward the middle to make 1 long strip 3 layers thick. Place ¼ cup of the filling at the bottom in the center, about ½” from the bottom edge. Fold the edge up over the filling and roll the bundle toward the top a couple of times. Fold the left and right edges over the center, and then finish rolling the bundle. Place seam side down on the baking sheet. Brush with more oil or butter. Repeat with the remaining phyllo and filling. Sprinkle the bundles with sesame seeds, if using, and bake for 20 to 25 minutes, or until the phyllo is golden and the filling is hot. Serve hot.
NOTE: Leftovers will keep for up to 4 days in the refrigerator. Reheat in a 350°F oven for 10 to 12 minutes. Resist the urge to microwave, as this will make the phyllo soggy.
TIP: Don’t feel locked into making these as bundles. See pages 50–51 for different ways to use phyllo.
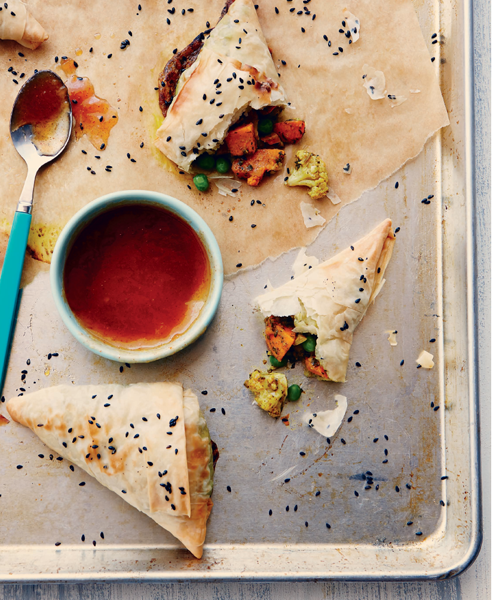
SWEET POTATO SAMOSAS
Traditional samosas are not wrapped in phyllo, but this packaged pastry is so versatile and convenient, it’s the one pastry I don’t bother making by hand. While this recipe calls for rolling the samosas in triangles, you can use any phyllo rolling technique that suits you. Regardless of how you wrap them, these Indian-inspired, spice-laced bundles are a perfect way to enjoy some vegetables.
MAKES ABOUT 16 | COMMITMENT LEVEL: DONE IN STAGES
FILLING
4 cups peeled and cubed sweet potatoes (about 2 large cut in ½” cubes)
2 cups chopped cauliflower (about ⅓ large head)
2 tablespoons vegetable oil
1 large onion, chopped
2 tablespoons grated fresh ginger
2 tablespoons grated garlic
1 tablespoon ground cumin
1 tablespoon ground coriander
1 tablespoon garam masala
1 teaspoon ground turmeric
½ teaspoon red-pepper flakes (optional)
1 teaspoon fine sea salt
½ cup unsweetened coconut milk
¼ cup lemon juice
1 cup frozen peas (petits pois are best)
½ cup packed chopped cilantro
WRAPPING
1 package (16 ounces) phyllo sheets, defrosted
½ cup vegetable oil or melted butter
1 tablespoon black sesame seeds (optional)
1. To make the filling: In a large pot over high heat, boil the sweet potatoes for 3 minutes. Add the cauliflower and boil until both vegetables are tender but not falling apart. Drain and set aside.
2. In a large skillet over medium heat, heat the oil. Cook the onion for 5 minutes, or until tender and golden. Stir in the ginger and garlic and cook for 1 minute. Add the cumin, coriander, garam masala, turmeric, pepper flakes (if using), and salt. Cook for 1 minute, stirring. Gently fold in the reserved sweet potatoes and cauliflower. Stir in the coconut milk and lemon juice and cook to heat through. The filling should be moist but not wet. If there’s too much moisture in the filling, the pastry will burst. If the filling is wet, continue cooking to reduce some of the liquid. If it’s falling-apart dry, add a bit more coconut milk.
3. Stir in the peas and cilantro. Remove the pan from the heat and set the filling aside to let cool before folding the samosas.
4. Preheat the oven to 350°F.
5. To make the wrapping: Lightly dampen a tea towel and place on top of the opened phyllo sheets to prevent the pastry from drying out. Remove 1 sheet at a time and, using a pastry brush, brush lightly with oil or butter. Fold the sheet in thirds so you have a sheet about 6” × 12” and 3 layers thick. Place ¼ cup of the filling at the bottom, about 1” from the bottom edge and slightly toward the left. Fold the bottom right corner over the filling to form a triangle. Fold the filling up, maintaining the triangle. Place the samosa on a baking sheet and brush with more oil or butter. Repeat with the remaining phyllo and filling. Dust the samosas with the sesame seeds, if using.
6. Bake for 20 to 25 minutes, or until the samosas are golden brown and crispy. Serve hot with mango chutney, Lime-Cilantro Dipping Sauce (page 204), or tzatziki (page 212).
NOTE: Leftovers can be refrigerated in an airtight container for up to 5 days. Reheat in a 350°F oven for 10 to 15 minutes. Microwaving will make the phyllo soggy.
TIP: The easiest way to grate ginger is to freeze the root—skin and all—in a resealable freezer bag or airtight container. When you need fresh ginger, grate the frozen ginger using a microplane. It will look like ice shavings, but within seconds, it will melt into a soft, gingery paste. There’s no wood pulp to remove, no peeling required, and best of all, no waste!
CHOCOLATE-ORANGE HAZELNUT NESTS
This is my interpretation of an open-faced Ferrero Rocher chocolate. Toasted hazelnuts folded into the meringue mimic the crunchy coating, while whipped rich chocolate cream is a nod to the ganache center. A little orange brings it all together in a decadent treat worthy of any special occasion.
MAKES 8 TO 10 | COMMITMENT LEVEL: LAZY SUNDAY AFTERNOON
HAZELNUT MERINGUE
1¼ cups toasted hazelnuts, skins removed
1 cup granulated sugar
¼ cup water
Pinch of fine sea salt
4 egg whites
¼ teaspoon cream of tartar
1 teaspoon pure vanilla extract
CHOCOLATE-ORANGE CREAM
1 cup sifted confectioners’ sugar
½ cup sifted unsweetened cocoa powder
2 cups heavy cream
2 tablespoons orange liqueur
Peel of 1 large orange, finely grated
(about 2 tablespoons)
1. To make the hazelnut meringue: Preheat the oven to 200°F. Line 2 baking sheets with parchment paper.
2. In a food processor or blender, grind the hazelnuts until finely chopped. Set aside 2 tablespoons for topping.
3. In a small saucepan, combine the granulated sugar, water, and salt. Stir over high heat until the sugar dissolves. Stop stirring and bring to a boil. Boil for 2 minutes, or until ¼ teaspoon of syrup dropped into a glass of ice-cold water forms a soft ball. (This is called the soft-ball stage and is 235°F on a candy thermometer.) Remove from the heat.
4. Using a stand mixer fitted with a whisk, beat the egg whites on medium speed until foamy. Add the cream of tartar, increase the speed to medium-high, and beat until soft peaks form. With the mixer running, pour the hot sugar syrup into the eggs in a thin stream. Add the vanilla. Beat until the egg whites are stiff and glossy. Using a spatula, gently fold the chopped hazelnuts into the meringue, being careful not to overstir.
5. Drop the meringue onto the baking sheets in mounds. Create an indentation in the middle using the back of a spoon or an ice cream scoop dipped in water. The aim is to create a nest that will hold the cream.
6. Bake for 2 hours. Turn off the heat and leave in the oven for 1 hour with the door slightly ajar.
7. To make the Chocolate-Orange Cream: In a medium bowl, sift the confectioners’ sugar and cocoa together. In a large bowl, pour the cream. Whisk the confectioners’ sugar mixture into the cream. Add the orange liqueur and peel. Using an electric mixer on high speed, beat until soft peaks form. Cover and refrigerate until needed.
8. When the meringues are cool, fill each nest with a generous scoop of chocolate-orange cream. Dust with the reserved hazelnuts. Serve immediately.
NOTE: The meringues won’t keep once the cream is added, so assemble only as many as you are going to eat. Store leftover unfilled meringues in an airtight container. Leftover cream, if covered and refrigerated immediately, will keep for 2 to 3 days.
TIP: You can use the leftover egg yolks to make crème anglaise (page 222) or aioli (page 207).
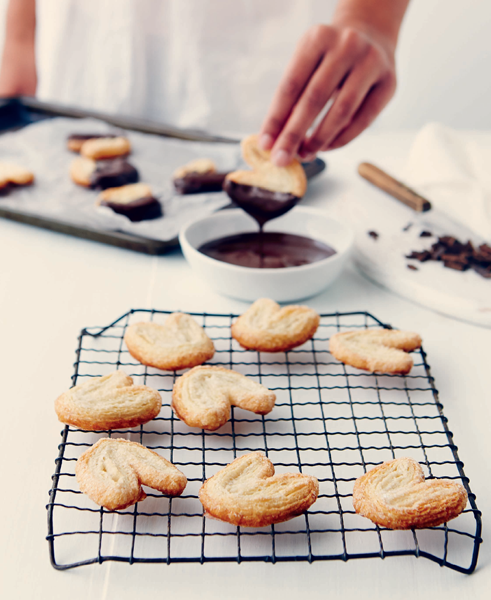
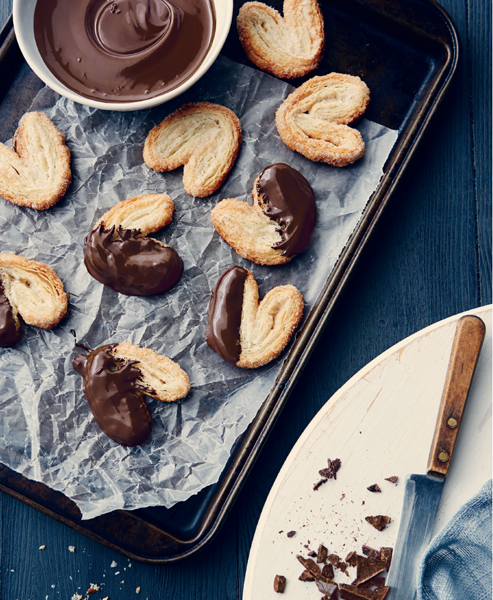
VANILLA-SCENTED PALMIERS
With the exception of lemon pie, these are my father’s all-time favorite dessert; he likes them without chocolate. I like them with. Or without. Either way, these are not the bready imposters found in many North American bakeries. Simple, flaky, sweet, and buttery, these are the shattery treats sold at tiny French patisseries that line cobblestone streets. One bite and you’ll think you’re in Paris.
MAKES 24 | COMMITMENT LEVEL: DONE IN STAGES
¾ cup vanilla sugar (see recipe for
“The Slow Way” on page 39) or plain granulated sugar
1 rectangle homemade Cheater’s Puff Pastry (page 44) or 1 roll commercial puff pastry
4 ounces semisweet chocolate, chopped (optional)
1. Sprinkle the work surface with half the sugar. Place the puff pastry on the sugar. Sprinkle with more sugar. Pressing the sugar into the dough, roll until you have an 8” × 12” rectangle. If using homemade pastry, flip and turn the dough often to ensure lots of sugar gets worked into the surface of the dough.
2. Trim the dough so that the edges are even and set the trimmings aside for later. Fold the long sides of the pastry rectangle toward the center. Don’t have these edges touch. Instead, leave ½” between where the folded edges would meet. This gap is crucial for the palmiers to keep their shape when cooking.
3. Fold the dough in half along this gap. You will now have a roll 4 layers thick and about 2” wide and 12” long. Flatten the dough gently with the palms of your hands, wrap in plastic wrap, and refrigerate for 1 to 2 hours. Scrape the sugar off the work surface and save with the rest of the sugar for dipping later.
4. About 30 minutes before you are ready to bake the palmiers, preheat the oven to 375°F. Line a baking sheet or two with parchment paper.
5. With a sharp knife, cut the dough crosswise ½” thick. Dip both cut sides in the sugar and place cut side down on the baking sheets. Be sure to leave at least 2” between palmiers. They will expand quite a bit sideways. They don’t expand much up and down, so you might be able to get 6 rows of 4 if your sheet is big enough.
6. Bake for 15 to 20 minutes, or until the palmiers are golden around the edges and the sugar has caramelized. Allow to cool for a few minutes before transferring to a rack to cool fully.
7. While the palmiers are baking, roll the reserved ends in sugar and cut into bite-size pieces. When the “real” palmiers are cooling, bake the ends for 10 to 15 minutes, or until golden and caramelized. They will look odd but will taste just as good. Don’t serve these. Reserve them for yourself as a treat for your hard work.
8. Optional chocolate dip: Melt the chocolate in the microwave oven in 30-second bursts or in a heatproof bowl over hot, not boiling, water, stirring gently until smooth. (For more on melting chocolate, see page 28.) Tilting the bowl to pool the melted chocolate, dip half of a palmier into the liquid chocolate, then place on parchment paper or waxed paper to set. Repeat with the remaining palmiers and chocolate.
NOTE: Palmiers are best eaten the day they are made. Store leftovers in an airtight container. Do not freeze baked palmiers. Their sugar content is too high.
TIP: Ever wonder why some cookies freeze well and others don’t? Sugar softens once frozen, so cookies with a high sugar content or crispy caramelized surfaces will just get soggy.
CHERRY AND LEMON MACAROON MERINGUES
Meringues and macaroons are usually gluten free. Paired together, they make an irresistible dessert even my wheat-eating friends can’t pass up. This recipe is inspired by a date-filled macaroon from Blackbird Bakery Gluten-Free by Karen Morgan. In this version, tart dried cherries and slightly bitter walnuts bring the sugar and coconut into balance, while lemon peel rounds out the flavor. As with Morgan’s version, you’ll need a napkin. They leave a trail of meringue flakes wherever you eat them.
MAKES ABOUT 3 DOZEN | COMMITMENT LEVEL: LAZY SUNDAY AFTERNOON
1 cup sugar
1½ teaspoons cornstarch
4 egg whites, at room temperature
1½ teaspoons pure vanilla extract
Peel of 1 lemon, finely grated
¾ teaspoon white vinegar
2 tablespoons boiling water
1 cup chopped dried unsweetened cherries
1 cup finely chopped walnuts
3 cups sweetened shredded coconut
1. Line 2 baking sheets with parchment paper or silicone baking mats. Preheat the oven to 350°F with the baking rack in the center.
2. In a small bowl, combine the sugar and cornstarch.
3. In the bowl of a stand mixer fitted with a whisk, beat the egg whites on high speed until foamy. (You can use a hand mixer, but it will take longer.) Reduce the speed to medium and add the sugar mixture 1 tablespoon at a time. Once the sugar has been fully incorporated, increase the speed to high. Add the vanilla, lemon peel, and vinegar and continue beating until the egg whites form stiff, glossy peaks.
4. Reduce the speed to medium and add the boiling water. Don’t panic. The egg whites are supposed to swell up. Once the egg whites settle down again, beat for 2 minutes on high. Set the meringue aside.
5. In a large bowl, combine the dried cherries, walnuts, and coconut. Toss to ensure the ingredients are evenly distributed. You want to avoid overstirring the meringue, so do your mixing now.
6. Sprinkle the fruit-and-nut mixture over the surface of the meringue. Using a scraper, gently fold it into the meringue. Using a 1-tablespoon cookie scoop, drop mounds of macaroons 1” apart on the baking sheets. Alternatively, you can do this with a spoon and slide the batter off with your finger. They will have more of a peak but will taste just as good.
7. Bake 1 sheet at a time on the middle rack for 5 minutes. Reduce the heat to 225°F and bake for 40 to 45 minutes, or until the cookies are light gold. Remove from the oven and allow to cool for 15 minutes. When they are stable enough to be removed without damage, transfer the cookies to a rack to cool completely. Repeat with the remaining cookies.
NOTE: Store in an airtight container in a cool, dry place for up to 1 week—if they last that long.
Variations: This cookie has endless options.
♦ Swap dried cranberries or Craisins for the dried cherries and orange peel instead of lemon.
♦ Try lime peel instead of lemon and dried pineapple instead of cherries for a piña colada meringue.