DIPPABLE
treats you dunk in coffee, tea, milk, soups, or sauces
When solid meets liquid, delicious changes occur. Rock-hard biscotti relax with a sigh when slipped into hot coffee or a steaming bowl of soup. Thirsty cookies lap up milk or cider or hot chocolate. Even vegetable chips grab on to sauces for dear life.
Will dipping lead to spills? Quite likely. But these dishes were designed to be dunked. Bathe your biscotti, douse your roasted cauliflower, immerse a cheese twist, and saturate a cigarette. Go on. Take the plunge.
DIPPABLE
SAVORY
| Herb, Olive, and Parmesan Biscotti | 96 |
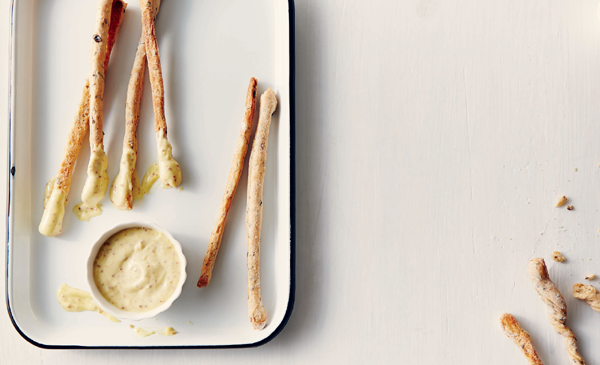
| Chili Cheese Twists | 98 |
| Rosemary and Black Olive Grissini | 100 |
| Not-Too-Spicy Roasted Cauliflower | 103 |
| Crispy Root Vegetable Chips | 104 |
SWEET
| Chocolate-Tipped Cigarettes | 106 |
| Double-Stuff Über-Oreo Cookies | 109 |
| Espresso and Hazelnut Biscotti | 112 |
| Chewy Crystallized Ginger Cookies | 115 |
HERB, OLIVE, AND PARMESAN BISCOTTI
Forget the cappuccino. These savory biscotti are made for soup, stews, or piping hot bowls of chili. Think of them as chunky croutons or hearty, olive-and-nut-studded breadsticks. They’re flavorful enough to stand on their own, but I love how they soften when slipped beneath the surface of a creamy tomato soup.
MAKES ABOUT 40 | COMMITMENT LEVEL: DONE IN STAGES
¾ cup chopped walnuts
½ cup unsalted butter, at room temperature
2 tablespoons sugar
Peel of 1 lemon, finely grated
2 eggs, slightly beaten, at room temperature
1 large clove garlic, grated on a microplane
¼ cup 2% milk
¾ cup roughly chopped black olives
2 cups all-purpose flour
2 tablespoons finely minced fresh rosemary
1 teaspoon fresh coarsely ground black pepper
1½ teaspoons baking powder
½ teaspoon fine sea salt
1 cup grated Parmesan cheese
1. Preheat the oven to 350°F. Line a large baking sheet with parchment paper.
2. Once the oven comes up to heat, toast the walnuts on an unlined baking sheet for 10 minutes, or until fragrant. Set aside to cool.
3. Meanwhile, using an electric or stand mixer with a paddle attachment, cream the butter, sugar, and lemon peel until light in color. Add the eggs, garlic, and milk and beat until blended. Stir in the olives.
4. In a medium bowl, whisk together the flour, rosemary, pepper, baking powder, salt, reserved walnuts, and cheese. With the mixer on low or using a wooden spoon, mix the flour mixture into the butter mixture, stirring until just blended.
5. Divide the dough in half. Using floured hands, shape each half into a log about 12” long. The logs will be oilier than normal biscotti if you used olives stored in oil. Place on the parchment-lined baking sheet and flatten to 1” high. Bake for 25 to 35 minutes, or until the tops feel firm when lightly pressed. Remove the pan from the oven, reduce the heat to 325°F, and let the logs cool for at least 15 minutes on the baking sheet.
6. Transfer the logs to a cutting board. Using a serrated knife, cut 1 log on the diagonal into slices about ½” thick. Place cut side down on a baking sheet and bake for 10 minutes. Turn the biscotti over and bake for 5 to 10 minutes, or until they start to brown. Transfer to a rack to cool and maintain their crispness. Repeat with the second log. You can reuse the parchment if you like.
NOTE: Store in an airtight container for up to a week. Biscotti freeze well for up to 2 months.
TIP: This recipe can be halved. You can also swap pine nuts or pecans for the walnuts.

CHILI CHEESE TWISTS
My mother used to serve a cheese-only version of these at parties. I thought they were the epitome of sophistication, as they made the rounds on a doily-lined tray alongside the smoked oyster spread. This spiced variation has the same grown-up look but provides a bit of heat. While these cheesy twists would overpower the oysters, they are perfect for dipping into hummus or tzatziki (see page 212). They also make a rich cracker replacement for when you’re in the mood for soup or a bowl of chili. I’ve also been known to nibble them as is.
MAKES 48 | COMMITMENT LEVEL: DONE IN STAGES
2 teaspoons cumin seeds
2 teaspoons coriander seeds
1 teaspoon red-pepper flakes
1 cup unsalted butter, at room temperature
8 ounces cream cheese, at room temperature
1 clove garlic
2 cups all-purpose flour
1 teaspoon salt
1 egg
1 tablespoon water
1 cup grated Parmesan cheese
1. In a dry skillet over medium heat, toast the cumin, coriander, and pepper flakes until the seeds become fragrant and start to pop. Transfer to a blender, coffee grinder (reserved for spices only), or mortar and pestle and grind to a powder. Set aside.
2. Either by hand in a large bowl or in the bowl of a stand mixer fitted with a paddle, beat the butter and cream cheese until smooth. Place a microplane over the bowl and grate the garlic into the cream cheese mixture. Beat again to blend thoroughly.
3. In a medium bowl, whisk together the flour, salt, and reserved ground spice mixture. Add to the cream cheese mixture and blend until the dough comes together. Knead on a floured surface to combine. Cut the dough in half, flatten into disks, wrap in plastic wrap, and chill for 1 hour or overnight.
4. When ready to bake, preheat the oven to 350°F. Line 2 baking sheets with parchment paper. Remove 1 disk of dough from the refrigerator and let warm at room temperature for 10 minutes. Meanwhile, in a small bowl, whisk the egg and water together.
5. On a floured surface, roll the dough until it’s ½” thick. Sprinkle with 2 tablespoons of the cheese. Fold the dough in thirds, place seam side down, and roll again until it’s ½” thick. Sprinkle with another 2 tablespoons of the cheese, fold in thirds, place seam side down, and roll again to form a 6” × 8” rectangle. Cut into strips ¼” wide. Cut the strips in half so you have pieces of dough, each approximately ¼” × 4”. (You can keep them 8” long if you wish, but short is easier to eat.)
6. Twist the end of each strip in opposite directions and place on the baking sheets about 1” apart. Brush with the egg mixture and sprinkle with 4 tablespoons of the cheese. While they are baking, roll the second batch.
7. Bake for 18 to 20 minutes, or until golden brown and baked all the way through. Serve hot from the oven.
NOTE: Twists will store in an airtight container for up to a week.
TIP: If you don’t want to bake all the twists at one time, prepare them up to the point of baking. Freeze the unbaked twists on the baking sheet until solid. Once frozen, transfer the twists to a resealable freezer bag and return to the freezer. They’ll keep for up to 2 months. When ready to bake, preheat the oven to 350°F, brush the twists with the egg wash, sprinkle with the Parmesan, and bake from frozen, adding 5 to 10 minutes to the baking time.
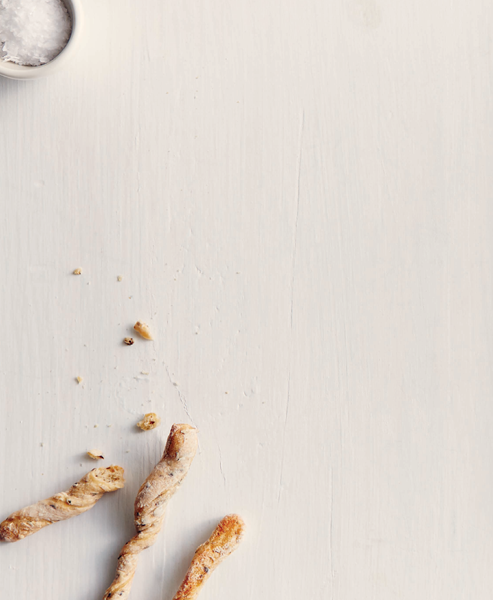
ROSEMARY AND BLACK OLIVE GRISSINI
These long, thin, crunchy breadsticks appeal to the child in me. I love how they snap when bitten and release their olive undertone. Even more, I love to play with them. Use them instead of a spoon to stir crème fraîche into your soup. Turn them into edible chopsticks and devour some roasted cauliflower (page 103), or challenge your fellow diners to a grissini duel. The winner gets all the breadsticks.
MAKES ABOUT 7 DOZEN | COMMITMENT LEVEL: DONE IN STAGES
1 cup warm water (about 110°F)
2½ cups bread flour
1 package (2¼ teaspoons) instant yeast
1 teaspoon fine sea salt
¼ cup black olive paste (see tip)
3 tablespoons minced fresh rosemary
1. Either by hand in a large bowl or in the bowl of a stand mixer fitted with a dough hook, mix the water, flour, yeast, salt, olive paste, and rosemary. When the dough comes together, turn it onto a lightly floured surface and knead until smooth and elastic. The dough will be slightly oily because of the olive paste.
2. Transfer the dough to a lightly oiled bowl. Cover with plastic wrap and let stand at room temperature until doubled in volume (60 to 90 minutes).
3. Preheat the oven to 375°F. If your oven has a convection setting, place 3 racks in the oven and adjust the temperature according to your oven’s requirements. Otherwise, place a rack in the center and bake 1 pan at a time. Line 4 baking sheets with parchment paper. If you don’t have enough pans, cut at least 4 sheets of parchment so you have something to set the cut dough on.
4. On a lightly greased work surface, roll the dough to a rectangle about 20” × 12”. The dough will be very easy to roll. Using a sharp knife or pizza cutter, cut the dough so you have strips that are 10” long and ¼” wide. Gently roll each breadstick beneath your palms to round the edges. If you like a twist in your breadstick, roll the ends in opposite directions.
5. Place the sticks on the baking sheets (or just on parchment paper if you don’t have enough baking sheets) at least ¼” apart. Cover with a tea towel and let rest for 30 minutes. Bake for 15 to 18 minutes, or until crisp and golden brown. Allow to cool on the baking sheets for a few minutes before transferring to racks to cool completely. Eat with soup, dip in tzatziki (page 212) or smoked paprika aioli (page 207), or just have as a snack by itself.
NOTE: Grissini will keep in an airtight container for several days. Just keep the humidity away.
TIP: If you don’t have black olive paste, you can make your own with pitted black olives such as kalamata, packed in oil. Remove the olives from the oil using a slotted spoon; place the olives in a blender and puree to a paste.

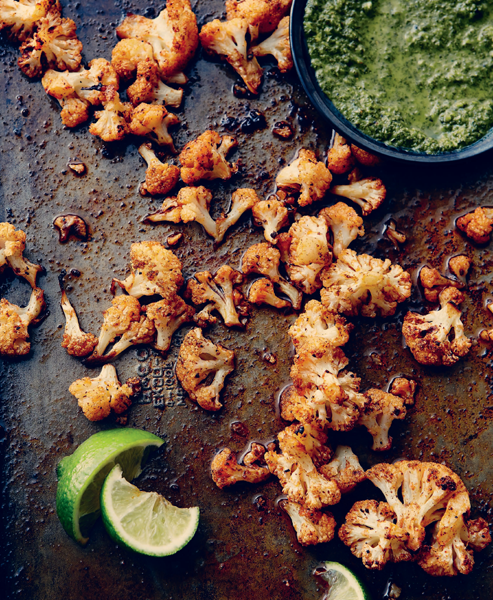
NOT-TOO-SPICY ROASTED CAULIFLOWER
If I had to eat cauliflower only one way for the rest of my life, I would ask for it to be roasted with spice. Roasting turns plain old one-note cauliflower into a nuanced, layered, and completely new vegetable. It’s sweeter, more complex, slightly nutty, and totally beguiling. Would I get bored if handed a life sentence of roasted cauliflower? Never. I could scoop it up with crisp lavash bread (page 182), dunk it in citrusy Lime-Cilantro Dipping Sauce (page 204), or slip it quietly into Smoky Mushroom Crêpes (page 121). It would tire of me long before I tired of it.
MAKES 3 TO 4 SERVINGS | COMMITMENT LEVEL: READY IN AN HOUR OR LESS
1 medium head cauliflower, cut into florets about 1½” wide (about 4 generous cups)
3 tablespoons vegetable oil
1 teaspoon chili powder
1 teaspoon smoked paprika
¼ teaspoon fine sea salt
Fresh ground black pepper
1 lime, cut into wedges (optional)
1. Preheat the oven to 425°F. For even crispier results, use your oven’s convection setting (if it has one) and adjust the temperature accordingly.
2. Place the cauliflower in a large bowl.
3. In a small bowl, whisk together the oil, chili powder, paprika, salt, and a good grinding of black pepper. Pour over the cauliflower florets and toss to thoroughly coat.
4. Spread the cauliflower in a single layer on a rimmed baking sheet and roast for 25 to 35 minutes, stirring after 15 minutes. The timing varies with the size of the pieces. You want the cauliflower to be deep golden and beginning to crisp. The tips of the stems might begin to blacken. Don’t let them burn.
5. Serve the cauliflower hot with a squeeze of fresh lime juice (if using), Lime-Cilantro Dipping Sauce (page 204), or tzatziki of your choice (page 212).
NOTE: I have never had leftovers to store, because cauliflower shrinks substantially when roasted. If you do have leftovers, refrigerate them in an airtight container.
TIP: Cutting cauliflower into uniform pieces is key to even roasting. It sounds like a lot of work, but it’s easy. First cut the head into quarters. Cut away the thickest part of the core. You can now pull the florets apart with your fingers or cut them with the tip of a paring knife.
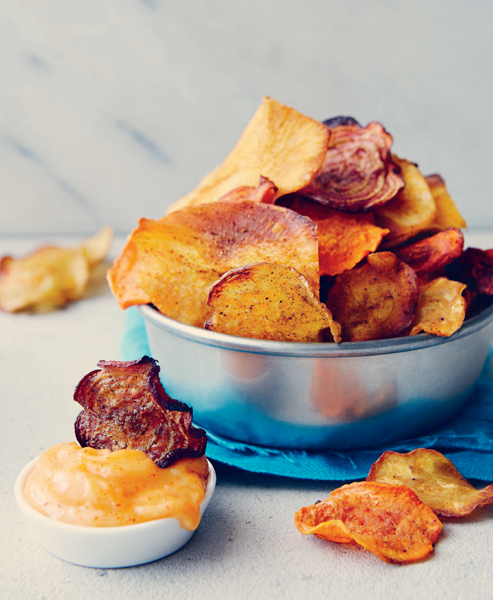
CRISPY ROOT VEGETABLE CHIPS
This is an extremely flexible recipe. You can use the spice mix suggested, which is a blend of at least 15 Moroccan spices, or go as plain as salt and pepper. For something in between, try the spices used in Not-Too-Spicy Roasted Cauliflower (page 103).
A mandoline will reduce prep time considerably and allow for more consistent, thinner chips. If you don’t have a mandoline, you can slice more thinly and consistently if you cut the vegetable in half, place the cut sides down, and then slice half-moon chips. Most food processor slicing disks aren’t suitable, as they slice too thinly and the chips will burn.
MAKES 4 SNACK SERVINGS | COMMITMENT LEVEL: READY IN AN HOUR OR LESS
1 pound root vegetables (potatoes, sweet potatoes, parsnips, turnips, taro, carrots, and/or beets)
3 tablespoons vegetable oil
4 teaspoons ras el hanout (available at Middle Eastern specialty shops)
1 teaspoon fine sea salt
1. Preheat the oven to 375°F. If your oven has a convection setting, use it and adjust the temperature accordingly. Line 3 baking sheets with parchment paper.
2. Wash the root vegetables. Leave the skin on or peel at your discretion. I leave the skin on for white potatoes but peel sweet potatoes. Slice the vegetables as thinly as you can. However, it’s more important to be uniform than thin so that the chips bake evenly. Aim for $$” thick, but do not cut thicker than ⅛”.
3. Place the slices on paper towels and blot dry. Arrange in a single layer on the baking sheets. Different vegetables bake at different rates, so if you are using a mix, arrange them 1 vegetable per pan.
4. In a small bowl, whisk together the oil, ras el hanout, and salt. Brush on the chips with a pastry brush. Flip the vegetables over and brush the oil mixture on the other side.
5. Bake for 10 minutes for $$” slices or 15 minutes for thicker slices. Remove the baking sheets from the oven, flip the chips over, and return the chips to a different rack for even cooking. Continue baking for 5 to 20 minutes, depending on how thick the chips are and what vegetable you’re roasting. The chips are ready when they are golden and the edges curl or ruffle. The thinner the chip, the more pronounced the ruffle. (Keep an eye on the smaller chips because they cook faster.)
6. Transfer the chips to a layer of paper towels to cool. Eat as is, or dip in a tzatziki (page 212) or aioli variation (page 207) that suits your spice selection.
NOTE: Once cooled, the chips can be stored in a resealable bag with the air squeezed out.
TIP: If you have an ovenproof rack, place it on the baking sheet, set the coated chips on the rack, and then bake. This eliminates the need to flip the chips.
CHOCOLATE-TIPPED CIGARETTES
I don’t smoke, but I do inhale the occasional tuile cigarette with my coffee. It is buttery like a shortbread, snaps like a fortune cookie, and has the sophisticated richness you expect from a French dessert. A hint of orange brightens the sweetness and plays well against the smoldering chocolate tip. Tuile cigarettes don’t come with a warning label, but if they did, it might read: “Caution! May cause squeals of joy and increase risk of delight.”
MAKES 15 TO 18 | COMMITMENT LEVEL: DONE IN STAGES
TUILES
1 cup sifted confectioners’ sugar
½ teaspoon pure vanilla extract
3 egg whites
¼ cup all-purpose flour
2 tablespoons ground almonds
¼ cup melted unsalted butter
1½ teaspoons heavy cream
2 teaspoons finely grated orange peel
DIP
4 ounces dark chocolate, roughly
chopped
2 tablespoons butter
1 teaspoon orange liqueur (optional)
Ground almonds, for dusting (optional)
1. To make the tuiles: Preheat the oven to 400°F. Line baking sheets with parchment paper.
2. In a medium bowl, combine the confectioners’ sugar, vanilla, and egg whites and whisk until smooth and foamy. Add the flour, almonds, butter, cream, and orange peel and mix well. The batter will be quite thin and liquid.
3. Drop 1 tablespoon of batter onto the baking sheet and spread with the back of a spoon to form an oval about 6” long and 3” wide. Form no more than 4 tuiles at a time, because otherwise they will cool before you can roll them. Bake for about 6 minutes, watching carefully to ensure they don’t burn. The tuiles are done when the middles are light gold and the edges are dark gold.
4. Remove the baking sheet from the oven and let the tuiles sit for about 1 minute. Using a spatula and working quickly, gently lift 1 tuile at a time onto a flat surface and roll it around a bamboo skewer about ⅛” in diameter. If you don’t have a skewer, use the handle of a thin wooden spoon. Roll and place on parchment paper, seam side down so it won’t unravel. Remove the skewer or wooden handle with a gentle twist and roll the next cookie. (Alternatively, you can drape tuiles over a rolling pin for a simple curve.) If the tuiles get too stiff, return them to the oven for 30 seconds. Repeat baking and rolling the remaining tuiles.
5. To make the dip: When all the tuiles have been rolled and are cooling, prepare the chocolate dip. Melt the chocolate and butter in a heatproof bowl over simmering (not boiling) water or in the microwave on medium power in 1-minute bursts. Stir in the orange liqueur, if using. Tipping the bowl to pool the chocolate, dip 1 end of a tuile cigarette into the chocolate about 1” to 2” deep. Hold over the almonds and sprinkle with the almonds before the chocolate dries, if using. Place the tuile on a sheet of parchment paper to set and repeat with the remaining tuiles.
NOTE: These are best eaten the same day and suffer greatly in humid conditions. If you have any leftovers, store them in an airtight container.
TIP: Even if you have only one baking sheet, you can speed things up. Scoop and shape all the tuiles on sheets of parchment paper before you start baking. When the pan comes out of the oven, remove the parchment paper with the hot cookies and replace it with a sheet of unbaked ones. The next pan of tuiles will bake while you roll.
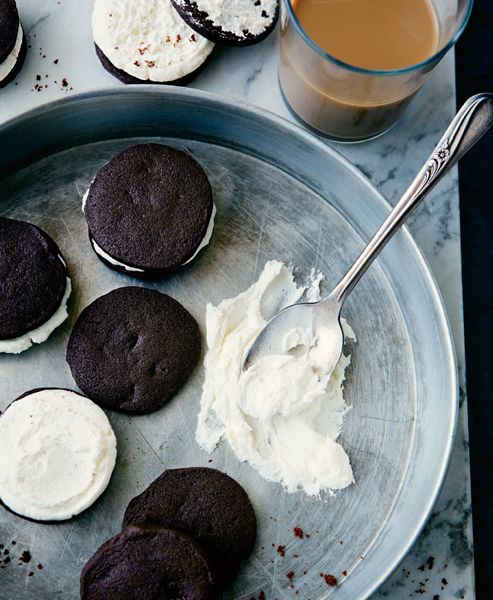
DOUBLE-STUFF ÜBER-OREO COOKIES
This “Oreo” cookie is actually a classic pâte sablée pastry loaded with cocoa and acting as bookends for a decadent buttercream icing. I knew I nailed the recipe when a friend bit into one and giggled. She’s not a giggler. Like the famous cookie that inspired it, this ultrarich chocolate treat with its double-thick middle pulls apart easily. While these cookies aren’t a grab-a-handful after-school snack screaming for a glass of milk, they do gently request a second helping.
MAKES 36 TO 40 | COMMITMENT LEVEL: DONE IN STAGES
COOKIES
1½ cups unsalted butter, at room temperature
1½ cups sifted confectioners’ sugar
½ teaspoon fine sea salt
2 egg yolks
1 tablespoon pure vanilla extract
1½ cups all-purpose flour
1½ cups Dutch-processed cocoa powder
FILLING
1 cup unsalted butter, at room temperature
3 cups sifted confectioners’ sugar
Generous pinch of fine sea salt
2 teaspoons pure vanilla extract
1. To make the cookies: Using an electric mixer or a stand mixer fitted with a paddle, beat the butter, confectioners’ sugar, and salt together until light and fluffy. Add the yolks and vanilla and beat until soft and light.
2. Into a medium bowl, sift the flour and cocoa together. Using a large wooden spoon or the stand mixer on its lowest setting, blend the flour mixture into the butter mixture. When all of the flour mixture is incorporated, increase the speed to medium and beat to ensure the dough is well blended.
3. Divide the dough in half and spoon onto plastic wrap. Form each half into a roll 10” long and approximately 2” wide. Make the rolls as round as you can. If you can’t make them uniformly round, make the rolls square. The aim is to be uniform, so pick the shape you can make best. Refrigerate for at least 2 hours or overnight. Alternatively, the raw dough can be frozen for a couple of months.
4. When you’re ready to bake, preheat the oven to 325°F and line 2 baking sheets with parchment paper.
5. Using a sharp, thin-bladed knife, slice the dough into scant ¼”-thick rounds and place on the baking sheets about 1” apart. Bake for 15 to 18 minutes, or until the cookies are firm when touched in the middle. Cool on racks.
6. To make the filling: While the cookies are baking, prepare the filling. Using an electric mixer or a stand mixer fitted with a whisk, beat the butter until smooth. Add the confectioners’ sugar, salt, and vanilla and beat on low speed to incorporate the sugar. When the sugar is fully absorbed, increase the speed and beat until the filling is very light. Keep beating. A bit more. This takes up to 5 minutes. You want the filling to be almost white.
7. To assemble, place 1 tablespoon of filling on the bottom of a cooled cookie, place a second cookie on top (bottom against the filling), and gently press. Repeat with the remaining cookies and filling.
NOTE: The cookies can be stored in an airtight container. Leftover filling can be frozen for the next time.
Variations: Feel free to play with the filling. Make it orange, coffee, mint, or any other chocolate-friendly flavor you like.
TIP: If you don’t have Dutch-processed cocoa powder, use regular and add ½ teaspoon baking soda.
ESPRESSO AND HAZELNUT BISCOTTI
To celebrate their 50th anniversary, my parents generously took the whole family on a group trip to Italy. For 10 days we toured, ate, laughed, and got hopelessly lost. I wanted to re-create our trip in cookie form. These espresso and hazelnut biscotti capture the essence of our time in Tuscany. Espresso powder is for the countless cups of cappuccino we drank in various piazzas, cinnamon for the dusting the barista put on them, hazelnuts for our Nutella binges, and a grating of orange for the unfailingly bright Florentine sky. The results? Delizioso.
MAKES ABOUT 4 DOZEN | COMMITMENT LEVEL: DONE IN STAGES
1½ cups hazelnuts
½ cup unsalted butter, at room temperature
1¼ cups sugar
Peel from 1 orange, finely grated
2 eggs at room temperature
1 tablespoon pure vanilla extract
2¾ cups all-purpose flour
1 teaspoon baking powder
1–1½ teaspoons cinnamon (optional)
1½ tablespoons instant espresso powder
½ cup dark chocolate chips
COATING (OPTIONAL)
8 ounces semisweet chocolate
¼ cup ground hazelnuts, for decoration
1. Preheat the oven to 350°F. Line a large baking sheet with parchment paper.
2. Once the oven comes up to heat, toast the hazelnuts in the oven on an unlined baking sheet for 10 minutes, or until fragrant. Turn the nuts out onto a clean tea towel and rub them to remove as much of the skin as possible. Roughly chop the nuts and set aside.
3. Using an electric mixer or a stand mixer with a paddle attachment, cream the butter, sugar, and orange peel until light and fluffy. Add the eggs and vanilla and beat until blended.
4. Into a large bowl, sift together the flour, baking powder, cinnamon (if using), and espresso powder. With the mixer on low or using a wooden spoon, mix the flour mixture into the butter mixture, stirring until just blended. Stir in the chocolate chips and reserved nuts.
5. Using floured hands, divide the dough in half and shape each half into a log about 12” long. Place on the parchment-lined baking sheet and flatten to 1” high. Bake for 25 to 35 minutes, or until the tops feel firm when lightly pressed. Remove the baking sheet from the oven, reduce the heat to 325°F, and let the logs cool for 15 minutes.
6. Transfer the logs to a cutting board. Using a serrated knife, cut each on the diagonal into slices about ½” thick. Place the cookies cut side down on the parchment-lined baking sheet and bake for 10 minutes. Turn the cookies over and bake for 5 to 10 minutes, or until they start to brown. Transfer to a rack to cool.
7. To make the coating (if using): When the biscotti are cooled, gently melt the chocolate in a heatproof bowl over simmering, not boiling, water. Once melted, you can either drizzle the chocolate over the biscotti or dip half into the chocolate. See pages 29–31 for drizzling ideas. To dip, tip the bowl to pool the chocolate. Dip half of the cookie in the chocolate, place on a sheet of parchment paper, and dust with ground hazelnuts before the chocolate sets.
NOTE: Store between layers of parchment paper in an airtight container. Biscotti will keep for a couple of weeks.
TIP: Instant espresso is not the same as instant coffee. It’s stronger and less harsh and doesn’t have the metallic taste some instant coffees have. You can find instant espresso in the coffee section of some big chain supermarkets or in coffee shops. If you can’t find it, use 2 heaping tablespoons of instant coffee.

CHEWY CRYSTALLIZED GINGER COOKIES
Each Christmas, every family member picks one type of cookie they’d like. Without so much as a second’s hesitation, my husband asks for ginger cookies. Always. He adores the spicing and the sink-your-teeth-into-them chew. They are a perfect accompaniment to a steaming mug of hot apple cider. The crinkly tops don’t hurt their cause. He has one stipulation: I must be the one who bakes them. Although the whole family uses this recipe, I am the only baker brave enough to pull them from the oven while still slightly underdone. Everyone else takes one look at the unfinished cookies and gives them an extra few minutes. Resist this urge. Early retrieval is the key to their ultrachewiness—and quite possibly the way to a chewy ginger cookie lover’s heart.
MAKES ABOUT 3 DOZEN | COMMITMENT LEVEL: READY IN AN HOUR OR LESS
¾ cup salted butter, at room temperature
1 cup sugar, plus more for optional rolling
1 egg, at room temperature
¼ cup fancy molasses (not blackstrap)
2 cups all-purpose flour
2 teaspoons baking soda
¼ teaspoon fine sea salt
2 teaspoons ground ginger
1 teaspoon ground cinnamon
1 teaspoon ground cloves
½ cup finely chopped crystallized
ginger, plus more for optional garnish
1. Position a rack in the center of the oven. Preheat the oven to 350°F.
2. In a large bowl, using either an electric mixer or a stand mixer fitted with a paddle, beat the butter and sugar until light and creamy. Beat in the egg and molasses.
3. In a separate bowl, combine the flour, baking soda, salt, ground ginger, cinnamon, and cloves. Add the crystallized ginger and mix lightly to coat with the flour mixture and distribute it evenly.
4. By hand or with the stand mixer on low, blend the flour mixture into the butter mixture.
5. Using a 1-tablespoon cookie scoop, place the dough on ungreased baking sheets. If you don’t have a cookie scoop, use a spoon and then roll the dough into a ball. Place 2” apart to allow for spreading. If you want to get fancy, dip one side of the cookie in granulated sugar and place a small piece of crystallized ginger on top.
6. Bake 1 pan at a time in the middle of the oven for 8 to 10 minutes. Do not overbake. The cookies should be slightly undercooked when they come out of the oven. Leave on the pan for 2 minutes, or until they are solid enough to transfer to a rack.
NOTE: Once cooled, the cookies can be stored in an airtight container for up to a week or frozen for up to 2 months.
TIP: If you like orange with your ginger, add the finely grated peel of a large orange to the batter when you are beating the butter and sugar together.