SLOPPY
foods that drip or ooze their filling
Some food is so happy to be eaten, it literally jumps for joy. All over your fingers, the plate, your shirt, the table.
If you want flavors that dance, avoid the food sitting all prim and proper with its ankles crossed neatly and its hands tucked into its lap. Instead, approach the empanada whose filling has shimmied onto the pan. Jive with the sandwich cookie that has more icing than biscuit. Rock the cream-jammed profiteroles. It takes two to tango. What are you waiting for?
SLOPPY
SAVORY
| Smoky Mushroom Crêpes | 121 |
| Chicken, Corn, and Cilantro Empanadas | 124 |
| Cheddar Tapenade Rolls | 126 |
SWEET
| Ginger-Crusted Strawberry Mascarpone Tart | 127 |
| Extra-Crispy Peach and Blueberry Crisp | 130 |
| Boozy Chocolate Torte | 131 |
| Profiteroles | 135 |
| Raspberry Butter Tarts | 138 |
| Citrus and Spice Crêpes | 139 |
| Raspberry-Stuffed French Toast | 141 |

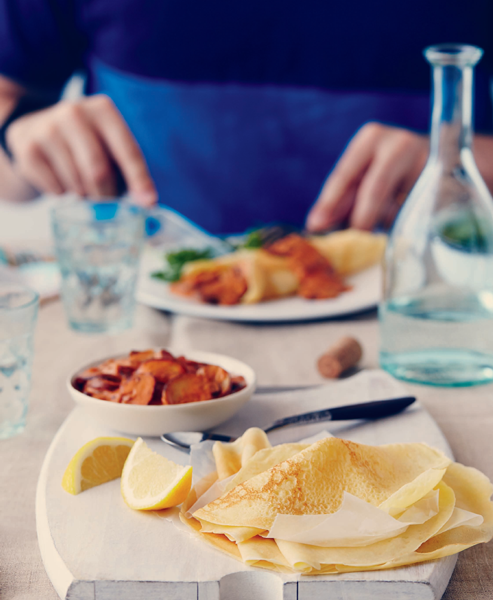
SMOKY MUSHROOM CRÊPES
Crêpes make a cook look good. People think they’re hard, but they’re really just very thin pancakes with a fancy French name. Eating them—at least neatly—is more of a challenge than assembling them. This version combines some of my favorite flavors in an irresistible although sometimes sloppy filling. Meaty mushrooms, smoked paprika, and a swirl of decadent cream all come together in a satisfying dish that’s rich but not too heavy.
MAKES 6 TO 8 | COMMITMENT LEVEL: DONE IN STAGES
CRÊPES
½ cup milk
2 eggs, at room temperature
1 tablespoon melted unsalted butter,
plus more for frying
½ cup all-purpose flour
Generous pinch of fine sea salt
FILLING
1 tablespoon unsalted butter
1 small onion, very finely chopped
1 clove garlic, grated on a microplane
½ teaspoon smoked paprika
1 teaspoon sweet paprika
2 tablespoons tomato paste
8 ounces sliced cremini mushrooms (about 4 cups)
¼ teaspoon fine sea salt, or more to taste
¼ cup heavy cream
¼ cup sour cream
1 tablespoon fresh lemon juice
Fresh ground black pepper
1. To make the crêpes: In a blender, puree the milk, eggs, melted butter, flour, and salt until smooth. Set the batter aside at room temperature for 30 minutes to 1 hour. (You can make the crêpe batter the night before. Just cover with plastic wrap and refrigerate. Before cooking, allow the batter to come to room temperature.) While the batter rests, make the filling.
2. To make the filling: In a medium skillet over medium heat, heat the butter until it melts and bubbles. Cook the onion until soft and just beginning to turn golden. Add the garlic and cook for a minute or two. Add the smoked paprika, sweet paprika, and tomato paste and cook until the spices and tomato paste have blended with the onion. Add the mushrooms and salt and cook until the mushrooms are soft. Add the cream, sour cream, and lemon juice, stirring to make a thick sauce. Taste. Add more salt if needed and a good grinding of black pepper. Remove the pan from the heat. Cover it to keep the sauce warm while you cook the crêpes.
3. Heat an 8” nonstick skillet over medium-high heat. Brush with a bit of melted butter for the first crêpe. Pour 2 to 3 tablespoons of batter into the pan and tilt the pan in a circular motion so the batter covers the bottom in a thin layer. Cook for 45 to 60 seconds, or until the edge of the crêpe is brown and flecked with tiny bubbles and the middle looks dull. Turn and cook for 30 to 45 seconds. The second side should be cooked but will not be as dark as the first side. (Consider the first crêpe a trial run. They rarely work out, so don’t panic. By the second or third, you should be turning like a pro.)
4. Place the crêpe flat on a plate. Scoop ¼ cup of the mushroom filling into its center and spread down the length of the crêpe. Fold the sides over the filling. Drizzle some filling sauce on top for show. Repeat with the remaining batter. You may or may not need to brush the pan again with butter for subsequent crêpes. Eat while hot.
NOTE: Unfilled leftover crêpes can be stored between sheets of waxed paper and refrigerated for up to 4 days. Reheat in a hot skillet for a few seconds, fill, fold, and enjoy. The filling can be refrigerated in an airtight container for up to 3 days.
TIP: Don’t have a microplane? Then crush the clove of garlic and put “microplane” on your shopping list. It’s worth the money and drawer space, as it can grate frozen ginger (see tip on page 62), zest citrus, turn block chocolate into fine shavings, and even grate hard cheeses like Parmesan.
CHICKEN, CORN, AND CILANTRO EMPANADAS
These are serendipity in a shell. I had fully intended to make cream cheese pastry and form the empanadas into traditional half-moons. But it was late, and I was tired, and there was leftover phyllo just begging to be used. So I tried a quick-fill version. Turns out people liked the package, so I’m passing the time-saving method onto you. No matter how you fold them, these empanadas are full of warm Mexican spices. Lime and cilantro give the mixture lift while corn adds sweetness. The chicken? She’d like to thank her amazing supporting cast for making her look so good.
MAKES 18 | COMMITMENT LEVEL: DONE IN STAGES
FILLING
3 tablespoons vegetable oil
2 onions, chopped
2 large cloves garlic, grated on
a microplane
2 teaspoons ground cumin
1 teaspoon ground coriander
2 canned chipotle chile peppers, minced
Peel of 2 limes, finely grated
1 cup finely chopped red bell pepper
1 cup corn, fresh or frozen and thawed
¼ cup fresh lime juice
4 boneless, skinless chicken breasts,
cut into ½” pieces (about 2 pounds)
¼ teaspoon fine sea salt
8 ounces shredded Monterey Jack
cheese (about 2 cups)
1 cup packed chopped cilantro
2 eggs, lightly beaten
WRAPS
9 large sheets phyllo, defrosted
½ cup vegetable oil or melted butter
1. To make the filling: In a large skillet over medium heat, heat the oil. Cook the onions for 5 minutes, stirring occasionally, or until brown and soft. Add the garlic, cumin, coriander, chipotle peppers, and lime peel and cook for 1 minute. Add the bell pepper, corn, and lime juice and cook until the bell pepper softens.
2. Add the chicken and salt and cook until the chicken is no longer pink and the liquid has evaporated. Set aside to cool.
3. When you are ready to cook the empanadas, preheat the oven to 350°F. Set out two 12-cup muffin pans. Stir the cheese, cilantro, and eggs into the cooled chicken mixture, mixing to combine well.
4. To make the wraps: Lightly dampen a tea towel. Lay the phyllo sheets flat and place a damp tea towel on top of the stack to prevent the pastry from drying out. Remove 1 sheet at a time and, using a pastry brush, brush lightly with oil or melted butter. Place a second sheet on top of the first and brush with oil or butter. Repeat with a third sheet. Using a sharp knife, cut the phyllo stack into six 6” squares. Discard any excess trim. Place 1 square over a muffin cup and gently press the pastry into the cup, being careful not to tear it. Spoon ¼ cup of chicken filling into the cup. Fold the pastry flaps over the filling and press gently. Brush with more oil or butter. Repeat with the remaining ingredients. Bake for 20 to 25 minutes, or until the phyllo is golden and the filling is hot. Serve with Lime-Cilantro Dipping Sauce (page 204) or cilantro tzatziki (page 212), or enjoy as is.
NOTE: Leftovers will keep for 2 days in the refrigerator in an airtight container. Reheat in a 350°F oven for 10 to 15 minutes. Microwaving will make the phyllo soggy.

CHEDDAR TAPENADE ROLLS
This is my cousin Jude’s favorite recipe in the book. If exclamation marks were currency and she were the bank, this recipe would have made me rich. The citrus lightens the saltiness of the olive-packed tapenade, the Cheddar adds bite, and the ricotta makes sure everything is smoothed out nicely. It’s all wrapped in a phyllo shell that makes it a perfect appetizer or cocktail party snack.
MAKES 3 TO 4 DOZEN | COMMITMENT LEVEL: DONE IN STAGES
FILLING
1 cup tapenade (homemade or commercial)
Peel of 1 lemon or orange, finely grated
2 cups ricotta cheese
4 ounces finely grated aged Cheddar (about 1 cup)
2 eggs, at room temperature
WRAPS
1 package (1 pound) phyllo pastry, defrosted
½ cup vegetable oil or melted butter
1. Preheat the oven to 375°F.
2. To make the filling: In a medium bowl, combine the tapenade, lemon or orange peel, ricotta, Cheddar, and eggs until well blended. If desired, the filling can be covered and refrigerated. Roll and bake within 3 days.
3. To make the wraps: Lightly dampen a tea towel. Lay the stack of phyllo sheets flat. Cut the stack in half crosswise. Stack the phyllo sheets on top of each other, remove 1 sheet, and place the damp towel on top of the stack to prevent the pastry from drying out.
4. Using a pastry brush, lightly brush the sheet with oil or butter. Spoon 1 heaping tablespoon of filling at the bottom of the sheet in the center. Roll the phyllo and filling toward the top of the sheet a few inches, up to halfway. When the filling is secure, fold the edges of the phyllo toward the center, covering the filling. You should use about a third of the sheet’s width per side. Finish rolling the log. (If you want to roll a different shape, see pages 49–51 for rolling ideas.)
5. Place the tapenade roll seam side down on an ungreased baking sheet. Brush with more oil or butter. Continue making tapenade rolls until you run out of phyllo or filling. Bake for 12 minutes, or until golden brown and crispy. Serve hot.
NOTE: Leftovers can be refrigerated in an airtight container for up to 3 days. Reheat at 350°F for 10 minutes, or until hot all the way through. Do not reheat in the microwave. The pastry will become glue-like.
TIP: Any leftover filling makes a lovely addition to Crispy-Crust Pizza (page 156).
GINGER-CRUSTED STRAWBERRY MASCARPONE TART
Tiramisu is one of my favorite desserts. I love its velvety, sloppy texture and the irreplaceable richness only mascarpone can deliver. Unfortunately, it’s been done so often, people roll their eyes when they hear its name. With summer berries coming at me fast and furious, I took the concept of the filling, skipped the alcohol, and made it a single layer. With ginger and lime added to the mix, this light, bright dessert is more lazy-patio than bustling-Italian-café. It’s a bit soft and sloppy, just like its creator.
MAKES 6 TO 8 SERVINGS | COMMITMENT LEVEL: DONE IN STAGES
CRUST
2 cups ground ginger cookies
(about 8 ounces whole)
2 tablespoons packed brown sugar
1 teaspoon ground ginger
¼ cup melted butter
FILLING
3 eggs, separated
6 tablespoons granulated sugar
1 container (8.8 ounces) mascarpone cheese (1 generous cup)
1 teaspoon vanilla bean paste (or pure vanilla extract)
Peel of 1 lime, finely grated
1 cup sliced strawberries or 1 recipe Balsamic Roasted Strawberries (page 215]
1. Preheat the oven to 350°F. Lightly butter a 10” flan pan.
2. To make the crust: In a blender or food processor, grind the cookies into crumbs. In a medium bowl, mix the cookie crumbs, brown sugar, and ginger together with a fork to combine. Drizzle the butter over the crumbs and mix until all of the crumbs are moistened. Firmly press the crumbs into the pan. Bake for 10 minutes. Let cool completely before filling.
3. To make the filling: In a large bowl using an electric mixer or the bowl of a stand mixer fitted with a whisk, beat the egg whites until soft peaks form. Set aside.
4. In a large bowl using an electric mixer or the bowl of a stand mixer fitted with a whisk, beat the yolks and granulated sugar for 5 minutes, or until pale and creamy and the sugar has dissolved. In a small bowl, using a spoon, blend the cheese, vanilla, and lime peel until smooth. Fold the cheese mixture into the yolk mixture. Add the reserved egg whites and fold gently. Spoon the filling into the crust.
5. Top with the strawberries. If using roasted berries, be sure to include their juice. Cover and refrigerate for at least 6 hours or overnight.
NOTE: The tart will keep for 2 days if covered and refrigerated, although the crust may become a bit soggy once the tart has been cut.
TIP: When a recipe calls for beating egg yolks and egg whites separately, whip the whites first to avoid inadvertently getting yolk in the whites. The whisk attachment on my stand mixer is a master at hiding specks of yolk and has ruined more than one batch of egg whites.
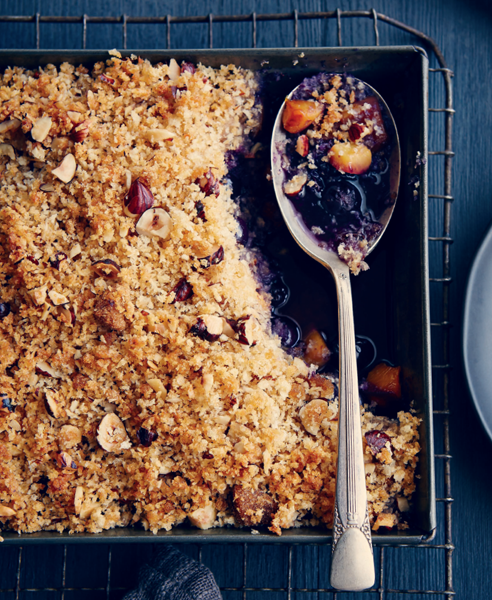
EXTRA-CRISPY PEACH AND BLUEBERRY CRISP
I had made some zucchini fries using panko and, being a very messy baker, hadn’t cleaned up fully from the night before. When I was creating this recipe, I saw the panko crumbs, which are extremely crisp, and thought, “Crisp for the crisp.” Unlike traditional crumb toppings made from oats or flour, this one is extra crunchy, in perfect contrast to the tender, classic summertime blueberry-and-peach mixture bubbling away beneath the surface. To enjoy the topping at its crunchiest, eat the crisp while still warm from the oven, but be careful when you serve it. The juices like to slop about.
MAKES 6 TO 8 SERVINGS | COMMITMENT LEVEL: READY IN AN HOUR OR LESS
FILLING
½ cup lightly packed brown sugar
1 tablespoon cornstarch
Peel of 1 orange, finely grated
3 cups pitted, peeled, and chopped
peaches
4 cups blueberries
1 teaspoon pure vanilla extract
TOPPING
1½ cups panko bread crumbs
½ cup lightly packed brown sugar
½ cup chopped hazelnuts
¼ teaspoon fine sea salt
⅓ cup melted unsalted butter
1. Preheat the oven to 350°F.
2. To make the filling: In a small bowl, mix the brown sugar, cornstarch, and orange peel until evenly combined.
3. In a large bowl, place the peaches and blueberries. Sprinkle with the vanilla and toss gently to evenly distribute the fruit. Sprinkle with the sugar mixture and toss gently to coat evenly. Spoon into an 8” × 8” glass baking dish. Level with the back of the spoon.
4. To make the topping: In a medium bowl, toss the panko, brown sugar, hazelnuts, and salt until well combined. Pour the butter over the crumbs and toss to coat well. Spoon the crumbs evenly over the fruit. Bake for 40 to 45 minutes, or until the fruit is bubbling and the topping is crispy. Allow to cool for 30 to 45 minutes before serving. The crisp can be served warm or at room temperature. Eat as is or topped with Chantilly Cream (page 135), ice cream, crème anglaise (page 222), or crème fraîche (page 224).
NOTE: This dessert is best eaten the day it’s made. Any leftovers should be covered and refrigerated. Soggy topping can be rescued with a minute under the broiler.
TIP: Crisps are a great way to use up fruit that is almost past its prime. Be sure to remove bruises before chopping. For best results, try to cut the fruit into uniform pieces. Panko are coarse, extra-crispy bread crumbs often used in Japanese cooking. Once confined to Asian markets, these crumbs can now be found in most large chain grocery stores. Look in the Asian section or in the regular bread crumbs/melba toast aisle.
BOOZY CHOCOLATE TORTE
Talk about versatile: This cake can take almost any chocolate-friendly pairing you throw at it—orange, cherry, raspberry. Don’t like fruit? Try rum and the Boozy Brown Sugar Whipped Cream on page 218. Making it for Christmas? Get festive with chopped-up candy canes and crème de menthe. The cocoa gives the chocolate depth, but if you want a subtler backdrop, omit the cocoa powder and add ¼ cup more flour. The result will be a moderately light but fairly thirsty cake, ready and willing to soak up all the liqueur, fruit, and whipped cream you place between its eager layers. If done right, it will act a little drunk, staggering sloppily to the plate when you serve it.
MAKES 10 TO 12 SERVINGS | COMMITMENT LEVEL: DONE IN STAGES
CAKE
4 ounces unsweetened chocolate,
chopped
1 cup unsalted butter
2 cups granulated sugar
1 cup milk, at room temperature
1¼ cups all-purpose flour
¼ cup sifted Dutch-processed cocoa
powder
4 teaspoons baking powder
1 teaspoon fine sea salt
4 eggs, at room temperature
2 teaspoons pure vanilla extract
FILLING
2 cups heavy cream
3 tablespoons confectioners’ sugar
½ cup (or more) liqueur of choice (such
as orange, chocolate, raspberry,
coffee, cherry, or hazelnut)
1 cup fruit, nuts, or other matching
flavor item of choice
1 ounce semisweet chocolate, grated
1. Preheat the oven to 350°F. Grease two 9” round pans and line with parchment paper.
2. To make the cake: In a large heatproof bowl, combine the chocolate and butter. Microwave on low power or set over a pot of simmering water to gently melt. Stir the chocolate and butter together with a spoon. Add the granulated sugar, milk, flour, cocoa, baking powder, salt, eggs, and vanilla at once, beating until smooth.
3. Pour the batter into the pans, making the cakes as even as possible. If you have a kitchen scale, the easiest way to do this is to weigh the pans. Push the batter to the edges of the pan so the cake will remain relatively flat when it rises during baking. Bake for 30 minutes, or until a wooden pick inserted in the center comes out clean. Allow the cakes to cool for 10 to 15 minutes. Turn out of the pans onto wire racks, remove the parchment paper, and allow to cool to room temperature.
4. Slice each cake in half horizontally. (See the tip on page 133) for easy ways to do this.)
5. To make the filling: In a large bowl, using an electric mixer on high speed, beat the cream with the confectioners’ sugar until soft peaks form.
6. Place 1 layer of cake on the platter or stand you will be serving it on. Drizzle with about one-quarter of the liqueur. Spread with one-quarter of the whipped cream, leaving a ¼” edge of cake showing. The weight of the cake will push the cream to the sides. Dot with one-quarter of the fruit/nuts/filling of choice and sprinkle with one-quarter of the grated chocolate. Repeat with the remaining layers of cake, whipped cream, fruit/nuts/filling, and chocolate.
7. Cover and refrigerate for at least 2 hours or overnight. Serve carefully; this is a very messy cake and can fall apart en route to the plate.
NOTE: Leftover cake can be wrapped in plastic wrap and stored in the refrigerator for up to 3 days. It also freezes well for up to a month.
TIP: You can use a serrated knife, but the easiest way to slice a cake in half horizontally is with thread or unflavored dental floss. Just wrap a length of thread around the sides of the cake where you want the cut to be made. Cross the ends of the thread and pull them gently but firmly away from each other. The thread will cut through the cake as you pull.

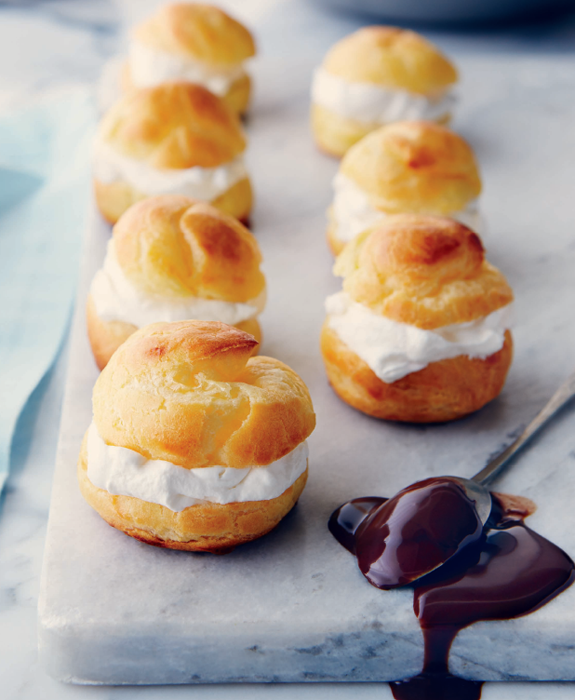
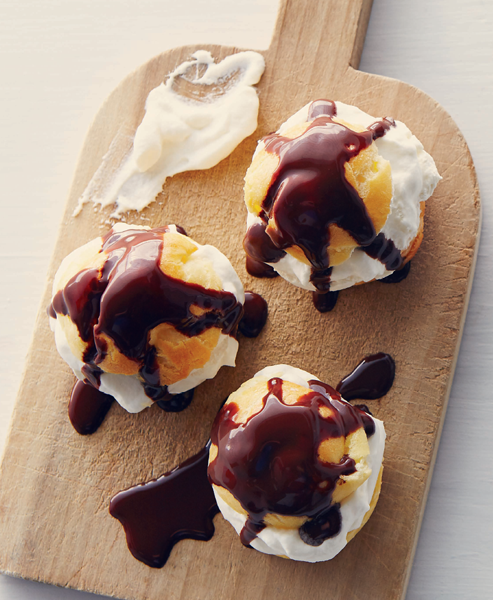
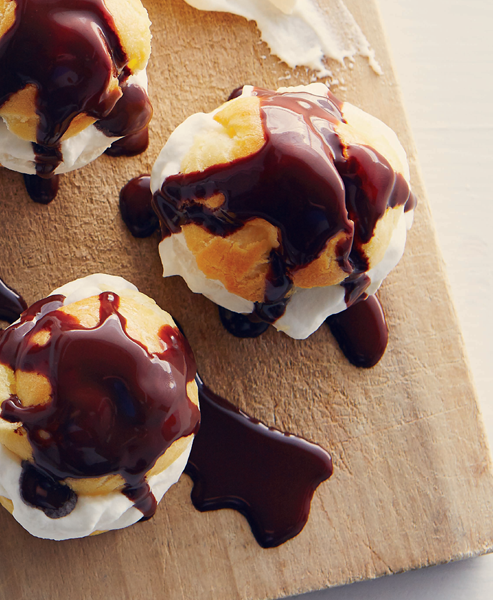
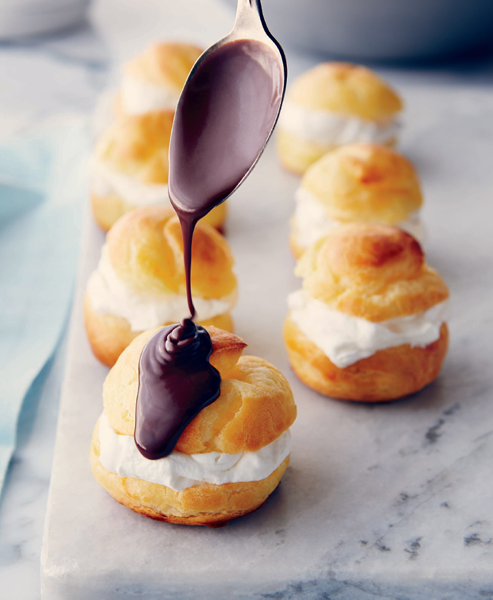
PROFITEROLES
Choux is the rebel of pastries. It’s made on the stove top, not in a bowl, and bites its proverbial thumb at the standard pastry rules that have you cutting in cold butter and mollycoddling the dough as if it were a newborn. With choux pastry, melted butter, heat, and a good stiff beating are key. The resulting dough is a thick paste you can scoop, drop, or pipe. And once baked? You get a pastry studded with air pockets, just ready and willing to hold all the cream you can pipe into it. Yeah, it’s a rebel, but with a deliciously drippy cause—cream.
MAKES ABOUT 3 DOZEN | COMMITMENT LEVEL: DONE IN STAGES
CHOUX PASTRY
½ cup unsalted butter
2 tablespoons granulated sugar
½ teaspoon fine sea salt
½ cup milk
½ cup water
1¼ cups all-purpose flour
4 eggs, at room temperature
1 egg yolk plus 1 tablespoon heavy
cream or milk (for glazing)
CHANTILLY CREAM
2 cups heavy cream, cold
¼ cup confectioners’ sugar
1 teaspoon pure vanilla extract
1. Preheat the oven to 375°F. Line 2 baking sheets with parchment paper.
2. To make the choux pastry: In a heavy saucepan over medium-high heat, combine the butter, granulated sugar, salt, milk, and water. Heat until the mixture just begins to boil. Reduce the heat to low and dump all the flour into the pan. With a wooden spoon or heat-resistant spatula, stir until the dough forms a ball.
3. Place the dough in the bowl of a food processor fitted with a steel blade. Pulse once or twice. With the food processor running, add the 4 eggs, one at a time, until combined. Alternatively, you can beat in the eggs one at a time by hand or with an electric mixer. The dough should be smooth and shiny and hold its shape.
4. Drop the dough onto the baking sheets to create profiteroles. You can do this using a pastry bag fitted with a large plain tip, a 1-tablespoon cookie scoop, or 2 dessert spoons. The aim is to make balls of dough about 1½” wide and tall so that filling them is easier. Regardless of the size you create, be consistent so they bake at the same rate. When all the profiteroles have been formed, tap down their points with a clean finger dipped in cold water.
5. In a small bowl, whisk the yolk with the cream or milk. Brush each profiterole with the egg wash. Bake for 20 to 25 minutes, or until the profiteroles are golden brown. Allow to cool completely before filling.
6. To make the chantilly cream: In a large bowl, using an electric mixer on high speed, beat the cream, confectioners’ sugar, and vanilla until soft peaks form. Fill the profiteroles immediately.
7. To fill the profiteroles with a tip: Put the cream into a pastry bag fitted with a small tip. Using a skewer, poke a hole in the side of the profiterole, insert the piping bag tip into the hole, and fill until you feel resistance. Repeat with the remaining profiteroles and cream.
To fill the profiteroles without a tip: Using a serrated knife, cut the profiteroles in half horizontally, spoon a dollop of cream onto the bottoms, and then place the tops on gently.
8. Chill the filled profiteroles until ready to serve. Profiteroles can be served as is or drizzled with Chocolate Anything Sauce (see page 216). Salted Caramel Sauce (page 220) or Nutmeg Brandy Sauce (page 221) makes a nice change of pace.
NOTE: Any uneaten, sauce-free profiteroles can be refrigerated in an airtight container for up to 3 days.
TIP: You can use regular or confectioners’ sugar for the chantilly cream, but confectioners’ sugar adds a bit of structure and makes the cream a bit easier to handle.
RASPBERRY BUTTER TARTS
Pop into a Canadian bakery and you’ll see a range of butter tarts for sale. Look in any cook’s recipe box and you’ll find a family butter tart recipe or two. Or three. We bakers like to outdo ourselves with creative variations. Classics are studded with raisins, coconut, or walnuts. Modern takes include chocolate chunks, toffee bits, and peanut butter chips. I’ve yet to see a raspberry version and can’t figure out why. Tangy raspberries so perfectly balance the sweet, sweet filling that I may never go back to the classic form again. If you fall for these like I have, say you saw it here first.
MAKES APPROXIMATELY 2 DOZEN | COMMITMENT LEVEL: READY IN AN HOUR OR LESS
1 recipe No-Fail Pastry (Lard or Shortening Version) (page 45)
2 eggs, at room temperature
2 cups packed brown sugar
2 tablespoons fresh lemon juice
1 teaspoon pure vanilla extract
½ cup melted salted butter
Whole raspberries, fresh or frozen and not thawed, 3–4 per tart, depending on size
Whipped cream and additional
raspberries, for garnish (optional)
1. Preheat the oven to 400°F. Grease two 12-cup muffin pans or twenty-four 2½” disposable tart pans.
2. On a floured surface, roll the pie dough to ⅛” thick. Using a 3½” cookie cutter or a clean, empty 19-ounce can, cut 24 rounds. Gently press the cut dough into the muffin pans or tart pans placed on a baking sheet. Chill until ready to use.
3. In a small bowl, whisk together the eggs, brown sugar, lemon juice, vanilla, and butter.
4. Place 3 or 4 raspberries in the bottom of each tart shell. Spoon the filling over the berries, filling the shell only two-thirds full. Any fuller and the filling will overflow, making it impossible to remove the tart without damaging the dessert or your ego.
5. Bake for 20 minutes, or until the crusts are golden and the filling is bubbly. Place the pans on a rack to cool. Allow the tarts to cool fully before removing from the pans with a nonserrated knife. Serve as is or with a dollop of whipped cream and a raspberry on top, if using.
NOTE: Store the tarts in the refrigerator in an airtight container for up to 5 days. These tarts can be frozen, but the crust will likely suffer a bit due to the filling’s high sugar content.
TIP: Want to make only a small batch? Go ahead. The leftover filling—without the berries—freezes really well. Just defrost it, mix, and then pour it over the berry-filled shells and bake.
CITRUS AND SPICE CRÊPES
Inspired by the classic crêpes suzette, this sauce provides a hit of orange without the need to flambé. The crêpes are tender and unassuming, and the filling delivers a familiar citrus flavor with an exotic hint of warm spices. I’ve kept the potentially aggressive star anise in check, but the orange needs some form of cream to tone it down.
MAKES 12 TO 16 | COMMITMENT LEVEL: DONE IN STAGES
CREPES
1 cup 2% or whole milk, at room temperature
3 eggs, at room temperature
2 tablespoons melted unsalted butter,
plus more for frying
1 tablespoon pure vanilla extract
1 cup all-purpose flour
⅛ teaspoon fine sea salt
1 tablespoon granulated sugar or vanilla sugar (page 39)
CITRUS SAUCE
3 navel oranges
2 tablespoons fresh lemon juice ½ cup honey
½ vanilla bean, split lengthwise
1 stick (3”) cinnamon
4 slices (1” each) fresh ginger
1 star anise
2 tablespoons unsalted butter
2 tablespoons orange liqueur (optional)
Pinch of fine sea salt
TOPPING
Crème fraîche (page 224), crème anglaise
(page 222), or vanilla ice cream
Confectioners’ sugar, for sprinkling
1. To make the crêpes: In a small bowl, whisk together the milk, eggs, melted butter, and vanilla.
2. In a medium bowl, combine the flour, salt, and granulated or vanilla sugar. Gradually whisk the milk mixture into the flour mixture. The batter will be the consistency of table cream. Let rest at room temperature for 30 minutes. (You can make the batter the night before. Just cover with plastic wrap and refrigerate. Allow the batter to come to room temperature before cooking.)
3. To make the citrus sauce: While the crêpe batter rests, make the sauce. Wash and dry the oranges. With a vegetable peeler, cut long, shallow strips of peel from the oranges, being careful to avoid the bitter white pith. Segment the oranges (see tip on page 140) and place in a large skillet. Squeeze any remaining juices over the orange segments. Add the strips of orange peel, lemon juice, honey, vanilla bean, cinnamon, ginger, and star anise. Bring the mixture to a boil over medium-high heat. Boil for 15 minutes, or until the sauce begins to thicken. Using a slotted spoon or fork, remove the orange peel, vanilla bean, cinnamon, ginger, and star anise. Stir in the butter, liqueur (if using), and salt. Set aside until you are ready to fill the crêpes.
4. Once the batter has rested, heat an 8” nonstick skillet over medium heat. Brush with a bit of melted butter for the first crêpe. Pour 2 to 3 tablespoons of batter into the pan and tilt the pan in a circular motion so the batter covers the bottom in a thin layer. Cook for 45 to 60 seconds, or until the edge of the crêpe is brown and flecked with tiny bubbles and the middle looks dull. Turn the crêpe and cook for 30 to 45 seconds. The second side should be cooked but will not be as dark as the first side. (Consider the first a test crêpe. By the second or third, you will be turning like a pro.)
5. Place the crêpe pale side up on a plate. Fold it in half and then in half again to form a wedge. Add a dollop of crème fraîche, crème anglaise, or vanilla ice cream. Spoon some of the citrus sauce over the crêpe, being sure to get a few orange segments along with the liquid. Dust with confectioners’ sugar and serve. Repeat with the remaining batter. You may or may not need to brush the pan again with butter for subsequent crêpes.
NOTE: Plain leftover crêpes can be stored between sheets of waxed paper and refrigerated for up to 4 days. Reheat in a hot skillet for a few seconds, fold, top, and enjoy.
TIP: To segment the oranges easily, cut them in half around the middle. Using a grapefruit or paring knife, cut each segment from the rind, then from its adjoining orange segment. Scoop the orange segments out with a small spoon.
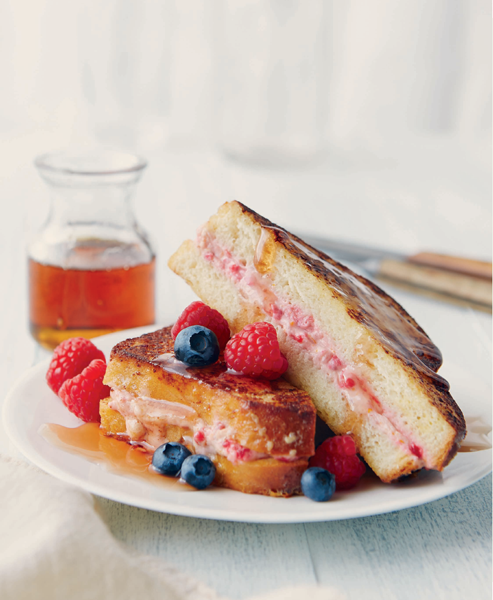
RASPBERRY-STUFFED FRENCH TOAST
The thought of tossing leftover brioche brings tears to my eyes. I can’t bear to see past-its-prime challah fed to the birds or dried-out panettone tossed to the squirrels. To save the specialty bread and my sanity, I found a way of restoring its former glory, thanks to an upscale twist on a familiar recipe. With a rich, berry-studded cream filling, this stuffed French toast is worthy of a Mother’s Day brunch or holiday breakfast. The rich berry-and-cream filling will spill a bit when you eat, but that just shows it’s full of melty goodness. For an over-the-top treat, use leftover sticky buns (page 165)—if you have any left.
MAKES 4 SERVINGS | COMMITMENT LEVEL: DONE IN STAGES
FILLING
½ cup mascarpone cheese
¼ cup cream cheese
Peel of 1 orange (about 2 tablespoons)
2 tablespoons granulated sugar
½ teaspoon pure vanilla extract
1 cup fresh or frozen and thawed raspberries
FRENCH TOAST
3 eggs, at room temperature
¼ cup 2% or whole milk
¼ cup heavy cream
1 teaspoon pure vanilla extract
⅛ teaspoon ground cinnamon
8 slices rich specialty bread (such as brioche, panettone, or challah), sliced ½” thick
2 tablespoons butter
Raspberries, confectioners’ sugar, maple syrup, Berry Sauce (page 223), or Boozy Brown Sugar Whipped Cream made with raspberry liqueur (page 218)
1. If your skillet won’t hold 4 slices of bread at once, preheat the oven to 250°F for warming.
2. To make the filling: In the bowl of a stand mixer fitted with a paddle or in a medium bowl using an electric mixer, beat the mascarpone and cream cheeses at medium speed until well blended. Add the orange peel, granulated sugar, and vanilla and beat until well blended. Beat in the raspberries until they are broken up and distributed but not badly smashed. Set the filling aside. If you are making the filling ahead of time, cover it with plastic wrap and refrigerate. Bring to room temperature before using.
3. To make the French toast: In a medium bowl, whisk the eggs, milk, cream, vanilla, and cinnamon. Pour into a pie plate for easy dipping.
4. Spread one-quarter of the reserved filling on a slice of bread. Place a second slice on top and press together gently. Assemble the remaining 3 servings of French toast.
5. In a large skillet or electric frying pan, melt the butter over medium heat until foamy. Working quickly, dip the stuffed French toast in the egg mixture and turn quickly to coat the other side. Immediately place it gently in the skillet or electric frying pan so as not to spill the filling. Fry each piece of stuffed French toast for 4 to 6 minutes, turning once, or until golden. (If you can’t cook all the French toast sandwiches in the same pan at once, cook them in batches and keep the finished ones warm in the oven until you’re ready to serve.)
6. Slice the French toast sandwiches in half diagonally and serve hot, sprinkled with a few berries and the topping of your choice.
NOTE: Leftovers can be wrapped and refrigerated for a couple of days. Bring to room temperature and fry in a nonstick skillet over medium-low heat until heated through and sizzling. Microwaving will just produce a soggy sandwich. If you have filling left over, store it in an airtight container and use within 2 days.
TIP: Work quickly when dipping bread for French toast. While bread pudding needs to sit awhile and soak up the custard, soggy bread just makes for gooey French toast. And not the good kind of gooey.