SMUDGY


food that makes you wipe your face
In my kitchen, sticky buns lead to sticky fingers. Pizza, waffles, fritters, and pie all leave smudgy forensic evidence of what I have eaten and where.
If I had a time machine, I’d go back and secure the patent for the disposable paper napkin. Not only would I be rich, but with an endless supply at my fingertips, my clothes would remain stain free and I’d be able to sneak a Chocolate-Orange Gingersnap Drop without being given away by a telltale smear. Or two.
SMUDGY
SAVORY
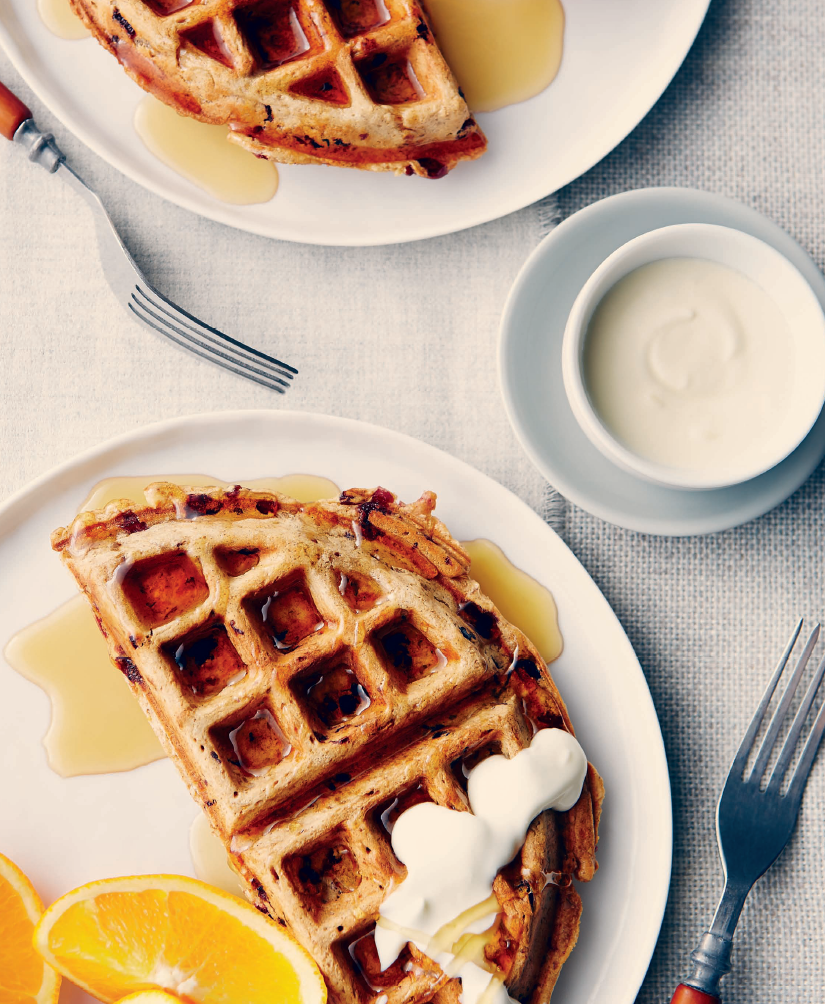
| Bacon, Cheddar, and Thyme Waffles | 148 |
| Peppery Pear and Smoked Gouda Dutch Baby | 151 |
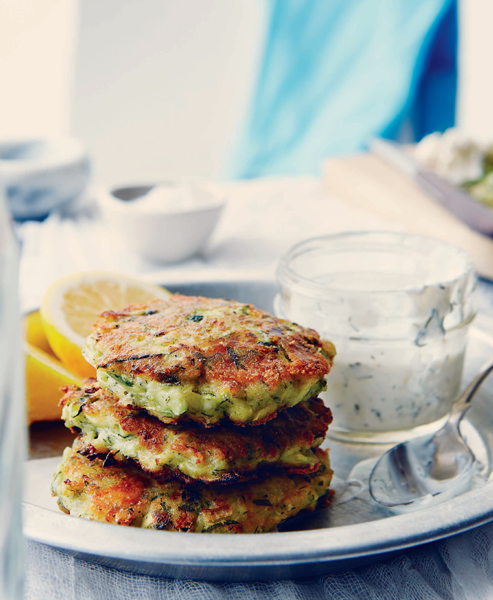
| Dill Zucchini Fritters with Lemon Tzatziki | 152 |
| Smoked Paprika Corn Fritters | 155 |
| Crispy-Crust Pizza with Five Variations | 156 |
SWEET
| Orange-Walnut Blondies with Maple Caramel Sauce | 161 |
| Cranberry-Orange Oatmeal Waffles | 163 |
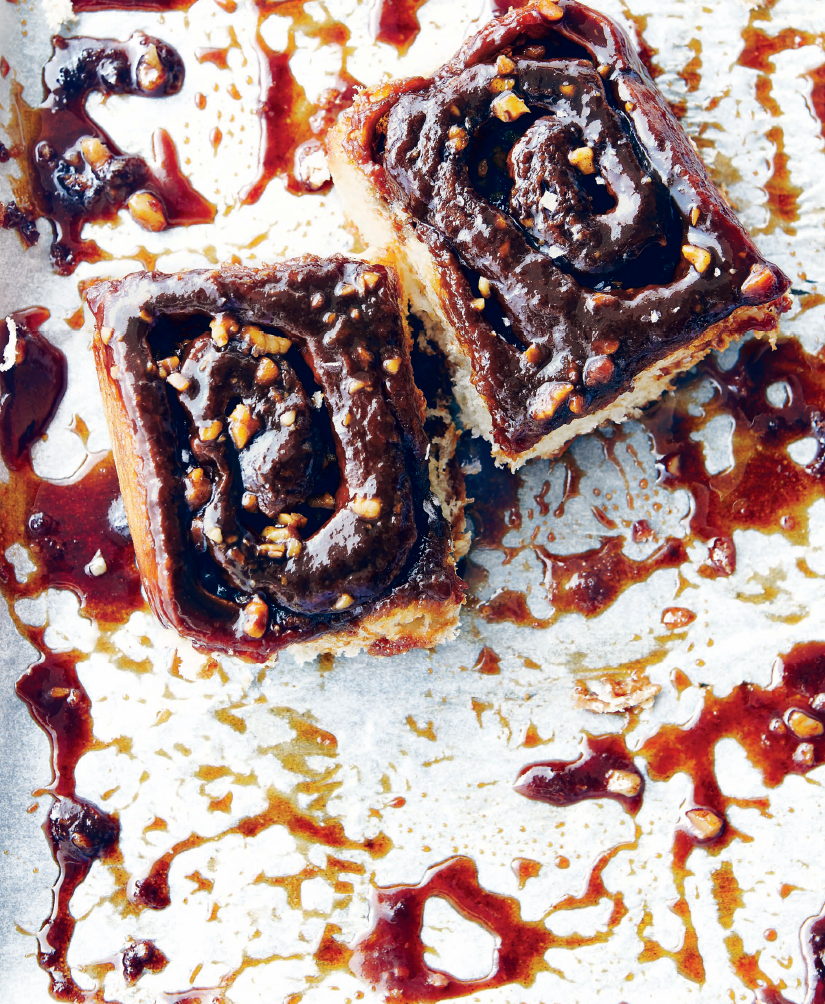
| Burnt Caramel and Sea Salt Sticky Buns | 165 |
| Rhubarb-Raspberry Galette with Frangipane | 169 |
| Chocolate Pear Tart with Honey and Pistachios | 170 |
| Whiskey-Kissed Pecan Pie | 172 |
| Chocolate-Orange Gingersnap Drops | 174 |
| Almond and Fruit Florentines | 176 |
BACON, CHEDDAR, AND THYME WAFFLES
I struggle as a short-order cook. My over-easy eggs always break. I can never get the yolk right with poached eggs. By the time the family is fed, I’m totally scrambled and anything but sunny-side up. My solution? Waffles. Fluffy, everyone-gets-the-same waffles. This savory version rolls three breakfast foods into one. Bacon, waffles, and cheese combine for a smoke-kissed treat that needs only a touch of sour cream and a drizzle of pure maple syrup. The eggs still make an appearance, but the whites are beaten and folded into the batter to keep the waffles as light as my mood.
MAKES 8 | COMMITMENT LEVEL: READY IN AN HOUR OR LESS
¾ cup all-purpose flour
¼ cup cornstarch
½ teaspoon baking powder
½ teaspoon baking soda
¼ teaspoon fine sea salt (optional, depending on how salty your bacon is)
2 tablespoons packed dark brown sugar
¼ teaspoon fresh ground black pepper (optional)
8 slices crisply cooked bacon, broken into ¼” pieces (¾ cup)
2 ounces shredded aged Cheddar cheese (about ½ cup)
1 tablespoon minced fresh thyme
2 eggs, separated
¼ cup melted unsalted butter
1 cup buttermilk
Sour cream, for garnish
Pure maple syrup, for garnish
1. Preheat your waffle iron.
2. In a large bowl, whisk together the flour, cornstarch, baking powder, baking soda, salt, brown sugar, and pepper (if using). Add the bacon, cheese, and thyme, tossing to coat well with the flour mixture.
3. In a medium bowl, combine the egg yolks, butter, and buttermilk. Whisk to combine well.
4. In a medium bowl, using an electric mixer on high speed, beat the egg whites until soft peaks form. Do not overwhip.
5. Add the buttermilk mixture to the flour mixture and stir until moist. Gently fold in the whipped egg whites. Spoon the batter into the hot waffle iron and cook according to the manufacturer’s directions. The amount of batter and cooking time will vary with the model of the waffle iron.
6. Serve the hot waffles immediately, topped with your favorite breakfast eggs or with a dollop of sour cream and a drizzle of maple syrup for a decadent brunch.
7. Leftover waffles can be stored in an airtight container in the refrigerator or frozen. They can be brought back (almost) to their former glory by warming to room temperature and then being popped into a toaster or back into a hot waffle iron.
TIP: Want an even more indulgent version? Use Caramelized Bacon (page 82) instead of regular cooked bacon and top with crème fraîche (page 224) instead of sour cream.


PEPPERY PEAR AND SMOKED GOUDA DUTCH BABY
If a popover and a pancake got together for a romantic tryst, the result would be a bouncing Dutch baby. Like a popover, this dish emerges from the oven puffed and light and proud as punch. Ooh and ahh quickly, as this baby takes on the features of its pancake parentage within minutes. In this version, a layer of peppery sautéed pears naps beneath a blanket of smoked Gouda batter.
MAKES 4 TO 6 SERVINGS | COMMITMENT LEVEL: READY IN AN HOUR OR LESS
1 cup milk
3 eggs, at room temperature
2 tablespoons melted unsalted butter
¾ cup all-purpose flour
¼ cup cornstarch
½ teaspoon fine sea salt
4 ounces smoked Gouda
2 pears (such as Bosc)
2 tablespoons unsalted butter, at room temperature
Fresh cracked black pepper
Crème fraîche or sour cream, for garnish
Honey, for drizzling
1. Place a rack in the center of the oven and a heavy 10” skillet on the rack to heat. Cast iron is ideal, but any ovenproof skillet will do. Preheat the oven to 425°F.
2. In a medium bowl, whisk the milk, eggs, and melted butter until smooth. Add the flour, cornstarch, and salt. Whisk until smooth. Grate the cheese using the large holes of a box grater. Add it to the batter and stir gently to combine. Set aside while you cook the pears.
3. Peel, core, and cut the pears into ¼”-thick slices. In a large skillet over medium heat, melt the room-temperature butter. When it bubbles, place the pears in the butter, add a light grinding of pepper, and cook, stirring often, for 4 to 5 minutes, or until the pears are lightly golden and beginning to get tender.
4. When the pears are done, remove the heated skillet from the oven. Slide the pears into the hot skillet and arrange in a single layer. Be sure to scrape out all the butter. Give the reserved batter a quick stir, pour it over the pears, and pop the skillet back into the oven. Bake for 15 to 20 minutes, or until puffed and golden. The Dutch baby will not rise as high as a plain version because of the cheese. This is normal. You didn’t do anything wrong.
5. Slice and serve with a dollop of crème fraîche (page 224) or sour cream, a grinding of fresh black pepper, and a drizzle of honey.
NOTE: Dutch babies don’t sleep well. Eat this dish hot from the oven. Technically, leftovers can be stored in the refrigerator in an airtight container and reheated in a skillet, but they might disappoint. If this is the case, serve with Caramelized Bacon (page 82) to take the edge off.
TIP: If you don’t have smoked Gouda, this recipe works with aged Gouda. Don’t like Gouda? Substitute Edam or smoked Cheddar.
DILL ZUCCHINI FRITTERS WITH LEMON TZATZIKI
One year I planted too many zucchini. They arrived nonstop all summer. We pureed them into soup. Grated them into breads and muffins. We diced, we sliced, we even julienne fried. These fritters come from one of the recipes I developed in self-defense, and it turned out to be one of my favorite summer recipes. Zucchini might be pushy in the garden, but it’s gracious when introduced to fresh herbs and feta. It also looks rather natty with a tzatziki hat. Should the Zucchini Apocalypse beat down your kitchen door, invite the gang in, and then pull out the grater and the frying pan. Survival never tasted so good.
MAKES 8 | COMMITMENT LEVEL: DONE IN STAGES
LEMON TZATZIKI
½ cup Greek yogurt
1 clove garlic
¼ teaspoon fine sea salt
Fresh ground black pepper
1 tablespoon minced fresh dill
3 sprigs fresh mint, minced
Peel of ½ lemon, finely grated
1 tablespoon fresh lemon juice
FRITTERS
2 cups grated zucchini (about 2 small;
see grating instructions in Step 2)
¾ cup all-purpose flour
1 teaspoon baking powder
½ teaspoon fine sea salt
½ teaspoon fresh cracked black
pepper, plus more for garnish
1 tablespoon minced fresh mint leaves
2 tablespoons minced fresh dill
1 large clove garlic
1 egg, at room temperature
Peel of 1 lemon, finely grated
2 tablespoons fresh lemon juice
6 tablespoons water
1 small onion, very finely chopped
4 ounces feta cheese, crumbled
2 tablespoons vegetable oil
1. To make the Lemon Tzatziki: In a medium bowl, stir the yogurt until smooth. Using a microplane, mince the garlic into the yogurt. Add the salt, pepper, dill, mint, lemon peel, and lemon juice. Stir and taste, adding more salt if needed. Cover and refrigerate until ready to use. This can be made ahead of time; it tastes better if allowed to mellow overnight. Tzatziki will keep in the refrigerator for up to 1 week.
2. To make the fritters: Wash and cut the zucchini in half lengthwise. If the zucchini is large, remove the seeds with a spoon or melon baller. Using the large holes of a box grater, grate the zucchini and set in a mesh strainer or colander to drain.
3. In a large bowl, whisk the flour, baking powder, salt, pepper, mint, and dill.
4. Using a microplane, grate the garlic into a small bowl. Add the egg, lemon peel, lemon juice, and water and beat with a fork to combine. Pour over the flour mixture and stir to combine. Stir in the onion, cheese, and drained zucchini.
5. In a large nonstick skillet over medium heat, heat 1 tablespoon of the oil. Using a cookie scoop or spoon, drop ¼ cup of batter per fritter into the pan and flatten to ¾” thick. Add additional batter for fritters as you are able without crowding the pan. Cook about 6 minutes, turning once, or until golden brown and cooked through. Repeat with the remaining batter, using more oil as needed. Serve hot with a dollop of Lemon Tzatziki and fresh ground black pepper.
NOTE: Fritters are best eaten hot. Any leftovers can be stored in the refrigerator for up to 3 days and reheated in a skillet.
TIP: If you can’t find Greek yogurt, you can make your own with standard plain yogurt. Place a strainer lined with two or three basket-shaped coffee filters or several layers of cheesecloth over a bowl. Empty a tub of plain yogurt into it, cover with plastic wrap, and set in the refrigerator for several hours or even overnight to drain. The yogurt will be reduced by at least half. Discard the yogurt water and use the strained yogurt in tzatziki.
SMOKED PAPRIKA CORN FRITTERS
I love corn so much that eating it one way just isn’t enough. These spiced fritters can be fried in a pan or cooked in a waffle iron. The fried version highlights the corn taste, while the waffle version provides contrast with a crunchy outside, soft inside. Either way, once topped with a dollop of sour cream, a sprinkle of cilantro, and some fresh lime juice, these corn-filled cakes will leave you wiping your mouth and asking for seconds.
MAKES 8 TO 10 FRITTERS OR 2 OR 3 LARGE WAFFLES |
COMMITMENT LEVEL: READY IN AN HOUR OR LESS
¾ cup all-purpose flour
1 teaspoon baking powder
½ teaspoon fine sea salt
1 teaspoon smoked paprika
1 teaspoon ground coriander
1 tablespoon ground cumin
⅛ teaspoon ground red pepper (optional)
¼ cup minced cilantro
Peel of 1 lime, finely grated
1 clove garlic
1 egg
2 tablespoons fresh lime juice 6 tablespoons water
2 cups corn, fresh off the cob or frozen and thawed
2 tablespoons vegetable oil
Sour cream, fresh lime juice, and additional minced cilantro, for garnish
1. In a large bowl, whisk the flour, baking powder, salt, paprika, coriander, cumin, red pepper (if using), cilantro, and lime peel.
2. Using a microplane, grate the garlic into a small bowl. Add the egg, lime juice, and water and beat with a fork to combine. Pour over the flour mixture and stir to combine. Stir in the corn.
3. Pan-frying method: In a large nonstick skillet over medium heat, heat 1 tablespoon of the oil. Using a large cookie scoop or spoon, drop ¼ cup of batter into the pan and flatten to ¾” thick. Add additional batter for fritters as you are able without crowding the pan. Cook for 6 minutes, turning once, or until golden brown and cooked through. Repeat with the remaining batter, using more oil as needed.
Waffle iron method: Heat and oil a waffle iron according to the manufacturer’s instructions. Cook the batter in the heated waffle iron, following the manufacturer’s instructions for batter quantity and timing.
4. Serve hot with a dollop of sour cream, a squeeze of fresh lime juice, and a sprinkle of cilantro.
TIP: Unless it’s of great sentimental value, toss your garlic press and replace it with a microplane. Anytime a recipe calls for crushed garlic, grab the microplane instead. This method releases more flavor, requires almost no strength (which is ideal if you have arthritis), and makes for a quick cleanup.
NOTE: No matter which cooking method you use, these are best eaten the day they are made.
CRISPY-CRUST PIZZA WITH FIVE VARIATIONS
We tend to think of pizza as a fast food, but the secret to an authentic thin-crust Italian pizza is slow-rising dough—very slow rising. Almost glacially slow. This recipe is inspired by the no-knead pizza dough developed by Jim Lahey, owner of Sullivan St. Bakery in New York City. It’s thin, light, very crisp, and edged with bubbles. While this dough tastes best when given a 24-hour head start, it takes only about 5 minutes to cook to crispy perfection. If you like your pizza thick and chewy, use focaccia dough (page 76). But for a taste of true Italy, plan ahead and go easy on the toppings.
MAKES FOUR 10” TO 12” PIZZAS | COMMITMENT LEVEL: DONE IN STAGES
3¾ cups all-purpose flour, plus more for rolling
¼ teaspoon active dry yeast
2 teaspoons fine sea salt
1¾ cups water
1. In a large bowl, combine the flour, yeast, and salt. Pour the water over the flour mixture and stir using a very sturdy wooden spoon. The dough won’t all come together, so when the dough gets too stiff, switch to mixing with your bare hands to blend in all the flour.
2. Leave the dough in the mixing bowl. Cover it with plastic wrap and leave it to rise at room temperature until it has doubled in size. This takes about 18 hours. (If you mix the dough right after dinner, it will be ready for you when you get home from work the next day.) See “No Panic, Quick-Reference Pizza Timing Chart” for timing tips.
3. Once the dough has risen, turn it onto a well-floured surface. Divide into 4 equal pieces and shape each into a ball by tucking the edges under. Be careful not to work the dough too much. Dust the balls with flour and cover with a damp tea towel to rise for another 2 hours before stretching. If you aren’t going to make the pizzas right away, seal the flour-dusted balls thoroughly in plastic wrap or slide them into a large, food-grade plastic bag. The formed dough can be refrigerated for up to 3 days.
4. An hour before you are ready to bake the pizza, place a pizza stone on a rack in the top third of the oven. Heat the oven to 550°F (or as high as your oven will go). After 45 minutes, switch the oven setting to broil.
5. Shape the dough by placing 1 ball on a floured surface and spreading it into a circle with well-floured hands. Do not use your nails, as you could tear the dough. Place your hands, knuckles facing up, beneath the dough at the 9 o’clock and 3 o’clock positions. Gently pull your hands apart, stretching but not tearing the dough. Shift each hand 1 hour clockwise and repeat the stretching. Continue rotating and stretching the dough until you have a 10” to 12” round. If it’s not 100 percent round, don’t worry.
6. Place the stretched pizza dough on a peel or large wooden cutting board dusted with flour or cornmeal. Give the board a shake to ensure the dough doesn’t stick. Apply toppings of choice (see pages 158 and 160 for some ideas). Be sure you don’t load the pizza too heavily, or the thin crust won’t be able to support the weight of the toppings.
7. Transfer the pizza to the hot stone. Place the peel at the farthest edge of the pizza stone. With a quick jerk, slide the pizza off the peel and onto the stone. Close the door quickly and set the timer for 4 minutes. I watch the dough through the oven door because it’s fun to see how quickly the dough bubbles up. The crust will go from golden to burned quickly, so keep an eye on the pizza at the 3½- to 4-minute mark. It might need an extra minute, but no pizza went longer than 6 minutes in my oven.
8. To remove the pizza, lift the nearest edge with tongs, slide the peel or board under the lifted edge, and pull the pizza onto the peel. Turn the oven to 550°F and allow the stone to heat for 10 to 15 minutes while making your next pizza. Turn the broiler back on just before the next pizza goes onto the stone.
TOPPINGS
Forget the mountains of cheese and rivers of sauce. Authentic Italian pizza crust has surprisingly little on it. A splash of sauce—if any—and a few carefully placed high-quality toppings are all you need to highlight the crust. While few people could eat an entire 12” fast-food pizza by themselves, you can (and most likely will) eat a whole thin-crust pizza unassisted. After all, it’s thin and lightly garnished, so it’s not a big stretch.
TIP: No pizza stone? While a baking sheet will do in a pinch, it won’t cook the crust from the bottom up like a stone will. Instead, use a cast-iron griddle or cast-iron frying pan turned upside down. Just make sure you preheat it like you would the pizza stone.
NO-PANIC, QUICK-REFERENCE
PIZZA TIMING CHART
24 HOURS AHEAD OF TIME: Mix the dough. Cover it and set aside at room temperature to rise.
2 HOURS AHEAD OF TIME: Form the dough into balls. Let rise at room temperature or cover and refrigerate for up to 3 days. If using refrigerated dough, let it come to room temperature before proceeding.
1 HOUR AHEAD OF TIME: Heat the oven and pizza stone.
JUST BEFORE BAKING: Stretch the dough and add toppings, being careful not to overload your pizza.
PIZZA MARGHERITA
MAKES ONE 10” TO 12” PIZZA
⅓ cup San Marzano plum tomatoes, broken into bite-size pieces
1 tablespoon chopped fresh basil
2 ounces bocconcini (3 large, cut in quarters)
2 tablespoons freshly grated
Parmigiano-Reggiano cheese
1 tablespoon extra-virgin olive oil
Scatter the tomatoes, basil, and bocconcini over the dough, being sure to leave a 1” edge. Sprinkle with the Parmigiano-Reggiano. Drizzle with the oil. Bake as directed.
SAUSAGE AND ARTICHOKE PIZZA
MAKES ONE 10” TO 12” PIZZA
⅓ cup marinara sauce, commercial or homemade Either Way Marinara Sauce (page 211)
4 ounces cooked Italian sausage, sweet or hot, sliced into rounds
⅓ cup chopped marinated artichokes, drained
3 ounces shredded mozzarella (about ¾ cup)
Spread the dough with a thin layer of sauce, leaving a 1” edge. Place the sausage and artichoke over the pizza. Sprinkle with the cheese. Bake as directed.
VEGETARIAN PESTO PIZZA
MAKES ONE 10” TO 12” PIZZA
¼ cup pesto
2 tablespoons pine nuts
¼ large red bell pepper, thinly sliced
2 ounces shaved Pecorino Romano
cheese (about ½ cup)
1 tablespoon extra-virgin olive oil
Spread the dough with a thin layer of pesto, leaving a 1” edge. Sprinkle with the pine nuts and bell pepper. Place the cheese on top and drizzle with the oil. Bake as directed.

CHICKEN AND HONEY PIZZA
MAKES ONE 10” TO 12” PIZZA
2 tablespoons extra-virgin olive oil
1 small clove garlic, cut into 4 pieces
¼ teaspoon dried oregano
¼ teaspoon dried marjoram
4 ounces cooked chicken breast, sliced
2 ounces chèvre cheese
2 tablespoons slivered almonds
2 tablespoons honey
Fresh cracked black pepper (optional)
Flaky sea salt
1. In a small bowl, whisk together the oil, garlic, oregano, and marjoram. Let sit for 5 to 10 minutes. At this point, the garlic pieces can be removed if you don’t want a strong garlic taste.
2. Brush the dough with the herbed oil. Scatter the chicken over the pizza, leaving a 1” edge. Dot the chicken pieces with the cheese and scatter the almonds over the pizza. Drizzle with the honey and finish with a generous grinding of fresh black pepper. If there is any herbed oil left over, you can drizzle some more on as well. Bake as directed. Add a dusting of flaky sea salt before serving.
DESSERT PIZZA
MAKES TWO 10” TO 12” PIZZAS
½ cup mascarpone cheese, at room temperature
1 teaspoon grated lemon peel
2 tablespoons honey
2 tablespoons heavy cream
½ teaspoon pure vanilla extract
1 tablespoon butter
1 apple, peeled, cored, and thinly sliced
1 tablespoon packed brown sugar
¼ cup golden raisins
1 tablespoon brandy
¼ cup pine nuts
Whole nutmeg
Cinnamon stick
Flaky sea salt (such as Maldon)
1. In a small bowl, combine the cheese, lemon peel, honey, cream, and vanilla. Set aside.
2. In a medium nonstick skillet over medium heat, melt the butter. Add the apple and brown sugar. Cook, stirring, for 3 minutes, or until the apple slices are slightly soft but keep their shape. Add the raisins and brandy and cook for 1 minute, or until the raisins are plump.
3. Spread half of the reserved cheese mixture on 1 round of dough, leaving a 1” edge. Arrange half of the apple mixture evenly over the cheese mixture. Sprinkle with half of the pine nuts. If any apple-brandy sauce remains, drizzle half over the pizza. Using a microplane, grate a gentle dusting of nutmeg and cinnamon on top. Repeat with the second round of dough and remaining toppings.
4. Bake as directed. Sprinkle with flaky sea salt before serving.
ORANGE-WALNUT BLONDIES WITH MAPLE CARAMEL SAUCE
Caramel never ceases to amaze me. Technically, it’s just melted sugar, but the variations seem endless. Here, slow cooking produces a soft, gentle blonde sauce so different from the bold, burnt brunette version poured over the sticky buns (page 165), it’s hard to believe they’re related. The blondies’ brown sugar base provides a hint of butterscotch, yet another caramel variation.
MAKES 24 SQUARES | COMMITMENT LEVEL: DONE IN STAGES
BLONDIES
1 cup unsalted butter, at room temperature
1½ cups lightly packed brown sugar
Peel of 1 orange, finely grated
1½ teaspoons pure vanilla extract
1 tablespoon orange juice
2 eggs, at room temperature
1½ cups all-purpose flour
1 teaspoon baking powder
½ teaspoon fine sea salt
1 cup toasted, coarsely chopped walnuts
MAPLE CARAMEL SAUCE
1 cup heavy cream
6 tablespoons granulated sugar
¼ cup pure maple syrup (dark is
preferable)
2 tablespoons unsalted butter
Peel of 1 orange, finely grated
1 tablespoon orange-flavored liqueur
Flaky sea salt (such as Maldon)
1. Preheat the oven to 350°F. Grease a 13” × 9” baking dish.
2. To make the blondies: In a large bowl using an electric mixer or in the bowl of a stand mixer fitted with a paddle, beat the butter, brown sugar, and orange peel until smooth and light. Add the vanilla and orange juice and beat to combine. Beat in the eggs, one at a time.
3. In a medium bowl, combine the flour, baking powder, and salt. Stir into the butter mixture by hand or with the mixer on low. Stir in the walnuts. Pour in the baking dish and smooth with a spatula. The batter will not be deep. Bake for 25 to 30 minutes, or until a wooden pick inserted in the center comes out clean. Allow the blondies to cool in the pan on a rack.
4. To make the sauce: While the blondies bake (and cool), make the sauce. In a heavy saucepan, combine the cream, granulated sugar, and maple syrup. Stir over medium heat until the sugar dissolves. Increase the heat and bring the mixture to a boil. Reduce the heat to medium-low and simmer, whisking occasionally, until the sauce is caramel-colored and slightly thickened. Be patient. This process can take about 35 minutes. It’s worth it.
5. Remove the sauce from the heat. Stir in the butter, orange peel, and orange liqueur. Cool the sauce slightly before using.
6. To assemble, cut the blondies into squares. Pour the slightly warm caramel sauce over individual blondies. Sprinkle with a pinch of flaky sea salt.
NOTE: Store any leftover sauce and blondies separately. The sauce will keep for several days in the refrigerator in an airtight container. The blondies will keep in an airtight container for the same length of time. Both the sauce and blondies can be frozen for up to 2 months. Once it’s refrigerated, gently warm the sauce over low heat, whisking to incorporate any butter that separated out. Allow the blondies to come to room temperature before serving with the sauce and a sprinkle of flaky sea salt.
CRANBERRY-ORANGE OATMEAL WAFFLES
I am an impatient baker. Oh, I’ll tell you to get all your ducks in a row and block off enough time before starting a recipe. Sure, these are crucial steps, but I’m still impatient. So when I was craving cranberry-orange oatmeal muffins and didn’t feel like waiting, I created a version in waffle form. All the flavor, half the time. It’s times like these when impatience pays off.
MAKES 4 SERVINGS | COMMITMENT LEVEL: READY IN AN HOUR OR LESS
½ cup walnut pieces
½ cup quick-cooking or rolled oats
½ cup all-purpose flour
1 teaspoon baking powder
¼ teaspoon baking soda
¼ teaspoon fine sea salt
½ teaspoon ground cinnamon
2 tablespoons packed brown sugar
½ cup chopped dried cranberries
¾ cup buttermilk
Peel of 1 navel orange, finely grated
¼ cup fresh orange juice
2 tablespoons melted unsalted butter
1 egg, at room temperature
1 teaspoon pure vanilla extract
Maple syrup, crème fraîche (page 224),
or vanilla yogurt
Citrus Sauce (page 139, optional)
1. Heat and oil the waffle iron according to the manufacturer’s instructions. Meanwhile, toast the walnuts. See the tip below for toasting ideas.
2. In a blender or food processor, combine the oats and flour. Blend or process until the oats are powdered. In a large bowl, whisk the oat mixture, baking powder, baking soda, salt, cinnamon, and brown sugar until well blended. Add the cranberries and toasted walnuts and toss to coat well with the flour mixture.
3. In a medium bowl, combine the buttermilk, orange peel, orange juice, butter, egg, and vanilla. Beat with a fork until well combined. Pour over the flour mixture and stir until combined, being careful not to overmix.
4. Cook the batter in the heated waffle iron, following the manufacturer’s instructions for batter quantity and timing. Serve immediately with maple syrup, crème fraîche, or vanilla yogurt. Add a splash of Citrus and Spice Crêpe Sauce if you have any left.
NOTE: Leftover waffles can be stored in the refrigerator in an airtight container for up to a week or in the freezer for up to 2 months. To restore the waffles to their former glory (sort of), reheat by toasting them in a toaster or toaster oven or popping them back in a hot waffle iron.
TIP: When baking, I usually toast nuts in the oven. But with waffles, it seems a wasteful method. You can toast nuts on the stove top in a dry nonstick skillet over medium heat or in the microwave in 60-second bursts. Be sure to slightly undertoast them, as they will continue to cook on their own for a minute or two.
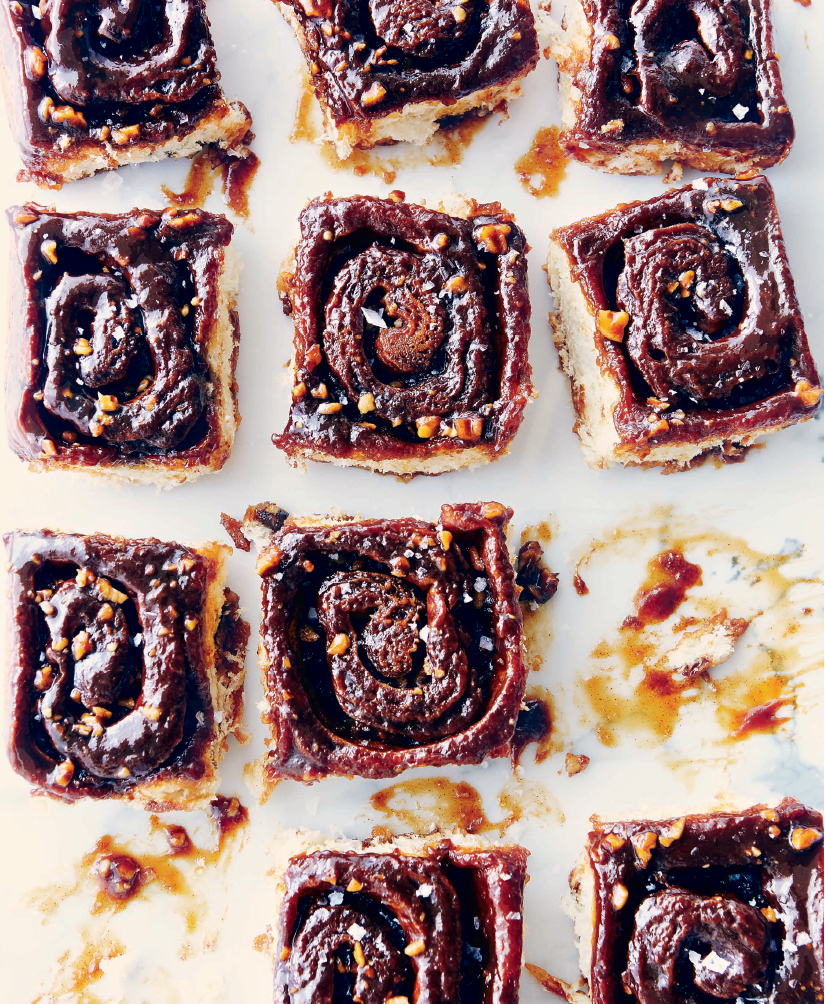
BURNT CARAMEL AND SEA SALT STICKY BUNS
This is the perfect recipe for a rainy weekend. The smells of yeast and cinnamon along with the burnt caramel come together in an aroma so enticing, you’ll be willing to burn your fingers to grab the first piece. Whether you have one with hot coffee, cold milk, or by itself, this tender, decadent sticky bun is best enjoyed while still warm.
MAKES ABOUT 12 | COMMITMENT LEVEL: LAZY SUNDAY AFTERNOON
DOUGH
1 package (2¼ teaspoons) active dry yeast
½ cup warm water (about 100°F)
⅓ cup granulated sugar, divided
¼ cup unsalted butter
½ cup sour cream
½ cup milk
1 tablespoon pure vanilla extract
1 teaspoon fine sea salt
1 egg, at room temperature
4 cups all-purpose flour, plus more for kneading
CARAMEL SAUCE
1½ cups granulated sugar
¼ cup water
¼ cup unsalted butter
½ cup heavy cream
FILLING
¼ cup melted butter
1½ cups packed Demerara or dark brown sugar
1½ tablespoons ground cinnamon
1 cup chopped walnuts
GARNISH
Flaky sea salt (such as Maldon)
1. To make the dough: In a measuring cup, sprinkle the yeast over the warm water. Stir the yeast into the water along with 1 teaspoon of the granulated sugar. Let stand for 5 to 10 minutes, or until foamy. Meanwhile, in a small saucepan over low heat, combine the remaining granulated sugar, butter, sour cream, milk, vanilla, and salt. Whisk until the butter has melted and the liquid is smooth. The mixture should be slightly warmer than room temperature. Add the egg and whisk to incorporate.
2. The dough can be mixed by hand in a large bowl or in the bowl of a stand mixer fitted with a dough hook. Place the yeast mixture, butter mixture, and flour in a large bowl and stir until the ingredients come together evenly. If mixing by hand, when it becomes too stiff to stir, turn the dough onto a lightly floured work surface and knead until smooth and elastic, adding more flour if the dough is sticky. If using a stand mixer, the dough is ready when it pulls away from the side of the bowl and begins to climb up the dough hook. Pull the dough from the hook and place the dough on a lightly floured work surface. Knead until smooth and elastic (about a minute). Transfer to an oiled bowl, cover with plastic wrap, and let rise for 90 minutes to 2 hours, or until doubled in size. When the dough has almost doubled, make the caramel sauce.
3. To make the caramel sauce: In a heavy-bottomed stainless steel saucepan with high sides, combine the granulated sugar and water. Cook over high heat, stirring occasionally, until the sugar melts and begins to boil. Keep cooking without stirring, brushing down the sides with a pastry brush dipped in water as needed. Boil 6 to 10 minutes, or until the syrup turns a deep amber color. Be careful to keep an eye on this, as it can burn quickly. To avoid scalding yourself, put an oven mitt on the hand that will stir. Remove the pan from the heat and carefully stir in the butter. When the butter has been incorporated, stir in the cream. Remain cautious, as it might bubble up again.
4. To assemble and add the filling: Grease a 13” × 9” baking dish.
5. Punch the dough down. On a floured surface, roll the dough into a rectangle about 20” × 12”. Drizzle the melted butter over the surface of the dough and spread to within 1” of the edges using a pastry brush. In a small bowl, combine the Demerara or brown sugar and cinnamon. Sprinkle the buttered surface with the cinnamon sugar and walnuts. Roll up the dough, starting with the long side. Press firmly to secure the roll. Cut the dough into 12 pieces about 1½” thick. If your ends are terribly uneven and have no filling, as is always the case with mine, trim and discard the ends.
6. Pour the caramel sauce into the baking dish. Arrange the 12 buns on top, cut side down. Cover with a tea towel and let rise for about 45 minutes, or until doubled in size.
7. While the buns rise, preheat the oven to 350°F and line a rimmed baking sheet with foil.
8. Bake for 35 to 40 minutes, or until golden brown. Remove from the oven and let stand for 5 minutes. While wearing oven mitts, place the rimmed baking sheet on top of the buns and invert them onto the baking sheet. Scrape the caramel from the baking dish over the buns. Sprinkle with flaky sea salt. Allow to cool slightly before eating.
NOTE: Sticky buns are best eaten warm but will keep in an airtight container for 2 or 3 days. Split them in half, butter the cut surfaces, and pop them under the broiler to bring them back to life. Leftovers can also be frozen for up to a month.

RHUBARB-RASPBERRY GALETTE WITH FRANGIPANE
Galettes are the ultimate in messy baking. Being free-form, the shape can be less than symmetrical, and you’re not required to do any tricky lifting or fancy edging like with pies. Sometimes the filling takes “free-form” too literally and tries to wander off. If it does this during assembly, just gently herd it back in place with your hands. If it does this during baking, call it rustic. I hoard spring rhubarb for this recipe, but if you don’t have any on hand, swap in blueberries, black cherries, or blackberries. Heck, why stop there? Sure, frangipane is traditionally a sweet almond paste, but try walnuts or hazelnuts instead. I won’t tell. Swap lemons or limes for the orange peel.
MAKES 6 TO 8 SERVINGS | COMMITMENT LEVEL: READY IN AN HOUR OR LESS
PASTRY
Dough for 1 unbaked single pie crust (page 45 or your favorite recipe)
ORANGE FRANGIPANE PASTE
½ cup ground almonds
½ cup granulated sugar
1 egg
1 teaspoon pure vanilla extract
1 tablespoon finely grated orange peel
FRUIT FILLING
3 cups fresh or frozen but unthawed diced rhubarb (¼” pieces)
1 cup fresh or frozen but unthawed raspberries
1 tablespoon pure vanilla extract
1 tablespoon orange juice
¼ cup all-purpose flour
¾ cup granulated sugar
2 tablespoons minute tapioca
FINISH
1 egg white
Turbinado sugar, for sprinkling
1. Preheat the oven to 400°F.
2. To make the pastry: On a lightly floured board, roll the dough out to form a 12” circle. Line a large, rimmed baking sheet with parchment paper. Transfer the rolled dough to the baking sheet.
3. To make the orange frangipane paste: In the small bowl of a food processor or in a blender, combine the almonds, granulated sugar, egg, and vanilla. Process or blend to form a paste. Add the orange peel and pulse to blend. Spread on the pastry, leaving a 2” border all the way around.
4. To make the fruit filling: In a large bowl, toss the rhubarb and raspberries together. Sprinkle the vanilla and orange juice over the mixture and toss again. In a small bowl, combine the flour, granulated sugar, and tapioca. Sprinkle over the fruit and toss to coat the fruit well.
5. To assemble: Spoon the fruit filling evenly over the frangipane paste. Fold the pastry edge over the filling to form a rim, pleating the dough as necessary. In a small bowl, beat the egg white with a fork until fluid. Brush the top of the pastry rim with the egg white and sprinkle the crust and filling with turbinado sugar. Bake for 35 to 40 minutes, or until the crust is golden and the filling bubbles at the edges.
6. Allow the galette to cool on the baking sheet before eating. Serve as is or with vanilla ice cream, Boozy Brown Sugar Whipped Cream (page 218), crème anglaise (page 222), or crème fraîche (page 224).
NOTE: Like most pies, galettes are best eaten the day they’re made, but leftovers—if there are any—can be stored in the refrigerator for up to 3 days.
CHOCOLATE PEAR TART WITH HONEY AND PISTACHIOS
This tart is hide-and-seek in a dessert form. Expecting a simple fruit tart, guests are often surprised—and delighted—to find a layer of dark chocolate crouching quietly beneath the golden pears and pale custard. Perhaps they thought the chocolate would arrive as a sauce. Maybe the pistachios distracted them. In our house, when this dessert arrives at the table, the first one to shout, “Ollie Ollie oxen free” gets an extra slice.
MAKES 6 TO 8 SERVINGS | COMMITMENT LEVEL: DONE IN STAGES
1 Pâte Sucrée tart shell (page 48)
4 ounces best-quality bittersweet or semisweet chocolate, finely chopped
3–4 medium dessert pears (preferably Anjou or Bartlett), ripe but still firm and unblemished
2 eggs
2 egg yolks
¾ cup sugar
Seeds of ½ vanilla bean or 1 teaspoon pure vanilla extract or 1 teaspoon vanilla paste
1½ cups heavy cream
⅓ cup honey
½ cup chopped pistachios
1. To partially bake the crust: Preheat the oven to 375°F. Prick the bottom of the chilled tart shell all over with a fork. Line the bottom with a piece of parchment paper or foil and fill with dried beans or pie weights. Bake for 15 to 20 minutes, or until the edges are just starting to turn golden brown and the bottom of the pastry is beginning to bake. Remove the liner and weights and bake for 10 minutes, or until lightly browned all over. Remove from the oven and allow to cool.
2. Preheat the oven to 400°F. Scatter the chocolate evenly over the bottom of the cooled tart shell. Halve and peel the pears, then core them using a melon baller to scoop out just the round seed area. Place a pear half, cut side down, on a cutting board. Slice very thin, cutting from the top of the pear almost to the bottom but keeping the pear’s shape intact (so even after it’s sliced, it still looks like an intact pear half). Gently press your hand down on the pear to fan the slices out. With a palate knife or spatula, transfer the fanned pear to the tart shell, with the narrow end facing the center. Repeat with the other pear halves. The tart should have a full circle of pears fanning from the center. Don’t worry if there are a few gaps; any space between the pear slices will fill with custard.
3. In a small bowl, whisk the eggs, egg yolks, sugar, and vanilla. Add the cream and whisk until smooth. Pour the custard over the pears. (If you have a little custard left over, see the tip on the next page.) Drizzle the honey evenly over the pears and sprinkle with the pistachios.
4. Place the tart on a rimmed baking sheet to catch any drips. Bake in the middle of the oven for 10 minutes. Reduce the heat to 375°F and bake for 40 to 50 minutes, or until the custard has set. Allow the tart to cool completely before slicing. Serve the tart the day it’s baked.
NOTE: Leftovers can be left in the tart pan, covered with plastic wrap, and stored in the refrigerator.
TIP: If you have some custard left over, make individual fruit clafoutis in ramekins. You might have enough custard for only one or two, but this provides a gluten-free alternative for guests who can’t have wheat and ensures nothing gets wasted. Just grease a few ramekins, fill with 2” of sliced fruit, pour the custard over the fruit, sprinkle with granulated sugar, and bake with the pear tart for 20 minutes, or until set. Allow to cool, then serve drizzled with Chocolate Anything Sauce (page 216) and/or crème anglaise (page 222).
WHISKEY-KISSED PECAN PIE
This twist on classic bourbon-laced pecan pie is made with Canadian whiskey. My husband is a whiskey fan, and for his 50th birthday, he asked for a dessert with his favorite drink and favorite nut. This pie was the result. It’s not cloyingly sweet; you can actually taste the pecans. And the booze! Toasting the pecans adds a depth of flavor that goes well with the vanilla tones in the whiskey. Whether topped with whipped cream or enjoyed as is, this pie will leave you scraping smudges of filling from your plate.
MAKES 6 TO 8 SERVINGS | COMMITMENT LEVEL: READY IN AN HOUR OR LESS
Dough for 1 deep 9” pie (page 45 or your favorite recipe)
2 generous cups pecan halves, divided
¼ cup melted salted butter
¾ cup lightly packed dark brown sugar
3 eggs, at room temperature
¾ cup amber corn syrup
1 teaspoon pure vanilla extract
3 tablespoons Canadian whiskey (such as Forty Creek)
1. Set a rack in the lower third of the oven and preheat the oven to 375°F. Line a deep 9” pie plate with the dough.
2. Roughly chop ¾ cup of the pecans. Place on a baking sheet and bake for 8 minutes, or until lightly toasted. Remove from the baking sheet and set aside to cool.
3. In a medium bowl, whisk the butter and brown sugar until the brown sugar dissolves. Add the eggs, corn syrup, vanilla, and whiskey and whisk until completely smooth. Stir in the toasted pecans. Pour the filling into the pie crust. Sprinkle the remaining 1¼ cups pecans on top of the pie.
4. Bake for 40 to 45 minutes, or until the filling is firm to the touch and the edges are golden. Allow to cool before eating. For a really tipsy experience, top with Boozy Brown Sugar Whipped Cream (page 218).
NOTE: Cover and refrigerate any leftovers. One of my testers (Don, raise your fork) swears the pie gets better with age and liked it best on day 4. No pie lasts that long in my house.
TIP: Anyone using fine single malt scotch will be slapped. If you don’t have Canadian whiskey, use bourbon, rye, or dark rum. If using a blended scotch, for best results use one described as sweet, not smoky or peaty.
CHOCOLATE-ORANGE GINGERSNAP DROPS
I wanted to include a recipe for orange-ginger chocolate cheesecake. But it was too big, took too long, was too rich, had too many layers. So I took the basic trio of flavors and made a simple, decadent, truffly thing that delivered the flavors in a bite-size package. I’m calling it a drop because you simply drop the mixture into a mini paper liner. No hours of baking. No water bath. And they’re so small, there’s almost no guilt. These are melt-in-your-hands treats, so be sure to have napkins nearby.
MAKES ABOUT 30 | COMMITMENT LEVEL: READY IN AN HOUR OR LESS
¾ cup walnuts
1 cup roughly crushed commercial gingersnaps (about 10, or 4 ounces)
⅓ cup finely chopped crystallized ginger
Peel of 1 navel orange, finely grated
½ cup unsalted butter
¼ cup golden corn syrup or Lyle’s golden syrup
7 ounces dark baking chocolate (70% cocoa), chopped into small pieces
1 egg, lightly beaten
1. Place 30 mini paper liners or truffle cups on a rimmed baking sheet. Set aside.
2. In a small skillet over medium heat, toast the walnuts for 5 to 8 minutes, stirring frequently to avoid burning, or until they are fragrant. Set aside and allow to cool.
3. Place the gingersnaps in a heavy resealable plastic bag and crush using a rolling pin or bottle. You will be dropping the mixture by heaping tablespoons, so you want the crumbs to be small enough to fit into the mini paper liners, but not fine like graham cracker crumbs. Empty the crumbs into a large bowl. Chop the walnuts and add to the crumbs along with the ginger and orange peel. Toss to distribute evenly and set aside.
4. In a small saucepan over medium-low heat, melt the butter and syrup. Gently bring to a boil. As soon as the sauce begins to boil, remove the pan from the heat and add the chocolate. Stir until the chocolate is fully melted and the mixture is smooth. Beat in the egg. Pour over the crumb mixture and stir until all the dry ingredients are fully coated.
5. Drop 1 heaping tablespoon of chocolate mixture into each paper liner. Cover with plastic wrap and refrigerate for several hours or overnight. Serve cold with plenty of napkins. These can get messy.
TIP: Citrus zest can be bitter if you grate off any of the white pith. You can use the fine holes of a box grater or a microplane. Microplanes are very sharp and can take off too much zest if you’re too enthusiastic. Grate with a light hand and go back and forth only two or three times before turning the orange.

ALMOND AND FRUIT FLORENTINES
When I was a child, the woman behind the counter at the bakery would give me a free cookie. Sometimes it was a plain sugar cookie or maybe an oatmeal raisin cookie that bordered on healthy. But if the stars aligned and the fates smiled upon me, she would hand me a florentine. This was no easy-to-eat, chewy kids’ cookie. This snappy treat, with its hole-laced edges, candied peel, and chocolate drizzle, was for grown-ups. I practically shook with joy when I ate one. I’m not sure if that bakery still sells florentines, but I do know I’m too old for free cookies. Neither matters now. I can make my own.
MAKES ABOUT 28 | COMMITMENT LEVEL: DONE IN STAGES
⅓ cup all-purpose flour
¾ cup sliced almonds
½ cup finely chopped dried cherries
3 tablespoons finely chopped crystallized ginger
3 tablespoons finely chopped candied orange peel
¼ cup unsalted butter
½ cup sugar
½ cup heavy cream
2 tablespoons maple syrup or honey
4 ounces semisweet chocolate, chopped into small pieces
1. Place a rack in the center of the oven and preheat the oven to 350°F. (Note: I found the convection setting didn’t work well with this cookie.) Line 2 baking sheets with parchment paper.
2. In a small bowl, combine the flour, almonds, cherries, ginger, and orange peel. Set aside.
3. In a saucepan over low heat, melt the butter, sugar, cream, and maple syrup or honey together. Increase the heat to medium and bring the sauce to a boil. When it begins to boil, remove the pan from the heat and stir in the reserved flour mixture, ensuring all the ingredients are evenly coated. The batter will be very runny. Let it cool for a couple of minutes to thicken slightly.
4. Using a 1-tablespoon cookie scoop, drop the batter onto the baking sheets about 3” apart. You can fit 6 to 8 on a pan. With the back of a spoon dipped in cold water, flatten the dough so that it’s very thin. Bake 1 sheet at a time for 8 to 12 minutes, or until the edges are golden brown and bubbly and the centers are light gold. Keep an eye on them until you get the timing of your particular oven.
5. Allow the cookies to cool on the baking sheet for 5 minutes before transferring to a rack, using a spatula.
6. While the cookies cool, melt the chocolate in a heatproof bowl over simmering, not boiling, water or in the microwave on medium power in 60-second bursts.
7. Place the cookies on a fresh sheet of parchment paper. Drizzle the chocolate over them. You can use a spoon, a resealable plastic bag with 1 corner snipped, or a parchment cone (see page 30 for details).
NOTE: Florentines are best eaten the day they are made. To store, place in an airtight container with parchment paper or plastic wrap between the layers. Force yourself to consume them within 3 to 4 days lest they spoil.
TIP: Florentines are not suitable for the freezer, as freezing will spoil the texture. Guess you have to eat them right away. Shucks.