GRITTY
items with seeds, spinach, or other nuisancey bits that mess up your smile
“Do I have anything in my teeth?” My sister and I have a pact to check each other’s smiles for flecks of spinach and stray poppy seeds. Not everyone is so lucky.
While fig cookies, lavash bread, and granola bars can make you smile, they can also make a mess of your grin. If you’re serving these gritty dishes, set out the toothpicks, and make sure a pack of dental floss is in plain sight near the bathroom mirror. Your guests and their smiles will thank you.

GRITTY
SAVORY
| Many-Seed Lavash Bread | 182 |
| Spinach and Dill Pockets | 185 |
| Rosemary, Apricot, and Pistachio Crisps | 189 |
SWEET
| Fig and Apricot Newtons | 191 |
| Citrus-Topped Poppy Seed Bars | 195 |
| Black and White Sesame Snaps | 196 |
| Chewy Fruit and Nut Bars | 197 |
| Sour Cherry and Pistachio Granola Bars | 198 |
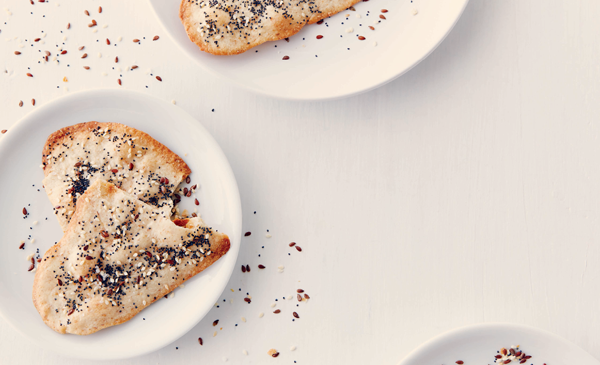
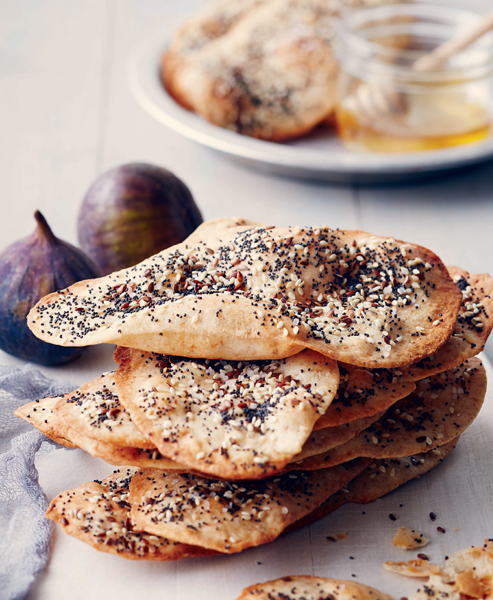
MANY-SEED LAVASH BREAD
This cracker-crisp, yeast-free Middle Eastern flatbread is almost effortless when made with a food processor. If you don’t have one, mix the dough by hand with a bit of elbow grease and a sturdy wooden spoon. While it’s fun to play with the kitchen equipment, people have been making variations of this bread for centuries with little more than a bowl and their hands. Enjoy these as is or with slices of cheese, a scoop of tzatziki (page 212), or a smear of aioli (page 207).
MAKES 4 LARGE OR 16 INDIVIDUAL | COMMITMENT LEVEL: DONE IN STAGES
1½ cups all-purpose flour
½ cup whole wheat flour
¾ teaspoon fine sea salt
1 tablespoon honey
¼ cup vegetable oil
½ cup water
1 tablespoon poppy seeds
1 tablespoon sesame seeds
1 tablespoon flax or chia seeds
Coarse kosher salt, for sprinkling
1. In the bowl of a food processor fitted with a steel blade, combine the flours and sea salt with a few pulses. In a small bowl, whisk together the honey, oil, and water. Pour into the flour mixture and pulse until the dough comes together. It will be stiff.
2. Turn the dough onto a lightly floured flat surface and knead a few times to form a ball. Cover and let rest at room temperature for at least 30 minutes or overnight.
3. Preheat the oven to 375°F. Line 2 baking sheets with parchment paper. In a small bowl, combine the poppy seeds, sesame seeds, and flax or chia seeds.
4. To make individual lavash breads: Cut the dough into 16 equal pieces and form into balls. Roll each into a length approximately 8” long and 3” wide. They should be about $$” thick. Place on the baking sheets. Brush with water and sprinkle with the seed mixture and kosher salt. Press the topping firmly into the breads with the rolling pin or it will fall off during eating. Bake for 12 to 15 minutes, or until golden all over.
5. To make large lavash breads: Cut the dough into 4 equal pieces. Roll each into a rectangle about $$” thick. Place on the baking sheets. Brush with water and sprinkle with the seed mixture and kosher salt. Press the topping firmly into the breads or it will fall off during eating. Bake for 16 to 18 minutes, or until golden all over.
6. Transfer to a rack to cool. Serve the individual breads as is, or break the large breads into small portions.
NOTE: Lavash bread can be stored in an airtight container for up to a week.

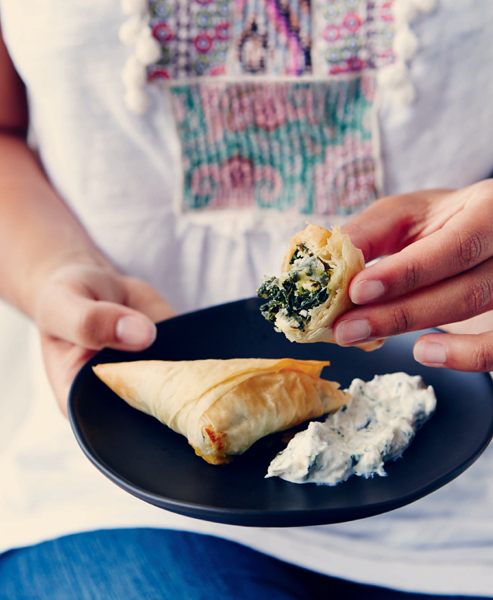
SPINACH AND DILL POCKETS
I find a lot of restaurant spanakopita heavy on the spinach or overly salty. These are nicely balanced with the right amount of onion and garlic. A bit of fresh (not dried) dill, mint, and lemon add lift. The only trick to these is making sure you squeeze all the water out of the spinach. Yes, this will leave you with messy tea towels, but if you don’t get enough moisture out, your spanakopita will burst and leave you to perform a cleanup of another kind.
MAKES 24 | COMMITMENT LEVEL: DONE IN STAGES
FILLING
2 packages (10 ounces each) frozen chopped spinach, thawed and drained
1 tablespoon vegetable oil
2 onions, finely chopped
1 clove garlic, minced
3 eggs, lightly beaten
¼ cup minced fresh dill
2 tablespoons minced fresh mint
Peel of 1 lemon, finely grated
12 ounces feta cheese, crumbled
WRAPS
1 package (16 ounces) phyllo pastry, thawed according to package directions
½ cup vegetable oil or melted butter, for brushing
Sesame seeds or poppy seeds, for sprinkling (optional)
1. Preheat the oven to 375°F.
2. To make the filling: In a sturdy colander, press the spinach to remove most of the moisture. Transfer to clean tea towels and roll, squeezing firmly to draw out the remaining moisture. This is crucial if you don’t want the spinach filling to burst. (If you have strong hands and don’t mind the feel of cooked spinach, you can get the moisture out by squeezing the spinach in your fist.) Place the spinach in a large bowl and set aside.
3. In a large nonstick skillet over medium heat, heat the oil. Cook the onions and garlic for 8 to 10 minutes, or until soft. Stir into the reserved spinach. Add the eggs, dill, mint, and lemon peel and blend thoroughly. Add the cheese and stir gently.
4. To make the wraps: Lightly dampen a tea towel. Lay the stack of phyllo sheets flat on a work surface. Cut the stack in half. You want a sheet that is approximately 9” by 12”. Stack the sheets on top of each other, remove 1 sheet, and place the damp towel on top of the stack to prevent the pastry from drying out.
5. Using a pastry brush, brush the sheet lightly with oil or butter. Fold the sheet in thirds lengthwise so you have a long, thin strip 3 layers thick. Using a small cookie scoop or a spoon, place 1 tablespoon of the spinach mixture at the bottom of the sheet toward 1 side. Fold the opposite corner over the filling to form a triangle. Fold the filling up the strip, maintaining the triangle shape. Place the triangle seam side down on an ungreased baking sheet. Brush the top with more oil or butter, and sprinkle with sesame or poppy seeds, if using.
6. Repeat until the filling or phyllo sheets are gone. Leftover filling can be used for an omelette.
7. Bake for 12 to 15 minutes, or until golden brown. Serve immediately, as is or with tzatziki (page 212).
NOTE: Once cool, these pockets can be stored in an airtight container in the refrigerator for up to 3 days. To eat, reheat for 10 minutes in a 325°F oven. The microwave will make the phyllo soggy.
TIP: Triangles are classic for spinach, but you can roll these pockets in other shapes or even just bundle them up. See pages 49–51 for different ways to use phyllo.

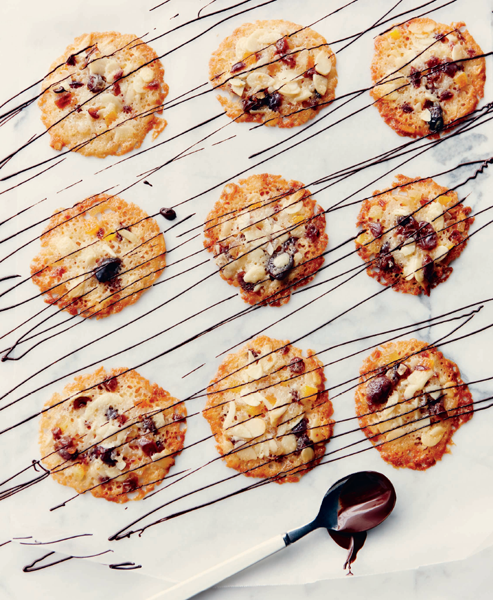
ROSEMARY, APRICOT, AND PISTACHIO CRISPS
This apricot and pistachio version of Raincoast Crisps is adapted from Julie Van Rosendaal’s recipe for these double-baked treats. Delightfully crisp, these crackers are bursting with dried fruit, nuts, and seeds. A hint of rosemary makes them the perfect match for cheese at parties. If for some reason they outlast the cheese, nibble them plain. Be warned, an entire batch will disappear quickly at parties, leaving the water biscuits and rice crackers feeling snubbed. Are they sweet? A little. Are they savory? A titch. Are they addictive? Totally. Bet you can’t eat just one.
MAKES 6 TO 8 DOZEN | COMMITMENT LEVEL: DONE IN STAGES
2 cups all-purpose flour
2 teaspoons baking soda
½ teaspoon fine sea salt
1 cup chopped dried apricots
½ cup chopped pistachios
½ cup pumpkin seeds
¼ cup sesame seeds
¼ cup ground flax seeds
1½ tablespoons chopped fresh rosemary
2 cups buttermilk
¼ cup packed brown sugar
¼ cup honey, warmed
1. Preheat the oven to 350°F. Coat two 8” × 4” or 9” × 5” loaf pans with cooking spray or grease liberally with butter and dust with flour.
2. In a large bowl, combine the flour, baking soda, and salt. Add the apricots, pistachios, pumpkin seeds, sesame seeds, flax seeds, and rosemary and toss to coat evenly with the flour mixture. In a small bowl, combine the buttermilk, brown sugar, and honey and stir until the sugar and honey dissolve. Add to the flour mixture and stir until just combined. Pour into the loaf pans. Bake for 35 to 45 minutes, or until golden and springy to the touch. Remove the loaves from the pans and cool on a rack. The bread is easier to slice when cool, so bake the day before or pop it in the freezer to cool it down.
3. Preheat the oven to 300°F. Using a serrated knife, slice the loaves as thinly as you can. Aim for no thicker than ⅛”, if possible. Place the slices in a single layer on an ungreased baking sheet and bake for 15 minutes. Turn them over and bake for 10 minutes, or until they are crisp and deep golden brown.
TIP: These are so addictive, you might want to slice and bake one loaf and put the second loaf in the freezer (well wrapped, of course) for when the crisp craving strikes.

FIG AND APRICOT NEWTONS
The first recipe I ever created was my own version of Fig Newtons. I was 12. They were like no other cookie on the shelf. The sweet, gritty filling had too many seeds to count, and it was all wrapped in a blanket of chewy biscuit that was hard to pin down. It wasn’t quite cake. It wasn’t quite cookie. Unable to get the recipe just right, I would tweak the previous version each day after school—until Mom opened the cupboard to find her stash of expensive figs gone. The experiment ended due to lack of funding. Now I’m back at it with a bit of a twist, adding dried apricots and orange to make a lighter and brighter version of my childhood snack.
MAKES APPROXIMATELY 2 DOZEN | COMMITMENT LEVEL: DONE IN STAGES
DOUGH
½ cup unsalted butter, at room temperature
¾ cup sugar
1 egg, at room temperature
¼ cup fancy molasses
2 teaspoons pure vanilla extract
2 cups all-purpose flour
½ teaspoon baking powder
½ teaspoon fine sea salt
FILLING
⅔ cup chopped dried figs, tough stems removed (Calimyrna or Black Mission work well)
½ cup chopped dried apricots
¼ cup sugar
2 tablespoons honey
½ cup fresh orange juice
1 tablespoon orange peel, finely grated
1 teaspoon pure vanilla extract
1. To make the dough: In a large bowl using an electric mixer or in the bowl of a stand mixer fitted with a paddle, cream the butter and sugar on medium speed until light and fluffy. Beat in the egg, molasses, and vanilla.
2. In a medium bowl, whisk the flour, baking powder, and salt to combine. Using a wooden spoon or the stand mixer set on low, stir the flour mixture into the butter mixture until well combined. Turn the dough onto a large sheet of plastic wrap and refrigerate for at least 1 hour or overnight.
3. To make the filling: In a small saucepan over medium heat, combine the figs, apricots, sugar, honey, and orange juice. Bring to a boil. Reduce the heat and simmer for 3 to 8 minutes, or until the fruit plumps. Transfer to a blender and puree until smooth. Transfer to a small bowl. Stir in the orange peel and vanilla and set aside until cool. If you won’t be baking the same day, cover and refrigerate.
4. When you’re ready to assemble and bake, preheat the oven to 375°F and line 2 baking sheets with parchment paper.
5. Cut the dough in half and gently knead on a lightly floured surface to soften the dough. Once warmed, the dough will be quite soft, so handle gently. Roll 1 portion of dough into a rectangle ¼” thick and approximately 18” long and 6” wide. Trim the edges with a knife or pizza cutter and set the trimmed dough aside. Spoon half the filling down the length of the dough, forming a 2”-wide strip down the center. Fold the edges over the filling. Cut the dough into 1½” bars, discarding any dough at either end that has no filling. Place on the baking sheets seam side down and bake for 12 minutes, or until the bars are slightly golden and baked all the way through. Leave on the baking sheets for a few minutes before transferring to a rack to cool.
6. While the first pan of bars bakes, roll, fill, and cut the second half of the recipe. Bake the second pan while the first is cooling.
NOTE: The bars can be stored in the refrigerator for up to 1 week. They can also be frozen for up to 2 months.
TIP: Don’t waste the trimmed dough. Instead, roll it to ¼” thick, cut into 2” squares, and bake in the 375°F oven for 5 to 7 minutes, or until golden on the edges. You can eat these squares as is with a cup of tea. If you want to get fancy, smear the hot cookies with apricot jelly, sprinkle with toasted walnuts, and dust with confectioners’ sugar.


CITRUS-TOPPED POPPY SEED BARS
Cookies and bars cycled through popularity in our house when I was growing up. Poppy Seed Bars were once the answer to the after-school snack attack. I loved them for their tangy lemon icing and crunchy seeds—even if they did get stuck in my braces. I’m not sure why Mom stopped making them, but I’ve decided to reinstate them with a bit of orange added to the mix.
MAKES 24 | COMMITMENT LEVEL: DONE IN STAGES
BARS
2 eggs, at room temperature
1 cup packed dark brown sugar
⅔ cup vegetable oil
2 teaspoons pure vanilla extract
¾ cup whole wheat flour
¾ cup all-purpose flour
½ cup poppy seeds
1½ teaspoons baking powder
¾ teaspoon fine sea salt
ICING
½ cup unsalted butter, at room temperature
Peel of 1 navel orange, finely grated (about 2 tablespoons)
Peel of 1 lemon, finely grated (about 1 tablespoon)
3 cups sifted confectioners’ sugar
2 tablespoons fresh orange juice
1 tablespoon fresh lemon juice
Generous pinch of fine sea salt
Poppy seeds, for garnish
1. Preheat the oven to 350°F. Line a 13” × 9” baking dish with parchment paper so it overhangs on the ends for easy removal.
2. To make the bars: In the bowl of a stand mixer fitted with a paddle or in a large bowl using an electric mixer, beat the eggs on medium speed until well blended. Gradually beat in the brown sugar until combined. Add the oil and vanilla and beat for 1 to 2 minutes, or until light.
3. In a small bowl, whisk the flours, poppy seeds, baking powder, and salt until combined. Using a spoon or the stand mixer set on low, stir the flour mixture into the egg mixture.
4. Spread the batter into the baking dish. It will not be deep. Bake for 15 to 18 minutes, or until the edges are golden and the middle springs back when lightly touched. Leave the bars to cool in the dish. Once the bars are cool, remove them from the dish using the parchment overhang and make the icing.
5. To make the icing: In the bowl of a stand mixer or in a medium bowl using an electric mixer, beat the butter, orange peel, and lemon peel until pale and fluffy. Turn the speed to low and gradually blend in the confectioners’ sugar, orange juice, lemon juice, and salt. Increase the speed to high and beat for 3 to 5 minutes, or until very light and fluffy. Spread the icing evenly over the cooled bars. Sprinkle with poppy seeds, if using. If you like less icing, spread it thinly and freeze the extra for next time. Let the icing set before cutting into bars.
NOTE: The bars can be stored in an airtight container for up to a week or frozen for up to 2 months.
TIP: Because of their high oil content, poppy seeds go rancid fairly quickly. To ensure you always have a usable supply on hand, store them in the freezer. They’ll keep for up to a year.
BLACK AND WHITE SESAME SNAPS
With black sesame seeds added to the mix, this is a grown-up version of the candy many of us snacked on incessantly as kids. While the list of ingredients is simple, the timing is tricky. I find it best to use a candy thermometer because honey burns easily. These snaps are also very sticky, so don’t give them to anyone with dentures or loose fillings—unless you’re a dentist looking to drum up business.
MAKES 32 GOOD-SIZE SNAPS OR 64 SMALL | COMMITMENT LEVEL: READY IN AN HOUR OR LESS
½ cup white sesame seeds
½ cup black sesame seeds
1 cup sugar
1 cup honey
Pinch of fine sea salt
1. Line a rimmed baking sheet with a silicone mat or heavy foil coated with cooking spray.
2. In a dry pan over medium heat, toast the sesame seeds until the white seeds turn light gold and are fragrant. Set aside.
3. In a heavy saucepan, combine the sugar and honey. Bring to a boil over medium heat. Cook without stirring. Occasionally, brush down the sides of the pan with a pastry brush dipped in cold water. Cook until the mixture is dark amber and a candy thermometer reaches 300°F (155°C). If you don’t have a candy thermometer, drop a bit of syrup into cold water. It should form a hard, brittle thread. This takes 15 to 20 minutes.
4. Stir the reserved sesame seeds and the salt into the honey mixture. Immediately pour onto the baking sheet, spreading the mixture with a greased spatula. Wait a few minutes until the snaps begin to set. Using a greased knife, score the snaps into 32 squares. (If you want smaller snaps, score each square in half diagonally.) Let the snaps cool completely before breaking them along the score lines. Alternatively, don’t score the snaps and simply break the cooled sheet to pieces and see what messy shapes appear.
NOTE: These will keep in an airtight container for up to 1 week. If it’s humid, refrigerate them or they will become very sticky. Allow refrigerated snaps to come to room temperature before eating.
TIP: Black sesame seeds are available at Asian grocery stores. If you can’t find them, just double up on the white ones. All you lose is a bit of visual drama.
CHEWY FRUIT AND NUT BARS
You’ve seen variations of these at the high-end coffee shops. Their price tags can be as steep as the lattes’. One of the simplest recipes in this book, this is a great way to introduce children to the fun—and mess—of baking. The cereal provides crunch, the dried fruit gives a burst of flavor, and the sticky allure of melted marshmallows provides the quintessential messy factor. Best of all, the rewards are almost instantaneous. By the time the kitchen is cleaned up, the treats are cool enough to sample.
MAKES 12 TO 16 | COMMITMENT LEVEL: READY IN AN HOUR OR LESS
4 cups breakfast cereal flakes (cornflakes, flax flakes, or bran flakes)
¼ cup roughly chopped dried cranberries
¼ cup roughly chopped dried apricots
¼ cup pumpkin seeds, raw or unsalted roasted
¼ cup sesame seeds, raw
¼ cup sunflower seeds, raw or unsalted roasted
¼ cup toasted chopped cashews
¼ cup slivered almonds
¼ cup unsweetened coconut flakes
40 large marshmallows or 4 cups miniature marshmallows
¼ cup unsalted butter, at room temperature
Generous pinch of fine sea salt
2 teaspoons pure vanilla extract
1. Generously butter a 13” × 9” baking dish.
2. In a very large bowl, combine the cereal flakes, cranberries, apricots, pumpkin seeds, sesame seeds, sunflower seeds, cashews, almonds, and coconut. Toss to mix well.
3. In a large saucepan over low heat or in a large microwaveable bowl using the microwave on medium power, melt the marshmallows and butter together. Stir in the salt and vanilla. Working quickly, pour over the cereal mixture and fold until all the dry ingredients are thoroughly coated. Scrape into the baking dish. Place a sheet of lightly buttered waxed paper on top of the mixture and firmly press it into the dish. Alternatively, use greased hands. Chill until firm. Cut and serve when set.
NOTE: Squares will keep in an airtight container for several days. You can also wrap individual bars in plastic wrap for lunch box treats.
TIP: You can customize these in many ways for fussy family members. Change the nuts, the dried fruit, or even the cereal. Just keep the quantities the same and don’t eat any of the marshmallows along the way, and you should be just fine.
SOUR CHERRY AND PISTACHIO GRANOLA BARS
With dried sour cherries and crystallized ginger, this isn’t the sweet candy bar version you’ll find in the grocery store. While you can send these off to school with the kids, they are an unexpected and surprisingly adult appetizer when served with slices of aged Cheddar and drinks.
MAKES ABOUT 18 | COMMITMENT LEVEL: READY IN AN HOUR OR LESS
½ cup pistachios
½ cup roughly chopped dried sour cherries
¼ cup chopped crystallized ginger
½ cup pumpkin seeds
½ cup flax or sesame seeds
1 cup ground almonds
2 cups whole rolled oats
⅛ teaspoon fine sea salt
½ cup unsalted butter
6 tablespoons packed dark brown sugar
¾ cup honey or maple syrup
Peel of 1 large navel orange, finely grated
1 tablespoon pure vanilla extract
½ cup dark chocolate chips (optional)
1. Preheat the oven to 325°F. Line three 6-cup jumbo muffin pans with paper liners. If you don’t have jumbo muffin pans, grease a 13” × 9” baking dish instead. If using chocolate chips, pop them in the freezer so they’ll hold their shape better when mixed into the warm granola.
2. Sprinkle the pistachios on a rimmed baking sheet and bake for 10 minutes, or until fragrant but not browned.
3. In a large mixing bowl, combine the pistachios, cherries, ginger, pumpkin seeds, flax or sesame seeds, almonds, oats, and salt. Toss to mix well.
4. In a small saucepan over medium heat, combine the butter, brown sugar, and honey or maple syrup and bring to a boil. Reduce the heat to a simmer and cook, stirring constantly, for 5 minutes, or until the syrup thickens slightly. Keep an eye on the mixture so that it doesn’t burn. Remove the pan from the heat and stir in the orange peel and vanilla. The syrup will bubble up when you add the vanilla. Stir until the syrup has calmed down.
5. Pour the hot syrup over the oat mixture. With a large spatula or wooden spoon, stir to completely cover the oats, fruits, and nuts. While the granola bar mixture is warm but not hot, add the chocolate chips, if using. Don’t rush adding the chips or you will have a melty mess on your hands. Stir quickly to distribute. Using a ¼-cup ice cream scoop or spoon, scoop ¼ cup of granola into the muffin cups and press to flatten. (Alternatively, press the entire mixture into the baking dish.) Bake in the muffin pans for 15 to 18 minutes or the baking dish for 25 to 30 minutes. The bars should be golden brown on the edges and not soggy in the middle.
6. Allow the granola bars to cool in the pans. Leave muffin cup bars in the paper liners, but cut the pan version into 18 bars.
NOTE: Store in an airtight container for up to a week. You can wrap cut granola bars individually in plastic wrap and store in the refrigerator. They can also be frozen for up to 2 months.