DRIPPY

sauces, dips, and toppings that splash and spill
Show me the tablecloth after dinner has been cleared and I will interpret it like a fortune-teller reading tea leaves.
If nothing but a clean, circular indentation from the plate remains, you are in control of your surroundings. You will lead a smooth, uncomplicated life.
Drips in a straight line reveal a thinker with laserlike focus. Little distracts you from your goal. You will be successful in your chosen field.
Splashes in all directions? You exhibit exuberance and unearned confidence. Blessed with more enthusiasm than knack, you will live a long, albeit messy, life.

DRIPPY
SAVORY
| Lime-Cilantro Dipping Sauce | 204 |
| Aioli with Variations | 207 |
| Four Takes on Gremolata | 208 |
| Either Way Marinara Sauce | 211 |
| Basic Tzatziki with Variations | 212 |
SWEET
| Balsamic Roasted Strawberries | 215 |
| Chocolate Anything Sauce | 216 |
| Boozy Brown Sugar Whipped Cream | 218 |
| Salted Caramel Sauce | 220 |
| Nutmeg Brandy Sauce | 221 |
| Crème Anglaise | 222 |
| Berry Sauce | 223 |
EITHER WAY
| Homemade Crème Fraîche | 224 |
LIME-CILANTRO DIPPING SAUCE
Lime, cilantro, and hot peppers are made for each other. If you’re a cilantro fiend, like I am, you will want to roll in this. But don’t. It’s a waste of good cilantro, and the honey makes it hard to clean.
MAKES ABOUT ½ CUP | COMMITMENT LEVEL: READY IN AN HOUR OR LESS
¼ cup vegetable oil
2 tablespoons fresh lime juice (about 1 lime)
1 cup roughly chopped fresh cilantro
1 clove garlic
½ jalapeño or serrano chile pepper (optional)
1 teaspoon honey
Generous pinch of fine sea salt (or more to taste)
Fresh ground black pepper
In a blender or the small bowl of a food processor, combine the oil, lime juice, cilantro, garlic, chile pepper (if using), honey, salt, and black pepper. Blend or process until smooth, scraping down the sides as necessary. Adjust the seasonings to taste before serving. This dipping sauce is great for Sweet Potato Samosas (page 61), Not-Too-Spicy Roasted Cauliflower (page 103), Chicken, Corn, and Cilantro Empanadas (page 124), or Smoked Paprika Corn Fritters (page 155).
NOTE: Store in an airtight container in the refrigerator for up to 5 days.
TIP: Resist the urge to use bottled lime juice. It has additives and can impart a metallic taste to the sauce.

AIOLI WITH VARIATIONS
Oh sure, you can make this garlic mayonnaise by hand, but I use a blender. If anyone accuses you of cheating, hit them with a copy of Julia Childs’s The Way to Cook. Even Ms. Child didn’t make mayonnaise by hand. Serve this with Rosemary and Black Olive Grissini (page 100) or anywhere you’d use mayonnaise.
MAKES 1½ CUPS | COMMITMENT LEVEL: READY IN AN HOUR OR LESS
BASIC RECIPE
1 large clove garlic
1 egg yolk
½ teaspoon fine sea salt
Peel of 1 lemon, finely grated
2 teaspoons fresh lemon juice
1 cup vegetable oil or olive oil
1. Using a microplane, mince the garlic into a blender or the small bowl of a food processor fitted with a steel blade. Add the egg yolk and pulse a few times to combine. Add the salt, lemon peel, and lemon juice and pulse again to combine. With the motor running, start adding the oil in a very, very slow stream. If you don’t trust yourself to pour slowly enough by hand, drip the oil using a turkey baster. When the mayonnaise begins to thicken, add the oil a little faster without pouring it in. The mayonnaise will hold its shape but be creamier than commercial versions.
2. Taste and adjust the seasonings, adding more lemon or salt as needed and processing briefly. Spread a bit of aioli on fritters (pages 152 and 155) or use as a dip for Crispy Root Vegetable Chips (page 104).
NOTE: Use immediately or refrigerate in an airtight container for up to 5 days. The extra egg white can be used to lighten waffles or make meringues (page 68).
VARIATIONS
♦ Add 1 teaspoon Dijon mustard to the egg yolk and/or add 1 teaspoon grainy mustard at the end once the mayonnaise has emulsified.
♦ Add ¼ teaspoon smoked paprika when you add the salt.
♦ Substitute balsamic vinegar for the lemon juice. Stir ½ cup diced sun-dried tomatoes into the prepared aioli.
TIP: If the mayonnaise begins to separate, don’t panic. Whisk in a teaspoon of Dijon mustard with a pinch of salt. Mustard is an emulsifier and will help hold the mayonnaise together. If this doesn’t work, whisk a fresh egg yolk in a clean bowl. By hand, whisk the separated mayonnaise into the fresh egg yolk a few tablespoons at a time.
FOUR TAKES ON GREMOLATA
Gremolata is really just an oil-free topping that brightens up meat and pasta. Traditionally, it’s made with three simple ingredients—garlic, parsley, and lemon peel. Wanting to raise the bar, I played with the classic. Then I stumbled upon a variation with nuts, and boom—there I was making all sorts of versions and sprinkling the results on items well past the standard scope of meat and grilled foods. I know the quarter cup this recipe makes doesn’t sound like much, but with gremolata, a little goes a long way.
MAKES ABOUT ¼ CUP | COMMITMENT LEVEL: READY IN AN HOUR OR LESS
BASIC RECIPE
1 clove garlic, roughly chopped
2 teaspoons finely grated citrus peel (usually lemon)
¼ cup finely chopped herb (usually flat-leaf parsley)
Place the garlic on a cutting board. Add the lemon peel and mince with a chef’s knife, using a pivoting motion to mince the garlic and peel together. Add the herb and continue chopping until the mixture is fine.
NOTE: Without nuts, gremolata will keep for a day if covered and refrigerated. If your gremolata uses nuts, use it right away, as the nuts will get soft quickly.
VARIATIONS
♦ MINT: Substitute finely chopped mint for half the parsley.
♦ ORANGE-NUT: Substitute orange peel for the lemon and add ¼ cup finely chopped toasted hazelnuts or walnuts to the mix. (Chop the nuts separately and stir them into the herb mixture just before serving.)
♦ LIME CILANTRO: Substitute lime for the lemon and cilantro for the parsley.
TIP: Use any of these gremolatas on Spinach and Dill Pockets (page 185), fritters (pages 152 and 155), or even Chicken, Corn, and Cilantro Empanadas (page 124). Heck, sprinkle some on crêpes if you like. It’s wonderfully messy if you do it by hand.

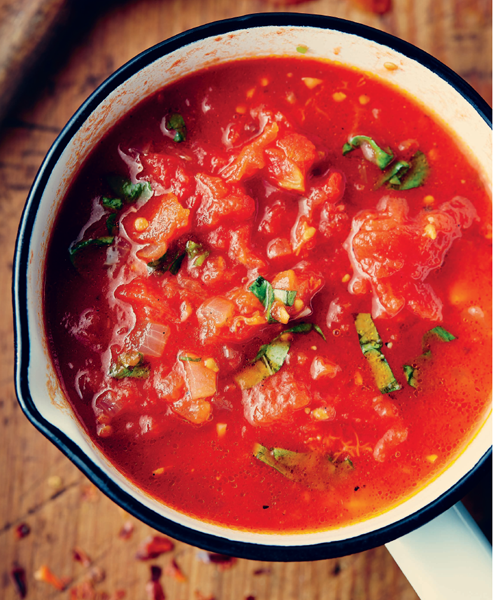
EITHER WAY MARINARA SAUCE
Some people like their marinara sauce with a bit of heat. Others prefer theirs plain. By making your own, you get to choose. Either way, this sauce is delicious and versatile.
MAKES ABOUT 2½ CUPS | COMMITMENT LEVEL: READY IN AN HOUR OR LESS
2 tablespoons olive oil
4 cloves garlic, finely chopped
1 Spanish onion, finely chopped
½ teaspoon red-pepper flakes (optional)
1 can (28 ounces) tomatoes
(San Marzano are the best, but regular are fine)
½ teaspoon fine sea salt (or more to taste)
Fresh ground black pepper
4–6 fresh basil leaves, slivered
1. In a large saucepan over medium-low heat, heat the oil. Cook the garlic, onion, and pepper flakes (if using), stirring occasionally, until the onion is soft. Make sure you keep the heat low enough that the garlic doesn’t brown.
2. If using whole tomatoes, chop them. Add the tomatoes, along with the juice, to the onion mixture. Season with the salt and black pepper. Increase the heat to medium-high and bring the sauce to a boil. Reduce the heat and simmer, stirring occasionally, for 25 to 35 minutes, or until the sauce has thickened.
3. Remove from the heat and stir in the basil. Season to taste with additional salt and black pepper. Use immediately or cool and store in an airtight container in the refrigerator.
NOTE: The sauce will keep for up to a week in the refrigerator. It can also be frozen for up to 2 months.
TIP: San Marzano are the best canned tomatoes. If you can’t find them and you are not happy with the flavor of your canned tomatoes, intensify the flavor by adding 1 to 2 tablespoons of tomato paste along with the tomatoes.
BASIC TZATZIKI WITH VARIATIONS
Most restaurant tzatziki has enough garlic to knock over a horse. I believe this yogurt spread should enhance the meal, not run over it like a steamroller. This milder, gentler version will leave you more socially acceptable and give the other menu items a fighting chance.
MAKES ABOUT 1½ CUPS | COMMITMENT LEVEL: DONE IN STAGES
1 cup Greek yogurt
1 or 2 cloves garlic
1 piece (6”) English cucumber
½ teaspoon fine sea salt
Fresh ground black pepper
1. Place the yogurt in a medium bowl. Using a microplane, grate the garlic into the yogurt. Stir to mix well.
2. Using the large holes of a box grater, grate the cucumber. Place the cucumber in a strainer over the sink and gently press out the excess water with the back of a ladle or your hand. Stir the drained cucumber into the yogurt. Add the salt and pepper, mix well, and adjust spices to taste, if necessary. Cover and refrigerate for at least a couple of hours to let the flavors blend. I think it’s best the next day.
NOTE: The tzatziki will keep for up to 5 days in the refrigerator in an airtight container.
VARIATIONS
♦ Use roasted garlic instead of raw for a delicate garlic taste.
♦ Add ¼ cup minced fresh dill.
♦ Add 2 tablespoons minced fresh dill and 1 tablespoon minced fresh mint.
♦ Add the peel of half a lemon (with or without dill and/or mint).
♦ Add ⅓ cup finely chopped cilantro. This is good served with Indian food such as samosas (page 61).
TIP: If you can’t find Greek yogurt, you can make your own with standard plain yogurt. Place a strainer lined with two or three basket-shaped coffee filters or several layers of cheesecloth over a bowl. Empty a tub of plain yogurt into it, cover with plastic wrap, and set in the refrigerator for several hours or even overnight to drain. The yogurt will be reduced by at least half. Discard the yogurt water and use the strained yogurt in tzatziki.


BALSAMIC ROASTED STRAWBERRIES
Delightfully gloppy, these roasted berries will spill all over the pan—and your ice cream, yogurt, or scones. Be sure to use a good-quality balsamic on them. If you can drink a sip straight from a spoon, it will be fine. If the vinegar makes you pucker, save it for salad dressings and splurge on a small jar of quality balsamic.
MAKES A PITIFULLY SMALL AMOUNT FOR 2 | COMMITMENT LEVEL: READY IN AN HOUR OR LESS
2 cups hulled and halved fresh ripe strawberries (halve small berries, quarter big ones)
1 tablespoon good-quality balsamic vinegar
2 tablespoons packed brown sugar
1. Preheat the oven to 425°F. Line a rimmed baking sheet with parchment paper.
2. In a medium bowl, toss the strawberries with the vinegar. Spread on the baking sheet, making sure they are in a single layer and not piled on top of each other. Sprinkle with the brown sugar.
3. Bake for 10 to 15 minutes, or until the sugar bubbles and the berries are tender. Allow to cool for a few minutes before transferring the berries and juice to a bowl. Serve on top of Ginger and Vanilla Scones (page 87) with or without crème fraîche (page 224), spoon them over ice cream, or use instead of fresh berries for Ginger-Crusted Strawberry Mascarpone Tart (page 127).
NOTE: If not using immediately, the berries can be covered and refrigerated for up to 3 days. Yeah, like that’s gonna happen.
TIP: Size matters when it comes to berries, but in this case, bigger isn’t necessarily better. Small berries from local growers will deliver more flavor and have a better texture than their gigantic imported counterparts.
CHOCOLATE ANYTHING SAUCE
Everyone in my family loves chocolate, but no one can agree on which flavor lends itself best as its partner. Select the liqueur depending on your preferences or what you plan to drizzle it over.
MAKES ABOUT 1 CUP | COMMITMENT LEVEL: READY IN AN HOUR OR LESS
½ cup heavy cream
4 ounces good-quality semisweet chocolate, roughly chopped
Pinch of fine sea salt
2 tablespoons liqueur (such as orange,
raspberry, mint, ginger, peach
schnapps, cherry, or coffee)
1. In a small, heavy saucepan over medium-low heat, bring the cream to a simmer. When steam begins to rise on the surface and bubbles form around the edge, remove the pan from the heat. Add the chocolate and salt. Let the chocolate sit a minute until it begins to melt, then gently stir until it has dissolved and the sauce is smooth.
2. Stir in the liqueur of your choice. Serve while still warm on ice cream, crêpes, waffles, or profiteroles (page 135).
NOTE: Once cooled, the sauce can be refrigerated for up to a week. To rewarm, gently heat in a heatproof bowl over simmering water or in the microwave on low power.
TIP: This sauce isn’t overly sweet, since it’s designed to go on sweet things. If you want a sweeter sauce, use 2 ounces of semisweet chocolate and 2 ounces of sweet chocolate.

BOOZY BROWN SUGAR WHIPPED CREAM
I was out of white sugar but needed some whipped cream, so I tried brown sugar. For some reason (I’m looking at you, husband dear), there was a bottle of whiskey on the counter. One thing led to another, and a tipsy, caramel-kissed cream was the result. A pinch of salt softens the edges.
MAKES ABOUT 1½ CUPS | COMMITMENT LEVEL: READY IN AN HOUR OR LESS
2 tablespoons firmly packed dark brown sugar
1–2 tablespoons whiskey, bourbon, rye, or rum (use less for a lighter whipped cream)
½ teaspoon pure vanilla extract
1 cup heavy cream, very cold
⅛ teaspoon fine sea salt
In the bowl of a stand mixer fitted with a whisk or in a medium bowl using an electric mixer, stir the sugar, liquor, and vanilla until the sugar is dissolved. Pour in the cream and salt. Beat on low speed for a few seconds to blend. Increase the speed to high and beat until stiff peaks form.
NOTE: Use immediately or cover and refrigerate until you’re ready to use it later that day.
TIP: What do you do with boozy whipped cream? Lick the beaters and some ideas will come. Add orange liqueur and serve it with Citrus and Spice Crêpes (page 139), whiskey with Whiskey-Kissed Pecan Pie (page 172), or raspberry liqueur with Rhubarb-Raspberry Galette (page 169). It makes a surprising filling for profiteroles (page 135) and can boost the tipsy factor in Boozy Chocolate Torte (page 131). One tester made it with Kahlúa and put it in her coffee. As long as there are no children present, use it anywhere you would dollop sweetened whipped cream.

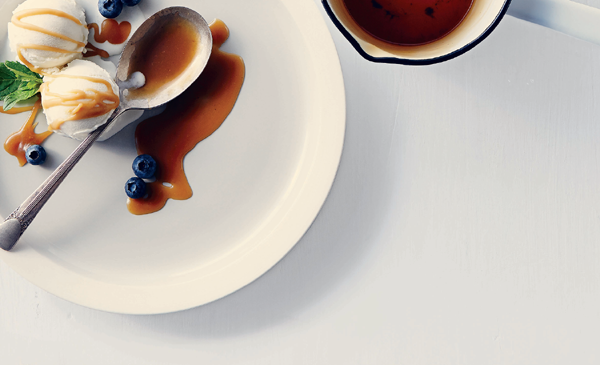
SALTED CARAMEL SAUCE
Caramel sauce requires all your senses. You need to see the sugar, smell it as it bubbles away, and have your muscles at the ready to dodge the spatters. This sauce takes the caramel to the brink of burning, so use a stainless steel or enamel-coated pot. Nonstick will mask the color, and you can slip from perfect to burned in seconds.
MAKES ABOUT 1½ CUPS | COMMITMENT LEVEL: READY IN AN HOUR OR LESS
2 cups sugar
¼ cup water
½ cup unsalted butter, cubed
1 cup heavy cream
½ teaspoon flaky sea salt (such as Maldon)
1. In a heavy saucepan over medium heat, combine the sugar and water. Heat, stirring gently, until the sugar starts to melt and begins to boil. When it does, stop stirring but continue to cook the sugar, swirling the pan occasionally to ensure the sugar melts evenly. If the sugar begins to crystallize on the side of the pan, brush down the sides with a pastry brush dipped in cold water. The caramel is ready when it turns dark amber and gentle whiffs of steam (not smoke) rise from the surface. If you have a candy thermometer, 350°F is the key. Watch carefully because the sauce will burn quickly. The second it reaches this stage, remove the pan from the heat.
2. Grab a whisk and an oven mitt to prevent your stirring hand from getting scalded by steam. Add the butter. Be careful—the mixture will spatter. Whisk in the butter. When it has dissolved, carefully whisk in the cream. Don’t relax just yet. The mixture will spatter with this addition, too. Whisk in the salt.
3. Allow the caramel sauce to cool slightly. Use on profiteroles (page 135), pour over ice cream, salvage day-old sticky buns (page 165), or use as a dip for apples. Yeah, apples. That’ll make this healthy.
NOTE: Store unused sauce in an airtight container. It will keep in the refrigerator for up to 2 weeks.
TIP: If despite your best efforts you get sugar crystals in your finished sauce, simply strain the sauce through a fine mesh strainer.
NUTMEG BRANDY SAUCE
This is an old-fashioned kind of sauce. Simple, straightforward, not a lot of steps. But don’t let the simplicity fool you. You might find yourself tasting and tasting and tasting again just to be sure you’ve got it right.
MAKES ABOUT 1½ CUPS | COMMITMENT LEVEL: READY IN AN HOUR OR LESS
1 cup unsalted butter
¾ cup lightly packed dark brown sugar
5 tablespoons brandy
⅛ teaspoon freshly grated nutmeg
¼ teaspoon fine sea salt
1. In a medium saucepan over medium heat, combine the butter, brown sugar, brandy, nutmeg, and salt. Stirring gently with a wooden spoon, heat the sauce until it becomes liquid. Bring to a simmer and cook for 2 minutes for a thin sauce, 5 minutes for a slightly thicker sauce.
2. Remove from the heat, allow to cool slightly, and whisk. Serve warm over profiteroles (page 135), crêpes, or ice cream. It also goes well on cake that has dried out a bit.
NOTE: The cooled sauce can be refrigerated in an airtight container for up to a week or frozen for later use for up to 2 months.
TIP: Avoid preground nutmeg. What it gains in convenience it loses in flavor. Instead, buy whole nutmeg and grate it on a microplane. If you have a container of ground nutmeg in the cupboard and want to use it up (replacing it with whole nutmeg, of course), you might have to bump the amount to ¼ teaspoon.
CRÈME ANGLAISE
This is a classic dessert sauce that never goes out of style. It can be served warm or cold on almost any dessert, especially those with fruit. It even saved Thanksgiving for one recipe tester who forgot to sweeten her pumpkin pie. Instead of tossing it, she served it covered in crème anglaise. No one complained. Some even asked for seconds.
MAKES ABOUT 1½ CUPS | COMMITMENT LEVEL: DONE IN STAGES
½ cup heavy cream
½ cup whole or 2% milk
½ vanilla bean
4 egg yolks
¼ cup sugar
1. In a small saucepan over medium heat, combine the cream, milk, and vanilla bean and heat until bubbles form around the edge of the pan. Remove the pan from the heat, cover, and let steep for 20 to 30 minutes to allow the vanilla bean to infuse the cream mixture.
2. Remove the vanilla bean, split it lengthwise with a sharp knife, and scrape the seeds into the cream mixture. (Don’t throw out the pod. It can be used to make vanilla sugar. See page 39.)
3. In a medium bowl, whisk the egg yolks with the sugar. Whisk a ladle of the warm cream mixture into the yolks to warm them. Add the rest of the cream in a thin, steady stream, whisking the entire time. Return the mixture to the saucepan. Stirring constantly, cook over medium heat for 2 to 3 minutes, or until the sauce is thick enough to coat the back of a spoon.
4. Place a fine mesh strainer over a clean bowl and strain the sauce. If serving warm, allow to cool slightly. If serving cold, place plastic wrap directly on the sauce’s surface and refrigerate for at least 1 hour, or until chilled. Drizzle on Rhubarb-Raspberry Galette (page 169), Extra-Crispy Peach and Blueberry Crisp (page 130), Citrus and Spice Crêpes (page 139), or any dessert that takes your fancy.
NOTE: Unused sauce can be stored in the refrigerator in an airtight container for up to 3 days.
TIP: Don’t have a vanilla bean? For this recipe, use 1½ teaspoons vanilla paste (which has the seeds) or 1½ teaspoons pure vanilla extract.
BERRY SAUCE
As a kid, I was jealous of friends who got to pour blueberry-flavored sauce from the grocery store over their pancakes. All Mom would give us was pure maple syrup. Oh, the injustice. Today? The tables have turned. But I still like berry sauce—only homemade. Unlike commercial syrups that are overly sweet, this sauce is more berry than sugar. Growing up has its advantages.
MAKES 1 TO 1½ CUPS | COMMITMENT LEVEL: READY IN AN HOUR OR LESS
2 cups fresh or frozen and unthawed berries (blueberries, raspberries, and blackberries work best, either on their own or mixed)
1 tablespoon water
¼ cup golden syrup or amber corn syrup
½ teaspoon pure vanilla extract
1. In a medium saucepan over medium heat, gently combine the berries, water, syrup, and vanilla and bring to a boil. Reduce the heat and simmer, stirring occasionally, for 3 to 5 minutes, or until the berries are tender. The timing varies with the berries you have used.
2. Using an immersion blender, food processor, or regular blender, puree the mixture. Place a fine mesh strainer over a clean bowl and press the puree through using the back of a ladle to remove the seeds and skin. Taste, adding more syrup as necessary. Use while still slightly warm over ice cream, waffles (page 163), or crêpes (page 139). Raspberry sauce goes great over Raspberry-Stuffed French Toast (page 141), and the blueberry version can enliven the Blueberry-Lime Cornmeal Muffins (page 85) as they reach the end of their shelf life.
NOTE: Leftover sauce will keep for up to a week if refrigerated in an airtight container. It can also be frozen for up to 2 months.
HOMEMADE CRÈME FRAÎCHE
Chefs love this thick, slightly tangy cream. Playing nicely with both sweet and savory dishes, it complements fresh fruit, crowns cobblers, and garnishes soups. Because it won’t curdle when boiled, it’s ideal for finishing hot dishes like beef stroganoff. While it might be readily available in France, it’s almost impossible to find in grocery stores. Should you be lucky enough to come across some in a specialty shop, its price will be as high as its fat content. Fortunately, you can make it at home for about the cost of heavy cream. No special equipment required.
MAKES 1 TO 1 CUPS | COMMITMENT LEVEL: DONE IN STAGES
1 cup heavy cream
2 tablespoons buttermilk, ½ cup sour cream, or ½ cup Balkan yogurt
1. In a small bowl, combine the cream and buttermilk, sour cream, or yogurt. Cover with plastic wrap and set on the counter. Leave at room temperature for 8 to 24 hours. (Don’t panic. It will not go bad. You need to leave the cream at room temperature so the bacteria in the dairy will thicken the cream. Think yogurt, only with 75 times the butterfat.)
2. Stir. Cover with fresh plastic wrap and refrigerate. Use on Rhubarb-Raspberry Galette (page 169), in soups, and on waffles (page 163) or crêpes (page 139), or drizzle over Extra-Crispy Peach and Blueberry Crisp (page 130).
NOTE: Once refrigerated, crème fraîche will keep for up to 10 days. Yeah. Right.