We grow an array of robust vegetables on our farm that take up plenty of space, like the pumpkins that send out thick runner stems, or the alien-looking kohlrabi, with their heavy globes snugged into the ground.
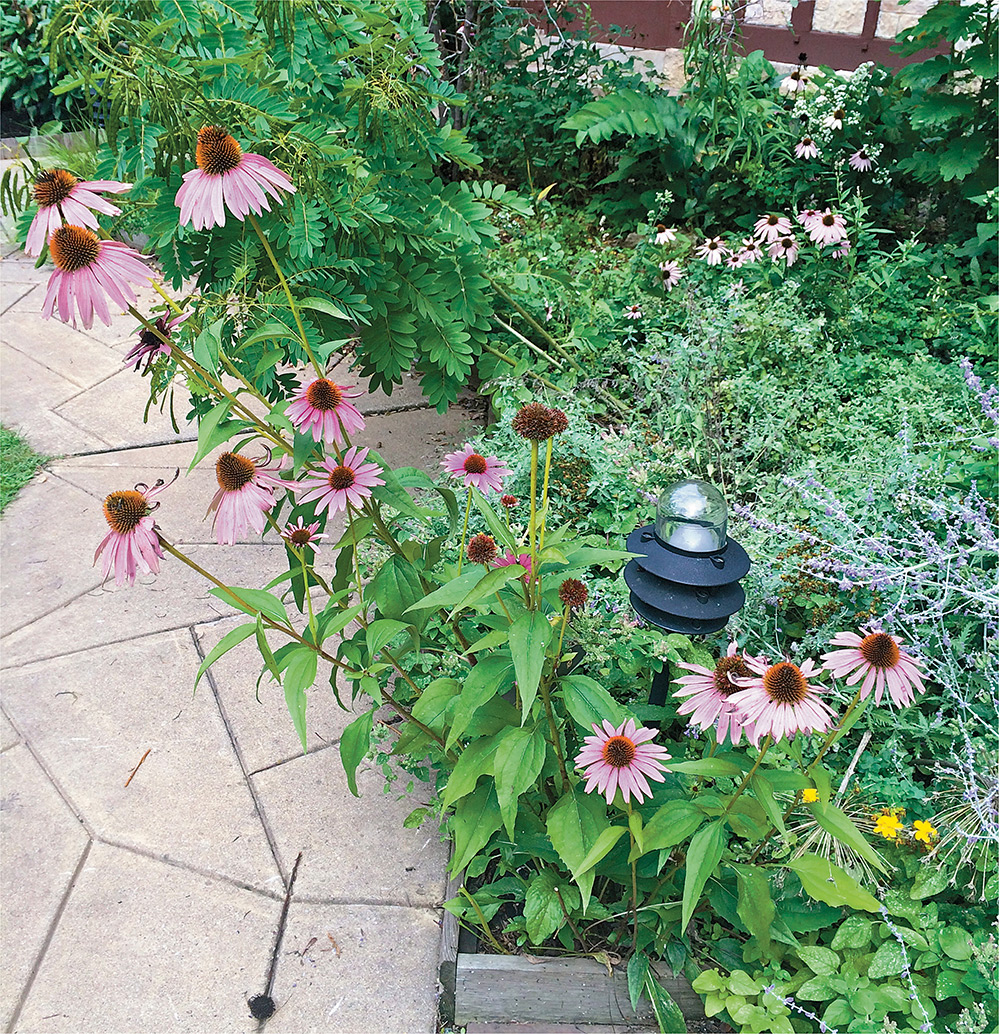
By comparison, the section we have allocated for medicinal plants seems like a little fairy garden. The delicate fronds and cute-as-a-button flowers of chamomile wave just above the dark green, lush leaves of lemon balm, giving me plenty of ideas about how to combine the two.
The fact is that our farm could become a large-scale production enterprise (it won’t) and I’d still consider this small growing space as one of the most important on the land. Perhaps it’s because I harvest from this section every day, chopping a bit of oregano and basil for a dish, or grabbing a few raspberry leaves to make into a bedtime tea. Our medicinal garden has become like a friend who’s always happy to see me.
People tend to grow especially fond of nurturing medicinal plants, fussing over their watering needs and soil acidity. That’s not surprising, because consider the return: A backyard spot filled with wellness and culinary wonders, many of them coming back year after year, growing more sturdy and robust. Creating a garden space—even if “garden” means a windowbox of herbs in your kitchen—is distinctly soul quenching, and much less intimidating than you might think. Let’s get started with some herb basics.
Plants are either perennial or annual, with the latter meaning that they have only one life cycle per growing season, and which you need to replant the following year. This includes herbs like basil, dill, and cilantro.
Many medicinal plants are perennial, which means they can stay green all winter, especially if you bring them inside, or they go dormant after a few frosts and then come back to life in the spring. That’s good news for your garden, since it means one planting of an herb can last for years. Just be sure to trim the herbs back in the fall, before the first frost, so all of the plant’s energy can go into the roots and prepare for dormancy.
There’s also a biennial, which is a plant that requires two years to complete a life cycle. This is rare in herbs, though, and I know of only two: parsley and caraway.
A traditional medicinal garden is often arranged according to some type of logical theme. For example, you might put culinary herbs in one section and medicinal flowers in another, or group the plants based on whether they’re annual or perennial so you can till up the annual bed at the end of the season.
However you group them, just be sure to keep harvesting in mind. When I first started growing medicinals, I created a partial labyrinth that was very pretty, but had some narrow pathways in certain spots. The idea was sound—a curving wall of herbs is amazing—but by making the walkways too small, I struggled whenever trying to harvest specific plants.
Another consideration might be proximity to your house or apartment building. Most likely, you’ll be harvesting from the garden plot at least a few times per week, if not every day, so putting it close to an entrance is usually best.
SUN/SHADE Many herbs and other medicinals prefer full sun, although they can tolerate shade, and there are some, like mint, that do better in shady conditions. In general, though, map out a space that gets at least six hours of sun per day.
Keep in mind that the full sun of the Midwest is certainly not like the full sun of the Pacific Northwest or the full sun of the Southwest. Most likely, you already know if your garden space could double as an oven in the summer, but if you’re not sure about how much it could affect your plants, you can consider tweaking your setup to create some artificial shade options.
For example, many farmers create a “caterpillar tunnel,” which means a series of simple hoops that are placed over plants, with a removable covering over that. You can drape shade cloth over the hoops on the days that are particularly hot to give the plants a break. If you only have a small section of your garden that seems to be suffering with the sun, you can even set up some large sun umbrellas in the space during the hottest parts of the day.
Most helpful, though, would be to place as many plants as possible in containers that can be moved to different parts your growing space. Even larger plants can be moved if you place the pots on wheeled carts before filling them with soil. Creating this kind of mobile garden can be very helpful for dealing with sun issues.
In smaller gardens, placing pots on wheeled bases can be handy for moving them in and out of the sun.
SOIL NEEDS Many medicinal plants usually prefer a moderately rich soil for growing, and appreciate well-draining soil, so if you have soil that’s more like clay, or particularly dense, you may consider growing in raised beds or containers instead. If that’s not an option, you can work some compost into the soil to prepare it, and add some sand or vermiculite to help with drainage. You could also try growing medicinals, such as rosemary or chamomile, in areas of your garden that have less-than-ideal soil.
If you can loosen your soil, though, it’s likely you’ve found a good spot for your medicinal garden. Before planting, create a nutrient-rich environment by adding some fertilizer, such as fish emulsion (available at garden stores), and thoroughly mixing it into the tilled soil. Home compost is another great option, but be careful with composted manures, since these can sometimes be too high in nitrogen—herbs can grow in nitrogen-packed soil, for example, but they tend to have reduced flavor or are more susceptible to disease and pests.
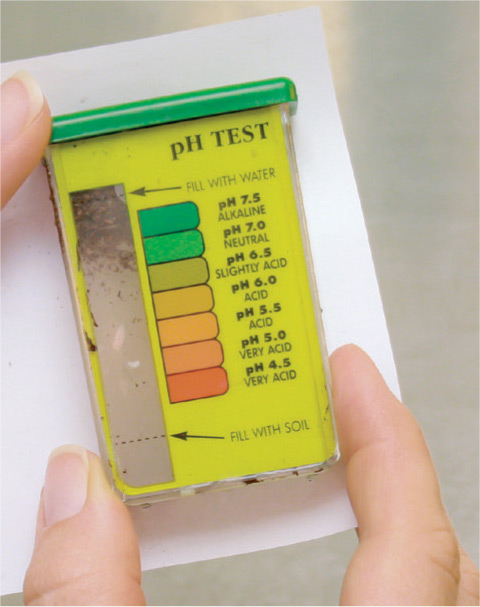
To get really geeked out, test your soil’s pH. This is a measure of the soil’s acidity or alkalinity, and some plants have very specific requirements in terms of pH ranges. For example, thyme prefers a more alkaline environment while blueberry does better in more acidic soil.
Quick primer: on the pH range, 7.0 is considered neutral, with any measurement below that considered more acidic and above that considered more alkaline. The overall pH range is 1 to 14, and can be tested with a device that’s found at any garden store (or sent to a testing lab for a more elaborate analysis).
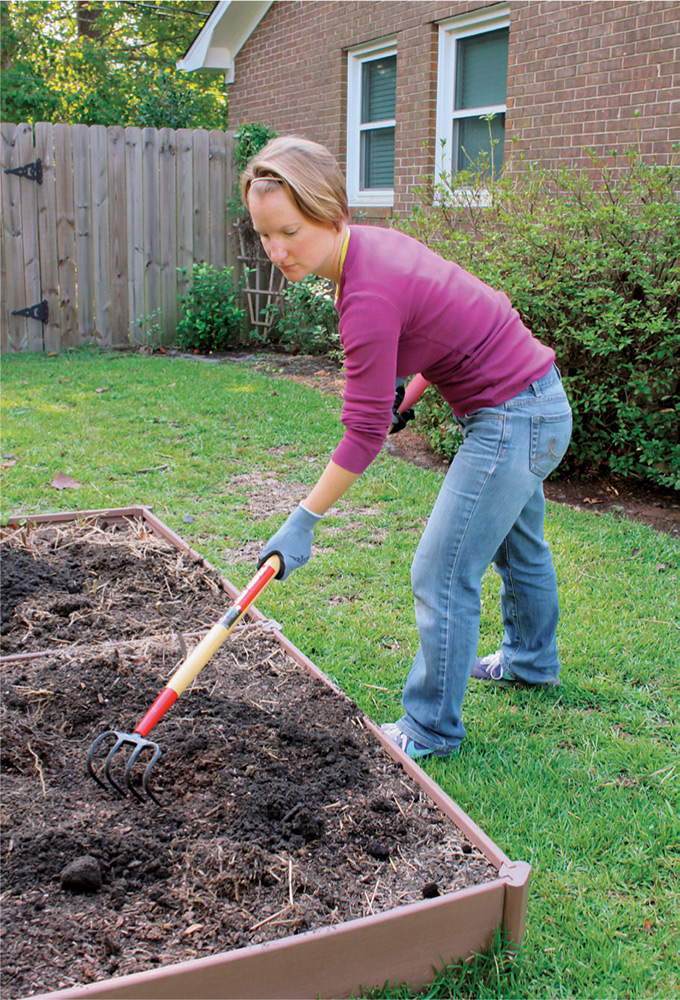
Before planting anything in the garden, get some worm castings (worm poop), mushroom compost, or composted cow manure to rake into the soil. Spread a 1-inch layer on top of the soil and use a four-tine claw to work it in.
Soil test kits like this one will allow you to test your soil for pH level. Other kits will allow you to test for the presence of Nitrogen-N, Phosphorus-P, and Potassium-K in the soil.
To make the soil more alkaline, and thus increase the pH, sprinkle a little agricultural limestone (referred to as “lime”) into the space and work thoroughly into the soil, or put just a touch of lime around the roots of a plant that’s already established.
To increase acidity, there are many fertilizers that can be useful, such as sphagnum peat, which should be added to the topsoil around plants, or just before the planting process. You can also use what’s called “elemental sulfur,” but keep in mind that it’s slow acting, so it may take several months to take effect. However, granular sulfur can do the trick more quickly.
If you happen to be friends with your local coffee shop owner, skip the sulfur and employ used coffee grounds instead. You’ll need plenty, probably about 4 to 6 inches’ worth above the soil, but it’s a nice way to acidify the soil.
Maybe, at this point, your eyes are glazing over a little. I have to admit, my partner Karla is the growing nerd and loves anything involving gauges, devices, monitors, or other indicators of soil health. I’m truly more of a “plant it and see what happens” kind of girl. So, if you’re more like me, then don’t worry: most likely, you can plant medicinals without worrying about sweet-and-sour soil. But if your plants are struggling, soil acidity is one component worth examining.
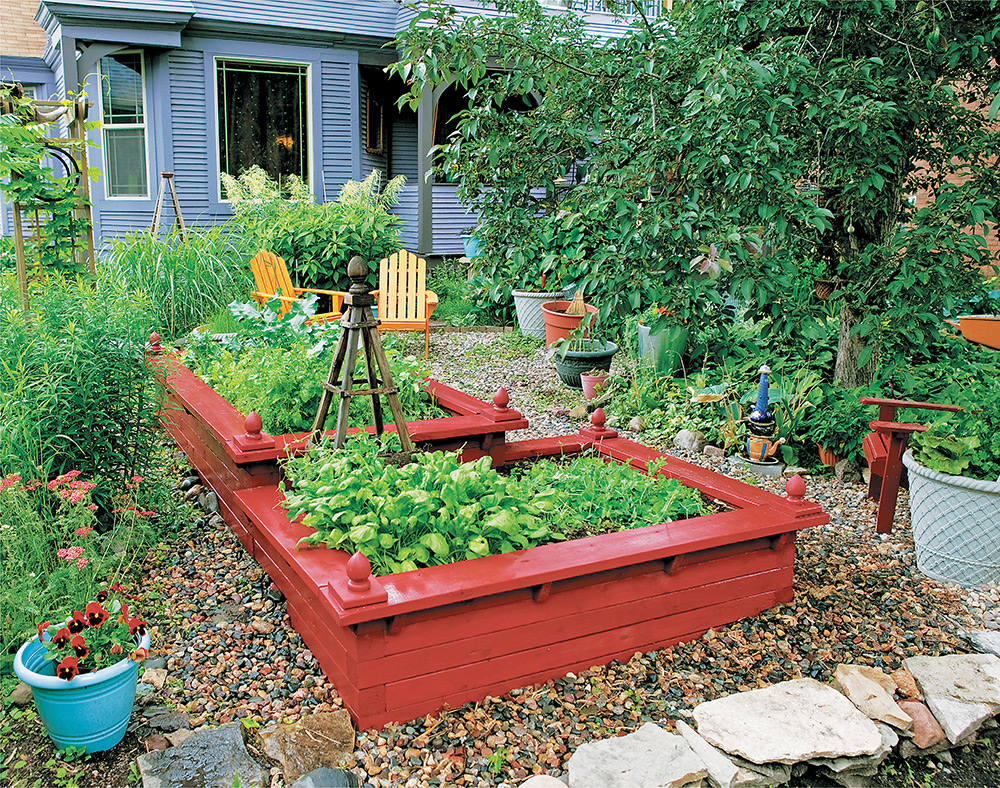
In addition to being very handy, well-designed raised beds can also become an attractive part of the garden.
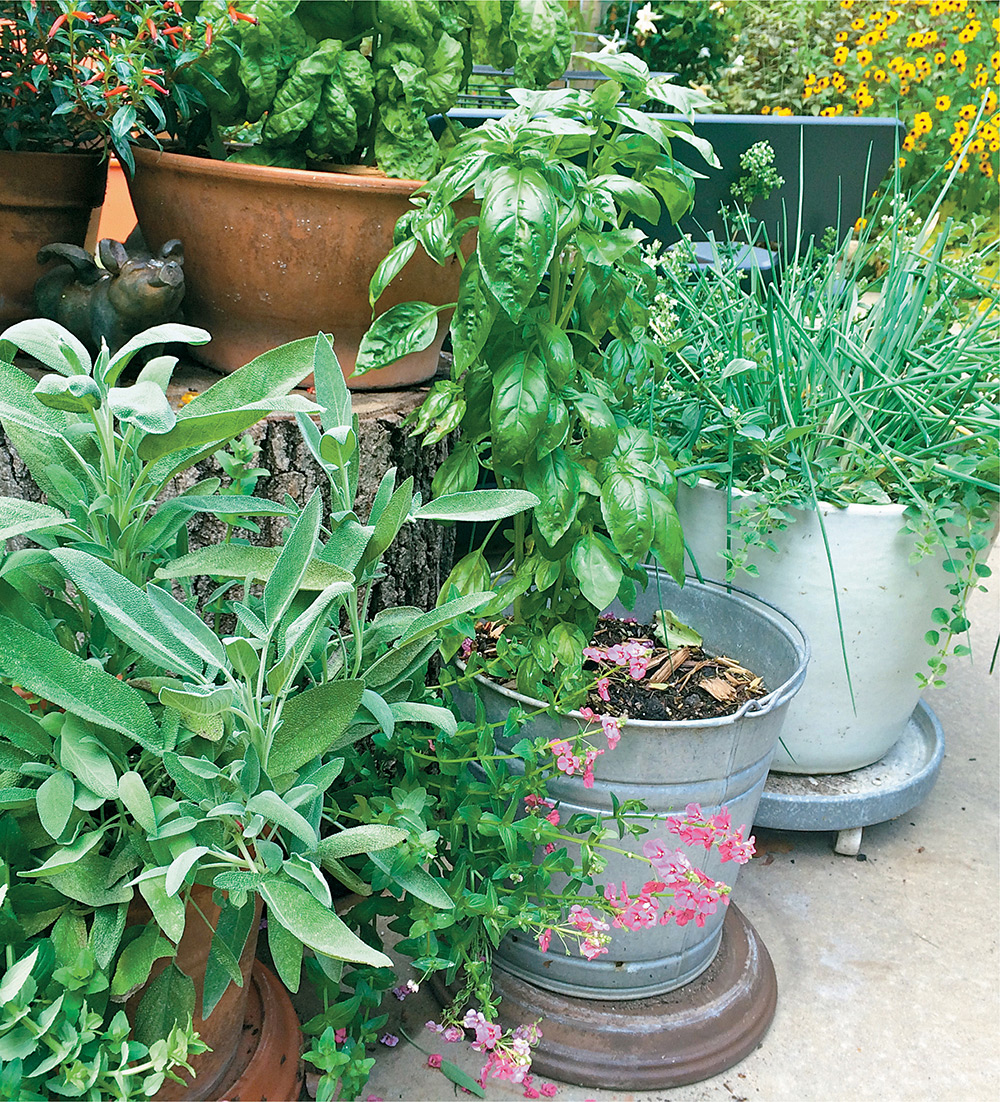
One way to remove any doubt about your soil mix is to utilize raised beds or individual pots for your plants, flowers, and bushes. This is a perfect way to get plenty of control overwatering, drainage, fertilization, and maintenance. Also, if you’re using containers, you can often bring the plants inside over the winter and extend their growing season, or you can easily reconfigure your garden space if you want to add or subtract plants.
One excellent resource if you want to go this route is Container Gardening for All Seasons: Enjoy Year-Round Color with 101 Designs, by Barbara Wise. Another option is my first book, Indoor Kitchen Gardening: Turn Your Home Into a Year-Round Vegetable Garden, which covers a number of issues when it comes to growing in pots and other containers.
Putting plants in containers can be handy when you want to move them to different parts of the garden.
One of the thrills of winter is getting the spring seed catalogs. Truly, as the polar vortex rages outside, I always seem to be tucked into the couch, cozy under a heavy blanket, reading about the hundreds of medicinal plant options that could be making their way into my summer rotation.
Although they help to make subzero temps more tolerable, these catalogs are also hugely helpful for general growing knowledge as well, because beyond the luscious descriptions, these catalogs—both in print and online—provide a wealth of information that can be used to plan a better garden strategy. When studying them, pay particular attention to these aspects:
• Hardiness zone: Shown in the accompanying chart (on pages 22 to 23), the United States is divided into plant hardiness zones that help growers and gardeners determine what’s suitable for where they live, based on average annual minimum temperatures. Lower numbers mean the average annual temperatures are colder, and higher numbers mean the temperatures are more toasty. For example, Hawaii includes Zones 9 to 13, while Alaska includes Zones 1 to 4. Our farm is in Zone 4b. That means I choose herbs that grow with 4 as the minimum threshold—a plant catalog will specify “Zones 4 to 8” for instance—but I wouldn’t pick an herb that thrives in a warmer zone, like those marked for “Zones 6 to 10.” This all sounds like a middle school math problem, but the basic message is: know your zone (look on the map if you need to), and choose your seeds accordingly.
• Light requirements: Many medicinal plants prefer full sun, but some do better in partial shade. Knowing this information before ordering will help you plan your garden space more effectively.
• Plant spacing: This will help you determine whether you’ll be putting in ten cilantro plants or just a few into a container by the walkway.
• Days to maturity: This is one of the most crucial pieces of info, because it can help you gauge when to expect harvest. Even with plants that regenerate, like many herbs do, I like to have a sense of the timeframe from seeding to harvest.
• Soil and fertilization needs: Many seed companies will provide acidity level information, so you’ll know if you have to adjust pH levels.
• Plant management: Some seed companies do a fantastic job of providing tips on pests, diseases, harvesting, and even storage. Reading through these descriptions can feel like a college agriculture course sometimes, and I’ve walked away from a seed catalog reading session knowing about things like pirate bugs (not as adorable as they sound).
• Container gardening suitable: Because of the rising interest in indoor growing and container gardening outside, seed companies have started putting some great information on their websites. High Mowing Organic Seeds, for instance, has a nice online section about the topic, including suggested varieties, tips on growing, and a “seed collection” of ten packets that tend to do well in containers.
• Pest issues: Some seed companies are very helpful in describing pest problems that could strike your medicinal plants. Much like vegetable growing, each plant tends to have its own specific pest issue, which can be exacerbated by other challenges like drought. It’s worth the time to do some research on pest problems and to investigate non-toxic solutions that can be implemented.
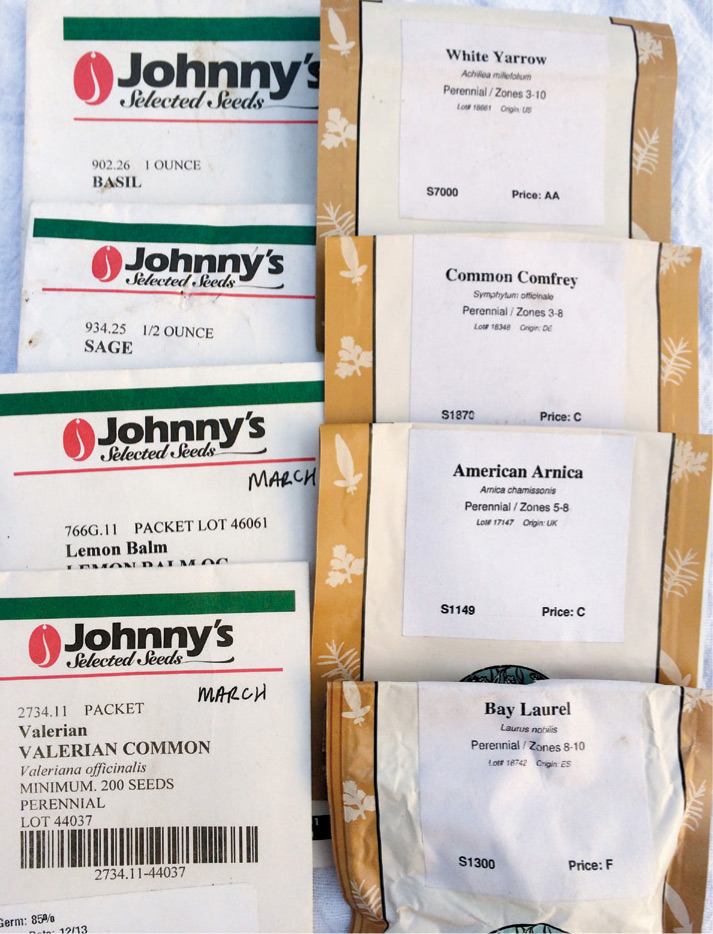
A quick note on organics here: because we own a farm that’s been certified organic, we must buy organic seed, since that’s part of the certification process. Beyond that, I’m a fan of organic growing, so even if we didn’t have to use those types of seeds for Bossy Acres, I’d still buy them. I believe that organic practices lead to more sustainability, healthier soils, and a better agricultural system in general. Because of that, I think organic seeds are worth the extra cost that’s usually involved in purchasing these seeds. You might opt for inexpensive, non-organic seeds instead, and that’s fine, no judgment. But just know that all the cool kids these days are going organic.
Either way, make sure your seeds are coming from an established source, where you can get the type of growing information that you need. There have been many times that helpful family members have given me seeds from who-knows-where and they hand them over in little plastic bags. “This is celery,” one of them will say. “Or it might be celeriac. I only marked it with ‘cel’ and it was a few years ago.” That’s the extent of the information I receive—they don’t know the variety, growing timeframe, potential root depth, or anything else that help me make a decision in how I grow the plant. So, I usually just end up putting them in my backyard’s raised beds, in a grab-bag experimental area that doesn’t get much devotion or tending. Sometimes it works out, most times it doesn’t.
No matter where you obtain your seeds, be sure to store them properly, in a plastic bin with a secure top. This will prevent numerous pest issues, and help to prolong the life of your seeds. For best results, use the seeds within a year or so, and sooner if possible. The older that seeds get, the less likely they are to germinate.
USDA Plant Hardiness Zone Map, 2012. Agricultural Research Service, U.S. Department of Agriculture. Access from http://planthardiness.ars.usda.gov.
Another handy tip: jot down notes right on the seed packet, including when the seeds were purchased. I use the packets for observations as well, noting what might be fast growing or whether a variety proved to be particularly good for tea, a decoction, a poultice, or other uses. It’s very easy for me to lose track of notebooks, even when I try to store them with my growing supplies. But because I keep my empty seed packets in the same bin as my other seeds, I know where they are, and that one small packet will be rife with information, from both the seed company and my own experience.
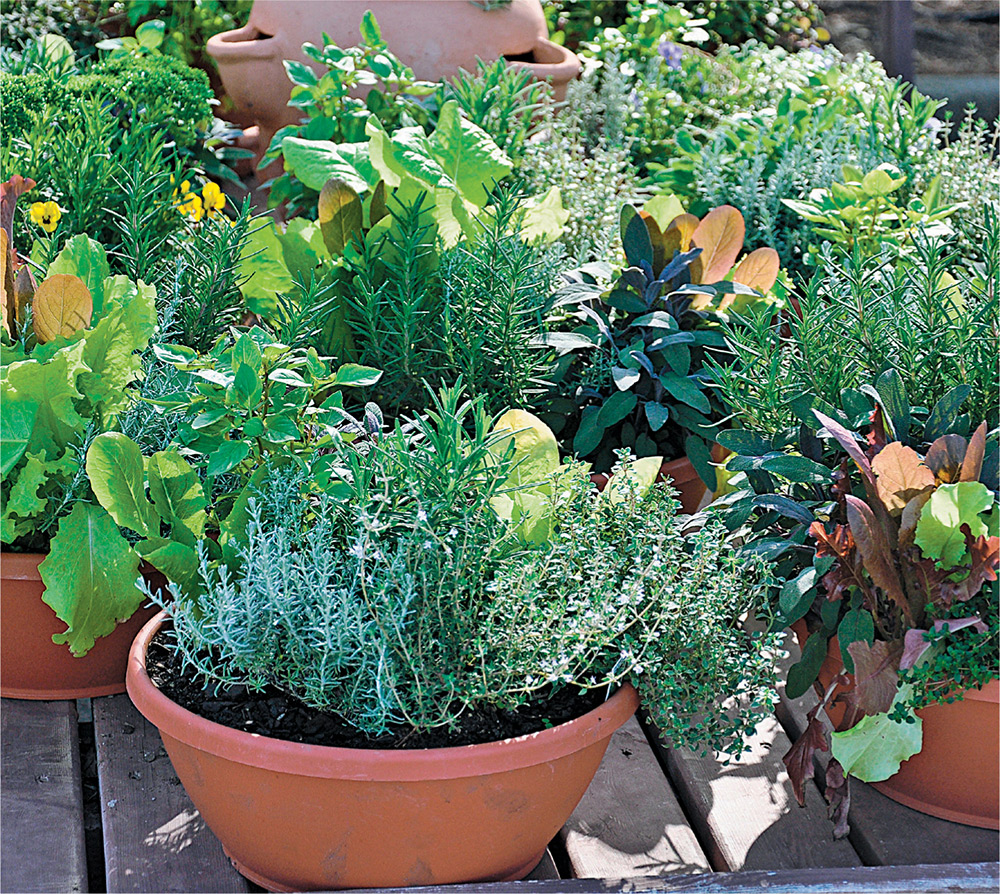
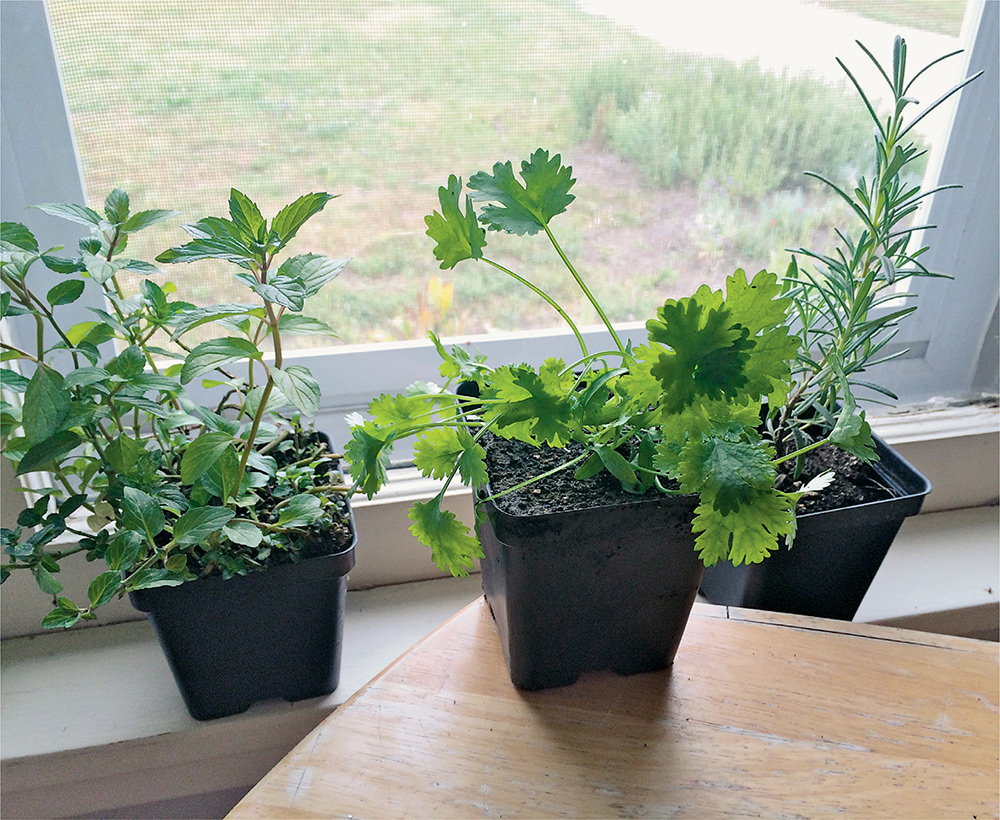
Greenhouses and nurseries can be great places to find healthy plant starts, and many have organic options.
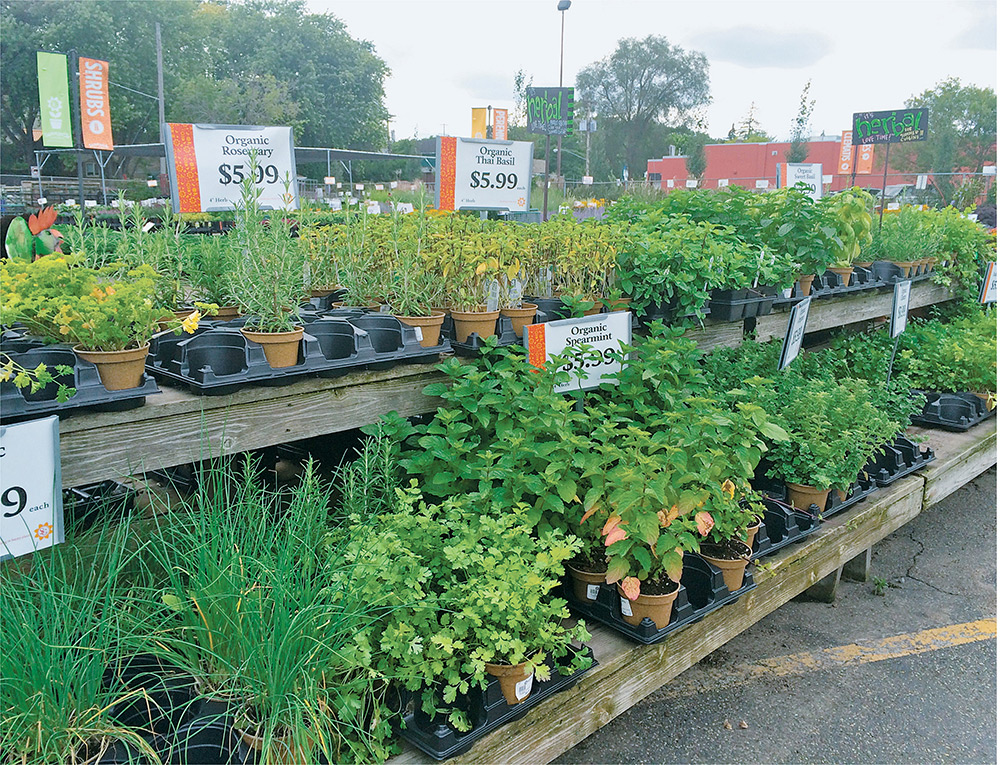
Although there’s a certain thrill with growing from seed, transplants might be more useful if you’ve had difficulty starting from seed before, or you just want to jumpstart your growing plan. If you’re buying from a reliable source, transplants are a nice way to build your garden quickly.
When buying transplants, be sure to inspect the plant thoroughly for any signs of pests or disease. A few dried leaves on the bottom usually aren’t a problem, but if you see spotting, yellowing, or dryness on leaf edges, choose another plant. Also keep in mind that bigger isn’t necessarily better. Many people opt for the largest transplants they can find, thinking that they’re leapfrogging a month in the growing season—and sometimes it does work out that way. But in general, larger plants run the risk of transplant shock because they’re more established and mature. Skip the behemoths and go for healthy, young transplants instead, which will be much easier to establish in a garden space.
Not to shill too heavily for my other book (hey, I have another book you can get!), but if you want to fill every available surface with green-and-leafy options, check out Indoor Kitchen Gardening. That covers all the picky little nuances of growing indoors, such as airflow, lighting, and container choices.
In general, though, many herbs are well suited for indoor growing, and several of the gardeners I know re-pot their outdoor garden herbs as the weather here gets crisp, so that they can extend the growing season indoors.
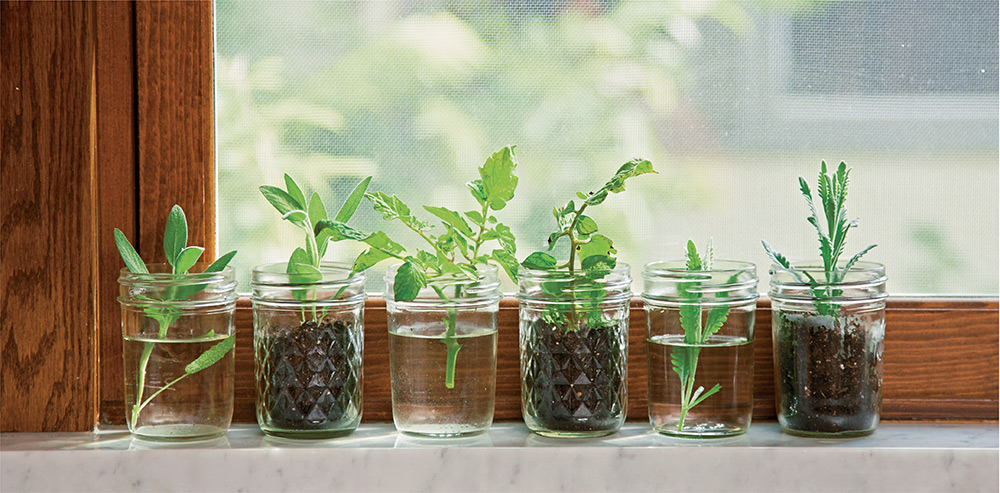
Some herbs, such as rosemary, oregano, thyme, and sage, propagate well if you take a cutting from an existing outdoor or indoor plant and prepare it for growth inside. If that’s your strategy, simply cut a 4-inch section (measured from the tip of the stem/leaf toward the soil) and strip off about an inch or so of the lower leaves. Put the stem into a potting mix, such as vermiculite, and keep the mix somewhat moist as the plant establishes.
These plants like humidity, so cover with clear plastic or glass—letting light in, but trapping moisture—but don’t let them get too hot from direct sunlight. Also, remove their covers occasionally or put them on a porch or “transitional” space to give them some air.
If you’re bringing an entire plant inside, one that’s already in a container, then be sure to make it a gradual process. For example, you might put the herb pot in a garage or porch for a week or two before placing it inside the house.
If using transplants from a garden store or farmers′ market, then it’s fine to bring them directly inside. The plants have already had a chance to be in an environment that’s cozier than outside in the ground, and they’re prepared for indoor growing.
Other medicinals, such as chamomile or berry plants, aren’t exactly well-suited for indoor growing, and definitely any of the options from the Wild Yard Friends chapter are happier outside.
Some medicinal plants, like calendula or elderberry, do well with regular watering but can withstand some dry days. Herbs, though, can be susceptible to overwatering, which can cause their roots to eventually rot. Even if you can avoid that fate, too much water may weaken the plant’s immune system, causing disease or pests to take over. Each plant has different watering requirements, but in general, it’s best to water when the soil feels dry, rather than keeping the herbs on a regular schedule in which you water automatically.
Another maintenance task is regular harvesting. This won’t be too difficult, since you’ll likely be using the plants often, but for those that you don’t need immediately, it’s a good idea to trim them back anyway and dry the harvested parts for later use. Not only does trimming help to keep a plant full and robust, but also the practice prevents bolting, which is the process by which a plant decides it’s done for the season and “goes to seed” to prepare for the next. Bolting is often signaled by the growth of flowers, so if you’re seeing those pop up, pinch the flowers off so you can extend the growing season.
In terms of fertilizer throughout the growing process, go easy. Many herbs, especially, like to be grown “lean,” which means not too much food or water (although obviously that doesn’t mean starve them of either). Too much fertilizer during the season tends to affect flavor, and can even reduce potency, since the herbs could have reduced essential oil as a result of the over-fertilization. That’s good news for gardeners like me, who tend to like a little benign neglect in their growing practices.
In general, some medicinal plants can be very picky to grow, but for this book, I’m focusing on those that have thrived under my occasionally lazy care. Like any plant, medicinals will have to be tended, nurtured, and harvested, but the ones in this collection are all manageable for those who don’t happen to be full-time gardeners. Let the fairy gardens begin.
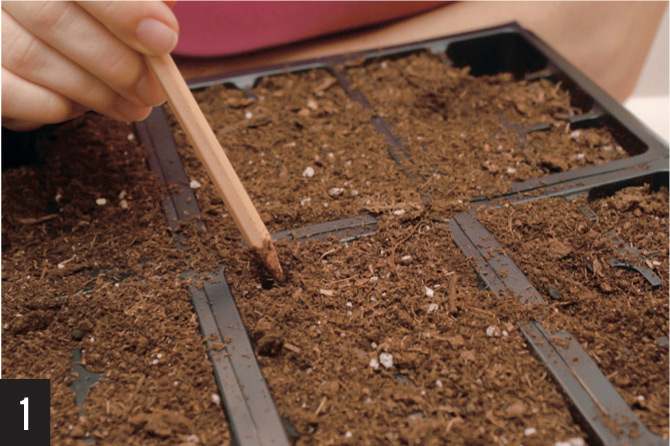
1. You can buy seed-starting tray kits at garden centers or home improvement stores. Usually you have to buy special seed-starting mix separately. This is a lightweight soilless mix made especially for starting seeds. Never use regular garden soil, as this soil can have fungi in it that kills emerging seedlings. Use a pencil to poke holes for the seeds in each section of the tray in which you’ll plant the seeds.

2. Plant one or two seeds per section of the seed-starting tray. Then water the soil until it is as moist as a wrung-out sponge. Depending upon the size of the sections in the seed-starting tray, you might or might not have to transplant plants into larger containers to grow before planting outside.
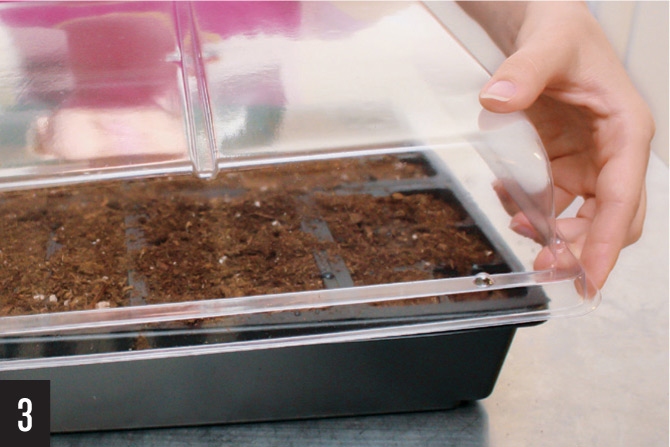
3. Cover the seed-starting tray with the plastic lid or with clear plastic cling wrap. This will keep the seeds moist. The top of the lid may become moist with condensation as the seeds begin to sprout. The condensation is a good thing, because it means you’ll have to water the seeds less.
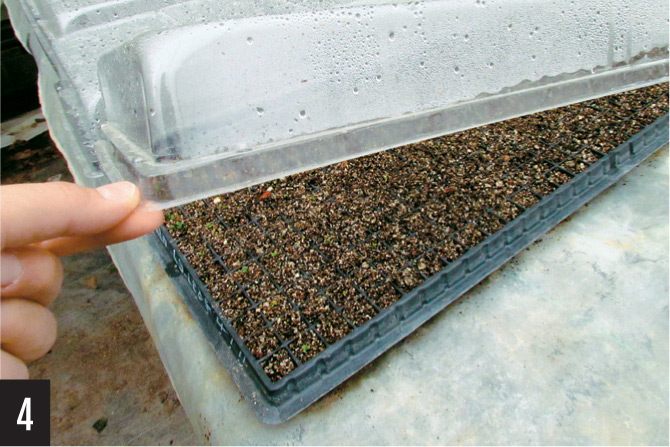
4. Check on the seeds as they’re sprouting. If the top of the soil is dry, mist them with a spray bottle or very lightly water them. (Misting is better than watering because it is less likely to wash the delicate seedlings out of their spots in the trays.) Don’t ever let seeds dry out while they’re sprouting, or they’ll die.
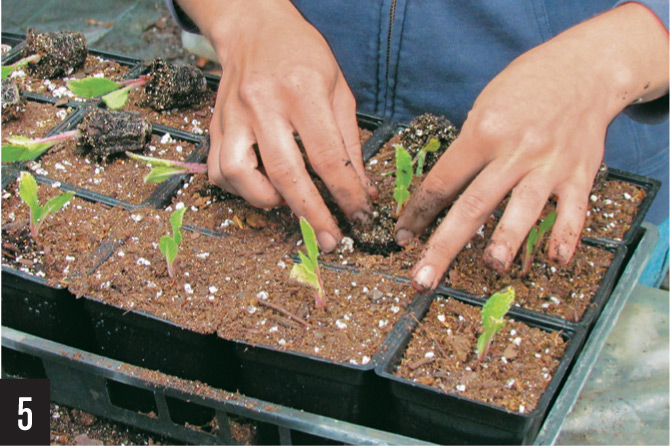
5. When seeds have two or more sets of “true leaves,” you can transplant them into larger containers. Moving them up to 4-inch pots gives them room to grow and get larger and stronger before planting outside.
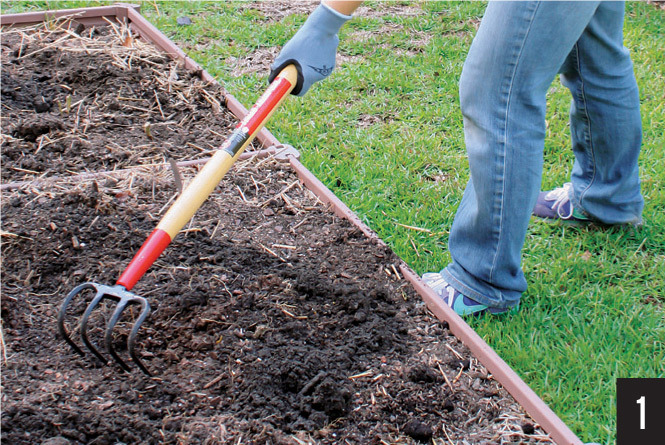
1. Before planting anything in the garden, get some worm castings (worm poop), mushroom compost, or composted cow manure to rake into the soil. Spread a 1-inch layer on top of the soil and use a four-tine claw to work it in.
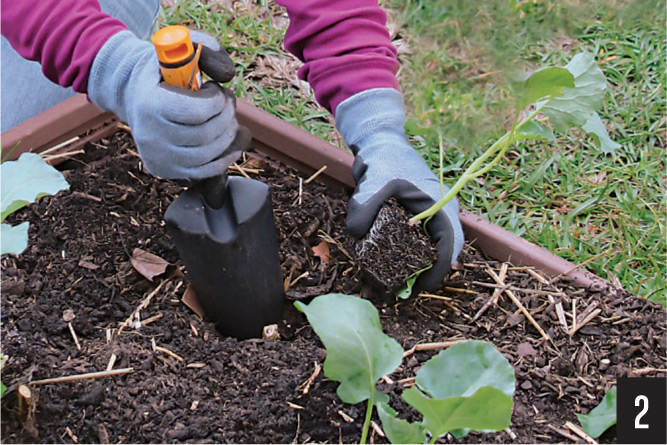
2. Once the soil is prepared, set out the plants according to spacing instructions on the plant tag. Broccoli, cabbage, and kale plants need 12 to 18 inches of space between them. Lettuce only needs 8 inches of space between plants.
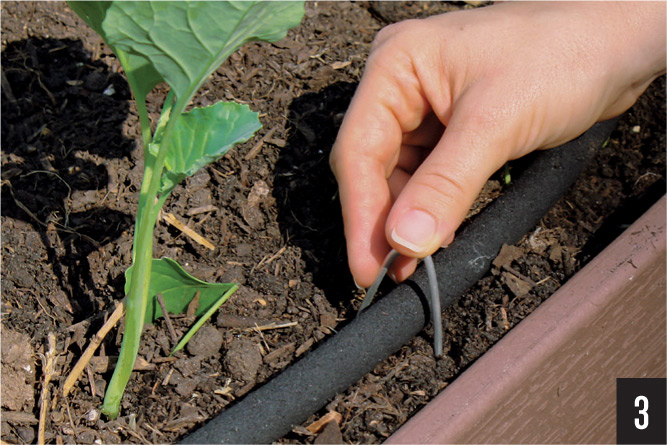
3. After you’ve planted everything, water each plant by placing the water breaker on the hose at the base of each plant and counting to ten. To make quick work of watering, put a soaker hose around your plants to water them. You can snake the hose in and out of rows and use wire pins called sod staples to hold down the hose. If the hose is in the middle of two rows, the water from it will reach plants on each side of the hose.
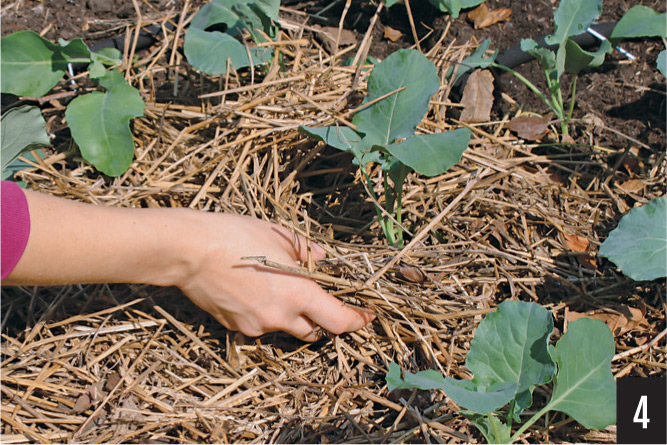
4. Spread mulch around the vegetable transplants. If you live in a warmer area, this will help keep water in the soil during those hot, Indian summer fall days. In cooler areas, the mulch acts to insulate the vegetables, helping them stay warmer longer into the fall. Straw is good for vegetable gardens because it is lightweight. Most garden centers and home improvement stores sell bales of wheat straw. Just ask for it if you don’t see it.
Here’s some bad news: you can’t grow twenty different kinds of herbs on a 3-foot space in a kitchen. Believe me, I wish someone had told me that a few years ago.
Like plants out in a field or in an outdoor raised bed, indoor plants need space apart from each other to stretch out. With the exception of microgreens and shoots, which are harvested during the first stage of growth and don’t need ample room to expand, most indoor plants benefit from at least some breathing room. Herbs and many types of vegetables can be cozy, but they shouldn’t be crowded.
When picking your growing spot and making a plan, create a rough sketch of where each pot or container will go, to give yourself a visual representation of your indoor garden. When it begins to feel like a game of Tetris, consider scaling back on the number of plants in favor of giving the top contenders a better shot at growth.
If you plant your in-home garden near a water source, such as the kitchen sink, you’ll have the option of bringing the plants to water. The main reason this is preferable is that it eliminates the risk of spilling water all around the plants set up throughout the home.