9
Identification
IT’S IMPORTANT TO PROPERLY IDENTIFY your animals and keep accurate records, especially if you raise miniature livestock as a business. In this chapter we’ll look at some common means of identification.
Permanent Identification
Purebred livestock must be permanently identified before most registries will admit them to their stud, herd, or flock books. This is especially true of breeds in which individuals tend to look alike. Tattooing and ear tags are the norm in smaller stock, freeze branding is a logical option for larger species, and all species can be microchipped.
Tattoos
Tattoos can be used to identify all types of livestock. They are sometimes put in out-of-the-way places like the inside of the upper lips of equines or the tail webs of Mini-LaMancha goats, but they generally go inside an animal’s ear.
Tattoo pliers come in  inch,
inch,  inch, and
  inch digit sizes; if you have a five-digit herd prefix (get this from your registry if you’re tattooing to their standards), make sure you choose a set that accepts five digits (some don’t). Better pliers automatically release. Most tattoo kits come with a roll-on applicator of black ink. Throw it away and buy green paste ink. Green is better than black because it shows up well in dark ears and paste won’t drip like roll-on tends to do. You’ll also need disposable gloves, a soft toothbrush to scrub ink into newly applied tattoo piercings, and alcohol and cotton balls or paper towels to clean the site before tattooing.
Step-by-Step Guide to Tatooing an Animal
1. Assemble your tools before you begin. Sterilize the tattoo digits by immersing them in alcohol before placing them in the pliers.
2. Test the tattoo on paper (index cards work well) to make certain you’ve inserted the digits right side up and facing the right direction.
3. Place the animal in a handling chute or a fitting or milking stand, or halter and tie him where you can easily access his ears. A little feed will help distract most animals, at least until you clamp the pliers on his ear.
4. Have a helper steady the animal’s head. If you aren’t using a chute or stand, ask a second helper to crowd the animal against a wall to help secure it in place.
5. Swab the inside of the animal’s ear with alcohol and pat it dry.
6. Flatten the ear as best you can. Position the pliers in the ear, making certain the digits are inside the ear and you aren’t holding the pliers upside down. Avoid tattooing into blood vessels, ridges of cartilage, or scar tissue. Press quickly but firmly and then release. If the needles stick to the ear or pierce through it, peel the ear away and try again, applying less pressure this time.
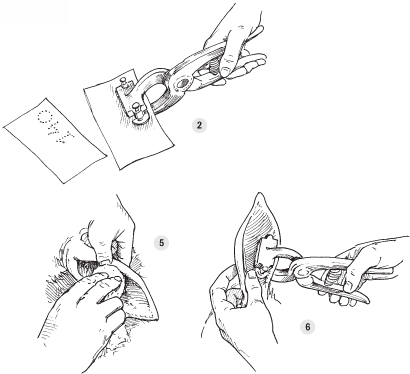
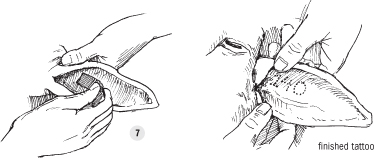
7. If some of the punctures bleed, pinch a paper towel or cotton ball over the bleeder until it stops. Don’t apply ink until the bleeding stops because blood flow washes ink out of the holes.
8. Squirt a blob of ink onto a soft toothbrush or your gloved finger (tattoo ink is hard to get off), making certain you get pigment, not just oil, out of the tube. Rub ink into the piercings with your finger or a soft-bristled toothbrush, taking care to get ink into every hole. When the holes have been filled, leave the excess ink on the ear (scrubbing it off may dilute ink in the piercings as well).
9. Give the animal a shot of tetanus antitoxin as a precaution.
10. Remove and disinfect the digits before moving on to another animal. When you’ve finished all of the tattooing, disinfect the equipment before storing it.
Ear Tags
Some producers like ear tags; others don’t. Their main failing is that ear tag numbers fade with age and the tags themselves are easily lost (it’s for this reason many producers tattoo and tag).
The beauty of ear tags, however, is that they’re easy to read from a distance and inexpensive to buy and apply. They come in metal and plastic in a wide range of types and sizes.
The United States Department of Agriculture’s mandatory scrapie eradication program for sheep and goats is overseen on the state level, so if you keep small ruminants, you may not have much choice in the type of ear tags you use. However, when you can, choose your ear tags wisely. Double-sided, button-type plastic tags and metal tags tend to cause infections, so avoid using them. Choose small, two-piece plastic models that swivel — they’re far less likely to snag on fencing or brush and tear the ear.
Plastic tags may be purchased preprinted by companies like Premier1 (see Resources) or as blanks. When writing on blank tags, use a marking pen designed specifically for writing on ear tags. Mark the tags the night before tagging to allow them to dry overnight.
Some colors are easier to read than others. When visibility is an issue, in descending order choose yellow, white, orange, light green, black, pink, purple, gray, brown, red, medium or dark green, then blue.
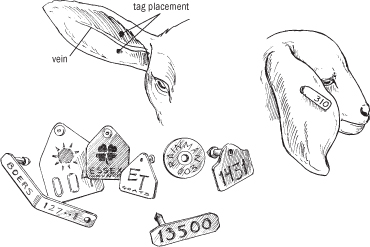
Ear tags came in a variety of shapes and types. Avoid large blood vessels and ridges of cartilage when inserting tags of any type.
How to Install an Ear Tag
Restrain the animal using the same protocol used for tattooing.
1. Clean the ear with alcohol and pat it dry.
2. Place the tag in your tag applicator, and apply antiseptic salve to the male (pointed) tip of the ear tag.
3. Place the female side of the tag inside the ear and the male part outside. When setting the tag, avoid blood vessels, ridges of cartilage, and scar tissue. With sheep and goats, insert it 1 to 2 inches from the skull, where ear tissue is thicker and more difficult to tear.
4. Press quickly and firmly, and it’s in.
Use colors and location to reap information at a glance. For instance, tag males in one ear, females in the other. Colors can indicate such things as sex, sire, year of birth, and commercial versus purebred animals.
Premier1 also prints individual tags to order. Name-bearing ear tags are a very handy thing when farm sitters or others unfamiliar with your animals have to look after your stock.
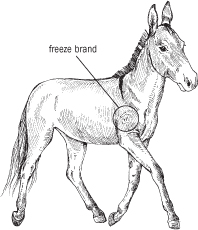
Freeze Branding
Freeze branding is the process of using a special branding iron to freeze a mark on the hide of an animal. The extreme cold of the iron kills pigmentation cells in the animal’s skin. Therefore, a freeze-branded animal will have white hair where the freeze branding iron touched her skin. The white hairs produced by a freeze brand are not very visible on a light-colored animal, however, so in these cases the iron is applied to the skin for a longer interval to intentionally halt future hair growth. This freeze brand looks much like a traditional hot brand, but it’s usually clearer and more easily read and always more pain-free to apply.
Freeze brands are widely used on large species such as equines and cattle.
The process itself is fairly straightforward, but you should ask an experienced person to help the first time. Some vets also freeze brand for a fee. Keep in mind that if you have to experiment, your first few attempts might not be perfect.
Two types of coolants are commonly used: a combination of dry ice and 95 to 99 percent alcohol, and liquid nitrogen. Both the dry ice/alcohol and the liquid nitrogen methods work well, but liquid nitrogen is much colder, and many experts feel it’s easier to use; so for our purposes let’s describe freeze branding using liquid nitrogen.
Freeze Branding Basics
First, assemble your tools. You will need:
 A freeze branding iron
Liquid nitrogen (buy this from artificial insemination companies or welding suppliers) and a container to hold it
A stiff grooming brush or curry comb
Clippers with a surgical blade
95 to 99 percent isopropyl alcohol solution
A squeeze chute for cattle; a means of mild sedation for equines
Gloves and safety goggles. Heavy gloves should be worn to insulate your hands when handling a cooled iron because the handle will become cold enough to cause frostbite. Safety goggles protect your eyes from liquid nitrogen splash.
Cool the iron in liquid nitrogen for 20 minutes before using it on the first animal. The liquid nitrogen should cover the head of the iron by at least one inch. A frost line on the handle of the iron indicates it’s ready. Recool the iron for two minutes between uses.
Restrain the animal in a squeeze chute or sedate her and wait until she is relaxed. Clip the hair from the area to be branded. The hip, between the hook and pin bones, is the preferred location for cattle; the shoulder or hip is good for horses (be sure to brand at the same location every time and in the location recorded with your state brand inspector’s office). Brush the clipped area to remove dirt and loose hair. Saturate the branding area with alcohol, working it all the way to the skin.
Immediately apply the freeze branding iron to the animal. The iron must move directly from the coolant to the animal. Apply firm pressure, and don’t let the iron slip. The area will quickly become numb, and the animal will experience minimal discomfort. Rocking the iron gently from top to bottom and from side to side makes a better brand. Have an assistant keep track of time so that the branding iron is in place for the correct length of time (see table above), then remove the iron from the animal and immediately place it in the liquid nitrogen for recooling.
CONTACT TIME FOR FREEZE BRANDING WITH LIQUID NITROGEN
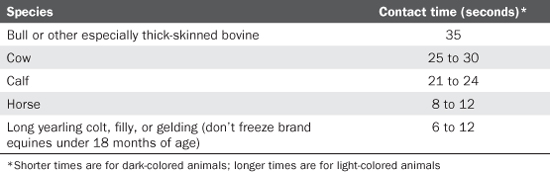
The brand will show up in indented form on the animal immediately after branding. Within minutes, the area will swell, creating a raised version of the brand. The swelling will subside in a few hours. In two to four weeks the area will begin to peel. Unpigmented hair will grow back in its place.
Designing Your Freeze Brand
When designing a brand, keep it simple and use open letters and symbols. For example, the letters C and X are far more open (have fewer enclosed areas) than do the letters A and B. The more open a symbol or letter, the greater the likelihood the brand will show up clearly and be easily readable. The simpler the brand, the lesser the likelihood that it will blotch and be unsightly and hard to read. When designing your freeze brand, become a keen observer of other people’s freeze brands to see what did and did not work for them.
Keep in mind that in most western states and in certain other parts of the United States, you can’t simply design a brand and start using it. In these states a brand must be registered with the state brand inspector’s office. It must also meet certain criteria and can’t duplicate another brand already in use. For example, the Arizona Department of Agriculture won’t register a brand incorporating unusual designs, anything designed within an enclosure, or any single letter or number (all brands must be of two or more characters). Neck brands, jaw brands, and dual location brands are also unacceptable. Brands must be of a design that is easily identifiable and one that won’t blotch.
Freeze branding requires a specially made freeze branding iron and cannot be done with old-fashioned hot branding irons. These irons are crafted of heavy copper or bronze with slightly rounded faces. For animals the size of miniature cattle and adult class B miniature horses, the brand should be about 3 inches (7.5 cm) tall, inch (1 cm) thick, and 1 inch (2.5 cm) deep. Keep in mind that brands applied to young animals will “grow” with their wearers. Talk to the company that builds your iron to custom-size an iron for the species and age of the animals you intend to brand.
Microchips
Microchips are tiny devices designed to be implanted under an animal’s skin. Based on Radio Frequency Identification (RFID) technology, they contain no power source. Microchips are composed of three parts: a silicone chip, a coil inductor, and a capacitor. The silicone chip contains a unique identification number and the circuitry needed to relay that information to a handheld scanner; these components are contained in a bio-compatible glass housing about the size of a large grain of rice. The chip is inserted using a syringe with a 12-gauge needle. The process appears to be nearly painless, though large animals are usually mildly sedated, just in case.
To read an implanted chip, the operator passes a microchip scanner over the implantation site. The scanner emits a low radio frequency that provides the power needed to transmit the microchip’s code and positively identify the animal. Unfortunately, until recently, chips and scanners weren’t standardized and not every scanner can read every chip. The new Euro chips, however, can be read by newer scanners manufactured by all three major chip makers — AVID, Destron, and HomeAgain — making them the best choice for compatibility.
Earlier chips had a disquieting habit of migrating away from the injection site, but newer chips incorporate Bio-Bond materials that are fully compatible with animal tissue, making migration problems a thing of the past.
Chips never go bad (they have a 25-year life expectancy) and cannot be altered or easily removed, making them arguably the best permanent means of positive identification. The downsides are that microchipping is comparatively expensive, and chips can’t be read without a scanner.
If you are adept at giving injections, you can implant your own microchips (if not, a veterinarian can implant them for you). Each microchip comes in sterile packaging complete with a single-use, preloaded syringe and a package of stickers printed with the unique code programmed into the chip. These stickers can be affixed to registration papers and similar records, and the code recorded with appropriate registries and databases such as the ones managed by AVID, HomeAgain, the International Equine Recovery Network, and Stolen Horse International’s NetPosse Identification Program.
Injection sites and methods vary from species to species. Equines are implanted on the left side of the neck into the nuchal ligament just below the mane, about halfway between the poll and withers, about H to I inches (1.25 to 1.9 cm) below the mane (see illustration below). Pigs are implanted on the side of the neck behind the base of the ear. Sheep and goats are implanted subcutaneously in the manner of implanting dogs and cats, near the base of the ear or between the shoulder blades. The International Llama Registry recommends implanting llamas at the base of the left ear (other sites such as the base of the right ear, shoulder, rump, and base of the tail are also used); the Canadian Llama and Alpaca Registry prefers the right side of the base of the tail or the base of either ear. To avoid microchips surfacing in cuts of meat, approved sites in cattle include out-of-the-way locations such as the base of an ear and the neck.
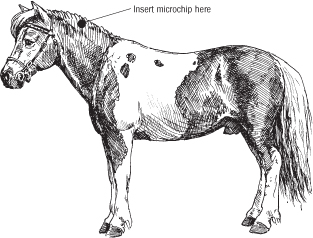
Insert an equine’s microchip midway between its poll and withers, just below the crest of the neck.
How to Implant a Microchip
1. When implanting an animal you didn’t raise yourself, scan the area to make certain that a microchip isn’t already present.
2. Scan the uninserted microchip to make sure it works.
3. Close-shave the area where the chip will be implanted, and swab it with antiseptic solution.
4. Position the needle at a 45-degree angle to the skin surface, and insert it to the hub. Push the thumb button forward all the way, then slowly withdraw the needle, making certain the chip was implanted and isn’t being withdrawn along with the needle.
5. Apply pressure to the site for a few seconds.
6. Scan the site to confirm the implant.
Temporary Identification
Colored plastic neck chains or neck straps can be used to identify classes of livestock according to age, ancestry, birth dates, productivity, and so on — and you can use them to lead tame animals. To reduce the risk of collared animals hanging themselves on fencing, brush, or another animal’s horns, choose lightweight plastic items that easily break in an emergency.
For very temporary markings, use chalk or wax markers, paint brands (inexpensive numerical branding irons dipped in marking fluid), paint sticks, or aerosol spray paints designed for use on livestock. Chalk and paint sticks last about one hour; wax markers last about four; and aerosol spray paints and paint brands last up to six weeks. They’re easy to read from a distance and are great for marking animals in a herd as you vaccinate or deworm them. Some producers use spray paint or paint brands to mark females and their offspring with matching numbers. The first family is marked with a “1,” the second with a “2,” and so on. This has the added advantage of giving the producer the approximate age of each youngster at a glance.
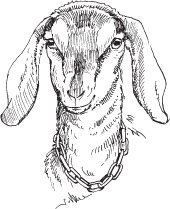
Plastic chain collars are strong enough to lead a sheep or goat but break away if the animal gets snagged on something.
 Tattoo at least a month before a show or production sale to allow tattoos time to heal and be fully legible.