10
RESTful APIs and Full-Stack Implementation
In Chapter 1, Introduction to Angular and Its Concepts, I introduced you to the wider architecture in which web applications exist. The choices that are made in full-stack architecture can profoundly impact the success of your web application. You simply cannot afford to be ignorant of how the APIs you interact with are designed. In this chapter, we are going to cover how to implement a backend for your frontend using Node, Express, and Mongo. Combined with Angular, this stack of software is referred to as the MEAN stack.
My take on the MEAN stack is minimal MEAN, which prioritizes ease of use, happiness, and effectiveness, the main ingredients for a great developer experience (DX). To keep up with the theme, we'll implement the LemonMart server. This server will round out JWT auth from Chapter 8, Designing Authentication and Authorization. In addition, the server will support recipes that I am going to cover in Chapter 11, Recipes – Reusability, Routing, and Caching, and Chapter 12, Recipes – Master/Detail, Data Tables, and NgRx.
This chapter covers a lot of ground. It is designed to serve as a roadmap to the GitHub repository (https://github.com/duluca/lemon-mart-server). I cover the architecture, design, and major components of the implementation. I highlight important pieces of code to explain how the solution comes together. However, unlike prior chapters, you cannot solely rely on the code sample provided in the text to complete your implementation. For the purposes of this book, it is more important that you understand why we are implementing various functionality over having a strong grasp of the implementation details. So, for this chapter, I recommend that you read and understand the server code versus trying to recreate it on your own.
You will need to take action towards the end of the chapter to implement a custom auth provider in your Angular app to authenticate against lemon-mart-server and also leverage Postman to generate test data, which will be useful in later chapters.
We begin by covering full-stack architecture, covering lemon-mart-server's monorepo design and how you can use Docker Compose to run a three-tier application with a web app, server, and a database. Then, we go over RESTful API design and documentation, leveraging the OpenAPI specification using Swagger.io, and implementation using Express.js. Then, we cover the implementation of a MongoDB object document mapper (ODM) using my DocumentTS library to store users with login credentials. We implement a token-based auth function and use it to secure our APIs. Finally, we leverage Postman to generate test data in our database using the APIs we have developed.
In this chapter, you will learn about the following:
- Full-stack architecture
- Docker Compose
- RESTful APIs
- MongoDB ODM with DocumentTS
- Implementing JWT auth
- Generating users with Postman
The most up-to-date versions of the sample code for the book can be found on GitHub at the repository linked below. The repository contains the final and completed state of the code. This chapter requires Docker and Postman applications.
It is critical that you get lemon-mart-server up and running on your development environment and have lemon-mart communicate with it. Refer to the instructions documented here or in the README on GitHub to get your server up and running.
In the case of this chapter:
- Clone the lemon-mart-server repository using the
--recurse-submodulesoption:git clone --recurse-submoduleshttps://github.com/duluca/lemon-mart-server - In the VS Code terminal, execute
cd web-app; git checkout masterto ensure that the submodule from https://github.com/duluca/lemon-mart is on the master branch.Later, in the Git submodules section, you can configure the
web-appfolder to pull from your lemon-mart server. - Execute
npm installon the root folder to install dependencies.Note that running the
npm installcommand on the root folder triggers a script, which also installs dependencies under theserverandweb-appfolders. - Execute
npm run init:envon the root folder to configure environment variables in.envfiles.This command will create two
.envfiles, one on the root folder and the other under theserverfolder, to contain your private configuration information. The initial files are generated based on theexample.envfile. You can modify these files later and set your own secure secrets. - Execute
npm run buildon the root folder, which builds both the server and the web app.Note that the web app is built using a new configuration named
--configuration=lemon-mart-server, which usessrc/environments/environment.lemon-mart-server.ts. - Execute
docker-compose up --buildto run containerized versions of the server, web app, and a MongoDB database.Note that the web app is containerized using a new file named
nginx.Dockerfile. - Navigate to
http://localhost:8080to view the web app.To log in, click on the Fill button to populate the email and password fields with the default demo credentials.
- Navigate to
http://localhost:3000to view the server landing page. - Navigate to
http://localhost:3000/api-docsto view interactive API documentation. - You can use
npm run start:databaseto only start the database, andnpm starton theserverfolder for debugging. - You can use
npm run start:backendto only start the database and the server, andnpm starton theweb-appfolder for debugging.
In the case of examples from this chapter that are based on lemon-mart:
- Clone the repository: https://github.com/duluca/lemon-mart
- Execute
npm installon the root folder to install dependencies. - The code sample for this chapter is available under the sub-folder:
projects/ch10 - To run the Angular app for this chapter, execute the following command:
npx ng serve ch10 - To run Angular unit tests for this chapter, execute the following command:
npx ng test ch10 --watch=false - To run Angular e2e tests for this chapter, execute the following command:
npx ng e2e ch10 - To build a production-ready Angular app for this chapter, execute the following command:
npx ng build ch10 --prodNote that the
dist/ch10folder at the root of the repository will contain the compiled result.
Beware that the source code in the book or on GitHub may not always match the code generated by the Angular CLI. There may also be slight differences in implementation between the code in the book and what's on GitHub because the ecosystem is ever-evolving. It is natural for the sample code to change over time. Also, on GitHub, expect to find corrections, fixes to support newer versions of libraries, or side-by-side implementations of multiple techniques for the reader to observe. The reader is only expected to implement the ideal solution recommended in the book. If you find errors or have questions, please create an issue or submit a pull request on GitHub for the benefit of all readers.
You can read more about updating Angular in the Appendix C, Keeping Angular and Tools Evergreen. You can find this appendix online from https://static.packt-cdn.com/downloads/9781838648800_Appendix_C_Keeping_Angular_and_Tools_Evergreen.pdf or at https://expertlysimple.io/stay-evergreen.
With your LemonMart server up and running, we are ready to explore the architecture of the MEAN stack. By the end of this section, you should have your own version of LemonMart communicating with the server.
Full-stack architecture
Full-stack refers to the entire stack of software that makes an application work, all the way from databases to servers, APIs, and the web and/or mobile apps that leverage them. The mythical full-stack developer is all-knowing and can comfortably operate in all verticals of the profession. It is next to impossible to specialize in all things software-related and to be considered an expert in relation to every given topic. However, to be considered an expert in a single topic, you must also be well-versed in related topics. When learning a new topic, it is very helpful to keep your tooling and language consistent so that you can absorb the new information without additional noise. For these reasons, I opted to introduce you to the MEAN stack over Spring Boot using Java or ASP.NET using C#. By sticking to familiar tools and languages such as TypeScript, VS Code, npm, GitHub, Jasmine, Docker, and CircleCI, you can better understand how a full-stack implementation comes together and become a better web developer as a result.
Minimal MEAN
Choosing the Correct-Stack™ for your project is difficult. First and foremost, your technical architecture should be adequate to meet business needs. For example, if you're trying to deliver an artificial intelligence project with Node.js, you're likely using the wrong stack. Our focus will be on delivering web applications, but beyond that, we have other parameters to consider, including the following:
- Ease of use
- Happiness
- Effectiveness
If your development team will be working on your application for an extended period of time, then it is very important to consider factors beyond compatibility. Your stack, choice of tool, and coding style can have a significant impact if your code base is easy to use, keeps your developers happy, or makes them feel like effective contributors to the project.
A well configured stack is key for a great DX. This can be the difference between a towering stack of dried-out pancakes, or a delicious short stack with the right amount of butter and syrup over it.
By introducing too many libraries and dependencies, you can slow down your progress, make your code difficult to maintain, and find yourself in a feedback loop of introducing more libraries to resolve the issues of other libraries. The only way to win this game is to simply not play it.
If you take your time to learn how to work with a few fundamental libraries, you can become a far more effective developer. In essence, you can do more with less. My advice would be to:
- Think before you write a single line of code, and apply the 80-20 rule.
- Wait for libraries and tools to mature, skipping the betas.
- Fast by reducing your gluttony for new packages and tools, mastering the fundamentals instead.
Watch my 2017 Ng conference talk entitled Do More with Less JavaScript on YouTube at https://www.youtube.com/watch?v=Sd1aM8181kc.
This minimalist mindset is the design philosophy behind minimal MEAN. You can review a reference implementation on GitHub at https://github.com/duluca/minimal-mean. Refer to the following diagram for the overall architecture:
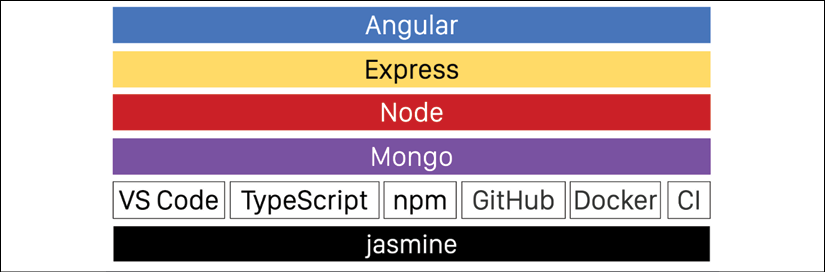
Figure 10.1: Minimal MEAN software stack and tooling
Let's go over the components of the architecture one by one.
Angular
Angular is the presentation layer. Angular is a capable and reliable development platform. It is well understood and has a great community. You should definitely take the time to master the fundamentals of Angular before considering another option.
Libraries such as Angular Material, Angular Evergreen, and angular-unit-test-helper help you deliver optimal and great-looking solutions with minimal effort.
You may containerize your Angular (or any other web app) using the minimal Docker container, duluca/minimal-nginx-web-server or duluca/minimal-node-web-server.
Express
Express.js will be our API layer. Express is a fast, unopinionated, and minimalist web framework for Node.js. Express has a vast plugin ecosystem that is almost guaranteed to meet every need. In minimal MEAN, we only leverage two packages:
In addition, we use express parsers to parse incoming HTTP requests in req.body and the express.static function to serve the content of the public folder.
You can read more about Express.js at https://expressjs.com/.
Node
Express.js runs on Node.js. We will be implementing the business layer in Node. Node is a lightweight and efficient JavaScript runtime, using an event-driven, non-blocking I/O model that makes it suitable for high-performance and real-time applications. Node runs everywhere, from fridges to smart watches. You can increase the reliability of your Node applications by using TypeScript to develop your application.
Refer to the blog post by Frank Rosner on non-blocking I/O for a more in-depth explanation of the topic at https://blog.codecentric.de/en/2019/04/explain-non-blocking-i-o-like-im-five/.
Later in this chapter, you're going to learn how to configure Node projects using TypeScript.
Mongo
MongoDB represents the persistence layer. MongoDB is a document-oriented database with dynamic JSON-like schemas. The major benefit of using a JSON-based database is the fact that you don't need to transform your data from one format to another. You can retrieve, display, edit, and then update the data solely using JSON.
In addition, the MongoDB native driver for Node is mature, performant, and capable. I have developed a library called document-ts, which aims to simplify interacting with MongoDB by introducing rich document objects that are easy to code. DocumentTS is a very thin TypeScript-based MongoDB helper with optional, rich ODM convenience features.
You can read more about MongoDB at https://www.mongodb.com/, and the DocumentTS library at https://github.com/duluca/document-ts.
Tooling
The tooling that supports your development is as important as your choice of software stack. Minimal MEAN leverages the following:
- VS Code: Great extension support, lightweight, fast, and cross-platform
- TypeScript: Fast and easy-to-use transpiler with great linting support using tslint
- Npm: Multi-platform scripting and dependency management with a rich ecosystem of packages
- GitHub: Flexible, free, and well supported Git host. GitHub flow enables gated code check-ins in tandem with a CI server
- Docker: Lightweight virtualization technology that encapsulates your environment configuration and settings
- Continuous Integration (CI): Critical to ensuring the delivery of quality code
- Jasmine: Batteries-included unit testing framework that works with nyc/istanbul.js to deliver code coverage metrics
Note that the tooling and language of choice we are using is the same as the ones we use for Angular development. This enables developers to be able to switch between frontend and backend development with minimal context switching.
Now that we have covered all major components and tooling for delivering a minimal MEAN stack app, let's start by creating a Git repository that can house our frontend and backend code.
Configuring a monorepo
You can optimize your development experience by creating a monorepo, which contains your frontend and backend code. A monorepo allows developers to be able to jump between projects within the same IDE window. Developers can reference code more easily across projects, such as sharing TypeScript interfaces between the frontend and the backend, thereby ensuring that data objects line up every time. The CI server can build all projects at once to ensure that all components of the full-stack application remain in working order.
Note that a monorepo is different to multi-root workspaces in VS Code, where you can add multiple projects to show in the same IDE windows. A monorepo combines projects at the source control level. Read more about multi-root workspaces at https://code.visualstudio.com/docs/editor/multi-root-workspaces.
Let's take a quick tour of the code base.
Monorepo structure
Under the lemon-mart-server project, you are going to have three main folders, as shown here:
lemon-mart-server
├───bin
├───web-app (default Angular setup)
├───server
│   ├───src
│   │   ├───models
│   │   ├───public
│   │   ├───services
│   │   ├───v1
│   │   │   └───routes
│   │   └───v2
│   │       └───routes
│   └───tests
|   package.json
|   README.md
The bin folder contains helper scripts or tools, the web-app folder represents your frontend, and server contains the source code for the backend. In our case, the web-app folder is the lemon-mart project. Instead of copying and pasting the code from the existing project, we leverage Git submodules to link two repositories together.
Git submodules
Git submodules help you share code between multiple repositories, while keeping the commits separate. Frontend developers may choose to only work using the frontend repository, whereas full-stack developers will prefer access to all code. Git submodules also provide a convenient way for existing projects to be combined.
Let's start by seeing how you can add your own lemon-mart project as a submodule of lemon-mart-server, leveraging the scripts that reside in the package.json file in the root folder of our monorepo:
I recommend that you perform this action on the version of lemon-mart-server that you cloned from GitHub. Otherwise, you will need to create a new project and execute npm init -y to get things started.
- Observe the following
package.jsonscripts that assist in the initialization, updating, and cleaning up of Git submodules:package.json "config": { ... "webAppGitUrl": "https://github.com/duluca/lemon-mart.git" }, "scripts": { "webapp:clean": "cross-conf-env rimraf web-app && git rm -r --cached web-app", "webapp:init": "cross-conf-env git submodule add $npm_package_config_webAppGitUrl web-app", "postwebapp:init": "git submodule status web-app", "modules:init": "git submodule update --init --recursive", "modules:update": "git submodule update --recursive --remote" }, - Update
webAppGitUrlwith the URL to your own project. - Execute
webapp:cleanto remove the existingweb-appfolder. - Finally, execute the
webapp:initcommand to initialize your project in theweb-appfolder:$ npm run webapp:init
Going forward, execute the modules:update command to update the code in the submodule. To pull the submodules after cloning the repo in another environment, execute npm modules:init. If you ever need to reset the environment and restart, then execute webapp:clean to clean Git's cache and remove the folder.
Note that you can have multiple submodules in your repository. The modules:update command will update all the submodules.
Your web application code is now available in the folder named web-app. Additionally, you should be able to see both projects under VS Code's Source Control pane, as shown:

Figure 10.2: VS Code Source Control Providers
Using VS Code's source control, you can independently perform Git actions on either repository.
If things get messy with your submodule, simply cd into the submodule directory and execute git pull and then git checkout master to restore the master branch. Using this technique, you may checkout any branch from your project and submit PRs.
Now that we have our submodule ready, let's see how the server project is configured.
Configuring a Node project with TypeScript
To create a new Node.js application using TypeScript, perform the following steps:
The following steps are only relevant if you are creating a new server project. I recommend that you use the one already provided in the lemon-mart-server project that you cloned from GitHub.
- Create a sub-folder
server:$ mkdir server - Change your current directory to the
serverfolder:$ cd server - Initialize npm to set up
package.jsonin theserverfolder:$ npm init -yNote that the top-level
package.jsonwill be utilized for scripts that are relevant to the full-stack project.server/package.jsonwill contain scripts and dependencies for the backend project. - Configure your repository using
mrm-task-typescript-vscode:$ npm i -g mrm-task-typescript-vscode $ npx mrm typescript-vscode
The mrm task configures VS Code for an optimized TypeScript development experience, similar to the way we did using mrm-task-angular-vscode in Chapter 2, Setting Up Your Development Environment.
When the command has finished executing, the project folder appears as shown here:
server
│   .gitignore
│   .nycrc
│   .prettierignore
│   .prettierrc
│   example.env
│   jasmine.json
│   package-lock.json
│   package.json
│   pull_request_template.md
│   tsconfig.json
│   tsconfig.src.json
│   tslint.json
│
├───.vscode
│       extensions.json
│       launch.json
│       settings.json
│
├───src
│       index.ts
│
└───tests
│       index.spec.ts
│       tsconfig.spec.json
The task configures the following:
- Common npm packages used for scripting: cross-conf-env (https://www.npmjs.com/package/cross-conf-env), npm-run-all (https://www.npmjs.com/package/npm-run-all), dev-norms (https://www.npmjs.com/package/dev-norms), and rimraf (https://www.npmjs.com/package/rimraf)
- Npm scripts for styling, linting, building, and testing:
styleandlint: Check compliance in code styling and linting errors. They are intended for CI server usage.style:fixandlint:fix: Apply code styling and linting rules to the code. Not all linting errors can be fixed automatically. You will need to address each error by hand.build: Transpiles the code into thedistfolder.start: Runs the transpiled code in Node.js.
prepublishOnlyandpreparescripts are only relevant if you're developing an npm package. In that case, you should also implement a.npmignorefile, which excludes thesrcandtestsfolders. ImportSort: Maintains the order of theimportstatements:- Settings are added to
package.json - Supporting npm packages are installed: import-sort, import-sort-cli, import-sort-parser-typescript, and import-sort-style-module
- Settings are added to
- TypeScript with tslint:
tsconfig.json: Common TypeScript settingstsconfig.src.json: Settings that are specific to the source code under thesrcfoldertslint.json: Linting rules
- The Prettier plugin, which automatically formats the styling of our code:
.prettierrc: Prettier settings.prettierignore: Files to ignore
- Jasmine and nyc for unit testing and code coverage:
jasmine.json: Testing settings..nycrc: Code coverage settings.- The
testsfolder: Containsspec.tsfiles, which include your tests andtsconfig.spec.json, which configures more relaxed settings that make it easier to write tests quickly. - In
package.json: Test scripts are created to build your tests usingbuild:testand execute them withnpm test. Thetest:cicommand is intended for CI servers andtest:nycprovides the code coverage report.
example.env: Used to document required environment variables that would be present in your private.envfile.envis added to.gitignore
- PR template: A pull request template that requests additional information from developers
- VS Code extensions, settings, and debugging configurations, respectively, in three files:
.vscode/extensions.json.vscode/settings.json.vscode/launch.json
Once you are comfortable with the changes introduced to your project, verify that your project is in working order.
Verify the project by executing the tests:
$ npm test
Before the test command is run, npm run build && npm run build:test is executed to transpile our TypeScript code to JavaScript. The output is placed in the dist folder, as shown:
server
│
├───dist
│       index.js
│       index.js.map
Note that on your filesystem,.js and .js.map files are created alongside every .ts file. In .vscode/settings.json, we configure the files.exclude property to hide these files in the IDE so that they don't distract developers during development. Additionally, in .gitignore, we also ignore .js and .js.map files, so they don't get checked into our repository.
Now that we have a barebones monorepo, we can configure our CI server.
CircleCI config
One of the benefits of using Git submodules is that we can verify that our frontend and backend works in the same pipeline. We will implement two jobs:
build_serverbuild_webapp
These jobs will follow the workflow shown here:
.circleci/config.yml
...
workflows:
  version: 2
  build-and-test-compose:
    jobs:
      - build_server
      - build_webapp
The CI pipeline will build the server and the web app simultaneously, with an option to run the deploy job if the jobs succeed on the master branch. Refer to the config.yml file on GitHub on how to implement the build_webapp job, which is similar to the one you implemented in Chapter 9, DevOps Using Docker, but that includes a number of subtle differences to handle working with submodules and the folder structure changes. The pipeline for building the server is not too dissimilar to the web app one, as shown here:
.circleci/config.yml
version: 2.1
orbs:
  coveralls: coveralls/coveralls@1.0.4
jobs:
  build_server:
    docker:
      - image: circleci/node:lts
    working_directory: ~/repo/server
    steps:
      - checkout:
          path: ~/repo
      - restore_cache:
          keys:
            - web-modules-{{ checksum "package-lock.json" }}
      # check npm dependencies for security risks - 'npm audit' to fix
      - run: npx audit-ci --high --report-type full
      - run: npm ci
      - save_cache:
          key: web-modules-{{ checksum "package-lock.json" }}
          paths:
            - ~/.npm
      - run: npm run style
      - run: npm run lint
      # run tests and store test results
      - run: npm run pretest
      - run: npm run test:ci
      - store_test_results:
          path: ./test_results
      # run code coverage and store coverage report
      - run: npm run test:nyc
      - store_artifacts:
          path: ./coverage
      - coveralls/upload
      - run:
          name: Move compiled app to workspace
          command: |
            set -exu
            mkdir -p /tmp/workspace/server
            mv dist /tmp/workspace/server
      - persist_to_workspace:
          root: /tmp/workspace
          paths:
            - server
The pipeline checks out the code, verifies the security of the packages we're using with audit-ci, installs dependencies, checks for styling and linting errors, runs tests, and checks for code coverage levels.
The test commands implicitly build the server code, which is stored under the dist folder. In the final step, we move the dist folder into the workspace so that we can use it at a later stage.
Next, let's see how we can bring together all tiers of our app and run it using Docker Compose.
Docker Compose
Since we have a three-tiered architecture, we need a convenient way to set up the infrastructure for our full-stack application. You can create scripts to start various Docker containers individually, but there's a purpose-built tool that runs multi-container applications called Docker Compose. Compose uses a YAML file format, named docker-compose.yml, so you declaratively define the configuration of your application. Compose allows you to adhere to infrastructure-as-code principles. Compose will also allow us to conveniently start a database instance without having to install a permanent and always-on database solution in our development environments.
You can use Compose to deploy your application on cloud services, scale the number of container instances you're running, and even run integration tests of your application on your CI server. Later in this section, we go over how you can run Docker Compose on CircleCI.
Consider the architecture of the following application with the communication port of each tier:

Figure 10.3: Lemon Mart three-tier architecture
Using Docker Compose, we are able to describe the architecture shown here precisely. You can read more about Compose at https://docs.docker.com/compose/.
Next, let's implement a more efficient web server for Lemon Mart.
Using Nginx as the web server
Our web app is already containerized as covered in Chapter 9, DevOps Using Docker. For this exercise, we will use the nginx-based container.
Add a new Dockerfile named nginx.Dockerfile to the root of your web-app. This image will be smaller than the Node-based one we have, since we're using nginx as the web server:
web-app/nginx.Dockerfile
FROM duluca/minimal-nginx-web-server:1-alpine
COPY dist/lemon-mart /var/www
CMD 'nginx'
Now, let's containerize our server.
Containerizing the server
So far, we have been using mostly preconfigured Docker images to deploy our web app. The following is a more detailed implementation of a Node.js-based server:
If you need it, refer to the Containerizing the app using Docker section in Chapter 9, DevOps Using Docker, as a refresher on Docker.
- Let's begin by defining the
Dockerfile:server/Dockerfile FROM node:lts-alpine RUN apk add --update --no-progress make python bash ENV NPM_CONFIG_LOGLEVEL error ADD https://github.com/Yelp/dumb-init/releases/download/v1.2.2/dumb-init_1.2.2_amd64 /usr/local/bin/dumb-init RUN chmod +x /usr/local/bin/dumb-init RUN mkdir -p /usr/src/app RUN chown node: /usr/src/app USER node WORKDIR /usr/src/app COPY package*.json ./ RUN NODE_ENV=production RUN npm install --only=production ENV HOST "0.0.0.0" ENV PORT 3000 EXPOSE 3000 ADD dist dist ENTRYPOINT ["dumb-init", "--"] CMD ["node", "dist/src/index"]Note that we ADD the
distfolder to our server and then run it using nodes with CMD.You can read more about how our server container is configured by checking out
README.mdon the similarly configuredminimal-node-web-serverrepo at https://github.com/duluca/minimal-node-web-server.Now, set up the cross-environment, npm scripts for Docker, which works on Windows 10 and macOS for our server.
- Install the npm scripts for the Docker task:
$ npm i -g mrm-task-npm-docker - Apply the npm scripts for Docker configuration, making sure to execute the command in the
serverfolder:$ npx mrm npm-docker - Configure your
package.jsonwith the configuration parameters:server/package.json "config": { "imageRepo": "duluca/lemon-mart-server", "imageName": "lemon-mart-server", "imagePort": "3000", "internalContainerPort": "3000" }
Be sure to build your app before building your Docker container.
Configuring environment variables with DotEnv
DotEnv files are widely supported to store secrets conveniently in a .env file that is not checked in to your code repository. Docker and Compose natively support .env files.
Let's start by understanding the environment variables at the heart of the monorepo:
- Refer to the
example.envfile at the root of the project:example.env # Root database admin credentials MONGO_INITDB_ROOT_USERNAME=admin MONGO_INITDB_ROOT_PASSWORD=anAdminPasswordThatIsNotThis # Your application's database connection information. # Corresponds to MONGO_URI on server-example.env MONGODB_APPLICATION_DATABASE=lemon-mart MONGODB_APPLICATION_USER=john.smith MONGODB_APPLICATION_PASS=g00fy # Needed for AWS deployments AWS_ACCESS_KEY_ID=xxxxxx AWS_SECRET_ACCESS_KEY=xxxxxx # See server-example.env for server environment variablesDon't store any real secrets in
example.env. Store them in the.envfile.example.envis there to document the environment variables that are required for your project. In this case, I've populated myexample.envfile with sample values so that readers can run the example without having to configure all these parameters. - Ensure that
init-dev-envis installed in the root of the project by executing:$ npm i -D init-dev-env - The
npm run init:envscript generates.envfiles based on theexample.envfile using theinit-dev-envpackage:In lemon-mart-server the
example.envfile for the server exists in two places. First in the root of the project asserver-example.envand second underserver/example.env. This is done to increase the visibility of the sample configuration settings.$ npx init-dev-env generate-dot-env example.env -f && init-dev-env generate-dot-env server-example.env --source=. --target=server -f - The second
.envfile is generated for the server as shown:server/.env # MongoDB connection string as defined in example.env MONGO_URI=mongodb://john.smith:g00fy@localhost:27017/lemon-mart # Secret used to generate a secure JWT JWT_SECRET=aSecureStringThatIsNotThis # DEMO User Login Credentials DEMO_EMAIL=duluca@gmail.com DEMO_PASSWORD=l0l1pop!! DEMO_USERID=5da01751da27cc462d265913
Note that this file contains the connection string to MongoDB, the secret we will use to encrypt our JWTs, and a seed user so that we can log in to the application. Normally, you wouldn't configure a password or a user ID for your seed users. These are only here to support repeatable demo code.
Now, we're ready to define the YAML file for Compose.
Define Docker-Compose YAML
Let's define a docker-compose.yml file in the root of the monorepo to reflect our architecture:
docker-compose.yml
version: '3.7'
services:
  web-app:
    container_name: web
    build:
      context: ./web-app
      dockerfile: nginx.Dockerfile
    ports:
      - '8080:80'
    links:
      - server
    depends_on:
      - server
  server:
    container_name: lemon-mart-server
    build: server
    env_file: ./server/.env
    environment:
      - MONGO_URI=mongodb://john.smith:g00fy@lemondb:27017/lemon-mart
    ports:
      - '3000:3000'
    links:
      - database
    depends_on:
      - database
  database:
    container_name: lemondb
    image: duluca/minimal-mongo:4.2.2
    restart: always
    env_file: .env
    ports:
      - '27017:27017'
    volumes:
      - 'dbdata:/data/db'
volumes:
  dbdata:
At the top, we build the web-app service using the nginx-based container. The build property automatically builds the Dockerfile for us. We are exposing the web-app on port 8080 and linking it to the server service. The links property creates an isolated Docker network to ensure that our containers can communicate with each other. By using the depends_on property, we ensure that the server is started before the web-app is started.
The server also uses the build property for an automatic Dockerfile build. It also uses the env_file property to load environment variables from the .env file under the server folder. Using the environment property, we override the MONGO_URI variable to use the internal Docker network name for the database container. The server both links and depends_on the database, which is named lemondb.
The database service pulls the duluca/minimal-mongo image from Docker Hub. Using the restart property, we ensure that the database will automatically restart if it crashes. We use the setup parameters within the .env file to configure and password-protect the database. Using the volumes property, we mount the database's storage directory to a local directory so that your data can persist across container reboots.
In a cloud environment, you can mount the volume of your database to your cloud provider's persistence solution, including AWS Elastic File System (EFS) or Azure File Storage.
Additionally, we define a Docker volume named dbdata for data storage.
Occasionally, your database may stop working correctly. This can happen if you upgrade your container, use a different container, or use the same volume in another project. In this instance, you can reset the state of your Docker setup by executing the following command:
  $ docker image prune
  $ docker container prune
  $ docker volume prune
or
$ docker system prune --volumes (this will delete everything)
To run your infrastructure, you will be executing the docker-compose up command. You can also use the -d option to your infrastructure in detached mode. You stop it with the down command and remove the containers it creates by means of the rm command.
Before you can run your infrastructure, you will need to build your application, which is covered in the next section.
Orchestrating the Compose launch
Running docker-compose up is a convenient and simple way to start your infrastructure. However, you need your code to be built before building your containers. It is an easy step to overlook. Refer to some npm scripts that you can use to orchestrate the launch of your infrastructure:
package.json
scripts: {
  "build": "npm run build --prefix ./server && npm run build --prefix ./web-app -- --configuration=lemon-mart-server",
  "test": "npm test --prefix ./server && npm test --prefix ./web-app -- --watch=false",
  "prestart": "npm run build && docker-compose build",
  "start": "docker-compose up",
  "stop": "docker-compose down",
  "clean": "docker-compose rm",
  "clean:all": "docker system prune --volumes",
  "start:backend": "docker-compose -f docker-compose.backend.yml up --build",
  "start:database": "docker-compose -f docker-compose.database.yml up --build",
We implemented a build script that runs the build commands for the server and the web app. A test script can do the same for executing tests. We implemented an npm start command that can automatically run the build command and run compose up. As a bonus, we also implemented start:backend and start:database scripts that can run alternate docker-compose files to stand up just the server or the database. You may create these files by removing the unnecessary parts of the master docker-compose.yml file. Refer to the GitHub repo for examples.
When coding on the server, I normally execute npm run start:database to stand up the database and, in a separate terminal window, I launch the server using npm start from the server folder. This way, I can see logs being generated by both systems side by side.
Execute npm start to verify that your docker-compose configuration is working. Hit Ctrl + C to stop the infrastructure.
Compose on CircleCI
You can execute your Compose infrastructure on CircleCI to verify the correctness of your configuration and run a quick integration test. Refer to the following updated workflow:
.circleci/config.yml
workflows:
  version: 2
  build-and-test-compose:
    jobs:
      - build_server
      - build_webapp
      - test_compose:
          requires:
            - build_server
            - build_webapp
We ensure that both server and web-app are built before running a new job named test_compose, which checks out the code, initializes the submodule, and copies the dist folders of both builds, as shown here:
.circleci/config.yml
  test_compose:
    docker:
      - image: circleci/node:lts-browsers
    working_directory: ~/repo
    steps:
      - setup_remote_docker
      - attach_workspace:
          at: /tmp/workspace
      - checkout:
          path: ~/repo
      - run: npm run modules:init
      - run:
          name: Copy built server to server/dist folder
          command: cp -avR /tmp/workspace/server/dist/ ./server
      - run:
          name: Copy built web-app to web-app/dist folder
          command: cp -avR /tmp/workspace/dist/ ./web-app
      - run:
          name: Restore .env files
          command: |
            set +H
            echo -e $PROJECT_DOT_ENV > .env
            echo -e $SERVER_DOT_ENV > server/.env
      - run:
          name: Compose up
          command: |
            set -x
            docker-compose up -d
      - run:
          name: Verify web app
          command: |
            set -x
            docker run --network container:web jwilder/dockerize -wait http://localhost:80
            docker run --network container:web appropriate/curl http://localhost:80
      - run:
          name: Verify db login with api
          command: |
            set -x
            docker run --network container:lemon-mart-server jwilder/dockerize -wait http://localhost:3000
            docker run --network container:lemon-mart-server appropriate/curl \
              -H "accept: application/json" -H "Content-Type: application/json" \
              -d "$LOGIN_JSON" http://localhost:3000/v1/auth/login
After copying the dist files, the job then lays down the .env files from the CircleCI environment variables. Then, we run docker-compose up to stand up our server. Next, we test the web-app by running a curl command to retrieve its index.html file. We run curl after waiting for the server to become available using dockerize -wait. Similarly, we test the integration of our API server and the database by logging in using our demo user.
Congratulations! Now, you have a pretty good understanding of how our full stack architecture is pieced together at a high level. In the latter half of this chapter, we will go over how the API is implemented, how it integrates with the database, and see how JWT auth works in tandem with the API and database.
Let's continue by diving into API design.
RESTful APIs
In full stack development, nailing down the API design early on is important. The API design itself is closely correlated with how your data contract will look. You may create RESTful endpoints or use the next-gen GraphQL technology. In designing your API, frontend and backend developers should collaborate closely to achieve shared design goals. Some high-level goals are listed as follows:
- Minimize data transmitted between the client and server
- Stick to well-established design patterns (in other words, data pagination)
- Design to reduce business logic present in the client
- Flatten data structures
- Do not expose database keys or relationships
- Version endpoints from the get-go
- Design around major data entities
You should aim to implement the business logic in your RESTful API. Ideally, your frontend shouldn't contain anything more than presentation logic. Any if statement implemented by the frontend should also be verified in your backend.
As discussed in Chapter 1, Introduction to Angular and Its Concepts, it is critical to aim for a stateless design in both the backend and frontend. Every request should utilize non-blocking I/O methods and should not rely on any existing session. This is the key to infinitely scaling your web application using cloud hosting providers.
Whenever you're implementing a project, it is important to limit, if not eliminate, experimentation. This is especially true in full stack projects. The downstream effect of missteps in API design can be profound and impossible to correct once your application goes live.
Next, let's look into designing an API around major data entities. In this case, we'll review the implementation of an API surrounding users, including authentication. First we'll explore how we can define an endpoint using Swagger, so we can concretely communicate the intent of our design to team members.
Remember that only significant pieces of code that are conceptually significant are covered in this chapter. While you may choose to implement this code from scratch, it is not necessary to get an understanding of how it works. If you choose to implement it from scratch, refer to the complete source code at https://github.com/duluca/lemon-mart-server to follow along and bridge the gaps in your implementation.
Later on, Swagger will become a documentation tool, reflecting the capability of our APIs.
API design with Swagger
Swagger will allow you to design and document your web API. For teams, it can act as a great communication tool between frontend and backend developers, thereby reducing a lot of friction. Additionally, defining your API surface early on allows implementation to begin without worrying about late-stage integration challenges.
We will implement a users API as we move on, so as to demonstrate how Swagger works.
I highly recommend installing the Swagger Viewer VS Code extension, which allows us to preview the YAML file without running any additional tools.
Let's begin by exploring the swagger.yaml file at the root of the monorepo:
- Open
swagger.yamlin VS Code. - Install the VS Code extension called Swagger Preview.
- Hit Ctrl + Shift + P, or
 +
+ +P, to bring up the command palette and run Preview Swagger.
 - See the preview, as shown here:
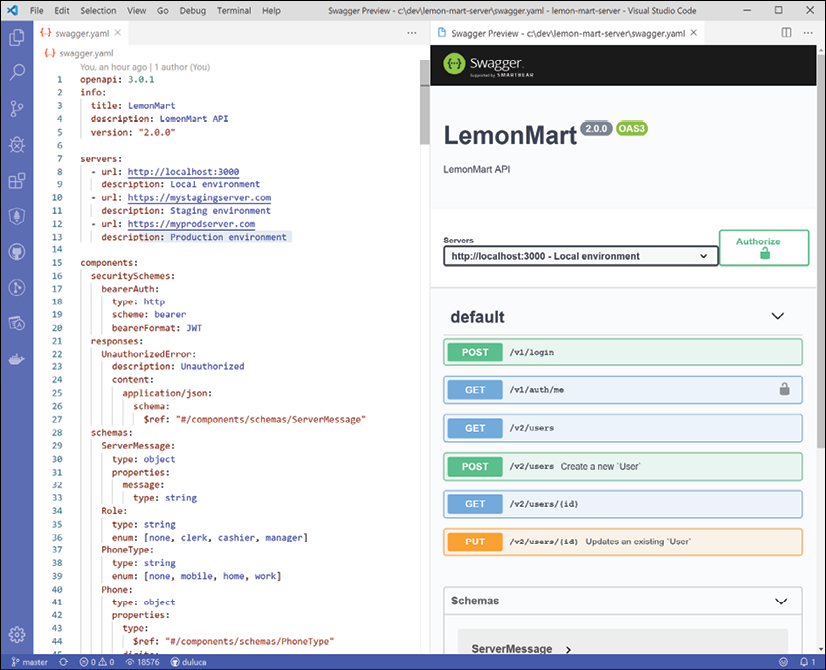
Figure 10.4: Swagger.yaml preview
Using the Swagger UI view, you are going to be able to try out commands and execute them against your server environment.
Defining a Swagger YAML file
We'll use Swagger spec version openapi: 3.0.1, which implements the OpenAPI standard. Let's go over the major components of the swagger.yaml file here:
For more information about how a Swagger file is defined, refer to https://swagger.io/specification/.
- The YAML file starts with general information and target servers:
swagger.yaml openapi: 3.0.1 info: title: LemonMart description: LemonMart API version: "2.0.0" servers: - url: http://localhost:3000 description: Local environment - url: https://mystagingserver.com description: Staging environment - url: https://myprodserver.com description: Production environment - Under
components, we define commonsecuritySchemesand responses, which define the authentication scheme we intend to implement and how the shape of our error message response will appear:swagger.yaml ... components: securitySchemes: bearerAuth: type: http scheme: bearer bearerFormat: JWT responses: UnauthorizedError: description: Unauthorized content: application/json: schema: $ref: "#/components/schemas/ServerMessage" type: stringNote the usage of
$refto reuse repeating elements. You can seeServerMessagebeing defined here. - Under
components, we define shared dataschemas, which declares the data entities that we either take in as input or return to the client:swagger.yaml ... schemas: ServerMessage: type: object properties: message: type: string Role: type: string enum: [none, clerk, cashier, manager] ... - Under
components, we add sharedparameters, making it easy to reuse common patterns such as paginated endpoints:swagger.yaml ... parameters: filterParam: in: query name: filter required: false schema: type: string description: Search text to filter the result set by ... - Under
paths, we begin defining REST endpoints, such as apostendpoint for the/loginpath:swagger.yaml ... paths: /v1/login: post: description: | Generates a JWT, given correct credentials. requestBody: required: true content: application/json: schema: type: object properties: email: type: string password: type: string required: - email - password responses: '200': # Response description: OK content: application/json: schema: type: object properties: accessToken: type: string description: JWT token that contains userId as subject, email and role as data payload. '401': $ref: '#/components/responses/UnauthorizedError'Note that
requestBodydefines input variables that are required with a type ofstring. Underresponses, we can define how a successful200response and an unsuccessful401response to a request appear. In the former case, we return anaccessToken, while in the latter case, we return anUnauthorizedError, as defined in Step 2. - Under
paths, we continue by adding the following paths:swagger.yaml ... paths: /v1/auth/me: get: ... /v2/users: get: ... post: ... /v2/users/{id}: get: ... put: ...
The OpenAPI spec is powerful, allowing you to define intricate requirements on how users should be able to interact with your API. The specification document at https://swagger.io/docs/specification is an invaluable resource while developing your own API definition.
Preview Swagger file
You can validate your Swagger file at https://swaggerhub.com for free. After you sign up for a free account, create a new project and define your YAML file. SwaggerHub will highlight any errors you made. It will also give you a preview of the web view, which is the same one you get with the Swagger Preview VS Code extension.
Refer to the following screenshot to see how a valid Swagger YAML definition looks on SwaggerHub:

Figure 10.5: Valid Swagger YAML definition on SwaggerHub
Our goal is to integrate this interactive documentation with our Express.js APIs.
Now, let's see how you can implement such an API.
Implementing APIs with Express.js
Before we begin implementing our APIs, let's review the target file structure of our backend in sections, so we get an understanding of how the server is bootstrapped, how routing is configured for API endpoints, how public resources are served, and how services are configured. Minimal MEAN intentionally sticks to the basics, so you can learn more about the underlying technologies. While I have delivered production systems using minimal MEAN, you may not enjoy the barebones development experience as much as I do. In this case, you may consider Nest.js, which is a popular framework for implementing full stack Node.js apps. Nest.js has a rich feature set with an architecture and coding style that closely resemble Angular. I recommend using such a library after you have mastered the basics of the MEAN stack.
Kudos to Kamil Mysliwiec and Mark Pieszak for creating a great tool and vibrant community around Nest.js. You can read more about Nest.js at https://nestjs.com/ and solicit consulting services at https://trilon.io/.
Now, let's review the file structure of our Express server:
server/src
│   api.ts
│   app.ts
│   config.ts
│   docs-config.ts
│   index.ts
│
├───models
│       enums.ts
│       phone.ts
│       user.ts
│
├───public
│       favicon.ico
│       index.html
│
├───services
│       authService.ts
│       userService.ts
│
├───v1
│   │   index.ts
│   │
│   └───routes
│           authRouter.ts
│
└───v2
    │   index.ts
    │
    └───routes
            userRouter.ts
Let's review the purpose and the interaction between these files by looking at a component diagram, giving us an overview of the architecture and the dependency tree:
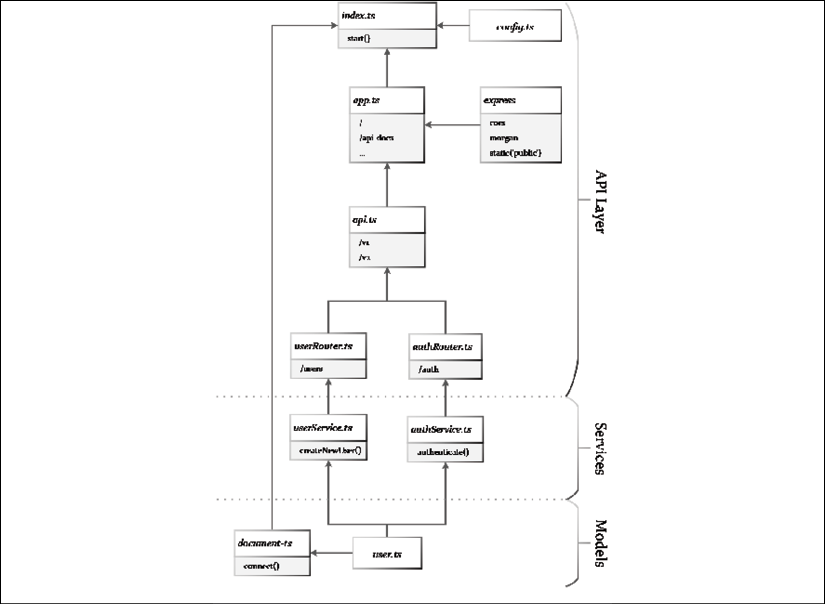
Figure 10.6: Express server architecture
index.ts contains a start function, which bootstraps the application leveraging three major helpers:
config.ts: Manages environment variables and settings.app.ts: Configures Express.js, defines all API paths, and then routers implement the paths and leverage services that contain the business logic. Services use models, such asuser.ts, to access the database.document-ts: Establishes a connection to the database and configures it, and leveragesuser.tsto configure a seed user during startup.
You can see that the components at the top of the diagram are responsible for start up and configuration chores, including configuring API paths, which represent the API layer. The Services layer should contain most of the business logic for the app, while persistence is handled in the Models layer.
Refer to the following implementation of index.ts without any database features:
server/src/index.ts
import * as http from 'http'
import app from './app'
import * as config from './config'
export let Instance: http.Server
async function start() {
  console.log('Starting server: ')
  console.log(`isProd: ${config.IsProd}`)
  console.log(`port: ${config.Port}`)
  Instance = http.createServer(app)
  Instance.listen(config.Port, async () => {
    console.log(`Server listening on port ${config.Port}...`)
  })
}
start()
Note that the last line of code shown, start(), is the function call that triggers the initialization of the server.
Now, let's look into how the Express server is set up.
Bootstrapping the server
App.ts configures Express.js, along with serving static assets, routing, and versioning. Express.js leverages middleware functions to integrate with libraries or your own code, such as an authenticate method:
server/src/app.ts
import * as path from 'path'
import * as cors from 'cors'
import * as express from 'express'
import * as logger from 'morgan'
import api from './api'
const app = express()
app.use(cors())
app.use(express.json())
app.use(express.urlencoded({ extended: true }))
app.use(logger('dev'))
app.use('/', express.static(path.join(__dirname, '../public'), { redirect: false }))
app.use(api)
export default app
In the preceding code, note that configuring Express is straightforward with the use() method. First, we configure cors, and then express parsers and logger.
Next, using the express.static function, we serve the public folder at the root's route, /, so we can display some useful information about our server, as shown:

Figure 10.7: LemonMart server landing page
We will cover how to configure the /api-docs endpoint, which is referenced above, in the next section.
Finally, we configure the router, which is defined in api.ts.
Routes and versioning
Api.ts configures the Express router. Refer to the following implementation:
server/src/api.ts
import { Router } from 'express'
import api_v1 from './v1'
import api_v2 from './v2'
const api = Router()
// Configure all routes here
api.use('/v1', api_v1)
api.use('/v2', api_v2)
export default api
In this case, we have two child routes for v1 and v2. It is critical to always version the APIs you implement. Once an API becomes public, it can be very tricky, even impossible sometimes, to simply phase out an API for a newer version. Even minor code changes or slight differences in the API can cause clients to break. You must pay careful attention to only making backward-compatible changes to your API.
At some point, you will have a need to completely rewrite the endpoint to meet new requirements, performance, and business needs, at which point you can simply implement a v2 version of your endpoint, while leaving the v1 implementation unchanged. This allows you to innovate at the pace you need to, while keeping legacy consumers of your app functional.
In short, you should version every API you create. By doing this, you force your consumers to version their HTTP calls to your API. As time goes on, you may transition, duplicate, and retire APIs under different versions. Consumers then have a choice to call whichever version of the API works for them.
Configuring a route is trivial. Let's see the configuration for v2, as shown:
server/src/v2/index.ts
import { Router } from 'express'
import userRouter from './routes/userRouter'
const router = Router()
// Configure all v2 routers here
router.use('/users?', userRouter)
export default router
The question mark at the end of /users? means that both /user and /users will work against operations implemented in userRouter. This is a great way to avoid typos, while allowing the developer to choose the plurality that makes sense for the operation.
In userRouter, you can then implement GET, POST, PUT, and DELETE operations. Refer to the following implementation:
server/src/v2/routes/userRouter.ts
const router = Router()
router.get('/', async (req: Request, res: Response) => {
})
router.post('/', async (req: Request, res: Response) => {
})
router.get('/:userId', async (req: Request, res: Response) => {
})
router.put('/:userId', async (req: Request, res: Response) => {
})
export default router
In the preceding code, you can observe the use of route parameters. You can consume route parameters through a request object, such as req.params.userId.
Note that all routes in the sample code are tagged as async because they will all be making a database call, which we are going to await. If your route is synchronous, then you don't require the async keyword.
Next, let's look into services.
Services
We don't want to implement our business logic in the router files, which represents our API layer. The API layer should largely consist of transforming data and making calls to the business logic layer.
You can implement services using Node.js and TypeScript features. No fancy dependency injection is necessary. The sample application implements two services – authService and userService.
For example, in userService.ts, you can implement a function called createNewUser:
server/src/services/userService.ts
import { IUser, User } from '../models/user'
export async function createNewUser(userData: IUser): Promise<User | boolean> {
  // create user
}
createNewUser accepts userData in the shape of IUser and, when it is done creating the user, it returns an instance of User. We can then use this function in our router as follows:
server/src/v2/routes/userRouter.ts
import { createNewUser } from '../../services/userService'
router.post('/', async (req: Request, res: Response) => {
  const userData = req.body as IUser
  const success = await createNewUser(userData)
  if (success instanceof User) {
    res.send(success)
  } else {
    res.status(400).send({ message: 'Failed to create user.' })
  }
})
We can await the result of createNewUser and, if successful, return the created object as a response to the POST request.
Note that even though we are casting req.body as IUser, this is only a development time comfort feature. At runtime, the consumer may pass any number of properties to the body. Careless handling of request parameters is one of the primary ways in which your code can be maliciously exploited.
Now that we have an understanding of the skeleton of our Express server, let's see how you can configure Swagger so that you can use it as a guide to implementation and create living documentation for your API.
Configuring Swagger with Express
Configuring Swagger with Express is a manual process. Forcing yourself to manually document the endpoints has a great side effect. By slowing down, you will get the opportunity to consider your implementation from the consumer's perspective as well as the implementor's perspective. This perspective will help you to resolve potential issues with your endpoints during development, thereby avoiding costly reworking.
The major benefit of integrating Swagger with your server is that you will get the same interactive Swagger UI that was covered earlier in this chapter, so your testers and developers can discover or test your API directly from a web interface.
We are going to use two helper libraries to help us integrate Swagger into our server:
swagger-jsdoc: This allows you to implement OpenAPI specs right on top of the relevant code by using the@swaggeridentifier in aJSDoccomment block, generating aswagger.jsonfile as output.swagger-ui-express: This consumes theswagger.jsonfile to display the interactive Swagger UI web interface.
Let's go over how Swagger is configured to work with Express.js:
- The dependencies and type information for TypeScript are shown here:
$ npm i swagger-jsdoc swagger-ui-express $ npm i -D @types/swagger-jsdoc @types/swagger-ui-express - Let's go over the
docs-config.tsfile, which configures the base OpenAPI definition:server/src/docs-config.ts import * as swaggerJsdoc from 'swagger-jsdoc' import { Options } from 'swagger-jsdoc' import * as packageJson from '../package.json' const options: Options = { swaggerDefinition: { openapi: '3.0.1', components: {}, info: { title: packageJson.name, version: packageJson.version, description: packageJson.description, }, servers: [ { url: 'http://localhost:3000', description: 'Local environment', }, { url: 'https://mystagingserver.com', description: 'Staging environment', }, { url: 'https://myprodserver.com', description: 'Production environment', }, ], }, apis: [ '**/models/*.js', '**/v1/routes/*.js', '**/v2/routes/*. js' ], } export const specs = swaggerJsdoc(options)Modify the
serversproperty to include the location of your testing, staging, or production environments. This allows consumers of your API to test the API using the web interface without additional tooling. Note that theapisproperty informs the code files thatswaggerJsdocshould parse when constructing theswagger.jsonfile. This routine runs during the bootstrapping of the server, which is why we reference the transpiled.jsfiles instead of.tsfiles. - Bootstrap the swagger config in
app.ts:server/src/app.ts import * as swaggerUi from 'swagger-ui-express' import { specs } from './docs-config' const app = express() app.use(cors()) ... app.use('/api-docs', swaggerUi.serve, swaggerUi.setup(specs)) ... export default app
Specs contain the content of the swagger.json file, which is then passed to swaggerUi. Then, using the server middleware, we can configure swaggerUi to host the web interface at /api-docs.
You already have the OpenAPI definitions that need to be used to complete the implementation of the application from the beginning of this chapter. Refer to the complete source code at https://github.com/duluca/lemon-mart-server for additional help.
Congratulations! Now you have a good understanding of how our Express server works. Next, let's look at how to connect to MongoDB.
MongoDB ODM with DocumentTS
DocumentTS acts as an ODM, implementing a layer of models to enable rich and customizable interaction with database objects. ODM is the document-based database equivalent of an Object Relational Mapper (ORM) in relational databases. Think Hibernate or Entity Framework. If you're not familiar with these concepts, I recommend that you do further research before moving on.
At its core, DocumentTS leverages the Node.js driver for MongoDB. This driver is implemented by the makers of MongoDB. It guarantees to offer the best performance and feature parity with new MongoDB releases, whereas third-party libraries often lag in supporting new features. Using the database.getDbInstance method, you can get access to the native driver directly. Otherwise, you will be accessing Mongo through models that you implement. Refer to the following diagram for an overview:

Figure 10.8: DocumentTS overview
You can read more about MongoDB's Node.js driver at https://mongodb.github.io/node-mongodb-native/.
About DocumentTS
DocumentTS provides three major features:
connect(): A MongoDB async connection harnessDocumentandIDocument: A base class and interface to help define your own modelsCollectionFactory: Defines collections, organizes indexes, and aggregates queries alongside collection implementations
Here are the convenience features that a DocumentTS collection provides:
get collectionreturns the native MongoDB collection, so you can operate on it directly:get collection(): ICollectionProvider<TDocument>aggregateallows you to run a MongoDB aggregation pipeline:aggregate(pipeline: object[]): AggregationCursor<TDocument>findOneandfindOneAndUpdatesimplify the operation of commonly used database functionality, automatically hydrating the models returned:async findOne( filter: FilterQuery<TDocument>, options?: FindOneOptions ): Promise<TDocument | null> async findOneAndUpdate( filter: FilterQuery<TDocument>, update: TDocument | UpdateQuery<TDocument>, options?: FindOneAndReplaceOption ): Promise<TDocument | null>findWithPaginationis by far the best feature of DocumentTS, allowing you to filter, sort, and paginate large collections of data. This function is geared toward use with data tables, so you specify searchable properties, turn off hydration, and use a debug feature to fine-tune your queries:async findWithPagination<TReturnType extends IDbRecord>( queryParams: Partial<IQueryParameters> & object, aggregationCursorFunc?: Func<AggregationCursor<TReturnType>>, query?: string | object, searchableProperties?: string[], hydrate = true, debugQuery = false ): Promise<IPaginationResult<TReturnType>>
DocumentTS aims to be reliable, optional, and convenient to use. DocumentTS directly exposes the developer to the native Node.js driver, so you learn how to work with MongoDB instead of some library. Developers can optionally leverage the library's convenience features, including the following:
- Define your own models through simple interfaces.
- Choose fields that you want to automatically hydrate, such as child or related objects.
- Serialize calculated fields with every request.
- Protect certain fields (such as passwords) from serialization so that they aren't accidently sent across the wire.
By being optional, DocumentTS allows developers to transition to new features in their own time. If performance becomes a concern, you can easily switch to native MongoDB calls to get the best performance. Using DocumentTS, you will spend more time reading MongoDB documentation than DocumentTS documentation.
Mongoose is a popular library for interacting with MongoDB. However, it is a wrapper around MongoDB, requiring a full buy-in. Furthermore, the library abstracts away the native driver, so it is very sensitive to changes and updates in the ecosystem. You can read more about Mongoose at https://mongoosejs.com/.
Install MongoDB dependencies and type information for TypeScript with the following commands:
$ npm i mongodb document-ts
$ npm i -D @types/mongodb
Next, let's see how we connect to the database.
Connecting to the database
It can be a challenge to ensure that database connectivity exists when writing a fully async web application. connect() makes it easy to connect to a MongoDB instance and makes it safe to be called simultaneously from multiple threads starting up at the same time.
Let's start by configuring your environment variables:
- Remember that the
MONGO_URIconnection string resides inserver/.env:server/.env MONGO_URI=mongodb://john.smith:g00fy@localhost:27017/lemon-martIn order to update the username, password, and database name, you'll need to edit the following variables in the top level
.envfile:.env MONGODB_APPLICATION_DATABASE=lemon-mart MONGODB_APPLICATION_USER=john.smith MONGODB_APPLICATION_PASS=g00fyRemember that
.envchanges only take effect when you restart your servers. - Let's see how
document-tsintegrates withindex.ts:server/src/index.ts ... import * as document from 'document-ts' import { UserCollection } from './models/user' ... async function start() { ... console.log(`mongoUri: ${config.MongoUri}`) try { await document.connect(config.MongoUri, config.IsProd) console.log('Connected to database!') } catch (ex) { console.log(`Couldn't connect to a database: ${ex}`) } ... Instance.listen(config.Port, async () => { console.log(`Server listening on port ${config.Port}...`) await createIndexes() console.log('Done.') }) } async function createIndexes() { console.log('Create indexes...') await UserCollection.createIndexes() } start()
We attempt to connect to the database using a try/catch block. Once the Express server is up and running, we call createIndexes, which, in turn, calls a function with the same name on UserCollection. Beyond performance considerations, MongoDB indexes are necessary to enable fields to become searchable.
Models with IDocument
You may implement an IUser interface similar to the one in LemonMart. However, this one will be extending the IDocument defined in DocumentTS:
- Here is the
IUserinterface:server/src/models/user.ts export interface IUser extends IDocument { email: string name: IName picture: string role: Role userStatus: boolean dateOfBirth: Date level: number address: { line1: string line2?: string city: string state: string zip: string } phones?: IPhone[] }The interfaces and base classes provided by DocumentTS aim to help you develop your business logic and database queries in a consistent manner. I encourage you to explore the base classes and interfaces by Ctrl + clicking on them so that you can see the source code behind them.
- Now, here is the
Userclass extendingDocument<T>and implementing Swagger documentation:server/src/models/user.ts import { v4 as uuid } from 'uuid' /** * @swagger * components: * schemas: * Name: * type: object * … * User: * type: object * … */ export class User extends Document<IUser> implements IUser { static collectionName = 'users' private password: string public email: string public name: IName public picture: string public role: Role public dateOfBirth: Date public userStatus: boolean public level: number public address: { line1: string city: string state: string zip: string } public phones?: IPhone[] constructor(user?: Partial<IUser>) { super(User.collectionName, user) } fillData(data?: Partial<IUser>) { if (data) { Object.assign(this, data) } if (this.phones) { this.phones = this.hydrateInterfaceArray( Phone, Phone.Build, this.phones ) } } getCalculatedPropertiesToInclude(): string[] { return ['fullName'] } getPropertiesToExclude(): string[] { return ['password'] } public get fullName(): string { if (this.name.middle) { return `${this.name.first} ${this.name.middle} ${this.name.last}` } return `${this.name.first} ${this.name.last}` } async create(id?: string, password?: string, upsert = false) { if (id) { this._id = new ObjectID(id) } if (!password) { password = uuid() } this.password = await this.setPassword(password) await this.save({ upsert }) } hasSameId(id: ObjectID): boolean { return this._id.toHexString() === id.toHexString() } }Note the properties,
getCalculatedPropertiesToIncludeandgetPropertiesToExclude. These define whether a field should be serialized by the client or allowed to be written to the database.Serialization and deserialization of data is the concept of transforming data into a format that can be stored or transported. Refer to the Further reading section for links to articles regarding serialization and the JSON data format.
fullNameis a calculated property, so we don't want to write this value to the database. However,fullNameis useful for the client. On the other hand, thepasswordproperty should never be transmitted back to the client, but obviously we need to be able to save it to the database for password comparison and changes. Upon saving, we pass in the{ upsert }object to instruct the database to update records even if partial information is provided.Remember to provide the complete Swagger definition.
- And finally, let's go over
UserCollectionFactory, which implementsCollectionFactory<T>:server/src/models/user.ts class UserCollectionFactory extends CollectionFactory<User> { constructor(docType: typeof User) { super(User.collectionName, docType, ['name.first', 'name.last', 'email']) } async createIndexes() { await this.collection().createIndexes([ { key: { email: 1, }, unique: true, }, { key: { 'name.first': 'text', 'name.last': 'text', email: 'text', }, weights: { 'name.last': 4, 'name.first': 2, email: 1, }, name: 'TextIndex', }, ]) } userSearchQuery( searchText: string ): AggregationCursor<{ _id: ObjectID; email: string }> { const aggregateQuery = [ { $match: { $text: { $search: searchText }, }, }, { $project: { email: 1, }, }, ] if (searchText === undefined || searchText === '') { delete (aggregateQuery[0] as any).$match.$text } return this.collection().aggregate(aggregateQuery) } } export let UserCollection = new UserCollectionFactory(User)
Here, we create a unique index, so another user with the same email won't be able to register. We also create a weighted index, which can assist in writing filter queries. We apply the indexes right after we connect to the database in index.ts.
userSearchQuery is a somewhat contrived example to demonstrate aggregate queries in MongoDB. It is possible to execute far more sophisticated and high-performance queries using aggregation in MongoDB. You can read more about aggregation in MongoDB at https://docs.mongodb.com/manual/aggregation.
At the bottom of the file, we instantiate a UserCollection and export it, so it can be referenced from anywhere in the application:
server/src/models/user.ts
export let UserCollection = new UserCollectionFactory(User)
Note that UserCollectionFactory is not exported, as it is only needed in the user.ts file.
Let's see how you can fetch data using the new user model.
Implementing JWT auth
In Chapter 8, Designing Authentication and Authorization, we discussed how to implement a JWT-based authentication mechanism. In LemonMart, you implemented a base auth service that can be extended for custom authentication services.
We'll leverage three packages for our implementation:
jsonwebtoken: Used to create and encode JWTsbcryptjs: Used to hash and salt a user's password before saving it in the database, so we never store a user's password in plain textuuid: A generated universally unique identifier that is useful when resetting a user's password to a random value
A hash function is a consistently repeatable, one-way encryption method, which means you get the same output every time you provide the same input, but even if you have access to the hashed value, you cannot readily figure out what information it stores. We can, however, compare whether the user has entered the correct password by hashing the user's input and comparing the hash of their input to that of the stored hash of their password.
- Let's see the JWT auth-related dependencies and type information for TypeScript:
$ npm i bcryptjs jsonwebtoken uuid $ npm i -D @types/bcryptjs @types/jsonwebtoken @types/uuid - Observe the
Usermodel with password hashing functionality:server/src/models/user.ts import * as bcrypt from 'bcryptjs' async create(id?: string, password?: string, upsert = false) { ... this.password = await this.setPassword(password) await this.save({ upsert }) } async resetPassword(newPassword: string) { this.password = await this.setPassword(newPassword) await this.save() } private setPassword(newPassword: string): Promise<string> { return new Promise<string>((resolve, reject) => { bcrypt.genSalt(10, (err, salt) => { if (err) { return reject(err) } bcrypt.hash(newPassword, salt, (hashError, hash) => { if (hashError) { return reject(hashError) } resolve(hash) }) }) }) } comparePassword(password: string): Promise<boolean> { const user = this return new Promise((resolve, reject) => { bcrypt.compare(password, user.password, (err, isMatch) => { if (err) { return reject(err) } resolve(isMatch) }) }) }
Using the setPassword method, you can hash the user-provided password and safely save it to the database. Later, we will use the comparePassword function to compare the user-provided value to the hashed password. We never store the user-provided value, so the system can never reproduce the user's password, making it a safe implementation.
Login API
The following is the login method implementation in authService for lemon-mart-server:
server/src/services/authService.ts
import * as jwt from 'jsonwebtoken'
import { JwtSecret } from '../config'
export const IncorrectEmailPasswordMessage = 'Incorrect email and/or password'
export const AuthenticationRequiredMessage = 'Request has not been authenticated'
export function createJwt(user: IUser): Promise<string> {
  return new Promise<string>((resolve, reject) => {
    const payload = {
      email: user.email,
      role: user.role,
      picture: user.picture,
    }
    jwt.sign(
      payload,
      JwtSecret(),
      {
        subject: user._id.toHexString(),
        expiresIn: '1d',
      },
      (err: Error, encoded: string) => {
        if (err) {
          reject(err.message)
        }
        resolve(encoded)
      }
    )
  })
}
The preceding code sample implements a createJwt function to create a JWT per user. We also defined canned responses for auth failures. Note the vagueness of the incorrect email/password message, meaning that bad actors cannot fish the system to exploit the authentication system.
Let's implement the login API at /v1/auth/login:
server/src/v1/routes/authRouter.ts
import { Request, Response, Router } from 'express'
import { UserCollection } from '../../models/user'
import {
  AuthenticationRequiredMessage,
  IncorrectEmailPasswordMessage,
  authenticate,
  createJwt,
} from '../../services/authService'
const router = Router()
/**
 * @swagger
 * /v1/auth/login:
 *   post:
 * …
 */
router.post('/login', async (req: Request, res: Response) => {
  const userEmail = req.body.email?.toLowerCase()
  const user = await UserCollection.findOne({ email: userEmail })
  if (user && (await user.comparePassword(req.body.password))) {
    return res.send({ accessToken: await createJwt(user) })
  }
  return res.status(401).send({
    message: IncorrectEmailPasswordMessage
  })
})
Note that when retrieving a user by email, keep in mind that emails are case-insensitive. So, you should always convert the input to lowercase. You can improve this implementation further by validating the email, and stripping any white space, script tags, or even rogue Unicode characters. Consider using libraries such as express-validator or express-sanitizer.
The login method leverages the user.comparePassword function to confirm the correctness of the password provided. The createJwt function then creates the accessToken to be returned to the client.
Authenticating middleware
The authenticate function is a middleware that we can use in our API implementations to ensure that only authenticated users with appropriate permissions can access an endpoint. Remember that real security is achieved in your backend implementation and this authenticate function is your gate keeper.
authenticate takes an optional options object to verify the current user's role with the requiredRole property, so if an API is configured as shown below, only a manager can access that API:
authenticate({ requiredRole: Role.Manager })
In certain cases, we want a user to be able to update their own records, but also allow managers to update everyone else's records. In this case, we leverage the permitIfSelf property, as shown:
authenticate({
    requiredRole: Role.Manager,
    permitIfSelf: {
      idGetter: (req: Request) => req.body._id,
      requiredRoleCanOverride: true,
    },
  }),
In this case, if the _id of the record being updated matches the current user's _id, then the user can update their own record. Since, requiredRoleCanOverride is set to true a manager can update any record. If it were set to false, this wouldn't be allowed. By mixing and matching these properties you can cover a vast majority of your gate keeping needs.
Note that idGetter is a function delegate, so that you can specify how the _id property should be accessed, when the authenticate middleware executes.
See the following implementation of authenticate and authenticateHelper:
server/src/services/authService.ts
import { NextFunction, Request, Response } from 'express'
import { ObjectID } from 'mongodb'
import { IUser, UserCollection } from '../models/user'
interface IJwtPayload {
  email: string
  role: string
  picture: string
  iat: number
  exp: number
  sub: string
}
export function authenticate(options?: {
  requiredRole?: Role
  permitIfSelf?: {
    idGetter: (req: Request) => string
    requiredRoleCanOverride: boolean
  }
}) {
  return async (req: Request, res: Response, next: NextFunction) => {
    try {
      res.locals.currentUser =
        await authenticateHelper(
          req.headers.authorization, {
            requiredRole: options?.requiredRole,
            permitIfSelf: options?.permitIfSelf
              ? {
                  id: options?.permitIfSelf.idGetter(req),
                  requiredRoleCanOverride:
                    options?.permitIfSelf.requiredRoleCanOverride,
                }
             : undefined,
          }
        )
      return next()
    } catch (ex) {
      return res.status(401).send({ message: ex.message })
    }
  }
}
export async function authenticateHelper(
  authorizationHeader?: string,
  options?: {
    requiredRole?: Role
    permitIfSelf?: {
      id: string
      requiredRoleCanOverride: boolean
    }
  }
): Promise<User> {
  if (!authorizationHeader) {
    throw new Error('Request is missing authorization header')
  }
  const payload = jwt.verify(
    sanitizeToken(authorizationHeader),
    JwtSecret()
  ) as IJwtPayload
  const currentUser = await UserCollection.findOne({
    _id: new ObjectID(payload?.sub),
  })
  if (!currentUser) {
    throw new Error("User doesn't exist")
  }
  if (
    options?.permitIfSelf &&
    !currentUser._id.equals(options.permitIfSelf.id) &&
    !options.permitIfSelf.requiredRoleCanOverride
  ) {
    throw new Error(`You can only edit your own records`)
  }
  if (
    options?.requiredRole &&
    currentUser.role !== options.requiredRole
  ) {
    throw new Error(`You must have role: ${options.requiredRole}`)
  }
  return currentUser
}
function sanitizeToken(authorization: string | undefined) {
  const authString = authorization || ''
  const authParts = authString.split(' ')
  return authParts.length === 2 ? authParts[1] : authParts[0]
}
The authenticate method is implemented as an Express.js middleware. It can read the request header for an authorization token, verify the validity of the JWT provided, load the current user, and inject it into the response stream, so an authenticated API endpoint can conveniently access the current user's information. This will be demonstrated by the me API. If successful, the middleware calls the next() function to yield control back to Express. If unsuccessful, then the API can't be called.
Note that authenticateHelper returns useful error messages, so users aren't confused if they try to execute an action they're not permitted to execute.
Consider the implementation of the me API, which returns the currently logged-in user to the client via /v1/auth/me, as shown here:
server/src/v1/routes/authRouter.ts
/**
 * @swagger
 * /v1/auth/me:
 *   get:
 *     ...
 */
// tslint:disable-next-line: variable-name
router.get('/me', authenticate(),
  async (_req: Request, res: Response) => {
    if (res.locals.currentUser) {
      return res.send(res.locals.currentUser)
    }
    return res.status(401)
      .send({ message: AuthenticationRequiredMessage })
  }
)
Note that the /v1/auth/me method uses the authenticate middleware and simply returns the user who was loaded into the response stream.
Custom server auth provider
Now that we have a functional auth implementation in our server, we can implement a custom auth provider in LemonMart, as covered in Chapter 8, Designing Authentication and Authorization:
You must implement this custom auth provider in your Angular app.
The code sample for this section is in the projects/ch10 folder on the lemon-mart repo. Note that the sample is also accessible under the web-app folder.
- In
environment.tsandenvironment.prod.ts, implement abaseUrlvariable. - Also select
authModeasAuthMode.CustomServer:web-app/src/environments/environment.ts web-app/src/environments/environment.prod.ts export const environment = { ... baseUrl: 'http://localhost:3000', authMode: AuthMode.CustomServer, - Install a helper library to programmatically access TypeScript enum values:
$ npm i ts-enum-util - Implement the custom authentication provider as shown here:
web-app/src/app/auth/auth.custom.service.ts
import { $enum } from 'ts-enum-util'
interface IJwtToken {
  email: string
  role: string
  picture: string
  iat: number
  exp: number
  sub: string
}
@Injectable()
export class CustomAuthService extends AuthService {
  constructor(private httpClient: HttpClient) {
    super()
  }
  protected authProvider(
    email: string,
    password: string
  ): Observable<IServerAuthResponse> {
    return this.httpClient.post<IServerAuthResponse>(
      `${environment.baseUrl}/v1/auth/login`,
      {
        email,
        password,
      }
    )
  }
  protected transformJwtToken(token: IJwtToken): IAuthStatus {
    return {
      isAuthenticated: token.email ? true : false,
      userId: token.sub,
      userRole: $enum(Role)
        .asValueOrDefault(token.role, Role.None),
      userEmail: token.email,
      userPicture: token.picture,
    } as IAuthStatus
  }
  protected getCurrentUser(): Observable<User> {
    return this.httpClient
      .get<IUser>(`${environment.baseUrl}/v1/auth/me`)
      .pipe(map(User.Build, catchError(transformError)))
  }
}
The
authProvidermethod calls our/v1/auth/loginmethod andgetCurrentUsercalls/v1/auth/meto retrieve the current user.Ensure that calls to
loginmethods always happen on HTTPS, otherwise you will be sending user credentials on the open internet. This is ripe for eavesdroppers on public Wi-Fi networks to steal user credentials. - Update
authFactoryto return the new provider for theAuthMode.CustomServeroption:web-app/src/app/auth/auth.factory.ts export function authFactory( afAuth: AngularFireAuth, httpClient: HttpClient ) { ... case AuthMode.CustomServer: return new CustomAuthService(httpClient) } - In
app.modules.ts, update theAuthServiceprovider'sdepsproperty to injectHttpClientintoauthFactory:web-app/src/app/app.module.ts ... { provide: AuthService, useFactory: authFactory, deps: [AngularFireAuth, HttpClient], }, ... - Start your web app to make sure that things are working.
Next, let's implement the get user endpoint, so our auth provider can get the current user.
GET User by ID
Let's implement the GET User by ID API endpoint, at /v2/users/{id}, in userRouter:
server/src/v2/routes/userRouter.ts
import { ObjectID } from 'mongodb'
import { authenticate } from '../../services/authService'
import { IUser, User, UserCollection } from '../../models/user'
/**
 * @swagger
 * /v2/users/{id}:
 *   get: …
 */
router.get(
  '/:userId',
  authenticate({
    requiredRole: Role.Manager,
    permitIfSelf: {
      idGetter: (req: Request) => req.body._id,
      requiredRoleCanOverride: true,
    },
  }),
  async (req: Request, res: Response) => {
    const user = await UserCollection
      .findOne({ _id: new ObjectID(req.params.userId) })
    if (!user) {
      res.status(404).send({ message: 'User not found.' })
    } else {
      res.send(user)
    }
  }
)
In the preceding code sample, we query the database by user ID to find the record we're looking for. We import UserCollection and call the findOne method to get a User object back. Note that we are not leveraging the userService. Since we're only retrieving a single record and immediately sending the result back, the additional layer of abstraction is cumbersome. However, if you start adding any business logic to the retrieval of a user, then refactor the code to leverage userService.
We secure the endpoint using the authenticate middleware, allowing users to retrieve their records and managers to retrieve any record.
Generating users with Postman
Earlier in this chapter, we covered how to create a POST method to create a new user in the Services subsection of the Implementing APIs with Express.js section. Using this POST endpoint and the Postman API client, we can quickly generate user records for testing purposes.
You must generate test data in lemon-mart-server following the instructions below, which will be required in later chapters.
Let's install and configure Postman.
Go to https://www.getpostman.com to download and install Postman.
Configuring Postman for authenticated calls
First, we need to configure Postman so that we can access our authenticated endpoints:
Bring up your server and database using either docker-compose up or npm run start:backend. Remember, make sure that, first and foremost, you're able to execute the sample server provided on GitHub at https://github.com/duluca/lemon-mart-server. Getting your own version of the server going is a secondary goal.
- Create a new collection named
LemonMart. - Add a POST request with the URL
http://localhost:3000/v1/auth/login. - In the headers, set the key-value pair, Content-Type:
application/json. - In the body section, provide the email and password for the demo user login that we defined in the top-level
.envfile:http://localhost:3000/v1/auth/login - Body { "email": "duluca@gmail.com", "password": "l0l1pop!!" } - Hit Send to log in.
- Copy the
accessToken, as shown here:
Figure 10.9: Setting up Postman
- Click on the settings icon in the top-right corner to manage environments.
- Add a new environment called LemonMart Server.
- Create a variable named
token. - Paste the
accessTokenvalue you have as the current value (no parentheses). - Click on Add/Update.
Going forward, when you add a new request in Postman, you must provide the token variable as an authorization header, as shown:
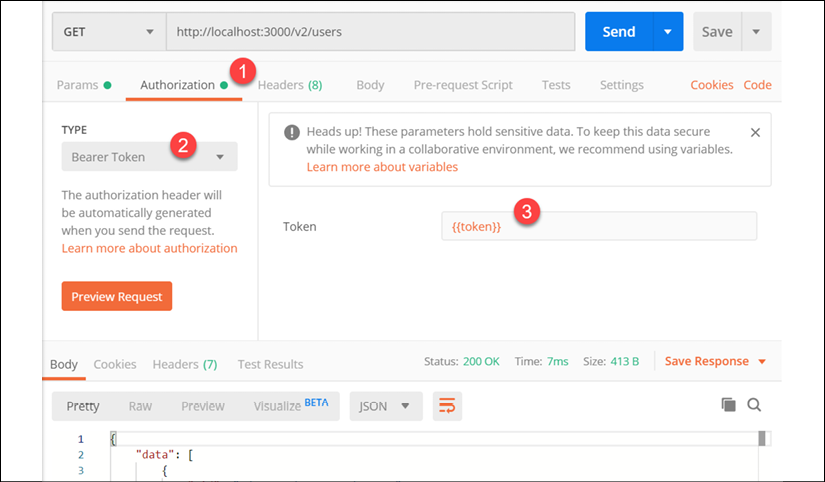
Figure 10.10: Providing a token in Postman
When using Postman, always make sure that the correct environment is selected in the dropdown in the top-right corner.
- Switch over to the Authorization tab.
- Select Bearer Token as the type.
- Provide the token variable as
{{token}}.
When you Send your request, you should see the results. Be mindful that when your token expires, you will need to repeat this process.
Postman automation
Using Postman, we can automate the execution of requests. In order to create sample users in our system, we can leverage this functionality:
- Create a new POST request for
http://localhost:3000/v2/usernamed Create Users. - Set the
tokenin the Authorization tab - In the Body tab, provide a templated JSON object, as shown here:
{
  "email": "{{email}}",
  "name": {
    "first": "{{first}}",
    "last": "{{last}}"
  },
  "picture": "https://en.wikipedia.org/wiki/Bugs_Bunny#/media/File:Bugs_Bunny.svg",
  "role": "clerk",
  "userStatus": true,
  "dateOfBirth": "1940-07-27",
  "address": {
    "line1": "123 Acme St",
    "city": "LooneyVille",
    "state": "Virginia",
    "zip": "22201"
  },
  "phones": [
    {
      "type": "mobile",
      "digits": "5551234567"
    }
  ]
}
For the purposes of this example, I'm only templating the email and the first and last name fields. You may template all properties.
- Implement a Postman Pre-request Script, which executes arbitrary logic before sending a request. The script will define an array of people, and one by one set the current environment variable to be the next row as requests are executed:
For more information on pre-request scripts, check out https://learning.postman.com/docs/postman/scripts/pre-request-scripts/.
- Switch to the Pre-request Script tab and implement the script:
var people = pm.environment.get('people') if (!people) { people = [ {email: 'efg@gmail.com', first: 'Ali', last: 'Smith'}, {email: 'veli@gmail.com', first: 'Veli', last: 'Tepeli'}, {email: 'thunderdome@hotmail.com', first: 'Justin', last: 'Thunderclaps'}, {email: 'jt23@hotmail.com', first: 'Tim', last: 'John'}, {email: 'apple@smith.com', first: 'Obladi', last: 'Oblada'}, {email: 'jones.smith@icloud.com', first: 'Smith', last: 'Jones'}, {email: 'bugs@bunnylove.com', first: 'Bugs', last: 'Bunny'}, ] } var person = people.shift() pm.environment.set('email', person.email) pm.environment.set('first', person.first) pm.environment.set('last', person.last) pm.environment.set('people', people)pmis a global variable that stands for PostMan.In the first line, we get the
peoplearray from the environment. During the first request, this won't exist, which allows us to initialize the array with our test data. Next, we shift to the next record, and set the individual variables we used in our templated request body. Then, we save the current state of the array back to the environment, so, during the next execution, we can shift to the next record, until such time as we run out of records. - Implement a
testscript in the Tests tab:var people = pm.environment.get('people') if (people && people.length > 0) { postman.setNextRequest('Create Users') } else { postman.setNextRequest(null) } - Make sure to save your request.
Here, we define a
testscript, which will continue to execute untilpeople.lengthreaches zero. With each iteration, we call the Create Users request. When there are no people left, we callnullto terminate the test.As you may imagine, you can combine multiple requests and multiple environment variables to execute sophisticated tests.
- Now, execute the script using Runner, located in the top-left corner of the screen:

Figure 10.11: Runner button in the top-left corner of the Postman UI
- Update your
logintoken before moving on. - Configure the runner as shown:

Figure 10.12: Collection Runner configuration
- Select the LemonMart collection.
Select the LemonMart Server environment, which contains the
tokenvariable.Only select the Create Users request.
Click on Run LemonMart to execute.
If your run succeeded, you should see the following output:

Figure 10.13: Collection Runner results
If you use Studio 3T as a MongoDB explorer, you can observe that all records have been created or you can check them out with Postman, when we implement the /v2/users endpoint.
Note that since we have a unique email index, your run partially succeeds on the next run. POST requests for already created records will return a 400 Bad Request.
You can read more about Studio 3T at https://studio3t.com/.
Put User
We have already covered how to create a POST request in the Services section earlier in the chapter. Now, let's see how you can update an existing user record:
server/src/v2/routes/userRouter.ts
/**
 * @swagger
 * /v2/users/{id}:
 *   put:
 */
router.put(
  '/:userId',
  authenticate({
    requiredRole: Role.Manager,
    permitIfSelf: {
      idGetter: (req: Request) => req.body._id,
      requiredRoleCanOverride: true,
    },
  }),
  async (req: Request, res: Response) => {
    const userData = req.body as User
    delete userData._id
    await UserCollection.findOneAndUpdate(
      { _id: new ObjectID(req.params.userId) },
      {
        $set: userData,
      }
    )
    const user = await UserCollection
      .findOne({ _id: new ObjectID(req.params.userId) })
    if (!user) {
      res.status(404).send({ message: 'User not found.' })
    } else {
      res.send(user)
    }
  }
)
We set userData from the request body. We then delete the _id property that's in the body, since the URL parameter is the authoritative source of information. Additionally, this prevents a user's ID from being accidentally changed to a different value.
We then leverage the findOneAndUpdate method to locate and update the record. We query for the record using the ID. We update the record by using MongoDB's $set operator.
Finally, we load the saved record from the database and return it back to the client.
POST and PUT methods should always respond with the updated state of the record.
For our last piece of implementation, let's review API endpoints that can support paginated data tables.
Pagination and filtering with DocumentTS
By far the most useful functionality of DocumentTS is findWithPagination, as mentioned in the About DocumentTS section. Let's leverage findWithPagination to implement the /v2/users endpoint, which can return all users:
server/src/v2/routes/userRouter.ts
/**
 * @swagger
 * components:
 *   parameters:
 *     filterParam: …
 *     skipParam: …
 *     limitParam: …
 *     sortKeyParam: …
 */
/**
 * @swagger
 * /v2/users:
 *   get:
 */
router.get(
  '/',
  authenticate({ requiredRole: Role.Manager }),
  async (req: Request, res: Response) => {
    const query: Partial<IQueryParameters> = {
      filter: req.query.filter,
      limit: req.query.limit,
      skip: req.query.skip,
      sortKeyOrList: req.query.sortKey,
      projectionKeyOrList: ['email', 'role', '_id', 'name'],
    }
    const users = await UserCollection.findWithPagination<User>(query)
    res.send(users)
  }
)
We copy all the parameters from the URL using the req.query object as local variables. We define an additional property named projectionKeyOrList to limit the properties of a record that can be returned to the client. In this case, only the email, role, _id, and name properties will be returned. This minimizes the amount of data that is sent over the wire.
Finally, we simply pass the new query object to the findWithPagination function and return the results to the client.
You can create a new request in Postman to verify the correct functionality of your new endpoint, as shown in the following screenshot:

Figure 10.14: Calling get users with Postman
In Chapter 12, Recipes – Master/Detail, Data Tables, and NgRx, we will implement a paginated data table that takes advantage of the filtering, sorting, and data limiting features.
Congratulations! You now have a grasp on how code works across the entire stack of software, from the database to the frontend and back.
Summary
In this chapter, we covered full-stack architecture. You learned about building a minimal MEAN stack. You now know how to create a monorepo for a full-stack application and configure a Node.js server with TypeScript. You containerized your Node.js server and declaratively defined your infrastructure with Docker Compose. Using Docker Compose with CircleCI, you verified your infrastructure in a CI environment.
You designed a RESTful API using Swagger and the OpenAPI spec, set up an Express.js app and configured it such that you can integrate your Swagger definition as documentation for your APIs. You configured MongoDB with the DocumentTS ODM so you can easily connect and query documents. You defined a user model with password hashing features.
You then implemented a JWT-based authentication service. You implemented an authenticate middleware to secure API endpoints and allow role-based access. You learned how to interact with RESTful APIs using Postman. Using Postman's automation features, you generated test data. Finally, you implemented RESTful APIs for authentication functions and CRUD operations for users.
In the next two chapters, we will go over Angular recipes to create forms and data tables. You will want your Lemon Mart Server up and running to verify the correct functionality of your forms and tables as you implement them.
Exercise
You secured your endpoints using the authenticate middleware. You configured Postman to send a valid token so that you can communicate with your secured endpoints. By way of an exercise, try removing the authenticate middleware and call the same endpoint with and without a valid token. Re-add the middleware and try the same thing again. Observe the different responses you get from the server.
Further reading
- What is DX? (Developer Experience), Albert Cavalcante, 2019: https://medium.com/@albertcavalcante/what-is-dx-developer-experience-401a0e44a9d9
- Overview of Blocking versus Non-Blocking, 2020: https://nodejs.org/en/docs/guides/blocking-vs-non-blocking/
- Explain Non-Blocking I/O like I'm Five, Frank Rosner, 2019: https://blog.codecentric.de/en/2019/04/explain-non-blocking-i-o-like-im-five/
- OpenAPI Specification, 2020: https://swagger.io/docs/specification
- Serialization, 2020: https://en.wikipedia.org/wiki/Serialization
- JSON, 2020: https://en.wikipedia.org/wiki/JSON
- Aggregation in MongoDB, 2020: https://docs.mongodb.com/manual/aggregation
Questions
Answer the following questions as best as you can to ensure that you've understood the key concepts from this chapter without Googling. Do you need help answering the questions? See Appendix D, Self-Assessment Answers online at https://static.packt-cdn.com/downloads/9781838648800_Appendix_D_Self-Assessment_Answers.pdf or visit https://expertlysimple.io/angular-self-assessment.
- What are the main components that make for a great developer experience?
- What is a
.envfile? - What is the purpose of the
authenticatemiddleware? - How does Docker Compose differ from using the
Dockerfile? - What is an ODM? How does it differ from an ORM?
- What is middleware?
- What are the uses of Swagger?
- How would you refactor the code for the
/v2/users/{id} PUTendpoint inuserRouter.ts, so the code is reusable?