13
Highly Available Cloud Infrastructure on AWS
The web is a hostile environment. There are good and bad actors. Bad actors can try to poke holes in your security or try to bring down your website with a Distributed Denial-of-Service (DDoS) attack. Good actors, if you're lucky, will love your website and won't stop using it. They'll shower you with recommendations to improve your site, but they may also run into bugs and may be so enthusiastic that your site may slow down to a crawl due to high traffic. Real-world deployments on the web require a lot of expertise to get them right. As a full-stack developer, you can only know about so many nuances of hardware, software, and networking. Luckily, with the advent of cloud service providers, a lot of this expertise has been translated into software configurations, with the difficult hardware and networking concerns taken care of by the provider.
One of the best features of a cloud service provider is cloud scalability, which refers to your server automatically scaling out to respond to high volumes of unexpected traffic and scaling down to save costs when the traffic returns back to normal levels. Amazon Web Services (AWS) goes beyond basic cloud scalability and introduces high-availability and fault-tolerant concepts, allowing resilient local and global deployments. I have chosen to introduce you to AWS because of its vast capabilities, which go way beyond what I will touch on in this book. With Route 53, you can get free DDoS protection; with API Gateway, you create API keys; with AWS Lambda, you can handle millions of transactions for only a few dollars a month; and with CloudFront, you can cache your content at secret edge locations that are scattered around major cities of the world. In addition, blue-green deployments allow you to achieve no-downtime deployments of your software.
Overall, the tools and techniques you will learn about in this chapter are adaptable to any cloud provider and are fast becoming critical knowledge for any full-stack developer. We will be going over the following topics:
- Creating and protecting AWS accounts
- Right-sizing infrastructure, including simple load testing to optimize instances
- Configuring and deploying to AWS
- ECS Fargate scripted blue-green deployments
- Billing
The most up-to-date versions of the sample code for the book are on GitHub at the following repository link. The repository contains the final and complete state of the code. Each section contains information boxes to help direct you to the correct filename or branch on GitHub that you can use to verify your progress.
The sample code for Chapter 13 removes all optional and alternate implementations from previous chapters and only enables auth with lemon-mart-server. This is so that readers can reference a clean implementation of the lemon-mart project.
For Chapter 13 examples based on lemon-mart:
- Clone the repo at https://github.com/duluca/lemon-mart.
- Use
config.docker-integration.ymlto verify yourconfig.ymlimplementation. - Execute
npm installon the root folder to install dependencies. - To run the CircleCI Docker integration configuration, execute
git checkout deploy_aws. Refer to the pull request at https://github.com/duluca/lemon-mart/pull/27. - The code sample for this chapter is under the sub-folder:
projects/ch13 - To run the Angular app for this chapter, execute:
npx ng serve ch13 - To run Angular unit tests for this chapter, execute:
npx ng test ch13 --watch=false - To run Angular e2e tests for this chapter, execute:
npx ng e2e ch13 - To build a production-ready Angular app for this chapter, execute:
npx ng build ch13 --prod
Note that the dist/ch13 folder at the root of the repository will contain the compiled result.
Beware that the source code in the book or on GitHub may not always match the code generated by the Angular CLI. There may also be slight differences in implementation between the code in the book and what's on GitHub because the ecosystem is ever-evolving. It is natural for the sample code to change over time. Also on GitHub, expect to find corrections, fixes to support newer versions of libraries, or side-by-side implementations of multiple techniques for you to observe. You are only expected to implement the ideal solution recommended in the book. If you find errors or have questions, please create an issue or submit a pull request on GitHub for the benefit of all readers.
You can read more about updating Angular in Appendix C, Keeping Angular and Tools Evergreen. You can find this appendix online from https://static.packt-cdn.com/downloads/9781838648800_Appendix_C_Keeping_Angular_and_Tools_Evergreen.pdf or at https://expertlysimple.io/stay-evergreen.
AWS is an extremely popular service and AWS accounts are even more popular targets for hacking attempts. Let's begin by creating a secure AWS account.
Creating a secure AWS account
Account access and control is of paramount importance in any cloud service, and this includes AWS as well. After initial account creation, you will have your root credentials, which is your email and password combination.
Let's start by creating an AWS account:
- Start by navigating to https://console.aws.amazon.com.
- If you don't have one, create a new account.
- If you are new to AWS, you can get 12 months of free tier access to various services, as shown on the sign-up screen here:

Figure 13.1: AWS account sign up
Your AWS billing is tied to your root credentials. If compromised, a lot of damage can be done on your account before you can regain access.
- Ensure that you enable 2FA on your root credentials.
To add another layer of security, going forward, you need to stop logging in to your AWS account using your root credentials. You can create user accounts using the AWS Identity and Access Management (IAM) module. If these accounts get compromised, unlike your root account, you can easily and quickly delete or replace them.
- Navigate to the IAM module.
- Create a new user account with global admin rights.
- Log in to the AWS console using these credentials.
- You should enable 2FA for these credentials as well.
- A secure account setup looks as follows, with every status reported as green:

Figure 13.2: AWS IAM module after secure setup
The major benefit of working with user accounts is programmatic access. For each user account, you can create a public access ID and private access key pair. When you're working with third parties, such as hosted continuous integration services, your own application code, or CLI tools, you use your programmatic access keys to connect to your AWS resources. When, inevitably, the access keys leak, it is quick and convenient to disable access to the old keys and create new ones.
Furthermore, user account access can be tightly controlled by very granular permissions. You can also create roles with a group of permissions and further control communication between AWS services and some external services.
When creating user accounts and roles, always err on the side of minimal permissions. This can be an exercise in frustration when working with clients, contractors, or colleagues who are unfamiliar with AWS; however, it is a worthwhile exercise.
You're only as secure and reliable as your weakest link, so you must plan for failures and, most importantly, practice recovery plans on a regular basis.
Securing secrets
Password and private key leaks occur more commonly than you may think. Your keys may be compromised on unsecured public Wi-Fi networks; you may accidentally check them into your code repository or use superbly insecure communication methods like email.
Accidental code check-ins, however, are the biggest issue, since most junior developers don't realize that deletion isn't an option in source control systems.
As a developer, there are a few noteworthy best practices to follow to safeguard your secrets:
- Always use a VPN service on public Wi-Fi, such as tunnelbear.com.
- Leverage the
.aws/credentialsfile located under your user's home folder, to create profiles and store access keys. - As a team norm, create an
.envfile in the root of your project that is in.gitignoreto store any secrets that your CI server may later inject. - Always review commits before pushing them.
- Consider signing up for a service that can monitor your repos for secrets, like GitGurdian at https://gitguardian.com/, which is free for open source projects.
Note that GitGuardian flags Firebase and OpenWeather API keys as leaks. This is a false positive, because the keys in question are public keys and must be published for your app to function correctly.
Following these conventions every single time will get you into the good habit of never checking in your secrets to a code repository. In the next section, we will delve into resource considerations for your cloud environment.
Right-sizing infrastructure
The point of optimizing your infrastructure is to protect your company's revenue while minimizing the cost of operating your infrastructure. Your goal should be to ensure that users don't encounter high latency, otherwise known as bad performance or, worse, unfulfilled or dropped requests, all the while making your venture a sustainable endeavor.
The three pillars of web application performance are as follows:
- CPU utilization
- Memory usage
- Network bandwidth
I have intentionally left disk access out of the key consideration metrics, since only particular workloads executed on an application server or data store are affected by it. Disk access would rarely ever impact the performance of serving a web application as long as application assets are delivered by a Content Delivery Network (CDN). That said, still keep an eye on any unexpected runaway disk access, such as the high-frequency creation of temp and log files. Docker, for example, can spit out logs that can easily fill up a drive.
In an ideal scenario, CPU, memory, and network bandwidth use should be utilized evenly at around 60-80% of available capacity. If you encounter performance issues due to various other factors, such as disk I/O, a slow third-party service, or inefficient code, most likely one of your metrics will peak at or near maximum capacity, while the other two are idling or severely underutilized. This is an opportunity to use more CPU, memory, or bandwidth to compensate for the performance issue and also evenly utilize available resources.
The reason behind targeting 60-80% utilization is to allow some time for a new instance (server or container) to be provisioned and ready to serve users. After your predefined threshold has been crossed, while a new instance is provisioned, you can continue serving an increasing number of users, thus minimizing unfulfilled requests.
Throughout this book, I have discouraged over-engineering or perfect solutions. In today's complicated IT landscape, it is nearly impossible to predict where you will encounter performance bottlenecks. Your engineering may, very easily, take $100,000+ worth of engineering hours, where the solution to your problem may be a few hundred dollars of new hardware, whether it be a network switch, solid state drive, CPU, or more memory.
If your CPU is too busy, you may want to introduce more bookkeeping logic to your code, via indexes, hash tables, or dictionaries that you can cache in memory to speed up subsequent or intermediary steps of your logic. For example, if you are constantly running array lookup operations to locate particular properties of a record, you can perform an operation on that record, saving the ID and/or the property of the record in a hash table that you keep in memory, reducing your runtime cost from O(n) down to O(1).
Following the preceding example, you may end up using too much memory with hash tables. In this case, you may want to more aggressively offload or transfer caches to slower but more plentiful data stores using your spare network bandwidth, such as a Redis instance.
If your network utilization is too high, you may want to investigate the use of CDNs with expiring links, client-side caching, throttling requests, and API access limits for customers abusing their quotas, or optimize your instances to have disproportionately more network capacity compared to their CPU or memory capacity.
Optimizing instances
In an earlier example, I demonstrated the use of my duluca/minimal-node-web-server Docker image to host our Angular apps. Even though Node.js is a very lightweight server, it is simply not optimized to just be a web server. In addition, Node.js has a single-threaded execution environment, making it a poor choice for serving static content to many concurrent users at once.
You can observe the resource that a Docker image is utilizing by executing docker stats:
$ docker stats
CONTAINER ID  CPU %  MEM USAGE / LIMIT  MEM %  NET I/O  BLOCK I/O    PIDS
27d431e289c9  0.00%  1.797MiB / 1.9GiB  0.09%  13.7kB / 285kB  0B / 0B  2
Here are comparative results of the system resources that Node and NGINX-based servers utilize at rest:
| Server | Image Size | Memory Usage |
|
|
16.8 MB |
1.8 MB |
|
|
71.8 MB |
37.0 MB |
However, at rest values only tell a portion of the story. To get a better understanding, we must perform a simple load test to see memory and CPU utilization under load.
Simple load testing
To get a better understanding of the performance characteristics of our server, let's put them under some load and stress them:
- Start your container using
docker run:$ docker run --name <imageName> -d -p 8080:<internal_port> <imageRepo>If you're using npm scripts for Docker, execute the following command to start your container:
$ npm run docker:debug - Execute the following bash script to start the load test:
$ curl -L http://bit.ly/load-test-bash | bash -s 100 "http://localhost:8080"This script will send
100requests per second to the server until you terminate it. - Execute
docker statsto observe the performance characteristics.
Here are high-level observations of CPU and memory utilization:
| CPU utilization statistics | Low | Mid | High | Max memory |
|
|
2% |
15% |
60% |
2.4 MB |
|
|
20% |
45% |
130% |
75 MB |
As you can see, there's a significant performance difference between the two servers serving the exact same content. Note that this kind of testing based on requests per second is good for comparative analysis and does not necessarily reflect real-world usage.
It is clear that our NGINX server will give us the best bang for our buck. Armed with an optimal solution, let's deploy the application on AWS.
Deploying to AWS ECS Fargate
AWS Elastic Container Service (ECS) Fargate is a cost-effective and easy-to-configure way to deploy your container in the cloud.
ECS consists of four major parts:
- A container repository, Elastic Container Registry (ECR), where you publish your Docker images.
- Services, tasks, and task definitions, where you define runtime parameters and port mappings for your container as a task definition that a service runs as tasks.
- A cluster, a collection of EC2 instances, where tasks can be provisioned and scaled out or in.
- Fargate, a managed cluster service that abstracts away EC2 instances, load balancer, and security group concerns.
In the top right corner of the AWS console, be sure to select the region that is closest to your users. For me, this is the us-east-1 region.
Our goal is to create a highly available blue-green deployment, meaning that at least one instance of our application will be up and running in the event of a server failure or even during a deployment. These concepts are explored in detail in Chapter 14, Google Analytics and Advanced Cloud Ops, in the Cost per user in a scalable environment section.
Configuring ECS Fargate
You can access ECS functions under the AWS Services menu, selecting the Elastic Container Service link.
If this is your first time logging in, you must go through a tutorial, where you will be forced to create a sample app. I would recommend going through the tutorial and deleting your sample app afterward. In order to delete a service, you need to update your service's number of tasks to 0. In addition, delete the default cluster to avoid any unforeseen charges.
Creating a Fargate cluster
Let's start by configuring a Fargate cluster, which acts as an anchor point when configuring other AWS services. Our cluster will eventually run a cluster service, which we will gradually build up in the following sections.
AWS Fargate is great choice to implement a scalable container orchestration solution in the cloud. In recent years, Kubernetes has gained prevalence as a go-to solution. Kubernetes is an open source alternative to AWS ECS with richer capabilities for container orchestration with on-premises, cloud, and cloud-hybrid deployments. AWS does offer Amazon Elastic Container Service for Kubernetes (Amazon EKS), however RedHat's open source OpenShift platform is easier to use and comes with batteries included compared to vanilla Kubernetes.
Let's create the cluster:
- Navigate to Elastic Container Service.
- Click on Clusters | Create Cluster.
- Select the Networking only... Powered by AWS Fargate template.
- Click on the Next step and you'll see the Create Cluster step, as shown:

Figure 13.3: AWS ECS Create Cluster
- Enter Cluster name as
fargate-cluster. - Create a VPC to isolate your resources from other AWS resources.
- Click on Create Cluster to finish the setup.
You will see the summary of your actions, as follows:

Figure 13.4: AWS ECS Fargate cluster
Now that you have created a cluster within its own Virtual Private Cloud (VPC), you can view it under Elastic Container Service | Clusters.
Creating a container repository
Next, we need to set up a repository where we can publish the container images we build in our local or CI environment:
This section presumes that you have set up Docker and npm scripts for Docker as detailed in Chapter 9, DevOps Using Docker. You can get the latest version of these scripts by executing npm i -g mrm-task-npm-docker and applying them with npx mrm npm-docker.
- Navigate to Elastic Container Service.
- Click on Repositories | Create Repository.
- Enter the repository name as
lemon-mart. - Copy the Repository URI generated on the screen.
- Paste the URI in the
package.jsonfile of your application as the newimageRepovariable:package.json ... "config": { "imageRepo": "000000000000.dkr.ecr.us-east-1.amazonaws.com/lemon-mart", ... } - Click on Create Repository.
- Click on Next step and then on Done to finish the setup.
On the summary screen, you will get further instructions on how to use your repository with Docker. Later in the chapter, we will go over scripts that will take care of this for us:
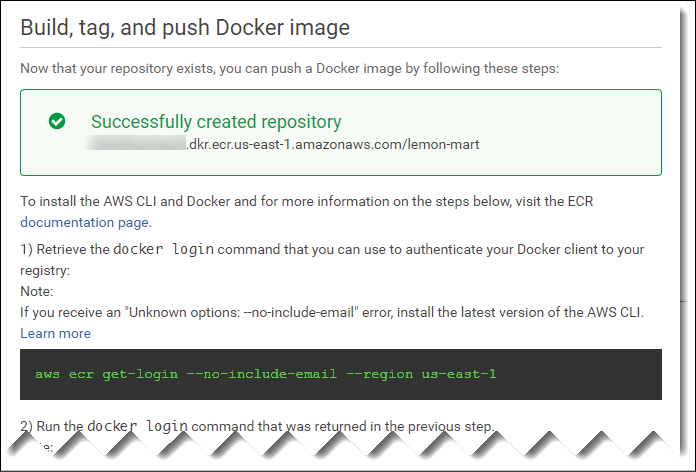
Figure 13.5: AWS ECS repository
You can view your new repository under Elastic Container Service | Repositories.
We will go over how to publish your image in the upcoming npm scripts for AWS section.
Let's continue with the setup of ECS.
Creating a task definition
With a container target defined in our repository, we can define a task definition, which contains the necessary metadata to run our container, such as port mappings, reserved CPU, and memory allocations:
- Navigate to Elastic Container Service.
- Click on Task Definitions | Create new Task Definition.
- Select Fargate launch type compatibility.
- Enter Task Definition Name as
lemon-mart-task. - Select Task role as none (you can add one later to enable access to other AWS services).
- Enter Task Memory as
0.5 GB. - Enter Task CPU as
0.25 CPU. - Click on Add Container:
- Enter Container name as
lemon-mart. - For Image, paste the image repo URI from earlier, but append the
:latesttag to it so that it always pulls the latest image in the repository, such as000000000000.dkr.ecr.us-east-1.amazonaws.com/lemon-mart:latest. - Set a Soft limit of
128 MBfor NGINX or256 MBfor Node.js. - Under Port mappings, specify Container port as
80for NGINX or3000for Node.js.
- Enter Container name as
- Accept the remaining defaults.
- Click on Add; this is how your task definition will look before creating it:

Figure 13.6: AWS ECS task definition
- Click on Create to finish the setup.
View your new Task Definition under Elastic Container Service | Task Definitions.
Note that the default settings will enable AWS CloudWatch logging, which is a way you can retroactively access the console logs of your container instance. In this example, a CloudWatch log group named /ecs/lemon-mart-task will be created.
View your new log group under Cloud Watch | Logs.
If you're adding a container that needs to persist data, the task definition allows you to define a volume and mount a folder to your Docker container. I've published a guide for configuring AWS Elastic File System (EFS) with your ECS container at https://bit.ly/mount-aws-efs-ecs-container.
Creating an elastic load balancer
In a highly available deployment, you want to be running two instances of your container, as defined by the task definition we just created, across two different Availability Zones (AZs). For this kind of dynamic scaling out and scaling in, we need to configure an Application Load Balancer (ALB) to handle request routing and draining:
- On a separate tab, navigate to EC2 | Load Balancers | Create Load Balancer.
- Create an Application Load Balancer.
- Enter Name as
lemon-mart-alb.In order to support SSL traffic under listeners, you can add a new listener for HTTPS on port
443. An SSL setup can be achieved conveniently via AWS services and wizards. During the ALB configuration process, AWS offers links to these wizards to create your certificates. However, it is an involved process and one that can vary depending on your existing domain hosting and SSL certification setup. I will be skipping over SSL-related configuration in this book. You can find SSL related steps in the guide I've published at https://bit.ly/setupAWSECSCluster. - Under Availability Zones, select the VPC that was created for your fargate-cluster.
- Select all AZs listed.
- Expand Tags and add a key/value pair to be able to identify the ALB, like
"App": "LemonMart". - Click on Next: Configure Security Settings.
If you added an HTTPS listener, you will see options to configure a certificate.
If configuring a certificate, click on Choose a certificate from ACM (AWS Certificate Manager) and select the Default ELB security policy.
If you never created a certificate, click on the Request a new certificate from ACM link to create one. If you have created a certificate before, then go to Certificate Manager to create a new one. Then, refresh and select your certificate.
- Click on Next: Configure Security Groups.
- Create a new cluster-specific security group,
lemon-mart-sg, only allowing port80inbound or443if using HTTPS.When creating your cluster service in the next section, ensure that the security group created here is the one selected during service creation. Otherwise, your ALB won't be able to connect to your instances.
- Click on Next: Configure Routing.
- Name a new Target group as
lemon-mart-target-group. - Change the protocol type from
instancetoip. - Under Health check, keep the default route,
/, if serving a website on HTTP.Health checks are critical for scaling and deployment operations to work. This is the mechanism that AWS can use to check whether an instance has been created successfully or not.
If deploying an API and/or redirecting all HTTP calls to HTTPS, ensure that your app defines a custom route that is not redirected to HTTPS. On an HTTP server,
GET /healthCheckreturns a simple 200 message sayingI'm healthyand verifying that this does not redirect to HTTPS. Otherwise, you will go through a lot of pain and suffering trying to figure out what's wrong, as all health checks fail and deployments inexplicably fail.duluca/minimal-node-web-serverprovides HTTPS redirection, along with an HTTP-only/healthCheckendpoint out of the box. Withduluca/minimal-nginx-web-server, you will need to provide your own configuration. - Click on Next: Register Targets.
- Do not register any Targets or IP Ranges. ECS Fargate will magically manage this for you. If you do so yourself, you will provision a semi-broken infrastructure.
- Click on Next: Review; your ALB settings should look similar to the ones shown:
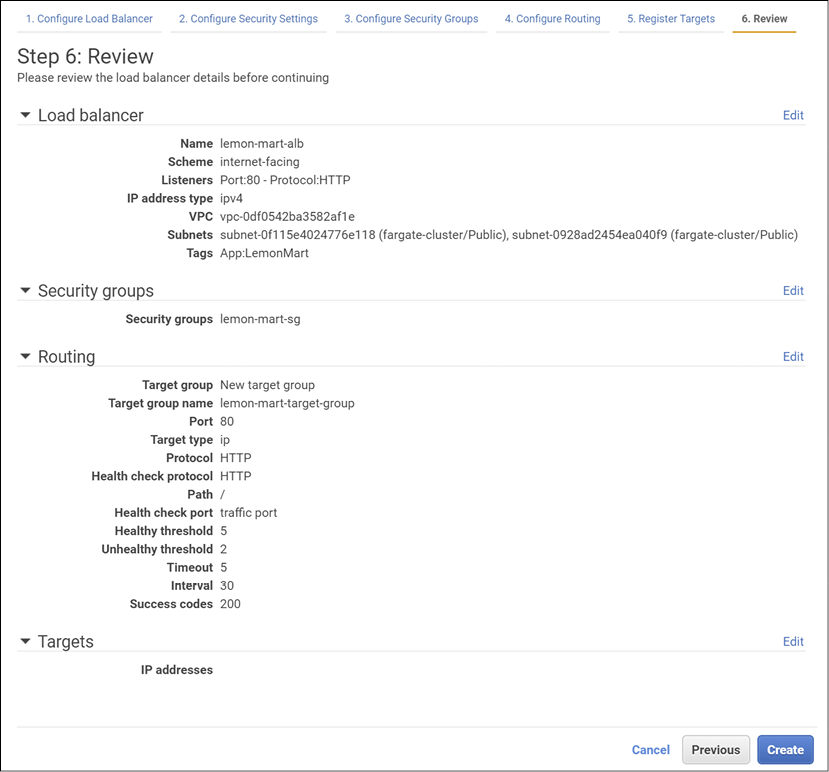
Figure 13.7: AWS Application Load Balancer settings
- Click on Create to finish the setup.
You will be using lemon-mart-alb when creating your cluster service in the next section.
Creating a cluster service
Now, we will bring it all together by creating a service in our cluster using the task definition and the ALB we created:
- Navigate to Elastic Container Service.
- Click on Clusters | fargate-cluster.
- Under the Services tab, click on Create.
- Select
Fargatefor Launch type. - Select the task definition you created earlier.
Note that task definitions are versioned, such as
lemon-mart-task:1. If you were to make a change to the task definition, AWS would createlemon-mart-task:2. You would need to update the service with this new version for your changes to take effect. - Enter Service name as
lemon-mart-service. - For Number of tasks, select
2. - For Minimum healthy percent, select
50. - For Maximum percent, select
200.Stick with the Rolling update deployment type, as we'll implement our own blue/green deployment strategy.
- Click on Next step.
Set Minimum healthy percent to
100for high availability even during deployment. Fargate pricing is based on usage per second, so while deploying your application, you will be charged extra for the additional instances, while the old ones are being deprovisioned. - Under Configure network, select the same
VPCas your cluster from earlier. - Select all subnets that are available; there should be at least two for high availability.
- Select the security group you created in the previous section, named
lemon-mart-sg. (If you can't see it, refresh the page.) - Select the Load Balancer type as Application Load Balancer.
- Select the lemon-mart-alb option.
- Add Container port to the ALB, such as
80or3000, by clicking on the Add to Load Balancer button. - Select the Production listener port that you have already defined.
- Select the Target group you have already defined,
lemon-mart-target-group. - Uncheck Enable service discovery integration.
- Click on Next step.
- If you'd like your instances to scale out and in automatically, when their capacities reach a certain limit, then set Auto Scaling.
I would recommend skipping the setup of auto scaling during the initial setup of your service to make it easier to troubleshoot any potential configuration issues. You can come back and set it up later. Automatic task scaling policies rely on alarms, such as CPU utilization. In Chapter 14, Google Analytics and Advanced Cloud Ops, in the Cost per user in scalable environment section, you can read about calculating your optimum target server utilization and set your alarms based on this number.
- Click on Next step and review your changes, as illustrated:
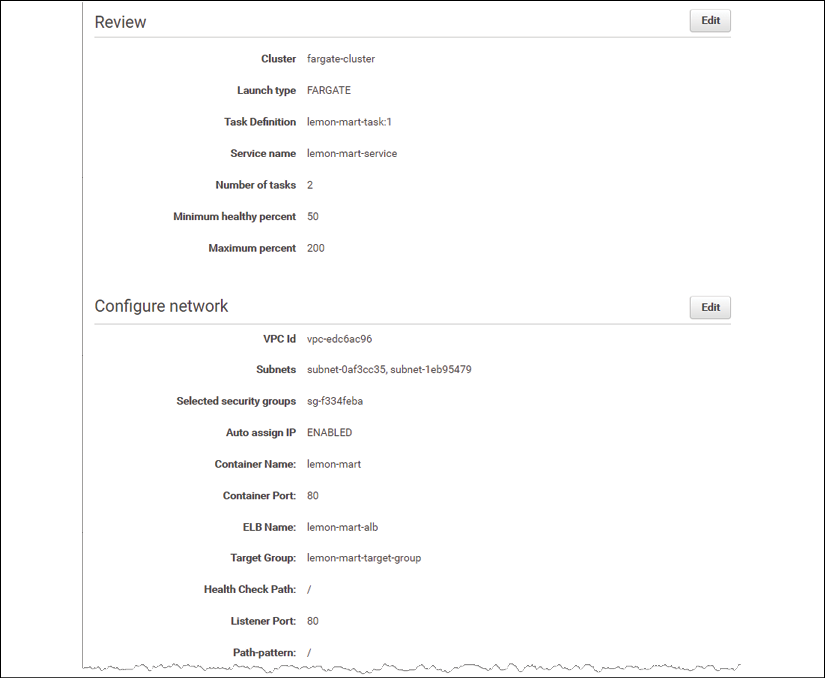
Figure 13.8: AWS Fargate cluster service settings
- Finally, click on Create Service to finish the setup.
Observe your new service under Elastic Container Service | Clusters | fargate-cluster | lemon-mart-service. Until you publish an image to your container repository, your AWS service won't be able to provision an instance, since the health check will continually fail. After you publish an image, you will want to ensure that there are no errors present in the Events tab for your service.
AWS is a complicated beast and with Fargate, you can avoid a lot of complexity. However, if you're interested in setting up your own ECS cluster using your own EC2 instances, you can get significant discounts with reserved instances of 1-3 years. I have a 75+ step setup guide available at https://bit.ly/setupAWSECSCluster.
We have executed a lot of steps manually to create our cluster. AWS CloudFormation resolves this issue by offering configuration templates that you can customize to your needs or script your own templates from scratch. If you would like to get serious about AWS, this kind of code-as-infrastructure setup is definitely the way to go.
For production deployments, ensure that your configuration is defined by a CloudFormation template, so it can be easily re-provisioned not if, but when a deployment-related faux pas occurs.
Configuring the DNS
To connect a domain or a subdomain name to your app, you must configure your DNS to point to the ALB. AWS offers the Route 53 service to manage your domain.
Route 53 makes it easy to assign a domain or a subdomain to an ALB dynamically:
- Navigate to Route 53 | Hosted Zones.
- If you already have a domain registered, select it; otherwise, register it with Create Hosted Zone.
Note that you would need to re-assign the nameservers of your domain to the AWS one for this to take effect.
- Click on Create record set.
- Enter Name as
lemonmart. - Set Alias to
yes. - Select lemon-mart-alb from the load balancer list.
- Click on Create to finish the setup:

Figure 13.9: Route 53 – Create Record Set
Now, your site will be reachable on the subdomain you just defined, for example, http://lemonmart.angularforenterprise.com.
If you don't use Route 53, don't panic. On your domain provider's website, edit the Zone file to create an A record to the ALB's DNS address and you're done.
Getting the ALB DNS name
In order to get your load balancer's DNS address, perform these steps:
- Navigate to EC2 | Load Balancers.
- Select lemon-mart-alb.
- In the Description tab, note the DNS name; consider this example:
DNS name:
lemon-mart-alb-1871778644.us-east-1.elb.amazonaws.com (A Record)
Now that we configured AWS ECS Fargate, let's prep our Angular app to be deployed to AWS.
Adding npm scripts for AWS
Just like npm scripts for Docker, I have developed a set of scripts, called npm scripts for AWS, that work on Windows 10 and macOS. These scripts will allow you to upload and release your Docker images in spectacular, no-downtime, blue/green fashion. You can get the latest version of these scripts and automatically configure them in your project by executing the following steps:
We are configuring these settings on the lemon-mart project.
- Install the npm scripts for the AWS ECS task:
npm i -g mrm-task-npm-aws - Apply the npm scripts for Docker configuration:
npx mrm npm-aws
Now let's configure the scripts:
- Ensure that
mrm-task-npm-dockerscripts are set up in your project. - Create a
.envfile and setAWS_ACCESS_KEY_IDandAWS_SECRET_ACCESS_KEY:.env AWS_ACCESS_KEY_ID=your_own_key_id AWS_SECRET_ACCESS_KEY=your_own_secret_key - Ensure that your
.envfile is in your.gitignorefile to protect your secrets. - Install or upgrade to the latest AWS CLI:
- On macOS,
brew install awscli - On Windows,
choco install awscli
- On macOS,
- Log in to the AWS CLI with your credentials:
- Run
aws configure. - You'll need your Access Key ID and Secret Access Key from when you configured your IAM account.
- Set Default region name as
us-east-1.
- Run
- Update
package.jsonto add a newconfigproperty with the following configuration properties:package.json ... "config": { ... "awsRegion": "us-east-1", "awsEcsCluster": "fargate-cluster", "awsService": "lemon-mart-service" }, ...Ensure that you update
package.jsonfrom when you configured npm scripts for Docker so that theimageRepoproperty has the address of your new ECS repository. - Ensure AWS scripts have been added to
package.json, as illustrated:package.json ... "scripts": { ... "aws:login:win": "cross-conf-env aws ecr get-login --no-include-email --region $npm_package_config_awsRegion > dockerLogin.cmd && call dockerLogin.cmd && del dockerLogin.cmd", "aws:login:mac": "eval $(aws ecr get-login --no-include-email --region $npm_package_config_awsRegion)", "aws:login": "run-p -cs aws:login:win aws:login:mac", }
Check your AWS CLI version by executing aws --version. Depending on your version, your aws:login needs to be different. The preceding script shows login scripts for AWS CLI v1. If you have v2, your login commands will look like the following scripts:
On macOS / Linux:
aws ecr get-login-password --region $npm_package_config_awsRegion | docker login --username AWS --password-stdin $npm_package_config_imageRepo
On Windows:
(Get-ECRLoginCommand).Password | docker login --username AWS --password-stdin $npm_package_config_imageRepo:latest
npm run aws:login calls platform-specific commands that automate an otherwise multi-step action to get a docker login command from the AWS CLI tool, as shown:
example
$ npm run aws:login
docker login -u AWS -p eyJwYXl...3ODk1fQ== https://00000000000.dkr.ecr.us-east-1.amazonaws.com
$ docker login -u AWS -p eyJwYXl...3ODk1fQ== https://00000000000.dkr.ecr.us-east-1.amazonaws.com
WARNING! Using --password via the CLI is insecure. Use --password-stdin.
Login Succeeded
You first execute aws ecr get-login and then copy-paste the resulting docker login command and execute it so that your local Docker instance is pointed to AWS ECR. Now let's see how we can deploy a built container:
package.json
...
"scripts": {
...
"aws:deploy": "cross-conf-env docker run
   --env-file ./.env silintl/ecs-deploy
   -c $npm_package_config_awsEcsCluster
   -n $npm_package_config_awsService
   -i $npm_package_config_imageRepo:latest
   -r $npm_package_config_awsRegion --timeout 1000",
}
...
example
$ docker image build . -f nginx.Dockerfile
   -t 000000000.dkr.ecr.us-east-1.amazonaws.com/lemon-mart:latest
$ npm run docker:publish
$ npm run aws:deploy
Using image name: 0000000.dkr.ecr.us-east-1.amazonaws.com/lemon-mart:latest
Current task definition: arn:aws:ecs:us-east-1: 0000000:task-definition/lemon-mart-task:7
New task definition: arn:aws:ecs:us-east-1: 0000000:task-definition/lemon-mart-task:8
Service updated successfully, new task definition running.
Waiting for service deployment to complete...
Service deployment successful.
We first build the NGINX version of the Docker image for our web app because we're listening to port 80 on ECS. Then, publish the container to ECR and finally execute npm run aws:deploy, which uses the silintl/ecs-deploy Docker container that runs a blue/green deployment.
The details of how blue/green deployment works using ECS commands are beyond the scope of this book. To see more examples using native AWS ECS commands, refer to the aws-samples repository at https://github.com/aws-samples/ecs-blue-green-deployment.
We can group our commands together to execute them as a singular release command, as shown here:
package.json
...
"scripts": {
  ...
  "aws:release": "run-s -cs aws:login docker:publish aws:deploy"
}
...
Finally, npm run aws:release simply runs aws:login, docker:publish from the npm scripts for Docker and aws:deploy commands in the right order.
Publish
Your project is configured to be deployed on AWS. You mostly need to use two of the commands we created to build and publish an image:
- Execute
docker:debugto test, build, tag, run, tail, and launch your app in a browser to test the image:$ npm run docker:debug - Execute
aws:releaseto configure Docker login with AWS, publish your latest image build, and release it on ECS:$ npm run aws:releaseNote that when running multiple commands back to back and one of the commands exits with status
1, then npm considers this a failure. However, this doesn't necessarily mean that your action failed. Always scroll through the terminal outputs to see if any real errors were thrown. - Verify that your tasks are up and running at the Service level:

Figure 13.10: AWS ECS service
Ensure that Running count and Desired count are the same. A mismatch or a deploy taking a very long time usually means that the health check on your new container is failing. Check out the Events tab for more information. Your container is either failing to start up or you're likely listening to the wrong port.
- Verify that your instances are running at the Task level:

Figure 13.11: AWS ECS task instance
Note the Public IP address and navigate to it; for example,
http://54.164.92.137, and you should see your application or LemonMart running. - Verify that the Load Balancer setup is correct at the DNS level.
- Navigate to the ALB DNS address, for example http://lemon-mart-alb-681490029.us-east-1.elb.amazonaws.com, and confirm that the app renders as follows:
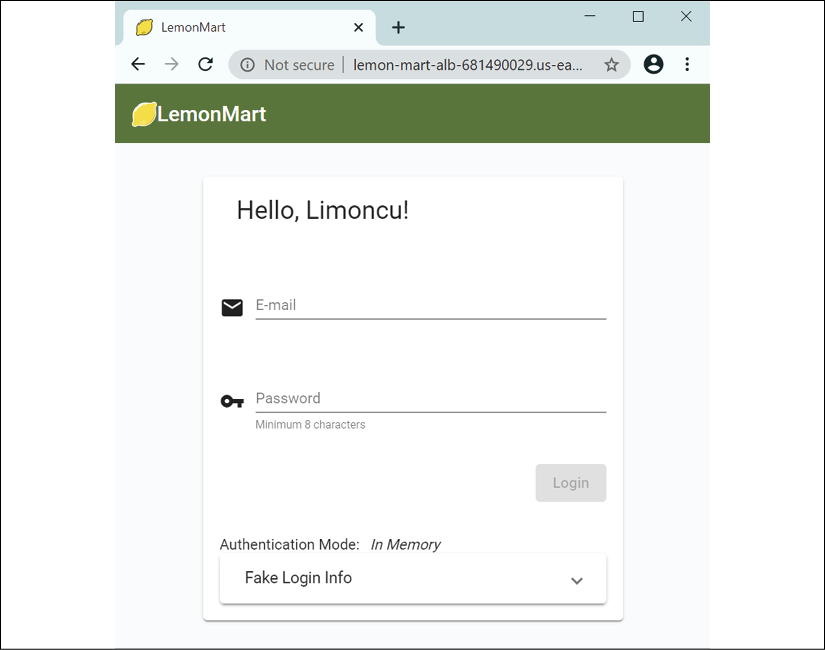
Figure 13.12: LemonMart running on AWS Fargate
Et voilà! Your site should be up and running.
In subsequent releases, following your first, you will be able to observe blue-green deployment in action, as shown:
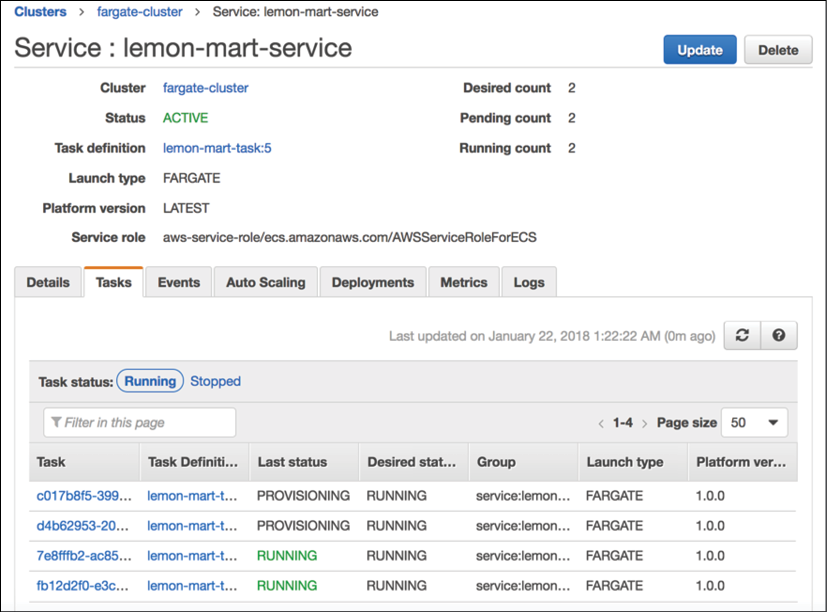
Figure 13.13: AWS Service during blue-green deployment
There are two tasks running, with two new ones being provisioned. While the new tasks are being verified, Running count will rise up to four tasks. After the new tasks are verified and the connections from old ones are drained, Running count will return to two.
You can automate your deployments by configuring CircleCI with your AWS credentials, using a container that has the awscli tool installed and running npm scripts for AWS. With this technique, you can achieve continuous deployment to a staging environment or continuous delivery to a production environment.
Deploying to AWS using CircleCI
In Chapter 9, DevOps Using Docker, we implemented a CircleCI pipeline based on a multi-stage Dockerfile, which resulted in a tar and gzipped Docker image. We also covered how to implement a deploy step using CircleCI. Leveraging what we learned in this chapter, we can combine the two strategies so we can deploy to AWS using CircleCI.
For an AWS deployment, you can use the aws-cli orb and a deploy job. The deploy job will have steps to restore the built Docker image from the cache, log in to AWS, and push the image to your AWS ECS container repository.
On the lemon-mart repo, the config.yml file for this section is named .circleci/config.docker-integration.yml. You can also find a pull request that executes the YML file from this chapter on CircleCI at https://github.com/duluca/lemon-mart/pull/27 using the branch deploy_aws.
For pushing the containers, we then deploy by running npm run aws:deploy. Let's add a new deploy job to our config.yml file.
Under CircleCI Account Settings or Organization Settings, add a new context named aws. Set the AWS_ACCOUNT_ID, AWS_ACCESS_KEY_ID, AWS_SECRET_ACCESS_KEY, and AWS_DEFAULT_REGION environment variables as a part of the context.
See the configuration changes here:
.circleci/config.yml
version: 2.1
orbs:
  aws-cli: circleci/aws-cli@1.0.0
...
jobs:
  ...
  deploy:
    executor: aws-cli/default
    working_directory: ~/repo
    steps:
      - attach_workspace:
          at: /tmp/workspace
      - checkout
      - setup_remote_docker
      - aws-cli/setup
      - run: npm ci
      - run:
          name: Restore .env files
          command: |
            set +H
            DOT_ENV=AWS_ACCESS_KEY_ID=$AWS_ACCESS_KEY_ID\\nAWS_SECRET_ACCESS_KEY=$AWS_SECRET_ACCESS_KEY
            echo -e $DOT_ENV > .env
      - run:
          name: Sign Docker into AWS ECR
          command: |
            aws ecr get-login-password --region us-east-1 | docker login --username AWS --password-stdin $AWS_ACCOUNT_ID.dkr.ecr.us-east-1.amazonaws.com/lemon-mart
      - run:
          name: Push it to ECR
          command: |
            docker load < /tmp/workspace/built-image.tar.gz
            ECR_URI=$AWS_ACCOUNT_ID.dkr.ecr.us-east-1.amazonaws.com/lemon-mart
            docker image tag lemon-mart:$CIRCLE_BRANCH $ECR_URI:$CIRCLE_BRANCH
            docker image tag $ECR_URI:$CIRCLE_BRANCH $ECR_URI:latest
            docker image push $ECR_URI:$CIRCLE_BRANCH
            docker image push $ECR_URI:latest
      - run:
          name: Deploy
          command: npm run aws:deploy
We configure the aws-cli orb with the aws-cli/setup job. We then execute npm ci, so we can run our npm script later on. We restore the .env file using CircleCI environment variables. We configure Docker with our AWS ECR login information, so we can push containers to it. We store built-image.tar.gz from the prior step and load it using the docker load comment. We tag and push the image to ECR. Finally, we execute npm run aws:deploy, which triggers our blue/green deployment.
Last, but not least, we update workflows to include the deploy job and configure the aws context we defined earlier:
.circleci/config.yml
...
workflows:
  version: 2
  build-and-deploy:
    jobs:
      - build
      - deploy:
          context: aws
          requires:
            - build
Getting the context configured in CircleCI correctly is critically important. If misconfigured, you will find yourself in a Kafkaesque labyrinth of errors, bad documentation, and misery. Don't say that I didn't warn you.
See the screenshot of a successful deployment here:

Figure 13.14: Successful CircleCI deployment to an AWS Fargate cluster
Note that the deploy step takes nearly 7 minutes. This is because the blue/green deployment makes sure that our new deployment is healthy and then it drains connections from existing containers to the new ones, which with the default settings takes 5 minutes. If the new deployment is not healthy, the deploy step will timeout and fail after 10 minutes.
Congratulations! Now we can continuously deploy to AWS in spectacular no-downtime, blue/green fashion. This is all great, but how much does a basic highly available configuration cost?
To avoid charges, delete lemon-mart-service. To do this, you need to update your service's number of tasks to 0 first. In addition, delete the default cluster created for you to avoid any unforeseen charges.
Let's examine the costs in the next section.
AWS billing
My highly-available deployment of LemonMart on AWS Fargate costs roughly $45 a month. Here's the breakdown:
| Description | Cost |
|
Amazon Simple Storage Service (S3) |
$0.01 |
|
AWS Data Transfer |
$0.02 |
|
Amazon CloudWatch |
$0.00 |
|
Amazon EC2 Container Service (ECS Fargate) |
$27.35 |
|
Amazon Elastic Compute Cloud (EC2 Load Balancer instances) |
$16.21 |
|
Amazon EC2 Container Registry (ECR) |
$0.01 |
|
Amazon Route 53 |
$0.50 |
| Total | $44.10 |
Note that the bill is very detailed, but it does accurately break down all the AWS services we end up using. The major costs are running two instances of our web server on EC2 Container Service (ECS) and running load balancers on Elastic Compute Cloud (EC2). Objectively speaking, $45/month may seem like a lot of money to host one web application. It is possible to get a lot more for your money if you're willing to set up your own cluster with dedicated EC2 servers where you can pay in 1 or 3-year increments and get cost savings of up to 50%. A similar, highly available deployment with two instances on Heroku starts at $50/month with other rich features you can get access to. Similarly, two instances on Vercel Now will cost $30/month. Note that both Heroku and Vercel Now don't give you access to physically diverse availability zones. Digital Ocean, on the other hand, allows you to provision servers in different data centers; however, you must code your own infrastructure. For $15/month, you can set up your own highly available cluster across three servers and be able to host multiple sites on it.
Summary
In this chapter, you learned about the nuances and various security considerations in properly protecting your AWS account. We went over the concepts of right-sizing your infrastructure. You conducted simple load testing in an isolated manner to find out relative differences in performance between two web servers. Armed with an optimized web server, you configured an AWS ECS Fargate cluster to achieve a highly available cloud infrastructure. Using npm scripts for AWS, you learned how to script repeatable and reliable no-downtime blue/green deployments. Finally, you became aware of the basic costs of running your infrastructure on AWS and other cloud providers such as Heroku, Vercel Now, and Digital Ocean.
In the next and final chapter, we will complete our coverage of the breadth of topics that a full-stack web developer should know about when deploying applications on the web. We will add Google Analytics to LemonMart to measure user behavior, leverage advanced load testing to understand the financial impact of deploying a well-configured scalable infrastructure, and measure the actual use of important application features with custom analytics events.
Exercise
Deploy LemonMart's server infrastructure, using its docker-compse.yml file, to AWS ECS. As a bonus, configure AWS ECS with AWS Elastic Filesystem (EFS) to persist your MongoDB data:
- Install the ECS CLI from https://docs.aws.amazon.com/AmazonECS/latest/developerguide/ECS_CLI_installation.html.
- Add
mrm-task-npm-awsscripts to the root oflemon-mart-server. - Create a new
docker-compose.aws.ymlat version 3.0 and update it to refer to already published versions of your containers. - Using the
npm run aws:publish:composecommand, deploy your app.
You can use the Minimal MEAN project and the linked GitHub gists as a guide at https://github.com/duluca/minimal-mean#continuous-integration-and-hosting.
Further reading
- AWS Certified Solutions Architect Official Study Guide, Joe Baron, Hisham Baz, et al. 2016, ISBN-13: 978-1119138556.
- Configuring AWS ECS to have access to AWS EFS, 2018, Doguhan Uluca, https://bit.ly/mount-aws-efs-ecs-container.
- BlueGreenDeployment, Martin Fowler, 2010, https://martinfowler.com/bliki/BlueGreenDeployment.html.
Questions
Answer the following questions as best as you can to ensure that you've understood the key concepts from this chapter without Googling. Do you need help answering the questions? See Appendix D, Self-Assessment Answers online at https://static.packt-cdn.com/downloads/9781838648800_Appendix_D_Self-Assessment_Answers.pdf or visit https://expertlysimple.io/angular-self-assessment.
- What are the benefits of right-sizing your infrastructure?
- What is the benefit of using AWS ECS Fargate over AWS ECS?
- Did you remember to turn off your AWS infrastructure to avoid getting billed extra?
- What is blue/green deployment?