4
Automated Testing, CI, and Release to Production
Ship it, or it never happened! In Chapter 3, Creating a Basic Angular App, you created a local weather application that could retrieve current weather data. You have created some amount of value in doing this; however, if you don't put your app on the web, you end up creating zero value. This motivation to ship your work is prevalent in many industries. However, delivering a piece of work to someone else or opening it up to public scrutiny can be terrifying. In software engineering, delivering anything is difficult; delivering something to production is even more difficult. This chapter is going to help you implement a Continuous Integration (CI) pipeline. A CI pipeline is going to help you achieve frequent, reliable, high-quality, and flexible releases.
Frequent and reliable releases are only possible if we have a set of automated tests that can quickly verify the correctness of our code for us. The app we created in the previous chapter has failing unit and end-to-end (e2e) tests. We need to fix these unit tests and then ensure that they never break again by leveraging GitHub flow and CircleCI. Then we're going to cover how you can deliver your Angular app to the web. In Chapter 9, DevOps Using Docker, we are going to cover Continuous Delivery (CD) pipelines, which can also automate your delivery.
Check out my 2018 talk, Ship It or It Never Happened: The Power of Docker, Heroku & CircleCI, at https://bit.ly/ship-it-or-it-never-happened.
This chapter covers:
- Unit testing with test doubles
- Angular unit tests using Jasmine
- Angular e2e tests
- GitHub flow
- Production readiness
- CI using CircleCI
- Deploying an app on the web using Vercel Now
The most up-to-date versions of the sample code for the book are on GitHub at the following linked repository. The repository contains the code in its final and complete state. You can verify your progress at the end of this chapter by looking for the end-of-chapter snapshot of code under the projects folder.
For Chapter 4:
- Clone the repo https://github.com/duluca/local-weather-app
- Execute
npm installon the root folder to install dependencies - The code sample for this chapter is in the following sub-folder:
projects/ch4 - To run the Angular app for this chapter, execute:
npx ng serve ch4 - To run Angular unit tests for this chapter, execute:
npx ng test ch4 --watch=false - To run Angular e2e tests for this chapter, execute:
npx ng e2e ch4 - To build a production-ready Angular app for this chapter, execute:
npx ng build ch4 --prodNote that the
dist/ch4folder at the root of the repository will contain the compiled result.
Beware that the source code in the book or on GitHub may not always match the code generated by the Angular CLI. There may also be slight differences in implementation between the code in the book and what's on GitHub because the ecosystem is ever-evolving. It is natural for the sample code to change over time. Also, on GitHub, expect to find corrections, fixes to support newer versions of libraries, or side-by-side implementations of multiple techniques for the reader to observe. You are only expected to implement the ideal solution recommended in the book. If you find errors or have questions, please create an issue or submit a pull request on GitHub for the benefit of all readers.
You can read more about updating Angular in Appendix C, Keeping Angular and Tools Evergreen. You can find this appendix online from https://static.packt-cdn.com/downloads/9781838648800_Appendix_C_Keeping_Angular_and_Tools_Evergreen.pdf or at https://expertlysimple.io/stay-evergreen.
Throughout this chapter, you need to sign up for accounts at CircleCI and Vercel Now. But before we can deploy our app, we need to ensure we have automated tests in place to ensure the quality of our app over time. First, we will deep dive into unit testing fundamentals to familiarize you with the benefits of test-driven development and cover principles like FIRST and SOLID.
Unit testing
Unit testing is crucial to ensure that the behavior of your application doesn't unintentionally change over time. Unit tests are going to enable you and your team to continue making changes to your application without introducing changes to previously verified functionality. Developers write unit tests, where each test is scoped to test only the code that exists in the Function Under Test (FUT) or Class Under Test (CUT). Angular components and services are all classes; however, you are also encouraged to develop reusable functions. Unit tests should be plentiful, automated, and fast. You should write unit tests alongside the original code. If they are separated from the implementation, even by a day or two, you are going to start forgetting the details of your code. Because of that, you may forget to write tests for potential edge cases.
Unit tests should adhere to the FIRST principle:
- Fast
- Isolated
- Repeatable
- Self-verifying
- Timely
A unit test should be fast, taking only milliseconds to run, so that we can have thousands of them running in just a few minutes. For fast tests to be possible, a unit test should be isolated. It shouldn't talk to a database, make requests over the network, or interact with the DOM. Isolated tests are going to be repeatable, so that every run of the test returns the same result. Predictability means we can assert the correctness of a test without relying on any outside environment, which makes our tests self-verifying. As mentioned earlier, you should write unit tests promptly; otherwise, you lose the benefits of writing unit tests.
It is possible to adhere to the FIRST principle if your tests focus only on a single FUT/CUT. But what about other classes, services, or parameters we must pass into the FUT/CUT? A unit test can isolate the behavior of the FUT/CUT by leveraging test doubles. A test double allows us to control outside dependencies, so instead of injecting an HttpService to your component, you may instead inject a fake or mocked HttpService. Using test doubles, we can control the effects of outside dependencies and create fast and repeatable tests.
How much testing is enough testing? You should have at least as much test code as production code. If you don't, then you're nowhere near writing enough tests.
Unit tests aren't the only kind of tests you can create, but they are by far the kind you should create the most of. Let's consider the three major classes of tests you can create: unit, integration, and UI.
As we've said, unit tests only focus on a single FUT/CUT at a time. Integration tests test the integration of various components so that they can include database calls, network requests, and interaction with the DOM. Due to their nature, integration tests are slow to run, and they need to be frequently maintained. Increases in runtime and maintenance mean that over time, integration tests are more expensive than unit tests. UI tests test the application as if a user is using it, filling in fields, clicking on buttons, and observing the expected outcome.
You may imagine that these tests are the slowest and most fragile kind of tests. The UI of an application changes frequently, and it is very tough to create repeatable tests with UI testing.
We can leverage a mixture of integration and UI testing to create acceptance tests. Acceptance tests are written to automate the business acceptance of the functionality that we deliver. Angular's e2e tests are a way to create acceptance tests.
We can visualize the pros and cons of the three major classes of automated testing with Mike Cohn's Testing Pyramid, shown as following:

Figure 4.1: Mike Cohn's Testing Pyramid
The testing pyramid effectively summarizes the relative amount of tests of each kind we should create for our applications while considering their speed and cost.
In terms of implementation, unit tests are made up of three parts:
- Arrange – setup
- Act – run the thing you want to test
- Assert – verify the results
During the arrange step, we set up test doubles, expected outcomes, and any other requisite dependencies. During the act step, we execute the line of code we're testing. Finally, in the assert stage, we verify if the outcome of the act step matches the expected results defined in the arrange step. We are going to see how arrange, act, and assert work in practice in the next section.
Let's look into what unit tests mean in Angular.
Angular unit tests
The definition of a unit test in Angular is slightly different from the strict definition of unit testing we defined in the previous section. Angular CLI auto-generates unit tests for us using the Jasmine framework. However, these so-called unit tests include DOM-interactions because they render the view of the component.
Consider the architecture of an Angular component from Chapter 1, Introduction to Angular and Its Concepts:

Figure 4.2: Anatomy of a Component
Since Angular uses binding, the component class and its template are inseparable, effectively representing a unit. We can still write pure unit tests by testing individual functions, but otherwise, a component and its template are considered the smallest possible units to test.
As your application grows, you may find that Angular unit tests are slow to run, because they render views and resolve the dependency tree. There are various ways to deal with this problem, including the parallelization of test runs, opting out of using the Angular TestBed, and more aggressive use of test doubles.
As you may note, we can inject services into the component or use other components in our template. We are going to leverage test double mechanisms provided by Jasmine to isolate our components from such external dependencies.
Let's go over what Jasmine is.
Jasmine
Jasmine is a behavior-driven testing framework for browser and Node.js tests. Jasmine also supports Ruby and Python. Jasmine is a batteries-included framework. It supports elemental unit testing needs, such as test fixtures, asserts, mocks, spies, and reporters.
The naming convention of a Jasmine test file involves using spec.ts after the file name, as in fileUnderTest.spec.ts. Jasmine tests are organized in describe blocks, which can be grouped in levels to reflect the structure of a file, class, or multiple tests that belong to a single function. Individual test cases, or specs, are represented in it blocks. The following sample shows a file named converters.ts exporting a function that converts Celsius to Fahrenheit:
Sample Jasmine Test
describe('Converters', () => {
  describe('convertCtoF', () => {
    it('should convert 0c to 32f', () => {
      ...
    })
  })
})
Specs are organized in a manner so that when they execute, they read like a sentence. In this case, the outcome would be Converters convertCtoF should convert 0c to 32f.
For more information on Jasmine, visit https://jasmine.github.io.
Next, let's cover the major categories of features of Jasmine and most other testing frameworks – fixtures and matches – which help you write coherent unit tests using the act, arrange, and assert structure.
Fixtures
As mentioned earlier, a unit test has three parts: arrange, act, and assert. The arrange part of unit tests can be repetitive as multiple test cases often require the same setup. Jasmine provides fixtures to help reduce the amount of repetition in your score.
Following are the four fixtures:
beforeAll()– runs before all specs indescribeafterAll()– runs after all specs indescribeper test fixturesbeforeEach()– runs before each spec indescribeafterEach()– runs after each spec indescribe
The fixtures execute before and after a spec or a group of specs as scoped with their describe block.
Matchers
In the assert part of a unit test, we need to let Jasmine know whether a spec passed or failed. We can do so by writing an assertion. There are two kinds of assertions:
fail('message')– this explicitly fails a specexpect()– given a matcher, this dynamically asserts if the expected outcome matches the actual outcome
The expect assertion requires matchers to determine the outcome of a test. The combination of expect and matcher is meant to read like a sentence. Following are common matchers that you may use:
Jasmine Matchers
expect(expected).toBe(actual)
                .toEqual(actual)
                .toBeDefined()
                .toBeFalsy()
                .toThrow(exception)
                .nothing()
For the full extent of Jasmine matchers, see https://jasmine.github.io/api/edge/matchers.html.
Other libraries with richer features exist, such as Jest, Mocha, or testdouble.js. However, when getting started with a new framework like Angular, it's important to keep your toolset minimal. Sticking to defaults is a good idea.
Additionally, Jasmine provides spies, which support stubbing and mocking, with the spyOn function. We are going to cover these test doubles in more detail later in the chapter.
Anatomy of auto-generated unit tests
Out of the box, Angular is configured so that you can compose your unit tests with Jasmine. Karma is the test runner, which can continuously monitor changes to your code and automatically re-run your unit tests.
Angular's default configuration leverages TestBed, which is an Angular-specific component that facilitates the provision of modules, dependency injection, mocking, the triggering of Angular life-cycle events like ngOnInit, and the execution of template logic.
As discussed before, when you leverage TestBed, it is not possible to call these tests unit tests in the strictest definition of the term. This is because, by default, TestBed injects actual instances of your dependencies. This means when you execute your test, you're also executing code in services or other components, whereas you should be testing only the code that resides in the service or component that is currently under test. We leverage test doubles to help us write isolated and repeatable unit tests.
In Chapter 3, Creating a Basic Angular App, the Angular CLI created unit test files as you created new components and services, such as current-weather.component.spec.ts and weather.service.spec.ts. Take a look at the following spec file and observe the should create test. The framework asserts that any component of the CurrentWeatherComponent type should not to be null or undefined, but instead should be truthy:
src/app/current-weather/current-weather.component.spec.ts
describe('CurrentWeatherComponent', () => {
  let component: CurrentWeatherComponent
  let fixture: ComponentFixture<CurrentWeatherComponent>
  beforeEach(
    async(() => {
      TestBed.configureTestingModule({
        declarations: [CurrentWeatherComponent],
      }).compileComponents()
    })
  )
  beforeEach(() => {
    fixture = TestBed.createComponent(CurrentWeatherComponent)
    component = fixture.componentInstance
    fixture.detectChanges()
  })
  it('should create', () => {
    expect(component).toBeTruthy()
  })
})
The WeatherService spec contains a similar test. However, you'll note that each type of tests is set up slightly differently:
src/app/weather/weather.service.spec.ts
describe('WeatherService', () => {
  let service: WeatherService

  beforeEach(() => {
    TestBed.configureTestingModule({})
    service = TestBed.inject(WeatherService);
  })
  it('should be created', () => {
      expect(service).toBeTruthy()
    })
  )
})
In the WeatherService spec's beforeEach function, the CUT is injected into TestBed. On the other hand, the CurrentWeatherComponent spec has two beforeEach functions. The first beforeEach function declares and compiles the component's dependent modules asynchronously, while the second beforeEach function creates a test fixture and starts listening to changes in the component, ready to run the tests once the compilation is complete.
Next, let's execute our unit tests to see how many are passing or failing.
Unit test execution
The Angular CLI uses the Jasmine unit testing library to define unit tests and the Karma test runner to execute them. Best of all, these testing tools are configured to be run out of the box. You may execute the unit tests with the following command:
$ npm test
The tests are run by the Karma test runner in a new Chrome browser window. The main benefit of Karma is that it brings live-reloading capabilities similar to what the Angular CLI achieves with webpack when developing your application.
After the initial execution of the npm test command, you're likely to run into compilation errors, because when we implemented our application code we didn't update the corresponding unit test code.
During the development process, it is normal to run into many errors. So, don't be frustrated! See Appendix A, Debugging Angular, to learn how to troubleshoot and debug errors using Chrome/Edge Dev Tools and VS Code.
Let's how you can address these errors.
Compilation errors
It is important to update your unit test code as you develop your application code. Failing to do so usually results in compilation errors.
Remember that test code is not built when you build your Angular app. You must execute npm test to build and run your test code.
When you execute the tests, you should see an error message like the one following:
ERROR in src/app/app.component.spec.ts:21:16 - error TS2339:
Property 'title' does not exist on type 'AppComponent'.
21     expect(app.title).toEqual('local-weather-app')
The first test we need to correct is under app.component.spec.ts, named 'should have as title "local-weather-app"'. We deleted the app property title from AppComponent in the previous chapter because we were not using it. So, we don't need this unit test anymore.
- Delete the
should have as title 'local-weather-app'unit test.As discussed before, Jasmine combines the text provided in the
describeanditfunctions. As a result, this test is called'AppComponent should have as title 'local-weather-app''. This is a convenient convention for quickly locating tests. As you write new tests, it is up to you to maintain readable descriptions of your specs.The second test to fix is under
AppComponentand is namedshould render title. We render the words LocalCast Weather as the title now, so let's change the test. - Update the
should render titletest as shown:src/app/app.component.spec.ts it('should render title', () => { ... expect(compiled.querySelector('h1').textContent) .toContain('LocalCast Weather') }) - Commit your code changes.
We have fixed the logical issues in our unit tests. They should now execute without compilation errors. However, you should expect all of them fail because we haven't yet configured Angular's TestBed.
Test results
You should observe the last message on the Terminal to be TOTAL: 2 FAILED, 2 SUCCESS. This is normal because we haven't been paying attention to the tests at all, so let's fix them all.

Figure 4.3: Karma Runner showing Jasmine unit test results
Keep the Karma Runner window open side by side with VS Code so that you can instantly see the results of your changes.
Configuring TestBed
TestBed has three major features that assist you in creating unit-testable components:
- Declarations – builds component classes, along with their template logic, to facilitate testing
- Providers – provides component classes without template logic and dependencies that need to be injected
- Imports – imports support modules to be able to render template logic or other platform functionality
TestBed is not a hard requirement to write unit tests in Angular, a topic covered well at https://angular.io/guide/testing. My colleague and reviewer of this book, Brendon Caulkins, contributed a bed-less spec file to Chapter 12, Recipes – Master/Detail, Data Tables, and NgRx code samples, named current-weather.component.nobed.spec.ts. He cites significant performance increases in running the tests, with fewer imports and less maintenance, but a higher level of care and expertise required to implement the tests. If you're on a large project, you should seriously consider skipping the TestBed.
You can find the sample code on GitHub at https://github.com/duluca/local-weather-app/tree/master/projects/ch12.
Let's go over these features one by one while fixing the tests at hand so they can run successfully.
Declarations
Declarations allow us to provide all components necessary to render the component under test. Normally, you will only be declaring the component that is under test. So, app.component.spec.ts declares AppComponent and current-weather.component.spec.ts declares CurrentWeatherComponent and so forth.
Note that we use <app-current-weather> within the template of AppComponent; however, this does not mean that we need to also declare CurrentWeatherComponent in app.component.spec.ts. Previous versions of Angular's TestBed required child components to be declared as part of the parent component's unit tests, causing significant overhead in creating unit tests. Including multiple components in declarations has the side effect of needing to inject all dependencies of all components declared, not just those of the one that is under test. This meant adding unrelated dependencies to our "unit" tests, making them integration tests.
In this case, CurrentWeatherComponent is a hard-coded dependency of AppComponent. It is possible to decouple the two components further in two ways: one way is to inject the component dynamically using an ng-container, and the other would be to leverage the Angular Router and router-outlet. The router-outlet strategy is how we structure the vast majority of multi-screen Angular apps, which I cover in later chapters. Properly decoupling components using ng-container is left as an exercise for the reader.
You may try out declaring CurrentWeatherComponent in app.component.spec.ts:
src/app/app.component.spec.ts
...
TestBed.configureTestingModule({
  declarations: [AppComponent, CurrentWeatherComponent],
}).compileComponents()
...
Note that doing so introduces HttpClient-related errors for AppComponent tests, even though AppComponent itself doesn't import WeatherService. In fact, CurrentWeatherComponent imports WeatherService, which itself imports HttpClient. You can see how the complexity of the dependencies can quickly get out of hand. Angular unit tests are configured to not require the declaration of the child component, but note that the unit test framework is throwing a warning regarding the unknown element:
WARN: ''app-current-weather' is not a known element
In programming, warnings are almost as serious as errors. Not resolving warnings is bound to cause trouble down the line. We will cover how to properly resolve this issue when we cover mocks later.
Be sure to undo your change before moving on.
For now, you don't need to declare child components for parent component tests, making it easier to have passing unit tests initially. There are certain cases where you must declare dependent components, such as when you are creating a custom control and you need to test whether your control works properly within the context of a component. An example of creating a custom control is included in Chapter 11, Recipes – Reusability, Routing, and Caching.
In the next section, we will look at providers, which help us inject real and fake implementations of dependencies so that we can avoid testing dependencies like WeatherService and only test the "unit."
Providers
Providers allow us to provide components without template logic or services that are injected to our component under test. You'll note that our CurrentWeatherComponent tests are not passing with an error complaining about the lack of provider for HttpClient:
CurrentWeatherComponent > should create
NullInjectorError: R3InjectorError(DynamicTestModule)[WeatherService -> HttpClient -> HttpClient]:
  NullInjectorError: No provider for HttpClient!
This is because WeatherService, which is injected into CurrentWeatherComponent, needs a provider for HttpClient. However, CurrentWeatherComponent has no knowledge of HttpClient. It only knows about WeatherService. You may guess that we're perhaps not strictly unit testing but actually integration testing, and you would be right.
However, let's play along and add the provider for WeatherService to current-weather.component.spec.ts. Provide the WeatherService in the declarations in current-weather.component.spec.ts, as shown:
src/app/current-weather/current-weather.component.spec.ts
...
beforeEach(async(() => {
  TestBed.configureTestingModule({
    declarations: [...],
    providers: [WeatherService],
  })
  ...
})
...
In this example, we have provided the actual implementation of WeatherService, which doesn't resolve the issue at hand. The implementation of WeatherService still depends on HttpClient and the error persists.
Be sure to undo your change before moving on.
Providers allow us to provide alternative implementations of a dependency, like a fake or a mock of that dependency.
If we define a fake implementation of WeatherService named FakeWeatherService, we can provide the fake instead of the actual implementation with useClass shown as follows:
providers: [{ provide: WeatherService, useClass: FakeWeatherService }]
A fake implementation would break the dependency on HttpClient and resolve our issue. I go over how to implement fakes in the upcoming section on test doubles.
Alternatively, if we create a mock for WeatherService named mockWeatherService, we can provide the mock with useValue shown as follows:
providers: [{ provide: WeatherService, useValue: mockWeatherService }]
With a mock, we wouldn't even have to implement a fake class and ensure that we're only testing the component under test. The upcoming section on test doubles covers mocks in detail.
Now that we have a good understanding of what providers can and can't do for us, let's see how imports round out TestBed.
Imports
Imports help bring in code that can facilitate the rendering of views or other dependencies to the test. Currently, the tests are still failing, because WeatherService itself depends on HttpClient, so we need to provide HttpClient. If we do, then our unit test will attempt to make calls over HTTP. We don't want our tests to depend on other services, as this goes against the FIRST principles covered earlier in the chapter. So, we shouldn't provide the actual HttpClient.
Angular provides a test double for HttpClient named HttpClientTestingModule. To leverage it, you must import it, which automatically provides the test double for you.
Import HttpClientTestingModule for current-weather.component.spec.ts:
src/app/current-weather/current-weather.component.spec.ts
import { HttpClientTestingModule } from '@angular/common/http/testing'
...
  describe(' CurrentWeatherComponent', () => {
    beforeEach(() => {
      TestBed.configureTestingModule({
        imports: [HttpClientTestingModule],
        ...
      })
    ...
  })
...
Similar to HttpClientTestingModule, there's also a RouterTestingModule and a NoopAnimationsModule, which are mock versions of the real services, so the unit tests can focus on only testing the component or service code that you write. In later chapters, we also cover how you can write your own mocks.
Phew! Now, all your unit tests should be passing. As you can see, the CurrentWeatherComponent tests are not our unit tests, because they are using the actual WeatherService, which itself depends on HttpClient.
Now, let's look into how test doubles can help us write unit tests that adhere to FIRST principles.
Test doubles
Only the code in the CUT should be exercised. In the case of the CurrentWeatherComponent, we need to ensure that the service code is not executed. For this reason, you should never provide the actual implementation of the service.
We need to go over two types of test doubles:
- Fakes
- Mocks, stubs, or spies
In general, it is easier to reason about fakes, so we will start with that. Once you're comfortable with unit testing and your existing set of tests are in working order, I highly recommend switching over to exclusively using mocks, as it'll make your tests more robust, efficient, and maintainable.
Fakes
A fake is an alternative, simplified implementation of an existing class. It's like a fake service, where no actual HTTP calls are made, but your service returns pre-baked responses. During unit testing, a fake is instantiated and is used like the real class. In the previous section, we used HttpClientTestingModule, which is a fake HttpClient. Our custom service is WeatherService, so we must provide our implementation of a test double.
We create a test double by creating a fake of the service. Since the fake of the WeatherService is used in tests for multiple components, your implementation should be in a separate file. For the sake of the maintainability and discoverability of your codebase, one class per file is a good rule of thumb to follow. Keeping classes in separate files saves you from committing certain coding sins, like mistakenly creating or sharing global state or standalone functions between two classes, keeping your code decoupled in the process.
We also need to ensure that APIs for the actual implementation and the test double don't go out of sync over time. We can accomplish this by creating an interface for the service.
- Add
IWeatherServicetoweather.service.ts, as shown:src/app/weather/weather.service.ts export interface IWeatherService { getCurrentWeather( city: string, country: string ): Observable<ICurrentWeather> } - Update
WeatherServiceso that it implements the new interface:src/app/weather/weather.service.ts export class WeatherService implements IWeatherService - Create a new file
weather/weather.service.fake.ts - Implement a basic fake in
weather.service.fake.ts, as follows:src/app/weather/weather.service.fake.ts import { Observable, of } from 'rxjs' import { IWeatherService } from './weather.service' import { ICurrentWeather } from '../interfaces' export const fakeWeather: ICurrentWeather = { city: 'Bethesda', country: 'US', date: 1485789600, image: '', temperature: 280.32, description: 'light intensity drizzle', } export class WeatherServiceFake implements IWeatherService { public getCurrentWeather( city: string, country: string): Observable<ICurrentWeather> { return of(fakeWeather) } }We're leveraging the existing
ICurrentWeatherinterface that our fake data has correctly shaped, but we must also turn it into anObservable. This is easily achieved usingof, which creates an observable sequence, given the provided arguments.Now you're ready to provide the fake to
AppComponentandCurrentWeatherComponent. - Update the provider in
current-weather.component.spec.tsto useWeatherServiceFakeso that the fake is used instead of the actual service:src/app/current-weather/current-weather.component.spec.ts ... beforeEach( async(() => { TestBed.configureTestingModule({ ... providers: [{ provide: WeatherService, useClass: WeatherServiceFake }], ...Note that this alternate implementation is provided under a different file named
current-weather.component.fake.spec, part of the sub-folderprojects/ch4on GitHub. - Remove
HttpClientTestingModulefrom the imports, since it is no longer neededAs your services and components get more complicated, it's easy to provide an incomplete or inadequate test double. You may see errors such as
NetworkError: Failed to execute 'send' on 'XMLHttpRequest',Can't resolve all parameters, or[object ErrorEvent] thrown. In case of the latter error, click on the Debug button in Karma to discover the view error details, which may look like Timeout - Async callback was not invoked within timeout specified by jasmine. Unit tests are designed to run in milliseconds, so it should be impossible to actually hit the default 5-second timeout. The issue is almost always with the test setup or configuration. - Verify that all tests are passing
With fakes, we were able to somewhat reduce test complexity and improve isolation. We can do much better with mocks, stubs, and spies.
Mocks, stubs, and spies
A mock, stub, or spy does not contain any implementation whatsoever. Mocks are configured in the unit test file to respond to specific function calls with a set of responses that can be made to vary from test to test with ease.
Earlier in the Declarations section, we discussed the need to declare CurrentWeatherComponent in app.component.spec.ts to resolve the not a known element warning. If we declare the real CurrentWeatherComponent, then the AppComponent test configuration becomes overly complicated with a lot of configuration elements, because we must resolve the dependency tree for the child component, including WeatherService and HttpClient. In addition, creating a whole fake service just to provide fake weather data is overkill and is not a flexible solution. What if we wanted to test different service responses, given different inputs? We would have to start introducing logic into our fake service, and before you know it, you're dealing with two separate implementations of the WeatherService.
An alternative to creating a fake would be to create an empty object that parades as the real thing but contains no implementation. These objects are called mocks. We will leverage two different techniques to create a mock component and a mock service below.
Mock components
If we were to provide a CurrentWeatherComponent in app.component.spec.ts, we could resolve the not a known element warning and not have to worry about all the components and services that CurrentWeatherComponent depends on.
If you were to implement it by hand, a mock component would look like this:
@Component({
  selector: 'app-current-weather',
  template: ``,
})
class MockCurrentWeatherComponent {}
However, this can get tedious really fast, which is why I published a unit test helper library called angular-unit-test-helper to make it easier to mock a component. With the library, you can just replace the component in the declaration with this function call:
createComponentMock('CurrentWeatherComponent')
Let's update app.component.spec.ts to use mocked components:
- Execute
npm i -D angular-unit-test-helper - Update
AppComponentwith the mocked components:src/app/app.component.spec.ts import { createComponentMock } from 'angular-unit-test-helper' TestBed.configureTestingModule({ declarations: [ ..., createComponentMock('CurrentWeatherComponent') ], ... }) - Remove the
providersproperty altogether - Clean up unused imports
Observe that the unit test file remains lean and the warning is resolved. angular-unit-test-helper infers that CurrentWeatherComponent represents an HTML tag like <app-current-weather> and provides it in the window object of the browser. The createComponentMock function then properly decorates the empty class CurrentWeatherComponent by assigning the selector 'app-current-weather' and an empty template. TestBed is then able to resolve <app-current-weather> as this mocked component. createComponentMock also allows you to provide a custom selector or a fake template that you can pass depending on your needs. This is a solution that scales, cutting imports by more than half and adhering to FIRST principles.
The concept of mocks extends to all kinds of objects we can define, including Angular services. By mocking a service, we don't have to worry about any dependencies that may be injected into that service.
Let's see how we can mock a service.
Mock services
Let's write two new unit tests for CurrentWeatherComponent to demonstrate the value of mocking a service instead of implementing a fake for it. Mocks allow us to create an empty object and give us the option to supply only the functions that may be needed for a test. We can then stub out the return values of these functions per test or spy on them to see whether our code called them or not. Spying is especially useful if the function in question has no return value. We need to set up our spy in the arrange part of our spec.
- Let's start by creating a spy
WeatherService, usingjasmine.createSpyObj, as shown:src/app/current-weather/current-weather.component.spec.ts import { ComponentFixture, TestBed, async } from '@angular/core/testing' import { injectSpy } from 'angular-unit-test-helper' import { WeatherService } from '../weather/weather.service' import { CurrentWeatherComponent } from './current-weather.component' describe('CurrentWeatherComponent', () => { ... let weatherServiceMock: jasmine.SpyObj<WeatherService> beforeEach(async(() => { const weatherServiceSpy = jasmine.createSpyObj( 'WeatherService', ['getCurrentWeather'] ) TestBed.configureTestingModule({ ... }) }) - Provide
weatherServiceSpyas the value ofWeatherServicewithuseValue - Finally, get the injected instance from
TestBedand assign the value toweatherServiceMock, using theinjectSpymethod from angular-unit-test-helper as shown:src/app/current-weather/current-weather.component.spec.ts beforeEach(async(() => { ... TestBed.configureTestingModule({ ..., providers: [{ provide: WeatherService, useValue: weatherServiceSpy }] }).compileComponents() weatherServiceMock = injectSpy(WeatherService) }
Note that injectSpy is a shorthand for TestBed.inject(WeatherService) as any.
In the preceding example, we have a mocked version of WeatherService, where declared that it has a function named getCurrentWeather. However, note that you're now getting an error:
TypeError: Cannot read property 'subscribe' of undefined
This is because getCurrentWeather is not returning an observable. Using weatherServiceMock, we can spy on whether getCurrentWeather is being called or not, but also stub out its return value depending on the test.
In order to manipulate the return value of getCurrentWeather, we need to update the should create test to reflect the arrange, act, and assert structure. To do this, we need to move fixture.detectChanges() from the second beforeEach, so we can control its execution order to be after the arrange part.
src/app/current-weather/current-weather.component.spec.ts
  import { of } from 'rxjs'
  ...
  beforeEach(() => {
    fixture = TestBed.createComponent(CurrentWeatherComponent)
    component = fixture.componentInstance
  })
  it('should create', () => {
    // Arrange
    weatherServiceMock.getCurrentWeather.and.returnValue(of())
    // Act
    fixture.detectChanges() // triggers ngOnInit
    // Assert
    expect(component).toBeTruthy()
  })
In the arrange part, we configure that getCurrentWeather should return an empty observable using the RxJS\of function. In the act part, we trigger TestBed's detectChanges function, which triggers lifecycle events like ngOnInit. Since the code we're testing is in ngOnInit, this is the right thing to execute. Finally, in the assert part, we confirm our assertion that the component was successfully created.
In this next test, we can verify that the getCurrentWeather function is being called exactly once:
src/app/current-weather/current-weather.component.spec.ts
  it('should get currentWeather from weatherService', () => {
    // Arrange
    weatherServiceMock.getCurrentWeather.and.returnValue(of())
    // Act
    fixture.detectChanges() // triggers ngOnInit()
    // Assert
    expect(weatherServiceMock.getCurrentWeather)
      .toHaveBeenCalledTimes(1)
  })
And finally, we can test out the fact that the values that are being returned are correctly assigned in the component class, but also that they are correctly rendered on the template:
src/app/current-weather/current-weather.component.spec.ts
import { By } from '@angular/platform-browser'
import { fakeWeather } from '../weather/weather.service.fake'
...
  it('should eagerly load currentWeather in Bethesda from weatherService', () => {
    // Arrange
    weatherServiceMock.getCurrentWeather
      .and.returnValue(of(fakeWeather))
    // Act
    fixture.detectChanges() // triggers ngOnInit()
    // Assert
    expect(component.current).toBeDefined()
    expect(component.current.city).toEqual('Bethesda')
    expect(component.current.temperature).toEqual(280.32)
    // Assert on DOM
    const debugEl = fixture.debugElement
    const titleEl: HTMLElement = debugEl.query(By.css('span'))
      .nativeElement
    expect(titleEl.textContent).toContain('Bethesda')
  })
In the preceding example, you can see that we're providing a fakeWeather object, where the city name is Bethesda. We are then able to assert that the current property has the correct city, and also that the <div> element with class=mat-title contains the text Bethesda.
You should now have seven passing tests:
TOTAL: 7 SUCCESS
Using mocks, stubs, and spies, we can rapidly test permutations of what outside dependencies can and cannot return and we are able to verify our assertions on the code that resides in the component or service class by observing the DOM.
To learn more about mocks, stubbing, and spies, refer to https://jasmine.github.io. Also, I've found Jasmine 2 Spy Cheat Sheet by Dave Ceddia, located at https://daveceddia.com/jasmine-2-spy-cheat-sheet, to be a useful resource.
In general, your unit tests should be asserting one or two things at most. To achieve adequate unit test coverage, you should focus on testing the correctness of functions that contain business logic: usually wherever you see an if or switch statement.
To write unit-testable code, be sure to adhere to the Single Responsibility and Open/Closed principles of the SOLID principles.
Check out the ng-tester library that my colleague Brendan Sawyer created at https://www.npmjs.com/package/ng-tester. It creates opinionated spec files for your Angular components that leverage angular-unit-test-helper to assist with mocking. In addition, the library demonstrates how to mock dependencies and create tests without using TestBed.
You may install the library npm install -D ng-tester and create a unit test with the command npx ng generate ng-tester:unit.
In addition to unit tests, the Angular CLI also generates and configures e2e tests for your application. Next, let's learn about e2e tests.
Angular e2e tests
While unit tests focus on isolating the CUT, e2e tests are about integration testing. The Angular CLI leverages Protractor along with WebDriver so that you can write Automated Acceptance Tests (AAT) from the perspective of a user interacting with your application in a browser. As a rule of thumb, you should always write an order of magnitude more unit tests than AATs, because your app changes frequently, and as a result, AATs are vastly more fragile and expensive to maintain compared to unit tests.
If the term web driver sounds familiar, it's because it is an evolution of the canonical Selenium WebDriver. On March 30th, 2017, WebDriver was proposed as an official web standard at the W3C. You read more about it at https://www.w3.org/TR/webdriver. If you're familiar with Selenium, you should feel right at home, since a lot of the patterns and practices are nearly identical.
The CLI provides e2e tests for the initial AppComponent and depending on the complexity and the feature set of your application. It's up to you to follow the provided pattern to organize your tests better. There are two files generated per component under the e2e folder:
e2e/src/app.e2e-spec.ts
import { browser, logging } from 'protractor'
import { AppPage } from './app.po'
describe('workspace-project App', () => {
  let page: AppPage
  beforeEach(() => {
    page = new AppPage()
  })
  it('should display welcome message', () => {
    page.navigateTo()
    expect(page.getTitleText())
      .toEqual('local-weather-app app is running!')
  })
  afterEach(async () => {
    // Assert that there are no errors emitted from the browser
    const logs = await browser
      .manage()
      .logs()
      .get(logging.Type.BROWSER)
    expect(logs).not.toContain(
      jasmine.objectContaining({
        level: logging.Level.SEVERE,
      } as logging.Entry)
    )
  })
})
app.e2e-spec.ts is written in Jasmine and implements acceptance tests. The spec is dependent upon the page object (po) file, which is defined beside the spec file:
e2e/src/app.po.ts
import { browser, by, element } from 'protractor'
export class AppPage {
  navigateTo(): Promise<unknown> {
    return browser.get(browser.baseUrl) as Promise<unknown>
  }
  getTitleText(): Promise<string> {
    return element(by.css('app-root div h1'))
      .getText() as Promise<string>
  }
}
Consider the following diagram, which represents the e2e test architecture visually:

Figure 4.4: The Architecture of e2e Tests
The goal of the 'should display welcome message' test is to verify that app.component.html displays the correct text. The page object file, app.po.ts, encapsulates web driver implementation to retrieve the message with the getTitleText function. Finally, the test is written as a Jasmine test in the app.e2e-spec.ts file. AATs are the most fragile kind of tests. Having a page object layer between the HTML and the spec files results in easy-to-maintain, human-readable tests. By separating concerns at this level, you keep the fragility of AATs to one location. By leveraging class inheritance, you can build a robust collection of page objects that can be easier to maintain over time.
e2e test execution
You can execute e2e tests with the following command in the terminal; ensure that the npm test process is not running:
$ npm run e2e
Note that the test execution is different as compared to unit tests. While you can configure a watcher to continually execute unit tests with Karma, due to the user-driven and stateful nature of e2e tests, it is not a good practice to attempt a similar configuration with e2e tests. Running the tests once and stopping the test harness ensures a clean state with every run.
The e2e page object and spec
After executing the e2e tests, you should see an error message similar to the one here:
**************************************************
*                    Failures                    *
**************************************************
1) web-app App should display welcome message
  - Failed: No element found using locator: By(css selector, app-root .content span)
Executed 1 of 1 spec (1 FAILED) in 0.659 sec.
The test is failing because we significantly altered the structure of the HTML in app.component.html and the getTitleText method in our page object is no longer correct.
- Begin by correcting
getTitleTextso it retrieves the correct text:e2e/src/app.po.ts getTitleText(): Promise<string> { return element(by.css('app-root div h1')). getText() as Promise<string> }Note that the error message now says:
- Expected 'LocalCast Weather' to equal 'local-weather-app app is running!'. - Update the
specto expect the correct header as follows:e2e/src/app.e2e-spec.ts it('should display welcome message', () => { page.navigateTo() expect(page.getTitleText()).toEqual('LocalCast Weather') }) - Re-run the tests; they should be passing now:
Jasmine started web-app App √ should display welcome message Executed 1 of 1 spec SUCCESS in 0.676 sec. - Commit your code changes.
Our unit tests and e2e tests are now working.
There are more robust tools for automated acceptance testing, such as https://cypress.io and https://github.com/bigtestjs. Consider using these tools instead of Angular's e2e tests.
You may find a sample implementation of Cypress, integrated with CircleCI, for the LemonMart project, covered in Chapter 7, Creating a Router-First Line-of-Business App, at https://github.com/duluca/lemon-mart.
Execute npm run cypress:run to see Cypress in action. Cypress can record and replay test runs for easy debugging; it is a robust tool for your next enterprise project.
Going forward, make sure that your tests remain in working condition.
Next, we need to ready our app for production deployments, which means building the app in prod mode and setting the appropriate environment variables.
Production readiness
When you run npm start, Angular builds in debug mode, which enables faster build times, breakpoint debugging, and live reloading. This also means that the bundle size of a small app balloons to over 7 MB. A 7 MB bundle size results in over two minutes of loading time on a slow 3G connection when we expect our app to load in mere seconds. Additionally, in debug mode, we use environment variables meant for local development. However, in production, we need to use different settings so our application can run in a hosted environment correctly.
Let's start by implementing an npm script to help us build in prod mode.
Building for production
Angular ships with a robust build tool that can optimize the size of your bundle by removing redundant, unused, and inefficient code from the debug build and pre-compiling sections of code so browsers can interpret it faster. So, a 7 MB bundle can become 700 KB and load in under 7 seconds even on a slow 3G connection.
By default, the ng build command builds your code in debug mode. By adding the --prod option to it, we can enable prod mode.
- Add a new script called
build:prodtopackage.json, as shown:package.json "scripts": { ... "build:prod": "ng build --prod" } - Test the script by executing:
$ npm run build:prod
This is a critical configuration for the efficient delivery of Angular apps.
Do not ship an Angular app without first enabling prod mode.
Next, let's set the environment variables for prod.
Setting environment variables
In Chapter 3, Creating a Basic Angular App, we configured the URL for the OpenWeatherMap APIs using environment variables stored in the src/environment/environment.ts file. We need to update our variables for production use because the environment that our Angular app lives in is changing. The settings that work in a local or test environment are not necessarily going to work in the hosting environment.
Apply the following changes to environment.prod.ts:
- Set
productiontotrue - If necessary, provide a production
appIdvariable - Update
baseUrltohttps:src/environments/environment.prod.ts export const environment = { production: true, appId: 'xxxxxxxxxxxxxxxxxxxxxxxxxxxxxxxx', baseUrl: 'https://', }
Setting production to true allows the application code to check the mode of the application to adjust its behavior. Also, we changed the baseUrl from HTTP to HTTPS, because our app is hosted over HTTPS. Browsers don't allow the serving of mixed content, which weakens the overall security benefits that HTTPS delivers. If we don't switch over to HTTPS, then our calls to the OpenWeatherMap APIs fail.
You can read more about mixed content at https://developers.google.com/web/fundamentals/security/prevent-mixed-content/what-is-mixed-content.
Next, let's set up CI to ensure that our tests are always passing before we deploy the app to production.
Continuous Integration
Before pushing your code to production, you should enable CI. This basic setup helps ensure our application code keeps working even when we make changes to our code, by automating the execution of our unit tests.
CircleCI
CircleCI makes it easy to get started, with a free tier and excellent documentation for beginners and pros alike. If you have unique enterprise needs, CircleCI can be brought on-premises, behind corporate firewalls, or as a private deployment in the cloud.
CircleCI has pre-baked build environments for the virtual configuration of free setups, but it can also run builds using Docker containers, making it a solution that scales to the user's skills and needs, as covered in Chapter 9, DevOps Using Docker:
- Create a CircleCI account at https://circleci.com/.
- Sign up with GitHub:

Figure 4.5: CircleCI Sign up page
- Add a new project:
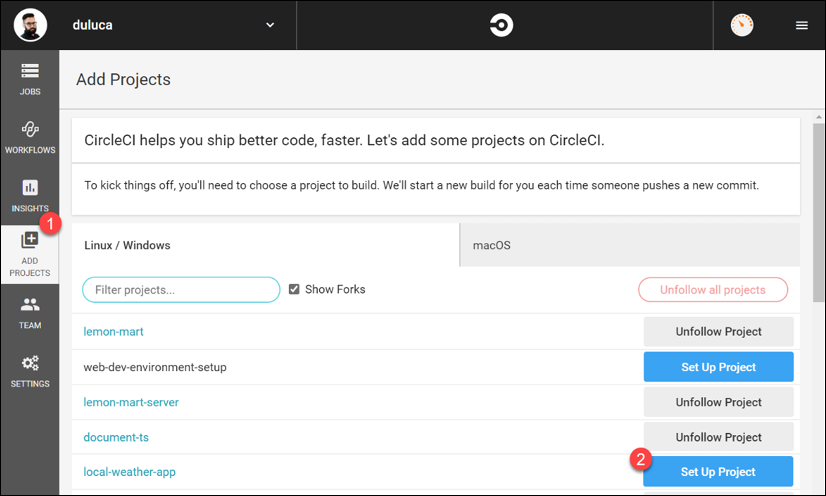
Figure 4.6: CircleCI Projects page
On the next screen, you have an option to select Linux or macOS build environments. The macOS build environments are good for building iOS or macOS apps. However, there is no free tier for those environments; only Linux instances with 1x parallelism are free.
- Search for
local-weather-appand click on Set Up Project. - Select Linux.
- Select Language as Node, which provides a sample
.ymlfile.This section uses the local-weather-app repo. The
config.ymlfile for this section is named.circleci/config.ch4.yml. You can also find a pull request that executes the yml file from this chapter on CircleCI: https://github.com/duluca/local-weatherapp/pull/52 using thebranch build_ch4. Note that this branch has a modified configuration inconfig.ymlandDockerfileto useprojects/ch4code from local-weather-app. - In your source code, create a folder named
.circleciand add a file namedconfig.yml:.circleci/config.yml version: 2.1 jobs: build: docker: - image: circleci/node:lts-browsers working_directory: ~/repo steps: - checkout - restore_cache: keys: - v1-dependencies-{{ checksum "package-lock.json" }} - run: npm ci # force update the webdriver - run: cd ./node_modules/protractor && npm i webdrivermanager@latest # because we use "npm ci" to install NPM dependencies # we cache "~/.npm" folder - save_cache: key: v1-dependencies-{{ checksum "package-lock.json" }} paths: - ~/.npm - run: npm run style - run: npm run lint - run: npm run build:prod - run: npm run test:coverage -- --watch=false - run: npm run e2e - run: name: Tar & Gzip compiled app command: tar zcf dist.tar.gz dist/local-weather-app - store_artifacts: path: dist.tar.gz workflows: version: 2 build-and-test: jobs: - build - Sync your changes to Github.
- On CircleCI, click Start building to register your project.
If everything goes well, you should have a passing, green, build. If not, you see a failed, red, build. The following screenshot shows a failed build, #97, and a subsequent build, #98, which was successful:

Figure 4.7: Green Build on CircleCI
Now that you have a green build, you can leverage CircleCI to enforce the execution of your automated pipeline with every code push. GitHub flow allows us to control how code flows into our repositories.
GitHub flow
The main reason we're developing software is to deliver value. In automating the way we deliver software, we are creating a value delivery stream. It is easy to deliver broken software; however, to reliably deliver value, each change to the codebase should flow through a stream of checks and balances.
With control gates, we can enforce standards, make our quality control process repeatable for every team member, and have the ability to isolate changes. If something goes wrong or the work doesn't live up to your standards, you can easily discard the proposed changes and restart.
GitHub flow is an essential part of defining a value delivery stream and implement control gates. As GitHub puts it, "GitHub flow is a lightweight, branch-based workflow that supports teams and projects where deployments are made regularly."
GitHub flow consists of 6 steps, as shown in the following graphic from GitHub:

Figure 4.8: GitHub flow diagram
- Branch – always add new code for a bug or a feature in a new branch
- Commit – make multiple commits to your branch
- Create a pull request – signal the readiness of your work to your team members and view CI results in a pull request
- Discuss and review – request a review of your code changes, address general or line-level comments, and make necessary modifications
- Deploy – optionally test your code on a test server or in production with the ability to roll back to the master
- Merge – apply your changes to the master branch
Using GitHub flow, you can ensure that only high-quality code ends up in the master branch. A solid foundation sets other team members up for success when they start making their changes. In order to enforce GitHub flow, you need to restrict push access to the master branch.
Let's enable branch protection for the master branch:
- Navigate to the GitHub settings tab for your project
- Select Branches from the left navigation pane
- Click the Add rule button
- Configure your rule as shown in the following image:

Figure 4.9: GitHub Branch protection rule
- After you've saved your changes, you should see your new rule on the Branches page as shown:

Figure 4.10: GitHub Branches
You are no longer able to commit code to your master branch directly. To commit code, you first need to create a branch from the master, commit your changes to the new branch, and when you're ready, create a pull request using the new branch. If you're not familiar with git commands, you can use GitHub Desktop to assist you with these operations. See the handy Branch menu in GitHub Desktop here:

Figure 4.11: GitHub Desktop Branch menu
After creating a pull request, you can now observe checks running against your branch. Now that we have CircleCI configured, if everything went well, you should be able to merge a pull request, as shown:
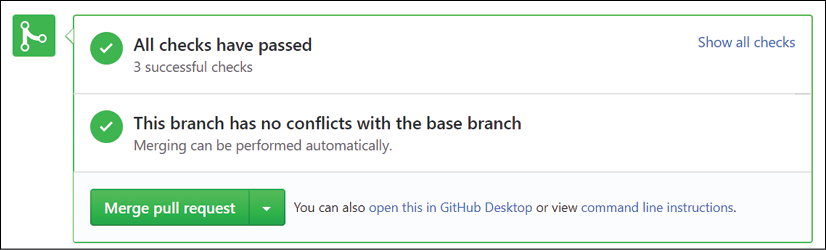
Figure 4.12: GitHub.com Status Checks Passing
When the checks fail, you are forced to fix any issues before you can merge the new code. Also, you may run into merge conflicts if a team member merged to the master while you were working on your branch. In this case, you may use GitHub Desktop's Update from master feature to catch up your branch with the latest branch from the master.
Observe the state of a failing pull request in the following image:

Figure 4.13: GitHub.com status checks failing
Note that I have an additional check, DeepScan, which runs additional tests against my codebase. You can register your repo with DeepScan at https://deepscan.io. In Chapter 9, DevOps Using Docker, I demonstrate how you can enforce unit test code coverage using Coveralls.
For more information, refer to https://guides.github.com/introduction/flow.
Now that we have ensured that our automated checks are being enforced, we can be reasonably sure that we won't push a broken app to production. Next, let's learn how we can deploy our app to the cloud.
Deploying to the Cloud
If delivering something to production is difficult from a coding perspective, it is very complicated to do it right from an infrastructure perspective. In Chapter 13, Highly Available Cloud Infrastructure on AWS, I cover how to provision a world-class AWS Elastic Container Service (ECS) infrastructure for your applications, but that won't help if you need to demonstrate an idea quickly or don't need a highly configurable solution. Enter Vercel Now.
Vercel Now
Vercel Now, https://vercel.com, is a multi-cloud service that enables real-time global deployments of applications directly from the CLI. Vercel Now works with static files, Node.js, PHP, Go applications, and any custom stack of software you're willing to write a custom builder for, which makes it quite straightforward to work with. Vercel Now, which is currently on version 2, has a free tier that you can use to deploy the dist folder of your Angular applications very quickly. In Chapter 9, DevOps Using Docker, I demonstrate how you can also deploy a containerized version of your Angular app.
Refer to Chapter 2, Setting Up Your Development Environment, for instructions on installing Vercel Now.
With the now tool, we're ready to deploy our app to the web.
Deploying static files
After you build an Angular project, the build output resides in the dist folder. The files in this folder are considered static files; all a web server needs to do is deliver these files to a client browser, unmodified, and then the browser executes your code dynamically.
This means that any web server is able to serve up your Angular project. However, now makes it exceedingly easy, and free, to pull off.
Let's get started with deploying your Angular app using now's static file hosting capabilities.
- Add two new scripts to
package.json, as shown:package.json ... "scripts": { ... "prenow:publish": "npm run build:prod", "now:publish": "now --platform-version 2 dist/local-weather-app" }To deploy Chapter 4-specific code from https://github.com/duluca/local-weather-app, you need to execute
now --platform-version 2 dist/ch4. Accept the default options for the CLI prompts. In my case, the app deployed to https://ch4-dun.now.sh/. - Execute
npm run now:publish. - Accept the default options for the CLI prompts.
In the terminal window, observe that the Angular project is built first and then uploaded to
now:$ npm run now:publish > localcast-weather@9.0.0 prenow:publish C:\dev\local-weather-app > npm run build:prod > localcast-weather@9.0.0 build:prod C:\dev\local-weather-app > ng build --prod Generating ES5 bundles for differential loading... ES5 bundle generation complete. chunk {2} polyfills-es2015.ca64e4516afbb1b890d5.js (polyfills) 35.6 kB [initial] [rendered] chunk {3} polyfills-es5.1d087d4db6b105875851.js (polyfills-es5) 128 kB [initial] [rendered] chunk {1} main-es2015.941dc398feac35a1a67d.js (main) 485 kB [initial] [rendered] chunk {1} main-es5.941dc398feac35a1a67d.js (main) 577 kB [initial] [rendered]chunk {0} runtime-es2015.0811dcefd377500b5b1a.js (runtime) 1.45 kB [entry] [rendered] chunk {0} runtime-es5.0811dcefd377500b5b1a.js (runtime) 1.45 kB [entry] [rendered] chunk {4} styles.1938720bb6985e81892f.css (styles) 62 kB [initial] [rendered]Date: 2020-03-24T00:14:52.939Z - Hash: 4d78a666345c6761dc95 - Time: 14719ms > localcast-weather@9.0.0 now:publish C:\dev\local-weather-app > now --platform-version 2 --prod dist/local-weather-app > UPDATE AVAILABLE Run `npm i now@latest` to install Now CLI 17.1.1 > Changelog: https://github.com/zeit/now/releases/tag/now@17.1.1 Now CLI 17.0.4 ? Set up and deploy "C:\dev\local-weather-app\dist\local-weather-app"? [Y/n] y ? Which scope do you want to deploy to? Doguhan Uluca ? Found project "duluca/local-weather-app". Link to it? [Y/n] y Linked to duluca/local-weather-app (created .now and added it to .gitigre)
 Inspect: https://zeit.co/duluca/local-weather-app/jy2k1szdi [2s]
 Production: https://local-weather-app.duluca.now.sh [copied to clipboard] [4s]
- Follow the URL displayed on the screen to see that your app has been successfully deployed, in my case, https://local-weather-app.duluca.now.sh.
Note the warning about a missing
now.jsonfile. When we run the command, we specify our platform version as version 2 with the option--platform-version 2, so a configuration file is not strictly necessary. However, if you wish to customize any aspect of your deployment, perhaps by using a custom domain, selecting a geographical region, or using scaling options, you should configure this file. For further information on how to make the best ofnow, please refer to https://vercel.com/docs.
If your deployment went successfully you should see your app display the current weather from Bethesda, US:

Figure 4.14: Successful deployment
And you're done! Congratulations, your Angular app is live on the internet!
Summary
In this chapter, you learned about the importance of unit testing and mastered Angular unit and e2e test configuration and setup. You learned how to configure Angular's TestBed and how to write unit tests using test doubles. You configured your Angular app for a production deployment. You ensured the quality of your application by creating a value delivery stream using a CI pipeline and GitHub flow. Finally, you successfully deployed a web application to the cloud.
Now you know what it takes to build a production-ready Angular application that is reliable, resilient, and containerized to allow for a flexible deployment strategy. In the next chapter, we go over how you can add Angular Material to your project and make your Local Weather App look great. In the process, you will learn about the negative performance impact that user control or UI component libraries can have on your application, including essential Material components; Angular Flex Layout; accessibility; typography; theming; and how to update Angular Material.
Further reading
- Succeeding with Agile: Software Development Using Scrum, Mike Cohn, 2009.
- TestPyramid, Martin Fowler, 2012, https://martinfowler.com/bliki/TestPyramid.html.
- Jasmine 2 Spy Cheat Sheet, Dave Ceddia, 2015, https://daveceddia.com/jasmine-2-spy-cheat-sheet.
- The Practical Test Pyramid, Ham Vocke, 2018, https://martinfowler.com/articles/practical-test-pyramid.html.
- SOLID Principles, Wikipedia, 2019, https://en.wikipedia.org/wiki/SOLID.
Questions
Answer the following questions as best as you can to ensure that you've understood the key concepts from this chapter without Googling. Do you need help answering the questions? See Appendix D, Self-Assessment Answers online at https://static.packt-cdn.com/downloads/9781838648800_Appendix_D_Self-Assessment_Answers.pdf or visit https://expertlysimple.io/angular-self-assessment.
- What is the test pyramid?
- What are fixtures and matchers?
- What are the differences between a mock, spy, and a stub?
- What is the benefit of building Angular in prod mode?
- How does GitHub flow work?
- Why should we protect the master branch?