Rolling pin
ALTHOUGH ANY BREWER WHO HAS ADVANCED beyond simple can kits may be interested in milling grain, it is usually the veteran all-grain brewers who think about grain mills. They avoid buying pre-crushed grain and pre-packaged grains. Instead, serious all-grain brewers typically buy malt in 50-pound sacks in order to realize substantial cost savings (they usually use 8 to 10 pounds of grain per 5-gallon batch) and to capture the freshness of newly milled grain.
If you want to join the ranks of serious all-grain brewers, you will have two somewhat contradictory goals: (1) you will want to crush the starchy endosperm (the inside of the barley grain) into a fairly fine powder that is removed from the husks so that it’s exposed to the brewing water during the mash; and (2) you will want the husks to remain relatively intact so they form a good filter bed when you sparge the grains.
Most homebrewers use commercially available mills for crushing grains, although a number have even built their own.
Do you really need to mill? For most novice homebrewers, the answer is “no.” A mill can cost as much as an entire basic brewing kit, and because you’re only using a pound or so of grain for color and added body, it’s more cost-effective to buy the grain pre-crushed at a homebrew supply shop. But what if you want to brew that tasty recipe you saw for an extract-based stout that called for a bit of black patent malt, and the shop did not have any pre-crushed? Well, there are a few simple alternatives that will get you by in a pinch:
Rolling pin
Coffee grinder
Food processor
The easiest way to crush grains with a rolling pin is to put the grains in a zip-sealing bag and then crush them. This is not easy, (1) because the grains likely will be harder than you expect, therefore will not crush easily; and (2) because the rolling pin tends to push the grains away rather than crushing them. As a result, it’s very difficult to end up with anything approaching a consistent crush. We’ve occasionally resorted to bashing the grain with a mallet. Even though this gives us a certain barbaric pleasure, it, too, produces less than optimal results. Usually we end up with more whole, uncracked kernels than we’d like. Because we’re using only small amounts of grain and we’re not relying on it for much (if any) of the body, we either don’t worry about it or we add a little extra grain to compensate for the relatively poor results.
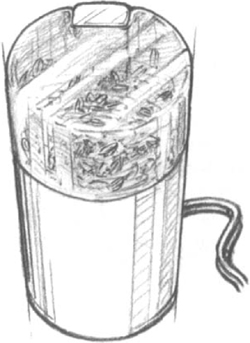
Manufacturers of small, hand-held coffee grinders (such as that shown on page 48) often advertise that they are capable of crushing grains — and they are, they just don’t do it very well. This grinder produced a very uneven crush. Some grains were not touched at all; others were completely pulverized, leaving no traces of intact husk. This would be completely unacceptable for an all-grain batch; but again, if you’re using only small amounts of grain to achieve the color, you can probably get away with it. By the way, this grinder did quite well grinding coffee.
If you’re just using a small amount of grain to add color to your brew, a small hand-held coffee grinder might be the best way to grind the grain.
The third option is a food processor, which requires a grinding attachment to handle grains. Kitchen Aid sells such an attachment, but it costs as much as some of the better malt mills (described in the next section). Like the coffee grinder, the food processor delivers an uneven crush; so, given the cost of purchasing the grinding attachment, we cannot recommend this approach. However, if you’ve already got the food processor and its attachment, you will probably find that it produces slow runoff times and low extraction rates. Our test crush had far more flour than we wanted and few intact husks. Some homebrewers report that the Kitchen Aid grinding attachment works well for them. So if you already have one, give it a try, but we don’t recommend buying one for brewing purposes.
Although none of these approaches produce exceptional results, you can partially compensate for the poor husk integrity by using a grain bag. If you’ve got other ideas, give them a try. Homebrewers are an inventive lot, and many people have undoubtedly found other ways to crush grain. (“Hey, Bob! Think I could just back my pickup truck over that sack a few dozen times?”) But let’s move on to ways of doing it right.
There are two general categories of grain mills used by homebrewers: grinders and roller mills. Grinders tend to cut the kernels of the grain, whereas roller mills burst the husk by crushing it. Generally, all roller mills maintain better husk integrity and offer improved yields than do the grinders.
The Corona Mill, a simple grinder made in South America, has been used by homebrewers for many years and is available at most homebrew supply shops. Although it is made for crushing corn, it does fairly well for limited amounts of malt. The most attractive feature of the Corona is its price — it can still be purchased for less than $50 (as of early 1995).
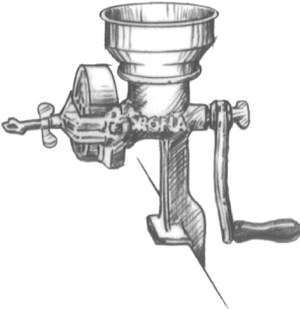
The Corona Mill is manufactured for crushing corn, but it does a good job of crushing malt in limited amounts.
Although all-grain brewers do not regard the Corona Mill as capable of delivering a high-quality crush (it is prone to delivering slow-runoff mashes and it is difficult to adjust), quite a few continue to use it. It’s a worthwhile choice for the brewer whose equipment budget is limited, and it certainly gets you into the all-grain game. However, we recommend that you spend a few dollars more and move up to any roller mill.
Several excellent roller mills came on the market in the early 1990s, and now advanced homebrewers can produce a high-quality crush, one in which the husk is structurally intact — not shredded or ground into flour — and the starchy endosperm is both crushed and exposed. Roller mills that are commercially available today include:
JSP MaltMill
Listermann PhilMill
Glatt Mill
Valley Mill
BrewTek Malt Mill
When you start looking for a new mill, there are several things to consider:
Quality of crush (sieve test, adjustability)
Roller construction (material, knurling pattern, diameter, and length)
Usability (cranking torque, throughput, hopper size)
Craftsmanship
Warranty
Price
Ability to be motorized
Generally, all roller mills should deliver a good crush, and crush tests have shown that indeed all of the roller mills on the market today do so. The tests involved running grain samples through each of the mills and then analyzing the amount of material that passed through or was retained by screens with varying sieve sizes. The tests also showed that better crush results can be achieved (more material separated from husks) by running the grain through the mill a second time. Regarding the quality of crush for these mills, the Corona tends to shear husks and produce a poor crush, but all the roller mills produce acceptable crushes.
If you are interested in more information on crush quality, in 1994, Zymurgy magazine published a detailed article by Bob Gorman, Steve Stroud, and Mike Fertsch that compared several of these mills.
When you look at the rollers, there are several things to keep in mind:
Longer rollers deliver better throughput
Larger-diameter rollers crush more easily
Surface texture is important on small rollers but less so on large rollers
Most rollers used in these mills are made of cold-rolled steel. However, stainless-steel rollers are also available for the JSP MaltMill.
Most roller mills on the market today have some sort of knurled pattern on the roller to provide friction and help pull the grains down into the crushing mechanism. Whereas large rollers tend to pull the grain through naturally, small-diameter rollers need some sort of friction to help pull the grain down into the gap to crush it. So, given the relatively small diameter of mills used by homebrewers, the knurl, or pattern on the roller, is important. Knurled patterns can be either long grooves that travel the length of the roller or, more commonly, a rough diamond shape.
Adjustability of the rollers is important to some homebrewers. By tightening the roller gap, they can produce a grist that is close to flour, which is desirable with some grains. But for the most part you will probably keep your mill at a constant setting, and a nonadjustable mill will provide good results. If you are looking for adjustability, it is best to have the rollers adjust in parallel. That way you get a consistent crush across the entire length of the roller.
The usability of a certain mill is something you’ll want to gauge for yourself. Ideally, try to find a shop that stocks several mills and try them out. The following are some of the things that affect usability:
The forte required to turn the handle. This is important if you’re not planning to motorize your mill. You want a mill that turns easily when the hopper is filled.
Throughput. This is the amount of grain that you can crush in a given time (essentially the speed at which the mill operates). Some homebrewers are willing to sacrifice throughput to save money because the time it takes to crush 8 to 10 pounds of grain is not significant to most hobbyists. To others, throughput is very important, especially those working with 15-gallon batches.
Hopper size. This is an issue because ideally you should not have to stop every few minutes to refill the hopper. If you’re motorizing the mill, (1) you may be able to simply feed the hopper continuously, in which case this isn’t a problem, or (2) you may be able to build an extension to your hopper.
Ease of use. Included here are how the crank feels in your hand, whether the crank is oriented in a way that feels natural to you, how the-crushed grain comes out, where the collection bucket is placed, and so on. These are issues that you need to judge for yourself.
Craftsmanship. There are several things to consider when you judge the craftsmanship of a mill. Look for signs of solid construction, that is, good-quality materials, smooth surfaces, tight fit of parts, and so on. If the mill has plastic or wooden components, will they withstand the rigors of your home brewery?
Let’s take a detailed look at the five malt mills we listed earlier and see how they work and what features they incorporate.
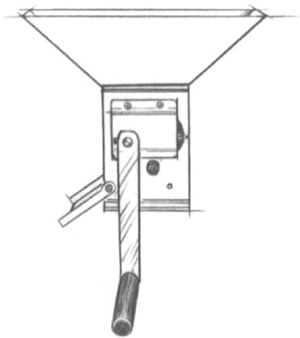
This was among the first of the roller mills available to homebrewers. The mill uses two 1½-inch diameter by 10-inch long rollers with a diamond-knurl pattern. A crank drives one roller, while the other roller is turned by friction as grain moves through the gap. The hopper and base are constructed of fiber board, and the unit is built to sit on top of a bucket, which catches the crushed grain. This mill is easy to crank and delivers the fastest throughput of any of the mills on the market today. It is available in either an adjustable or fixed-gap model, and it can be motorized easily. Brewers who have used the fixed-gap model report that they get good crushes with all types of grain and appreciate the savings they gain by skipping a feature they don’t need.
The JSP MaltMill, one of the first roller mills available to homebrewers, delivers the fastest throughput of any of the mills on the market today.
The JSP MaltMill is backed by a lifetime guarantee, the best guarantee of all the mills. The street price of the JSP MaltMill ranges from $99 to $109 for the fixed-gap model and rises to about $125 for the adjustable model. It is available from Jack Schmidling Productions, although many homebrew supply shops stock the mill or can get it.
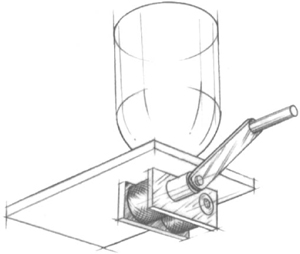
The Listermann PhilMill is a single-roller mill that grinds grain against a fixed metal plate. The plate is actually slightly curved, leaving the grain in contact with the roller as it moves downward, giving it a better crush. The quality of the crush can be adjusted by turning a screw that pushes or releases the metal plate, although we found both the crush and the screw fairly hard to adjust consistently. The roller is about 2½ inches long and 1½ inches in diameter, with a diamond-knurl pattern. The base is oak and is fairly compact — it attaches to a counter or table top with two hooks and wing nuts. The hopper, which is not included, is simply a 2-liter soda bottle whose mouth fits into a hole above the roller. This bottle will hold about 2 pounds of uncrushed malt. The unit cranks fairly easily, but throughput is about half that of the JSP MaltMill. The unit is sturdy and well built, but we saw no mention of a guarantee in the package. Instructions are provided for motorizing the mill using a drill. The PhilMill retails for about $70. It is available from Listermann Manufacturing.
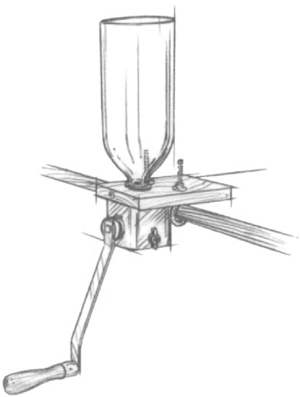
The PhilMill is a single-roller mill that grinds grain against a fixed metal plate.
The Glatt Mill is a two-roller mill that uses plastic gears to drive both rollers. The unit comes with a fair-sized stainless-steel hopper that will hold about 2 pounds, and it cranks fairly easily. The rollers are small — about 1½ inches by 4 inches.
Like the PhilMill, this mill has about half the throughput of the JSP MaltMill. We’ve heard some reports of problems with the plastic gears, but the plastic is a carbon-impregnated nylon that should be durable for most malt milling applications. We suspect that the problems were only in earlier models. This unit retails for about $115. It’s sturdy and the most visually attractive of the mills sold today. The Glatt is a good mill. Unfortunately, Glatt may be out of business as of late 1995; but given the durability of their mills, you will most likely continue to see them in use by homebrewers for some time.
The Glatt Mill has plastic gears that drive two small rollers.
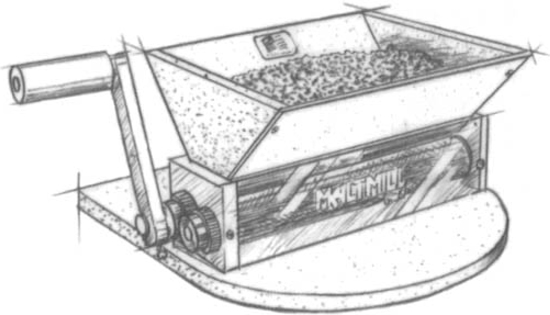
The Valley Mill is very similar to the JSP MaltMill. It uses long rollers (9 inches by 1 inch in diameter), one of which crank-drives directly. The other is driven by friction. Grain is fed through the top from a very large, tall hopper. (Hoppers on the Glatt and JSP mills are more flared.) The instructions claim the hopper will hold 4 pounds — it’s certainly one of the largest hoppers we’ve seen. One nice thing about this mill is that the rollers adjust in parallel via a spring-loaded cam mechanism with several preset stops. The JSP mill, by comparison, adjusts at only one end. The Valley Mill should theoretically deliver a more consistent crush. The mill can be motorized by attaching an electric drill. However, you will need to build your own base for the mill. This can be as simple as cutting a rectangle in a piece of wood and setting it on a bucket. When comparing costs of mills, consider what it will cost to buy or build the base. The Valley Mill sells for $99 in the United States and $145 in Canada. It is available from Valley Brewing Equipment.
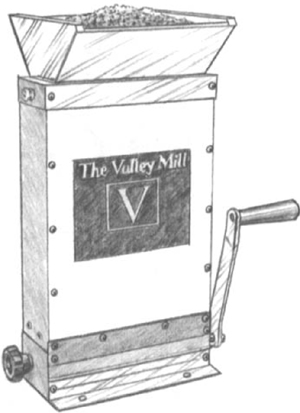
The Valley Mill has two long rollers: one crankdrives directly, and the other drives by friction.
The BrewTek Mill from Brewer’s Resource came on the market in mid-1995. It uses two stainless-steel rollers that are about 2 inches in diameter by 2 inches long. A hand crank directly drives one roller; the second roller is turned by friction. Both rollers are knurled and adjust in parallel. The wooden base has a hole drilled above the rollers into which a soda bottle fits to serve as the hopper (similar to the PhilMill). A 2-liter soda bottle should give you a hopper capacity of about 2 pounds. The larger-diameter roller crushes well, but its short length allows throughput that’s just slightly better than the PhilMill and the Glatt but consistently less than the JSP or Valley Mill. The BrewTek Mill retails for about $90. It is available from Brewer’s Resource.
The BrewTek Mill has two stainless-steel rollers: one operates by hand crank, the other by friction.
Which one do we recommend? All these mills are fine products and are priced competitively, given their quality and performance. We like the simplicity and low price of the PhilMill, but the JSP MaltMill has the best throughput and the best guarantee. We don’t like its adjustment mechanism, however; so if adjustability is not critical to you, the nonadjustable JSP MaltMill would be a good selection. We do like the adjustment mechanism of the Valley Mill and its large hopper, and we like the fat rollers on the BrewTek Mill. The choice is yours, of course, and you could even try building your own mill.
If you’re a woodworker or at least a wood tinkerer, then you can build a simple wooden roller mill. It is definitely not what you want for all-grain brewing. This mill is suited for extract brewers who like to add a pound or two of adjuncts and want something better than a rolling pin to crush their grains. The main problem will be obtaining something suitable for rollers. If you have access to a lathe, then you’re in good shape. Otherwise you might have to visit a wood shop, in which case you may pay more for the roller than it’s worth. You need to locate a piece of close-grained hardwood, such as hard maple, hickory, or walnut, that is at least 16 inches long and 1½ inches to 2 inches in diameter. Old-style rolling pins might work if you can find them. The wood you choose must be straight; if it is warped, it cannot be used. One clever homebrewer used a broken base ball bat, which should do nicely as long as it meets the minimum criteria stated above. You can work around the taper.
If you’ve managed to locate a suitable piece of hardwood — and you don’t need a lathe — then skip to the next section. If you do have to turn your roller, read on.
Lathes can differ, so mount the wood stock on your lathe according to the instructions for turning a long piece of wood. Turn the entire length to a uniform diameter. The final diameter should match a standard wood drill-bit dimension. (You will be running the roller through holes, so choose a diameter based on standard drill-bit sizes.) Leave the wood in the lathe to cut the grooves. It’s easier this way: You can use the tool rest as a guide, and the wood is safely clamped in place, but you must figure out some way to lock the lathe to keep it from turning. Once the grooves are cut, you can turn down a 3-inch length on each end to allow for handles — it’s your choice.
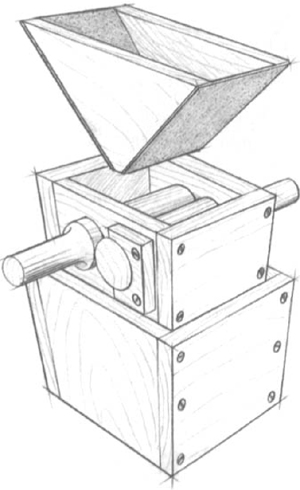
If you’re an extract brewer who likes to add a pound or two of malt to your brew — and if you like to work with wood — you can build this wooden roller mill. The frame can be either of plywood or dimensional lumber; the rollers must be hardwood (old rolling pins are excellent). The roller mill frame, which is also the collection box, is made of ½-in. plywood.
1. Mark a line 4 inches in from each end.
2. Clamp the wood into a vise or secure it somehow to your bench top. (Skip if it’s still in the lathe).
3. With the corner of a very sharp chisel, cut  "-deep grooves lengthwise between the two lines. Make the cuts every 14¼” until you’ve completely covered the roller. It does not have to be precise. You’re just giving a “bite” to the rollers so they will be able to grab the grain.
4. Saw the roller into two equal-sized rollers.
The roller frame can be made of either plywood or dimensional lumber. If you want it to last, use a hardwood such as oak or maple. Whatever wood you choose must be clear of knots and warps. While we’re on the subject, if you choose dimensional lumber, use 1 inch by 4 inch material and don’t worry that it’s not exactly 4 inches wide. That fact has been taken into consideration.
1. Cut two pieces 6" long × 4" wide and two end pieces 4" × 4".
2. Locate and mark a center line lengthwise on the 6" side pieces.
3. Locate the exact center of this line on both side pieces.
4. Divide the diameter of the rollers by 2, measure this distance on either side of the center line, and mark these points on both side pieces.
5. Drill a hole the same diameter as the rollers at these points for both side pieces.
6. Cut another piece of wood 3" long × 4" wide. This piece will adjust the gap between the rollers.
7. At the exact center of this piece, drill another hole the same diameter as the rollers.
8. Cut this piece into two pieces along the 4" dimension to get two pieces that are 2" × 3".
9. Using eight #6 x 2" screws, assemble the frame. See illustration of wooden roller mill on page 59.
10. Place the gap adjustment pieces as shown, leaving at most a " gap between the rollers. (Use a drum sander to enlarge the holes if necessary.)
11. Secure the gap adjustors with screws.
The base is also the collection box, and the roller mill frame sits down inside it. It is made of Vi-inch plywood.
1. Cut the two sides,  " long × 6" high.
2. Cut the two end pieces,  " long × 6" high.
3. Cut the bottom, " long × " wide.
4. Assemble all sides to the bottom with glue and twelve #6 × 1½ screws. See illustration on page 59.
5. Cut out two 2½ × ½ wood strips that are 5" to 6" long, and two others that are 6" to 7" long. (These can be made out of any scrap wood you have.)
6. Glue and clamp the strips on the inside of the collection box, ½ below the top edge of the sides.
Now all you need is a hopper to feed grain into the rollers. Using ½-inch plywood and ⅛-inch masonite, you can build a suitable hopper.
1. Cut two end pieces out of ½ plywood, 6¾” wide × 3⅛” high. The sides of the end pieces are trimmed at a 45-degree angle, leaving about a ½-wide bottom.
2. Cut the two masonite sides 3½" wide × 3⅛ high.
3. Attach the masonite sides to the end pieces with eight l"-long #6 wood screws.
4. Attach the hopper assembly to the frame by setting the narrow end of the hopper into the frame and securing it so that the bottom of the hopper is about 1 inch below the top edge of the frame with two 1"-long #6 wood screws (see illustration).
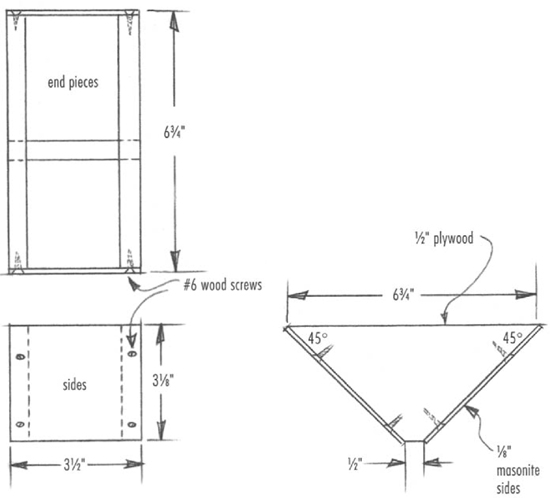
The end pieces are attached to the masonite sides with eight 1"-long #6 wood screws.
To use, set the hopper and frame assembly inside the collection box and fill the hopper with grain. Grasp a roller in each hand and turn them toward one another, pulling the grain down between the rollers. It may take some effort. Jams can be cleared by reversing the turning direction. Just don’t turn the roller too far, or whole grains will drop down into the collection box.
If you are serious about all-grain brewing, you might consider building a motorized roller mill (see illustration). Chris Barnhart of Geneseo, Illinois, built a compact, motorized roller mill that delivers excellent crushes comparable in quality to those delivered by JSP MaltMill. Milling the grain on brew day is as simple as turning on the mill and filling the hopper. For Chris Barnhart’s full instructions, see Appendix A, “Building a Motorized Mill.”
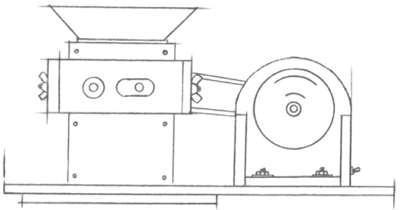
Mill and motor are mounted on a particle board base that is cut to fit over a drywall bucket.