Using an oblong picnic cooler
WHAT PROPERTIES ARE WE LOOKING FOR in a mashing vessel’ Well, obviously it has to hold hot liquid — anything that leaks or melts at high temperatures would be a poor choice. We would like our mashing vessel to be insulated so that it holds heat. If not insulated, it should be able to withstand the application of direct heat, so it can be placed on a stove or burner to maintain an appropriate mash temperature. Beyond that, anything goes.
Several years ago some of the homebrewing literature recommended approaches that required mashing in one container and then moving the grain to a separate container for sparging (rinsing the grain with hot water). For most brewers, any approach that requires moving the mash from one vessel to another will be a poor choice. It’s much easier to have one vessel that serves for both mashing and lautering (straining the sweet wort off the spent grains after mashing).
As with all homebrewing equipment, the mashing vessel needs to meet the requirements of the individual homebrewer. Whereas we do not recommend approaches that require moving the mash from vessel to vessel, that approach does work well for some brewers using a step mash.
When we talk about sparging the grains, we should be aware of how liquids flow through a grain bed so that we get as much of the sugars from the grain as we can. In a mashing vessel, fluids flow through the grain bed following the path of least resistance. The water tends to flow along certain paths rather than uniformly flowing through the grain. This forms the equivalent of rivers through the grain bed and is often referred to as “channeling.” There are various solutions to this problem, including using blades to cut the mash bed and using an outlet system (manifold) that draws from many points to minimize the chance of a single strong channel forming. The false bottom is probably the best method for reducing channeling, although other methods, such as the manifold, do quite well. Again, this is of mostly academic interest to homebrewers, and the most intense home-brewers can spend hours discussing it over a cool pint of bitter. All the approaches we discuss here will produce good beers on a small scale.
Keep in mind when working with mashing equipment that some heat energy will be lost to the equipment when you add your heated strike water. This is less important when using a mashing method that allows you to apply direct heat to the mashing vessel, but brewers using picnic coolers and similar vessels should try to minimize the heat loss. You can do this by pre-heating your mashing vessel; fill it with 180°F water. The temperature isn’t especially critical, but very hot water could warp the liner of your picnic cooler. Let the water sit for a few minutes, and then empty it just as you’re ready to start your mash.
Some heat energy is invariably lost during the mash. This heat loss can be minimized by insulating your mashing vessel. Some brewers simply toss a blanket or sleeping bag over the vessel; however, a more elegant approach is to fit an insulation layer around the vessel. Cutting to fit something like the space blankets sold at outdoor stores works well.
The mash tun is one area in which homebrewers have a wide latitude for good, solid, workable, home-built solutions. Some of the approaches most widely used include:
Using an oblong picnic cooler
Building a mash tun from a round, cylindrical water cooler
Modifying a beer keg
Large chest-style picnic coolers make ideal mash tuns because they are well insulated and inexpensive. For a 5-gallon setup, look for a 34-quart cooler (about $10 to $15). The next size up is usually the 48-quart cooler, which will handle 10- or 15-gallon batches without a problem. Although 48-quart coolers are larger than you’d really want when doing 5-gallon batches (they may give you a shallow grain bed), quite a few homebrewers use that size without a problem. For very large batches, 60- or 80-quart coolers are reasonable. One consideration when choosing a cooler is its resistance to heat. If you can find a brand that claims to withstand 170°F temperatures, you’re ahead of the game. If not, you’re still okay. Most of them don’t warp too badly, and even if they do, they’ll still hold heat well enough to mash — and besides, they’re cheap. Building a new one every year or so is no big deal.
Once you have the cooler, you may need to drill out a drainage plug if it doesn’t already have one. Because we’re using ½-inch-diameter CPVC pipe for this project, drill a ⅝-inch-diameter hole (the outer diameter of a ½-inch-diameter CPVC pipe). Although the drainage hole in a cooler is usually on the side, having the hole in the bottom is actually a bit more workable in many situations. Next, you’ll have to build a drainage manifold to lay in the bottom of the cooler.
6’ of ½"-diameter CPVC pipe
Four 90-degree elbows for ½"-diameter CPVC pipe
Five tee connectors for ½"-diameter CPVC pipe
Food-grade silicone or epoxy sealant
½"-diameter I.D. (inside diameter) poly tube
Picnic cooler
Hack saw
5/8"-diameter drill bit and drill (if the cooler does not have a drain)
1. Measure the length of the cooler bed. Subtract 4" and cut four lengths of CPVC tubing to that length.
2. Measure the width. Subtract 4" and divide by 3. Cut six lengths of CPVC tubing to that length. Cut one of these lengths in half. Now use a hacksaw and cut thin slots in all the pipes, about one-third of the way through. Assemble the manifold as shown in the illustration on page 68.
3. You can glue the manifold together, but it will be easier to clean if you make it easy to disassemble. One idea that works well is to permanently glue the two end-units together, and then just piece together the four long rods when it’s time to brew.
You could add a valve to the manifold outlet if you wish, but a simple and less expensive approach is to use a length of vinyl hose, a hose clamp, and a pinchcock type (siphon) clamp. Push a length of hose over the outlet tube and secure it with the hose clamp. Feed the hose through the siphon clamp. This will be your valve. By closing and opening this clamp, you can adjust the flow of your runoff. If you wish to use a valve, CPVC ball valves are available for about $3 to $5. Compression fittings with gaskets are also available for CPVC tubes, and if your cooler does not already have a drain plug in the wall, consider using one of these. Before drilling through the wall, remember you could also go through the bottom rather than the side.
You could use a grain bag in conjunction with the manifold if you really want to, but we’ve had no problems with the manifold by itself, so save the money from the grain bags for better ingredients. In Greg Noonan’s book Brewing Lager Beer, he suggests that if you’re using a manifold like this, build in a flush tube so you can recover stuck sparges and so on. Stuck sparges that refuse to runoff aren’t often a problem, and most homebrewers we have met who’ve built manifolds like this don’t use the flush tubes. One other idea that seems to work well is to replace the CPVC with copper pipe, which is readily available at most plumbing supply stores and is fairly inexpensive and easy to work with.
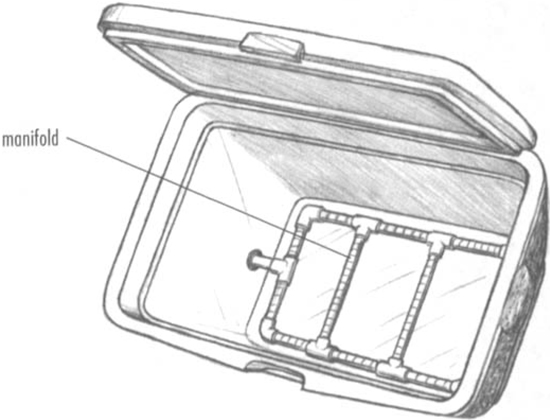
A picnic-cooler masb tun with an easy-to-build and effective plastic-pipe drainage manifold.
A couple of approaches will work for introducing sparge water to the picnic-cooler mash tun. A simple hose attached to a boiling kettle will work fine (see the description of the JSP EasySparger on page 83 and 84). You could also construct a simple sparge sprayer out of CPVC pipe. Simply obtain two lengths of thin CPVC supply line (⅜ inch will be fine) and cut one to the length of your cooler. Next, cap one end of this pipe and drill very small holes in the pipe (see illustration below).
To do this, we acquired a couple of 1/32-inch drill bits from a hobby shop (they break easily!) and drilled holes about ½ inch apart on one side only along the entire length of the pipe. Glue the second length of CPVC, which is cut a bit longer than the cooler’s width, to the long tube and at a right angle to it. The second pipe simply supports the sprayer and provides stability when it’s positioned over the top of the cooler.
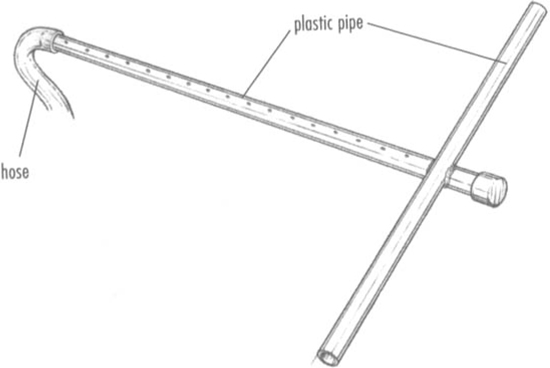
You can make a simple sprayer to fit into a picnic-cooler mash tun out of two pieces of plastic pipe. (This is a bottom view: the holes need to point down to spray onto the grain bed.)
Now push the vinyl tube over the end of the CPVC tube. Depending on the size of your hose, you may have to add a hose barb adapter to hook the CPVC to the vinyl hose. If you use ½-inch-diameter CPVC pipe, a ⅜-inch-diameter I.D. (inside diameter) poly hose will fit tightly over the end. Then siphon the sparge water into the sprayer.
The large, round, cylindrical water coolers that you often see on the back of construction trucks make ideal mashing vessels. They are available in sizes that are large enough for home mashing, and they are well insulated. The brand most often used by homebrewers is the Gott cooler, which is made by Rubbermaid.
This cooler is known to withstand the heat of a mash without warping, as often happens with cheaper coolers. The 10-gallon size is the one you’ll want; it usually runs about $50 at outdoor or construction supply stores, although it can be found at discount warehouses for as little as $30.
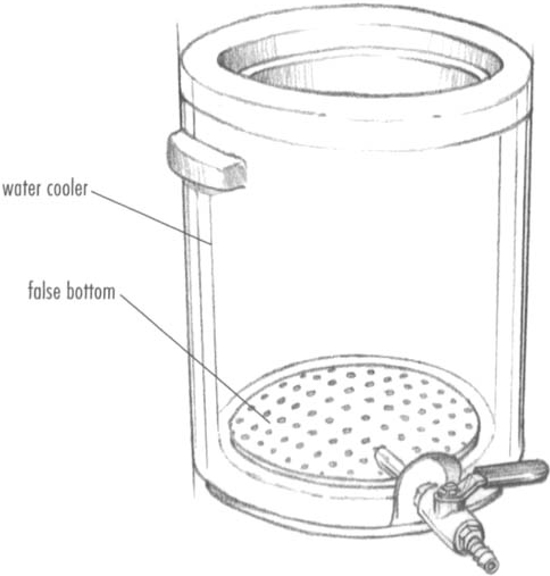
Round water coolers make great mash tuns. You can use a vegetable steamer as a false bottom, or better yet, a colander.
An easy way to use the cooler is to put a vegetable steamer in the bottom of the cooler and then set the grains on that. We’ve found this works acceptably well, but it does tend to let a lot of grains through. Another idea is to get a colander that’s smaller than the circumference of the cooler and set it upside down in the bottom of the cooler. You may want to rig some kind of drainage device, such as the JSP EasyMasher (available from Jack Schmidling Productions), to go inside the colander. Phil’s Phalse Bottom (available from Listermann Manufacturing) is an excellent choice for use as a drainage system with the Gott coolers, and this is the method that we recommend. The Phil’s Phalse Bottom is simply a heavy plastic cone that’s perforated with holes. It’s available at many homebrew supply shops.
You can also build a manifold to go in the bottom of the cooler, much like that described in the previous section.
One thing that you’ll want to do with the water cooler is to install a valve of some kind. The pushbutton spigot is entirely inadequate (unless you want to hold in the button for the hour or so that a sparge might take).
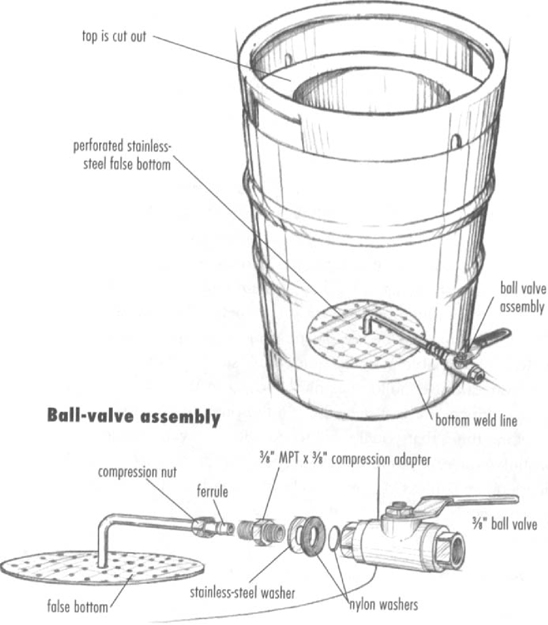
Modified kegs, if not the most commonly used mash tun, are probably the most talked about and respected. Kegs are sturdy and inexpensive, and they work well. You can apply heat directly to them, and you can modify them with false bottoms and valves to make sparging simple. They are also easy to clean.
The first thing you will need is a legally obtained keg. Do not think that paying the deposit for a full half-barrel, consuming the contents, and then keeping the keg is a legal means of acquiring one. It is not. Instead you will need to talk to the distributors in your area. Sometimes they are willing to help, and sometimes they’ll barely give you the time of day. Other sources are salvage yards and scrap-metal dealers. Just don’t be discouraged. If you cannot locate one, SABCO Industries sells a cleaned and fully modified keg for a reasonable price. When you consider the amount of work and tools required to modify a keg, the price is a veritable bargain.
Kegs with false bottoms are probably the most common form of mash tun, but the actual work that goes into modifying these tough stainless-steel vessels is considerable.
Before you begin to modify your own keg, you will need an assortment of gear:
Hearing and eye protection. You are about to embark on the noisiest job you’ve ever started.
Variable-speed sabre saw or reciprocating saw. A two-speed unit is not good enough. The slowest setting is still way too fast.
Five bi-metal saw blades (32 teeth per inch or better). You may need more. A small angle grinder would work fabulously for cutting a keg.
Center punch (or nail and hammer)
⅜" electric drill, variable speed preferred
An assortment of drill bits
Grinding wheel
⅜" copper tubing
8" diameter perforated stainless steel for false bottom
One ⅜" compression nut and ferrule
One ⅜" male pipe thread (MPT) x ⅜" compression adapter
One ½" I.D. (inside diameter) stainless-steel washer
Two ½" I.D. (inside diameter) nylon washers
One ⅜" ball valve with ⅜" female pipe thread (FPT)
12" square perforated stainless steel
Permanent marking pen
Lightweight oil
Note: Stainless steel is tough stuff. Take your time with it, and take time outs to apply a few drops of lightweight oil during the drilling and cutting to help extend the life of your tools.
Also, be sure to test the fit of the washers while in the store. They frequently end up in the wrong bin.
1. Without a blade in the saw, set the sabre saw against the inside top of the keg. You are finding out how close you can cut to the handles, as the saw body will be the limiting factor.
2. Mark a point where the blade will be cutting. Draw a circle around the top inside of this mark. In our case, we were able to make an opening 12" in diameter in our keg.
3. With a center punch (or nail and hammer), mark a point ⅛" from the line inside this circle.
4. Drill a ¼" hole at that point. (It is easier if you drill a smaller hole first and then enlarge it).
5. Install a blade in the saw, oil it, and at a slow speed carefully cut the top out of the keg. Plan on spending at least 45 minutes on this phase.
6. With the grinding wheel in the drill, grind off all sharp edges.
7. Mark a point ⅜" above the bottom weld line.
8. Drill a ½"-diameter hole. (Again, start small, then enlarge the hole.)
Note: You are done cutting and about to start assembling your mashing vessel. This is a good time to scrub the interior of the keg. It will save time later. Also clean all parts before final assembly. That too will help.
9. Place the stainless-steel washer and then a nylon washer on the pipe-thread end (the large end) of a ⅜" MPT x ⅜" compression adapter.
10. Insert this into the ½"-diameter hole. It will fit tightly, and you will have to use a wrench to finish the job. You may have to enlarge the hole slightly beyond ½"
11. Place the other nylon washer over the pipe threads.
12. Wrap Teflon tape around the threads.
13. Thread on a ⅜" ball valve and tighten. Be sure to use a wrench on the inside to hold the adapter in place.
14. Drill a ⅜"-diameter hole in the center of the perforated metal (false bottom).
15. Bend the end of the ⅜“-diameter copper tubing to 90 degrees. This bent end goes through the false bottom.
16. Set the false bottom and tube assembly in the bottom of the keg.
17. Measure and cut the copper tubing so that it fits into the inside ⅜" compression fitting.
18. Attach the tubing to the ⅜" compression fitting with a compression nut and ferrule.
19. Add a ⅜" MPT × ⅜" compression fitting to the ball valve output. By using a ⅜" compression nut, you can either connect this to your counterflow chiller or add a small piece of ⅜" copper tubing for a spigot and attach a vinyl hose.
Note: Instead of using the adapters, washers, and all, you could just take the keg and have two ⅜" female nipples welded to the hole. A welded nipple will also be easier to clean and sanitize. You would need a ⅜" male nipple to attach the ball valve and a ⅜" MPT to ⅜" compression adapter to attach the copper tube. Wrap the male threads with Teflon tape before installing.
You’re done. But before you start brewing beer for the first time, fill the keg with 12 gallons of water and add a gallon of vinegar. Bring the mixture to a full boil and boil it for about 15 minutes. Drain. Now everything should be ready for your first batch in your new mash tun.
Although modifying a keg is not outside the capabilities of many homebrewers, it is a dirty, noisy job, and it can often be done with cleaner, more aesthetically pleasing results by someone who has done it before or by someone with a plasma cutter, who could do it in a minute. Several companies will sell you modified kegs for use as mashing or boiling vessels, and most will even sell you a complete turnkey brewery system built around modified beer kegs. Pico-Brewing Systems has several brewing systems available at reasonable prices. Pico-Brewing also sells a larger setup based on 55-gallon drums, and a smaller setup based on 5-gallon stainless-steel pots. SABCO Industries sells modified beer kegs for use as either mashing or boiling vessels.
One of the better values among complete keg-based mashing systems is the PBS 3K system sold by East Coast Brewing Supply. They also offer systems based on stainless-steel kettles in sizes ranging from 5 to 25 gallons.
Here are three systems that range from easy-to-use to gadget-heads-only.
The EasyMasher from Jack Schmidling Productions is an eminently simple system. You take a 32-quart enamel canning pot, drill a hole in the side, and attach a spigot to the outside and a tubular stainless-steel screen to the inside. That’s basically it. The mash is held at a constant temperature in the pot either by directly heating it with a stove burner or by calculating your strike water temperature correctly. You can cover the vessel with a large blanket, set it in a pre-warmed (but turned off) oven, or simply let it sit. The volume of mash should, at room temperature, retain heat long enough to reach full conversion. When starch conversion is finished, you sparge in the same pot.
Some homebrewers believe this approach does not rinse the grains thoroughly during the sparge because the wort is pulled from a single point toward the middle of the pot. The manufacturer claims that simply stirring the mash will take care of that problem, but in some test batches with this equipment we found that not stirring at all still gave us respectable yields of 28 points per pound per gallon. When we did stir, we had to recirculate the first runnings again. In sum, the system works well for most homebrewers, is simple, and is inexpensive.
The EasyMasher, which lives up to its name, is basically a tubular stainless-steel screen, a few inches of copper tubing, and a spigot. The screen and tubing is placed inside the vessel and attached, through a hole in the side of the vessel, to the spigot on the outside.
The EasyMasher consists of a 6-inch tube of stainless-steel screen, sealed at the end, and clamped to a 6-inch piece of ⅜"-inch-diameter copper tube that’s bent in order to let the screen rest on the kettle’s bottom. A brass spigot with a lever valve attaches to the outside of the pot and is joined to the copper tube with a compression fitting. (The illustration shows how this fits together.) Although the parts can be obtained at most hardware stores, you can buy the assembly from Jack Schmidling Productions, or you can buy it already installed in a canning pot. The EasyMasher is also available in a size and configuration suitable for modified kegs.
The BruHeat from BrewCo of Boone, North Carolina, is a plastic bucket with an electric immersion heating element that heats and maintains mash temperature. The buckets are sometimes used in conjunction with a grain bag and a siphon tap in the side of the bucket, although many users seem to prefer having a second vessel for lautering!
The bucket can also double as a brewpot, with the electric elements heating the wort to boiling temperatures. Some homebrewers have found that maintaining a vigorous boil with the electric elements is difficult.

The 7½-gallon BruHeat electric mashing and brewing bucket comes with an immersion heating element for heating the mash.
The BruHeat has a capacity of 7½ gallons and a 2,750-watt electric heating element. BrewCo warrants the product for one year. This requires a 220-volt power cable, which you must attach yourself (not a big deal if you’ve ever hooked up a range or clothes dryer, but you must be careful about doing it properly). If your house has a gas stove and dryer, you probably don’t have a 220-volt outlet, so this may not be a workable option for you.
The recirculating infusion mash system (RIMS), conceived by Rodney Morris, differs from other mashing methods in that throughout the mashing process, liquid is drained from the bottom of the mashing vessel and pumped back to the top, effectively creating a continuous lautering cycle throughout the mash. In most uses of the RIMS, an in-line heating element maintains mash temperature throughout the process. A thermostatic controller is set up to monitor the mash temperature and reduce current to the element as needed, giving precise control over the mashing environment.
The recirculating infusion mash system offers several attractive benefits, including efficient extraction rates and clear runoff. However, the RIMS involves complicated equipment in most uses and is quite expensive. The hot wort could also be subject to aeration if the system is not set up correctly (although the importance of aeration at this stage is disputed). Many brewers do not want to clarify their wort to such an extent that the cloudy matter that contains material useful for yeast nutrition would be lost.
It’s often repeated in homebrewing circles that the electronic controller is the heart of the RIMS, but this is false. It’s likely the most talked-about aspect of RIMS, but the heart of the system is really the pump. You could make an inexpensive and uncomplicated recirculating infusion mash system by using a pump in conjunction with a kettle built with a false bottom and ball valve, and controlling the heat with the stove top using an ordinary dial thermometer and the time-tested method of turning the burner on and off. This will not give you the precise temperature control that is one of the attractive benefits of a full RIMS as described by Morris, but it will give you clear running wort. One other inexpensive alternative is to put an appropriately rated dimmer switch on the heater element.
When adapting equipment for use as a RIMS setup, keep in mind that you’ll need a pump that is both safe for food and beverage applications and that can handle high temperatures. You’ll also want to make sure that your liquid return outlet has some sort of shield, baffle, or other control to keep the liquid from splashing violently into the mash, disturbing the set grain bed. (Doing this will also reduce the aeration risk mentioned above.) If you’re developing your own RIMS design, be sure to use ground fault circuit interrupt (GFCI) protection and avoid closing off any tube containing an in-line heating element — you do not want pressure to build up in the line.
SABCO’s Brew-Magic RIMS is a gadget-head’s dream.
Most recirculating infusion mash systems are built around a half-barrel keg mash tun. Commercially, SABCO Industries has a large-scale RIMS built from modified kegs. Theirs is a complete turnkey brewing system that’s sold under the name Brew-Magic. It’s an attractive system that can produce good beers and offers the best approach to ensuring repeatability and control, but at about $3,000 it’s beyond the budget of casual hobbyists.
Less expensive commercial options are in the works. One system developed by Larry Koch of Koch’s Koncepts is a RIMS built on a picnic cooler with a pump and in-line heating element for around $300 to $350. The pump and heater are controlled manually, avoiding the need for expensive controllers. A drain below a false bottom feeds the pump, which passes the liquid through the heater and back to the top of the mash bed. The entire unit is compact and folds into the cooler for easy storage.
Some implementations of the RIMS concept have delivered beers with various problems, including thin bodies and grainy tastes. There are, however, many homebrewers in the community producing excellent beers with RIMS. But since most RIMS setups are complicated and expensive, we feel that they don’t provide enough benefit to be worth the trouble.
The following systems all work well. It’s a matter of preference and — of course — money.
Probably the best-known approach to sparging is the “Zapap— Lauter Tun described by Charlie Papazian in his book The New Complete Joy of Homebrewing. The idea is simple and inexpensive, which is probably why some homebrewers continue using it.
Basically a Zapap consists of two buckets, one inside the other. The inner bucket is drilled with dozens (or hundreds) of small  -inch) holes so that the sweet liquor drains from the grain bed into the other bucket. You might want to drill a hole in the bottom bucket for a spigot, although you could just lift the bucket and pour, or siphon off, when you’re done.
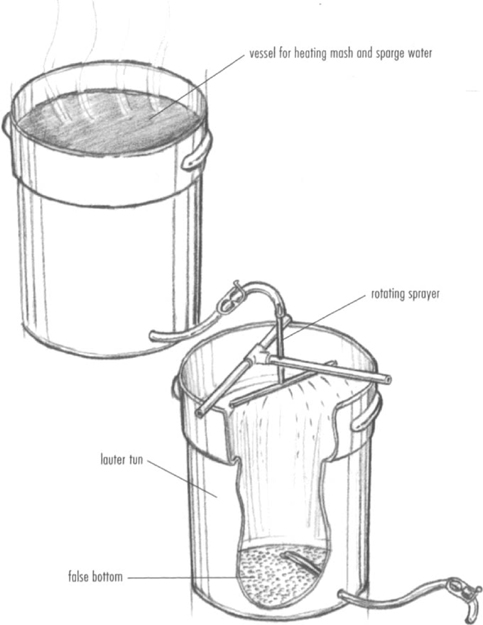
Phil’s Lauter Tun, a plastic bucket with a false bottom, comes with a rotating sprayer, similar to a garden hose, that fits through a hole in the lid.
Phil’s Lauter Tun is essentially a plastic bucket with a plastic false bottom and a rotating brass sprayer head suspended through a hole in the lid above the mash bed. A hose attaches to the sprayer to provide the sparge water. As the water feeds through the hose, the sprayer rotates (just like a garden sprinkler), covering the grain bed with hot water. The system — complete with two buckets, the sprayer unit, and Phil’s Phalse Bottom — retails for about $40. It is produced by Listermann Manufacturing and is available through many homebrew suppliers (or see Suppliers on page 241). Overall, the system works quite well for sparging, but we prefer avoiding plastic buckets for mashing because they’re not insulated and don’t hold heat well (again, wrapping the vessel with a blanket or sleeping bag can help minimize heat loss). However, the sprayer itself and the Phalse Bottom are nifty gadgets, and using them in conjunction with a Gott cooler is a good approach that delivers good results at a fairly low cost.
The JSP EasySparger is an enamel canning pot with two barb connectors. To the upper connector you attach a poly hose from your kitchen faucet. The other connector (lower barb) is for the hot-water exit hose (an HDPE tube), which runs into the mash tun (theoretically the EasyMasher, described on page 76 and 77). The canning pot sits on your stove, and you turn the heat to high. When the water in the pot begins to boil, reduce water flow from the faucet to a steady rate of about 1 gallon per 8 to 10 minutes. Next, raise the water to a level slightly above the grain bed, then open the outlet spigot on the mash tun to match the flow rate of the water from the faucet. The water coming out of the hose will be just above 170°F. We’ve used the EasySparger on several batches and found it to be true to its name — and it delivered good results. It is available from Jack Schmidling Productions.
The sink faucet hose is connected to the EasySparger, which is connected to the EasyMasher. Note the relatively high position of the outlet hose on the EasySparger, which carries hot water to the mash tun. The stainless-steel pot at the bottom of the setup is the collection vessel.
One of the complete mashing systems on the high end of the price scale is the Stoelting Brew System. This is a stainless-steel brewing system built around 7- to 20-gallon vessels. These are not kegs that have been modified. They are custom-fabricated vessels made of type 304 stainless steel with ⅜-inch ball valves and ¼-inch hose nipples. The mash screens are built of tapered bars spaced .03-inch apart. The vessels range in price from $429 to $799, and the mash screens usually run from $179 to $249.
Although some homebrewers are content to let the mash sit throughout the starch-conversion process, others prefer to mix the mash, either periodically or continuously in an effort to maximize their mash efficiency, converting as much starch to sugar as possible. A canoe paddle is the stirrer of choice for many large-scale brewers, and you’ll find canoe paddles in quite a few small microbreweries and brewpubs for just that purpose. Kmart and similar discount retailers sell very small canoe paddles (2½ to 3 feet long) that are adequate for many picnic-cooler mash tuns. On page 96, we show how you can cut a simple paddle from a plank. If you make a paddle, avoid using any type of finish on it. If you buy a paddle, you may want to use a light sandpaper to remove the lacquer finish. We do not recommend paddles that are glued together.
Over the years quite a few homebrewers have concocted schemes for putting together motorized mash stirrers. Many of these involve fabricating metal blades shaped like propellers that cut the grain bed as the shaft turns. Motors can be obtained from a variety of sources. One brewer who talked about efficiency at the 1995 AHA conference in Baltimore displayed a mash stirrer powered by a reciprocating saw. In the July/August 1995 issue of Brewing Techniques, Sam Johnson described a mashing vessel fitted with a fabricated blade and powered by an ice-cream maker. Johnson’s scheme strikes us as an ingenious idea. There is some evidence that stirrers may exacerbate channeling effects.