 Projects from the
Turk’s Head Knot
 Projects from the
Sailors will recognize the Turk’s Head knot as the one traditionally tied to the spot on the wheel where the rudder is centered. This knot can also be found on bell pulls, stanchions, and a tiller. First tied as a practical knot, the Turk’s Head knot was often meant to keep the feet from slipping, as when tied into the bolt ropes on bowsprit netting.
The Turk’s Head knot came into prominence during the era of the tall-masted sailing ships. The knot was tied in many different configurations, often around a spar or mast to mark the sailor’s path through the maze of rigging to his station. Today, the Turk’s Head knot is a popular choice for decorative knotting projects.
The Turk’s Head knot is a series of loops (also known as bights or clovers) braided together to create texture and visual interest. These knots can be made directly around a cylindrical object such as a stanchion, or they can be made on a table and then either used as a mat or tightened around a cylinder (to create a bracelet, for example).
The projects in this chapter use Turk’s Head knots made on a table. This chapter explains how to create Turk’s Head knots this way. Chapter 8 explains how to tie a Turk’s Head knot around a cylindrical object (decorative hitching).
5 feet of #48 cotton seine twine
1 to 2 feet of thread and a needle
sharp knife or scissors
ruler
Each of the thousand-plus different kinds of Turk’s Heads has a numbered title. The one we’re tying here is the simplest. The width of the braid is given in the number of “leads,” and the rounded parts (which look like clovers) are known as “bights.” It’s labeled 3L × 4B (3 leads and 4 bights).

Gather these simple materials to create nautical napkin rings and a box with a nautical motif, perfect as a gift or recipe box with flair.
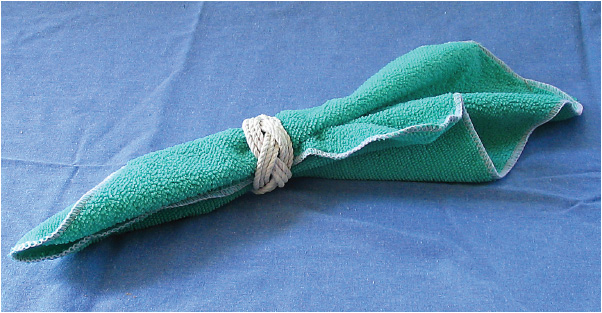
Easily tied, cotton napkin rings suit your galley or your cottage and are fun projects for young ones to make and give.
1. Making the first, second, and third bights. 2. Tying in the fourth bight. 3. The final napkin ring has three lines laid, so two more should be added—here we are just starting to lay in the second.
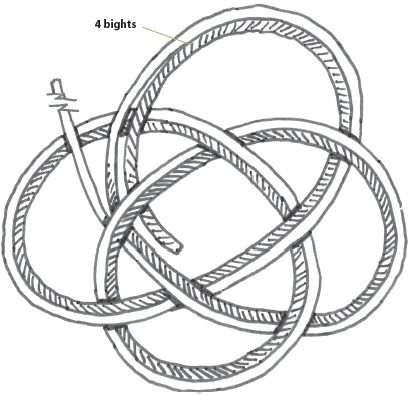
Here the third and final line is being laid.
It helps to tape or pin the outer edge of each clover to your work surface as you make each clover. Follow these steps and refer to the drawings to make the napkin ring:
1  Lay the twine out on a table. About a foot from the right-hand end of the twine, make two overlapping bights (loops) about 2 inches in diameter with the twine. The longer end of the twine is the working end, and the shorter end of the twine is the bitter end.
2  Weave the working end under and over the two bights to create a third clover. Cross the bitter end over the working end to begin a fourth bight.
3  Move the bitter end to the top left, and lay the working end against it to complete the fourth bight.
4  Using the first strand as a model, continue to lay the working end along all four bights, threading the working end under and over the bights as needed.
5  Use the working end of the twine to make the third and final strand.
6  Put a 1-inch- to 2-inch-diameter cylinder (such as a spool or a piece of dowel) in the middle of the knot where the four cloves intersect. Untape or unpin the clovers and gently pull on the strands to both tighten and remove all the slack.
7  Sew the bitter end and the working end into the other three leads. Trim off the extra cordage next to the sewn end.
8  Remove the completed napkin ring from the cylinder when you are done.

Two bights made for the napkin ring.
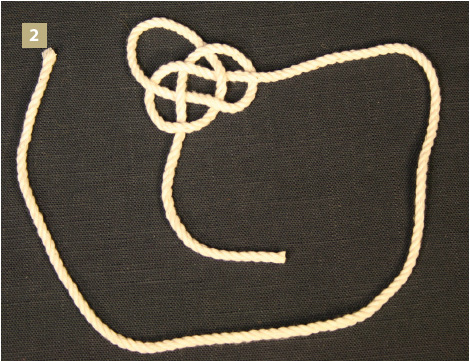
Three bights made for the napkin ring.
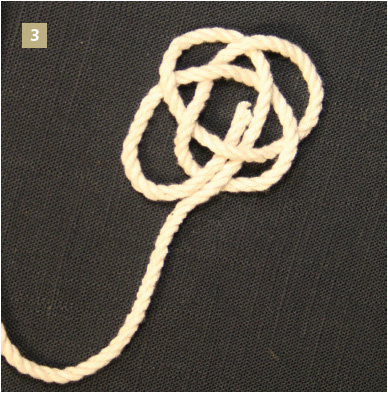
Four bights completed for the napkin ring.
Beginning the second lead around the bights.
The first two leads are complete and the third lead is being made with the working end, shown going up to the left.
The third and final lead is being laid down.
The finished Turk’s Head bracelet. Note that cotton twine can shrink, so make the bracelet a bit larger than your wrist if you are going to be swimming or showering with it on.
10 feet of #48 cotton seine twine
1 to 2 feet of heavy thread and a needle
sharp knife or scissors
ruler
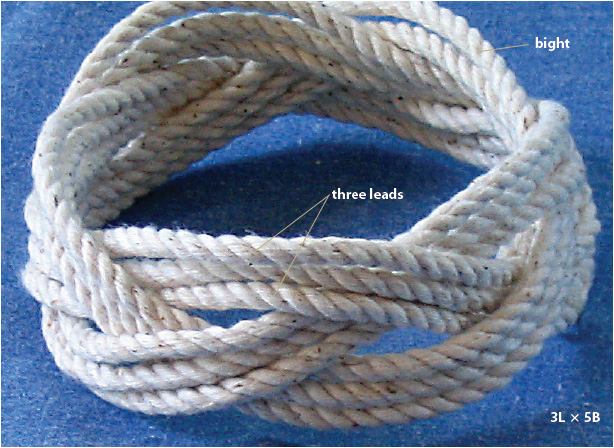
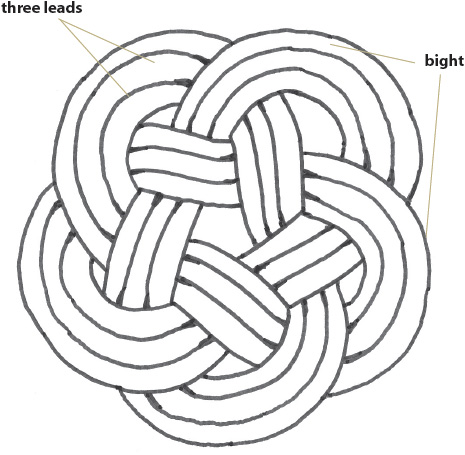
This is the next most complicated Turk’s Head knot. It’s labeled 3L × 5B (which means 3 leads and 5 bights). It makes a nice mat knot, and after some manipulation it can be turned into the Turk’s Head bracelet.
The knot is easier to make if you tape or pin each clover to your work surface as you make it. Follow these steps and refer to the drawings to make a Turk’s Head bracelet.
1  About 6 inches from the bitter end of the twine, make two overlapping bights to create the first two clovers.
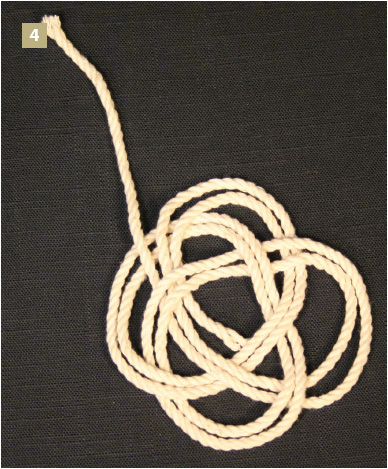
Creating the 5 bights—after the two leads are done, as shown here, add the third (not shown).
The third lead has been threaded into the five bights.
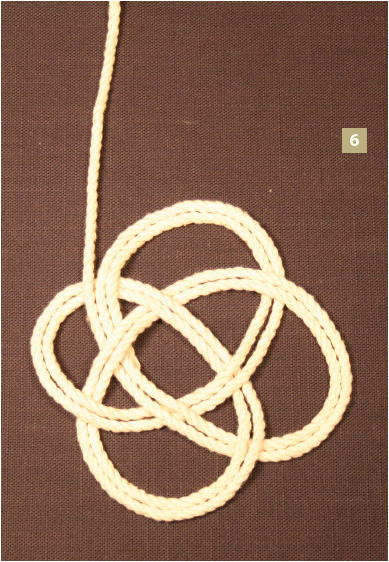
2  Make the third bight, weaving the twine over and under the other two clovers.
3  Add the last bight for the bracelet.
4  Lay a second line of twine against the first, using the first lay as a guide. Then lay a third line of twine against the first two lines to complete the bracelet.
5  Put enough slack in your work so you can place a cylinder that is the diameter you want for the bracelet (such as a water glass or a wide dowel) in the center of the knot.
6  Flip the sides of the knot up along the glass or dowel, and tighten the knot against the cylinder by pulling gently on the bights.
7  Sew the working end and the bitter end of the twine to the bracelet. Trim the cordage near the sewn ends.
8  Slide the finished bracelet off the cylinder and flip the bracelet inside out to hide where you sewed the ends.
4 inch by 2 inch by 2 inch unfinished wooden box
2 to 3 feet of #18 cotton seine twine
3 feet of #36 cotton seine twine
2 to 3 feet of #48 cotton seine twine
5 to 6 feet of #60 cotton seine twine
scissors or sharp knife
ruler
white glue
masking tape
shellac and brush
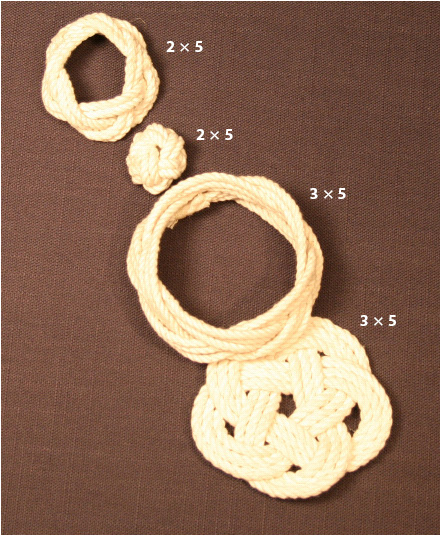
One possibility for the decorations on the top of the wooden box uses multiple Turk’s Head knots shown from the top left: a 2L × 5B, another 2L × 5B, a 3L × 5B (like the napkin ring just tied), and another 3L × 5 B.
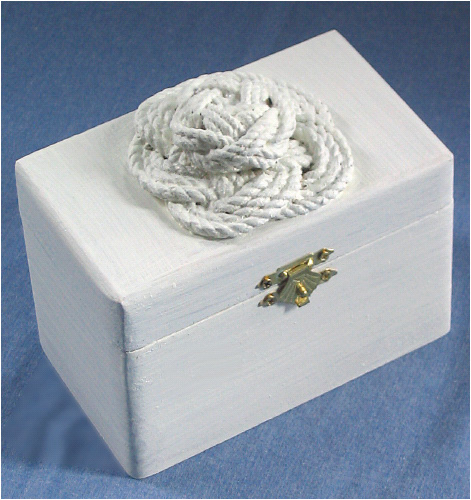
An inexpensive wooden box, readily available at crafts stores, can be made attractive and nautical with the addition of four Turk’s Head knot variations.
A fun and family-friendly project, this decorated wooden box looks like an elaborate project, but it is built up from a number of simple knots (see Chapter 9 for another decorated wooden box). Unfinished boxes are available from crafts stores everywhere. The box pictured is 4 inches by 2 inches by 2 inches and has four knots stacked on it.
Use the Turk’s Head knot-tying skills you developed in the napkin ring and bracelet projects to make a set of knots to stack on top of the wooden box.
Follow these steps to create the box shown in the accompanying photos.
1  Stain or paint the box according to the manufacturer’s directions.
2  While the box is drying, make these four Turk’s Head knots:
• 2L × 5B (2 leads and 5 bights) Turk’s Head knot tied with 2 to 3 feet of #18 cotton seine twine
• 2L × 5B Turk’s Head knot tied with 3 feet of #36 cotton seine twine
• 3L × 5B (3 leads and 5 bights) Turk’s Head knot tied with 2 to 3 feet of #48 cotton seine twine
• 3L × 5B Turk’s Head knot tied with 5 to 6 feet of #60 cotton seine twine
3  Arrange the four knots as shown, nested together like Russian Matryoshka dolls. The different knots, tied in various twine sizes, will fit nicely: the #18, the smallest, fits inside the #36, which fits into the #48. The three “nested” knots now fit atop the #60 Turk’s Head mat.
4  Glue all the knots in place and then glue the stack of knots to the top of the box. (Thin the glue with a little water and apply with a small watercolor brush.)
5  Finish the box with more shellac, stain, or paint as needed.