Ashley’s Knot #2216
In Ashley’s Book of Knots there are about two dozen covering knots. Each is numbered. Knot #2216 is a medium-hard one to tie. I’ve seen it tied at the end of a tiller. The next time you are cruising around the harbor or boatyard, see how many ways you can see this knot used.
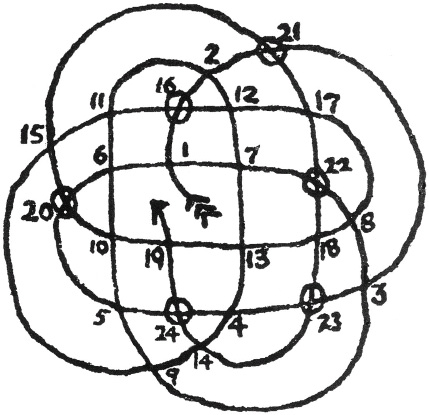
Ashley’s #2216 knot.
Materials and the projects made from Ashley’s Knot #2216. You can decorate a variety of cylindrical objects and balls with this knot. Note that the egg uses five leads in each bight, while the candlestick shown here uses only four leads. (The long, thin tool with the Ashley’s knot at the end is a puller that I use when splicing and working on tough braiding projects.) Pigmented shellac is used to darken some of these projects.
16 feet of #48 cotton seine twine
corkboard or like material with T pins, or clipboard
scissors or sharp knife
diagram of Ashley’s knot #2216
superglue
shellac and brush
ruler
Ashley’s knot #2216 is a wonderfully distinctive knot tied in a most unusual way.
Follow these steps to create Ashley’s #2216 knot.
1  Photocopy the diagram of the knot (enlarge or reduce to fit your finger size), cut it out, and place it on a piece of board that accepts pins easily. I use a 6-inch by 6-inch piece of cork that I bought from a crafts store.
2 Use a 16-foot length of #48 cotton seine twine to create the knot. Pin the end of the twine to the diagram where the fin of the arrow is. (It will take 4 feet to go around the diagram one time.)
3 Now follow the line up a bit to where you’ll see a number 1. This is where you’ll want to pin your length of twine next.
4 Continue leading your cordage along the line, placing pins at each number until you reach number 16. Notice the circle at that number. The circles are Ashley’s way of telling you to lead your twine under the other twine at that spot. You’ll still want to pin the spot even though one length of twine passes under the other one.
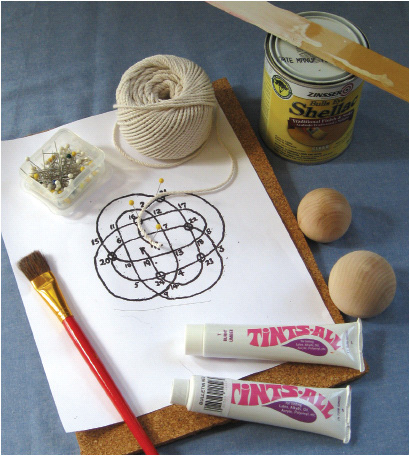
Shown are the materials for tying the #2216 knot and also some of the material used for tying it around other objects (see later in this chapter).
Use this diagram to create Ashley’s #2216 knot. The small circles indicate where you lead the twine under the other piece of twine.
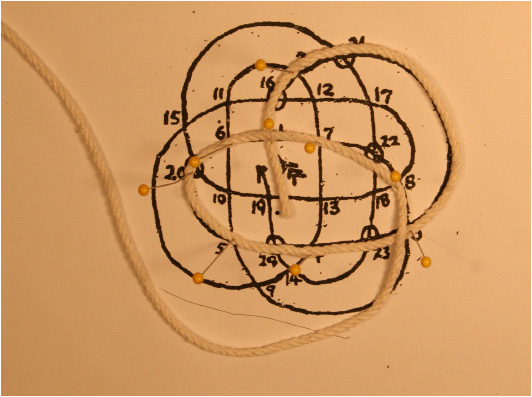
Beginning Ashley’s #2216 knot using the diagram.
5 Continue to pin the twine at each number until you finish following the diagram. You’ll pass the twine under other twine at numbers 20, 21, 22, 23, and 24.
6 Now lead your end around again through the whole diagram. You’ll notice that the knot is getting a little more rigid. You’ll find that it’s possible to remove some of the pins as you proceed around and through the mat a second time.
7 Next, lead your end around a third time. This third pass really stiffens the knot you’ll find that just a pin left here and there will hold it in place.
8 Finally, lead your end around a fourth time. After the fourth pass is complete, unpin the mat. Complete the knot in your hands.
For the projects in this chapter, you need to get this knot into the shape of a cup and then closed enough to fit around a ball or other object. To do this, you’ll want to start drawing out the slack in the knot. Follow these steps:
1 Hold your flat knot in the palm of your hand and use the fingers in your other hand to form your flat knot into a gently curved cup.
2 Look for extra slack in the knot. Gently pull on that part of the knot to remove that slack. Now work that slack all the way around and eventually it will come out at one of the ends of the twine.
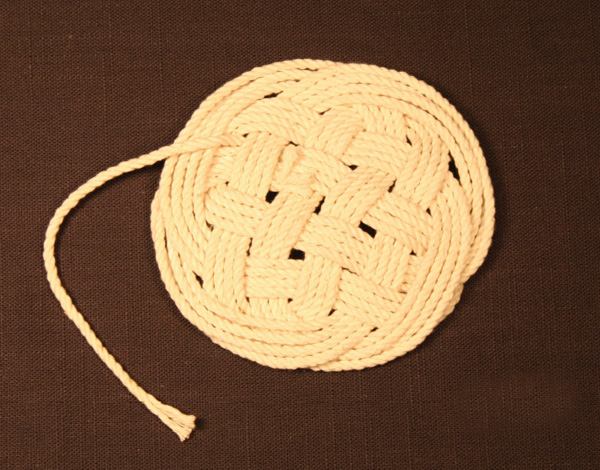
The first pass of the Ashley’s #2216 knot completed.

The completed Ashley’s #2216 knot.
3 Work your way around the knot, gathering slack to release from one end of the twine. This is time-consuming work, and you’ll need to go around at least three times in order to pull out all the slack.
4 As the knot becomes more sack-like, insert the ball or item you want to cover with the knot.
5 Continue to gather slack until the knot is snug around the item.
6 Use pigmented shellac to fix the knot once it is on the item.
Add some nautical flair to a standard candlestick.
7-inch wooden candlestick holder
14 feet of #30 cotton seine twine
diagram of Ashley’s #2216 knot
corkboard or like material with T pins
sharp knife or scissors
ruler
shellac and brush
Follow these steps to decorate a candlestick holder with Ashley’s #2216 knot:
1 Pin the diagram of the knot to the corkboard.
2 Follow the instructions in this chapter to create the knot with 14 feet of #30 cotton seine twine.
3 Gently widen the center of the knot and slide the knot over the candlestick.
4 Draw out the slack to tighten the knot against the candlestick.
5 Cut off the ends of the twine.
6 Coat the candlestick and knot with the shellac.
Here’s a great gift for a young child to make with help from a grandparent to give a mom or dad.
standard wooden egg
18 feet of #30 cotton seine twine
diagram of Ashley’s #2216 knot
corkboard or like material with T pins
sharp knife or scissors
ruler
shellac and brush
Follow these steps to decorate a wooden egg with Ashley’s #2216 knot:
1 Pin the diagram of the knot to the corkboard.
2 Follow the instructions in this chapter to create the knot with 18 feet of #30 cotton seine twine. You’ll note that the egg has five leads (strands) in each bight, so it needs more twine.
3 Place the wooden egg in the knot, and draw out the slack to tighten the knot against the egg by carefully manipulating and removing the slack until the knot encompasses or covers or coats a 2-inch ball.
4 Cut off the ends of the twine.
5 Coat the knot with the shellac.
You can use Ashley’s #2216 knot to spruce up knobs used at sea or ashore.
1½-inch tool knob or tiller knob
14 feet of #30 cotton seine twine
diagram of Ashley’s #2216 knot
corkboard or like material with T pins
sharp knife or scissors
ruler
shellac and brush
Follow these steps to decorate a knob with Ashley’s #2216 knot:
1 Pin the diagram of the knot to the corkboard.
2 Follow the instructions for the Candlestick Holder to create the knot with 14 feet of #30 cotton seine twine.
3 Place the knob in the knot and draw out the slack to tighten the knot against the knob.
4 Cut off the ends of the twine.
5 Coat the knot with the shellac.