 Projects from the
Net Knot
 Projects from the
A net consists of a fabric of thread, twine, or cord, the intersections of which are firmly knotted so as to form meshes, or interspaces of fixed dimensions. The meshes are usually diamond shaped. It is inferred from carvings in the Cairo Museum that Egyptians used nets as early as 3000 BCE.
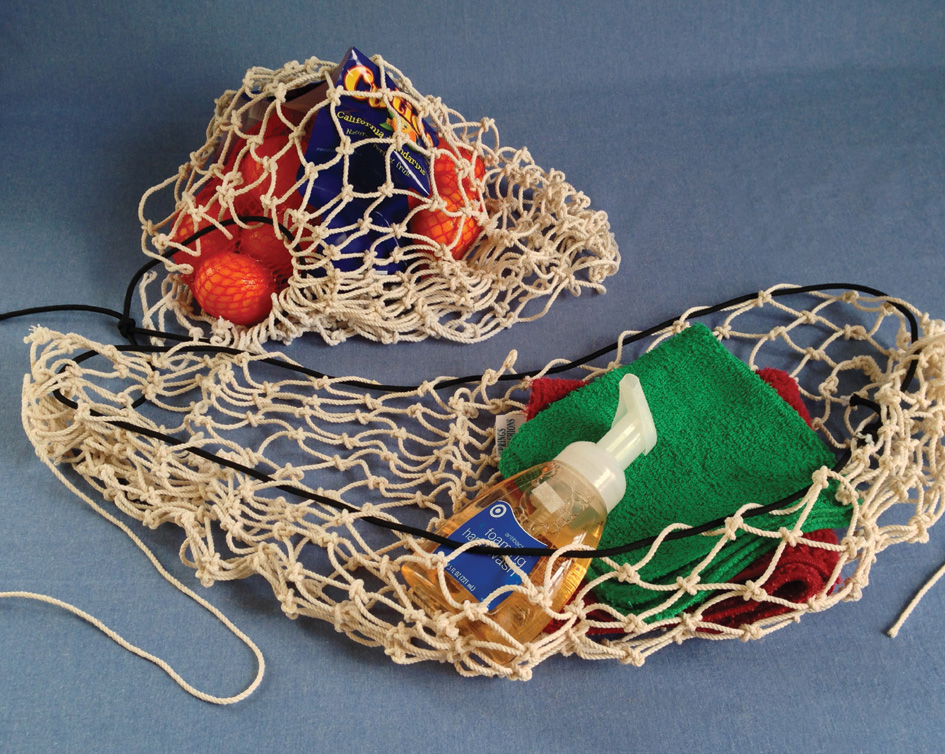
Gear hammocks and mesh shopping bags are marvelous projects to make for your boat or a friend’s boat.
From the net knot pattern you can make two different projects, a gear hammock or a roomy string bag for shopping. A 1-pound ball of #36 cotton seine twine is enough for six items, all inexpensive, earth-friendly, useful, and fun to make.
Gear Hammock:
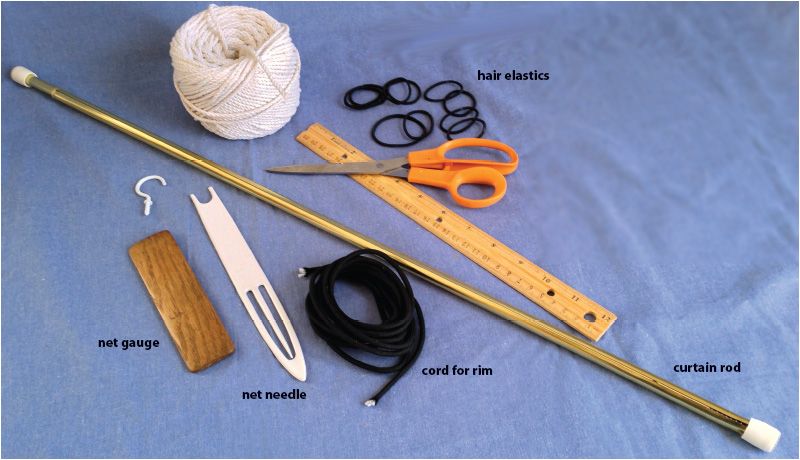
12 hair elastics or rubber bands of the same size
125 feet of #36 cotton seine twine
5 feet of #48 or #60 cord (for rim)
7-inch net needle
3½-inch net gauge (also known as a spool or a mesh stick)
2-foot curtain rod or dowel
sharp knife or scissors
ruler
String Shopping Bag:
14 hair elastics or rubber bands of the same size
125 feet of #36 cotton seine twine
2 feet of #48 or #60 black braid (or cord) for drawstring
7-inch net needle
3½-inch net gauge
2-foot curtain rod or dowel
sharp knife or scissors
ruler
To learn the net knot, practice tying the knot in a larger piece of cordage. You’ll notice that the knot is an independent knot; it doesn’t rely on another knot to hold it together, as “sweater” type of knitting does.
Examine the spaces between the knots; these spaces are referred to as “mesh.” To create the spaces, we use a spool or mesh stick, which is held in place between each knot as we go across the rows.

The shopping net and gear hammock both use a net gauge and a net needle. The net gauge, also known as a spool or a mesh stick, is a rather short, smooth spool-shaped stick 3 to 4 inches long, usually carved from wood (or you could make one out of stiff cardboard). The circumference of the net gauge regulates the size of the mesh. A different gauge is required for each size of mesh. A net needle is a shuttle-like instrument used to carry the twine along as one works. The needle is loaded with twine (see below). If you are working on a big project, the needle is loaded multiple times, and the fisherman’s knot (also known as the true-lover’s knot, see Chapter 6) is used to connect lengths of twine. Net needles also come in various sizes.
Learning the net knot (also known as the mesh knot or the sheet bend) before constructing your gear net or hammock: Take two pieces of cotton seine twine of the larger size—#60 or #48 will do. Manipulate one piece until you have a loop of about 4 inches. Bring the loaded needle up through the loop from the back going forward toward you and out. Pass it around the back of both sides of the loop, then under itself and out to the right. Snug it up tightly and there you have a net knot.
The steps to make the gear hammock and the string shopping bag are similar. Follow these steps to get started with either project:
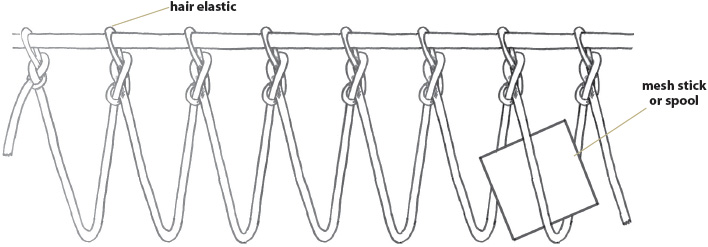
1  Slip 12 hair elastics or rubber bands onto the curtain rod or dowel.
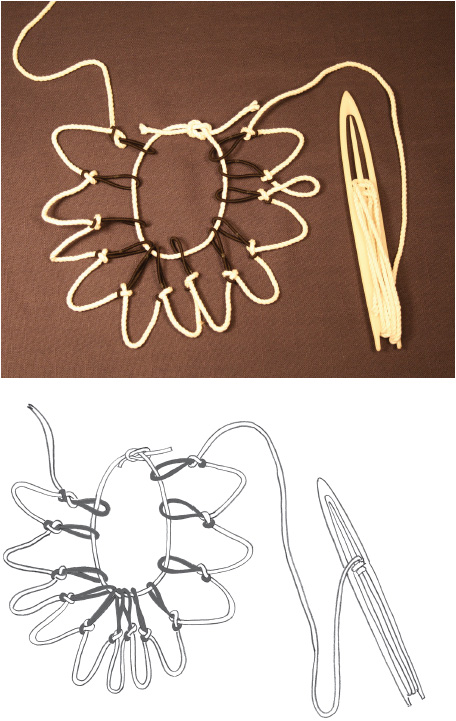
2  Load the net needle with 25 feet of #36 cotton seine twine. To load the needle, hold it in your left hand pointing away from you. Place the end of the cotton twine against the flat of the needle and capture it with your left thumb. Bring it up and around the tongue and then down toward the end of the needle—you’ll have to move your thumb to accomplish this—continuing down between the two prongs. Rotate the needle as you’d turn the page of a book—back and forth, not flipping end to end—bringing the twine up to the tongue, around it, and down again. Continue these steps, keeping a goodly amount of tension on the twine so the needle fills firmly.

Use the needle to learn to tie the net knot, then use to tie in the elastic as shown (top photos), and use the mesh stick to make sure the loops hanging down are all the same length. When done, the first row of knots will be tied to the hair elastics.
3  Using the net (mesh) knot, as explained in the accompanying photo and caption, follow the diagram to string the net twine to each elastic along the curtain rod. Slide the loaded needle up and out of the first elastic. Use the mesh stick to make sure the hanging loops are all the same length. Hold the stick in place with your first finger and thumb. (Remember to leave a tail of 2 feet by allowing a couple of feet to hang free to the left before the first net knot tied in the first hair elastic. This tail will be used later to gather up the head of the gear hammock.)
4  Throw out a 2- to 3-inch loop to the left. Bring the loaded needle to the right and then to the back of the pinched pieces.
5  Slide the needle up and out toward you through the loop you threw to the left. Pull until all the slack is out of the area and the knot is tied tightly and sitting on the top edge of the mesh stick.
6  Remove the stick and bring it over to the next knot.
7  Make sure you “set” or tie each knot very tightly.
Follow these steps to finish the gear hammock or string shopping bag:

Once you have threaded the cord through the elastics (taking it off the dowel) and tied it, hang the cord on a hook and then begin the process of adding rows.
Adding length to the net by adding mesh knots (the hook holding the project is not shown).
1  When you’ve reached the end of the first row, string the elastics onto a cord and remove it from the curtain rod or dowel.
2  Tie the cord into a circle about 3 inches wide.
3  Hang the cord on a hook about waist height.
4  At the end of the first row, flip your work—your row #1 will now be upside down and the last loop you ‘knit’ in row #1 will be the first knot in row #2.
To make the shopping bag, follow these steps:
1  Use the long tails of twine you left on the sides to sew up the sides. (There is no bottom to sew, since you are essentially folding the net in two.)

Another view of the completed net shopping bag (top) and gear hammock (bottom).
A completed flat net. To make the shopping bag, you will fold the flat net in two and sew up the sides, then add a drawstring. To make the light-duty gear hammock, you will lace both ends with the tails and then weave a rim of cord (shown in black in the chapter opening photos) around the top of the hammock. (The elastics used to start the net are cut off when you are done netting.)
2  Add a drawstring to the top of the bag. To make it easier to see the mouth of the bag, use a drawstring of a different color, such as the black cord in the materials list.
To make the gear hammock, follow these steps:
3  Lace both ends with the tail lengths of the cotton string and tie it tightly.
4  Suspend the hammock between two hooks, poles, or cabinet door pulls. Weave the contrasting- colored rim material around the rim of the hammock.
5  When the two ends of the rim material meet, gently pull on them until the hammock measures about 26 inches long. Tie the rim material together with a fisherman’s knot (also known as a true-lover’s knot, see page 47) and cut off the excess.