Garment Buttons Using the Wall and Crown Knots

In addition to the Chinese button knot (described in Chapter 10), there is another useful button made from a wall knot and a crown knot. The wall and crown is a versatile knot. Tied with a certain number of strands and manipulated just so, voila—a rope fender. Tied with a certain number of strands and manipulated just so, voila—a knob at the end of a rope railing or at the bottom of a rope ladder. Tied in a different configuration with a different number of strands, voila—garment buttons perfect for a blazer (if they’re tied in leather) and so classy if they’re tied in cotton seine twine for a fisherman’s knit sweater. The garment button is attached to the garment by means of the small bight we sewed in at the start with the length of #18 cotton seine twine (the single strand). The dark-colored button shown is made from  -inch leather lacing; the light-colored button is made from #72 cotton seine twine.
Wall and crown garment buttons tied with leather lacing and cotton seine twine.
Materials for making garment buttons include cotton twine, leather lacing, a needle, and fine cotton twine for sewing the small bight in the attachment loop.
You can use these buttons to fasten garments or to decorate other projects.
12 inches of #72 cotton seine twine for cotton buttons
two 10-inch-long pieces of  -inch leather lace for black leather buttons
sewing needle and heavy cotton thread (#18)
sharp knife or scissors
ruler
shellac and brush
Follow these steps to make the garment buttons out of the #72 cotton seine twine. This is a six-strand wall and crown button. Directions for making buttons out of the leather lace follow the directions for making buttons out of cotton seine twine. (To illustrate this knot, we used cotton rope, and the sizing in the picture and drawing is of #18 cotton seine twine. For your button in #72 cotton seine twine, you’ll want to use a single strand of the #18 cotton seine twine or a length of thread.)
1  Middle (fold in half) a 10-inch piece of #72 cotton seine twine.
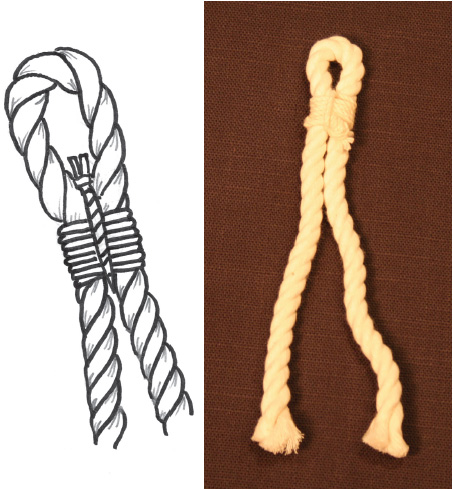
2  Tie a small loop at one end of the heavy cotton thread, and thread the needle on the other end. Tie it on, seizing ½ inch up from the bight (loop) that you made in the #72 cotton seine twine. You now have a small loop bound by seizing with two lengths of twine below the seizing (see illustration).
3  Unlay (untwist) the two lengths of twine all the way up to the seizing to create six strands.
4  Tie a six-strand wall knot. Follow these steps:
5  Lay out the six strands parallel to one another.
6  Loop the left strand down in the direction the rope twists and up under the far right strand.
7  Loop the next strand on the left under and over the first loop.
8  Continue to loop each strand under and over the previous loops until you have looped all six strands.
9  Tighten the knot.
To finish this button, tie a single “topper” of a crown knot with the six strands in pairs. Follow these steps:
1  Lay out the six strands parallel to one another.
2  Loop one pair of strands on the left up and over the pair of far right strands.
3  Loop the next set of strands on the left over and under the first loop.
4  Loop the third set of strands over and under the second loop.
5  Tighten the knot.
You can use a mixture of wall and crown knots to design your own buttons. For example, the larger of the two light-colored buttons in the photograph at the start of this chapter is composed of a base of two rows of wall knots and a topper of a three-paired crown knot. It’s possible to make the button even larger by adding another layer of single wall knots and another topper of a three-paired crown knot.
For the dark-colored leather button, I seized two lengths of lacing together and formed the small button with a base of wall knots and a “topper” of a four-strand single crown knot. For the larger leather button, I added to the pattern a single layer of wall knots and a topper of single-strand crown knots.
After you are satisfied with the shape and size of the button, cut the ends off closely and dip them into the shellac. This will prevent the ends from coming untied. After the shellac is thoroughly dry, you might want to paint the button a different color.

Twine middled and bound with thread (seized) to create a loop on top.

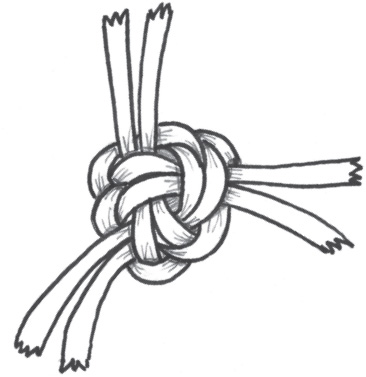
Finishing the knot with the crown.

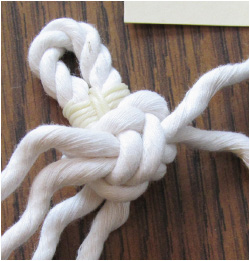
The wall and crown knot in progress.