 Shipboard or Household Items to Make:
Round Canvas Ditty Bag or Laundry Bag, Canvas Letter Holder, Rope Hammock
 Shipboard or Household Items to Make:
If you enjoy embellishing projects with colorful stitches and stamped accents, these projects are for you.
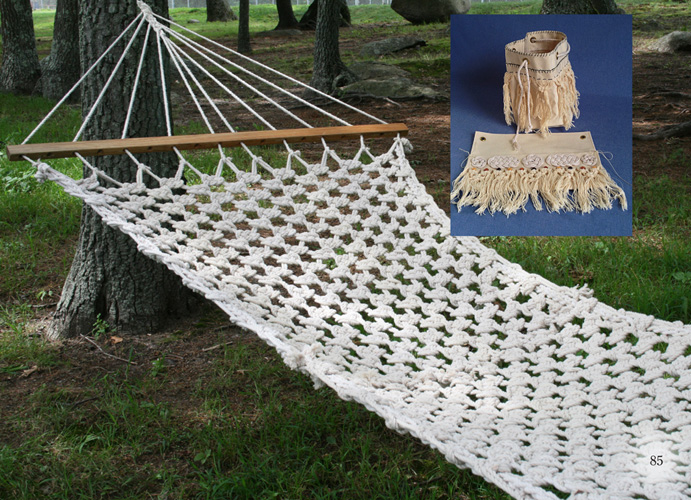
A finished hammock makes a marvelous island oasis in your backyard. Inset: A decorated round canvas bag and a canvas letter pouch—perfect gifts for your onboard neighbors.
Your local craft or hardware store contains all the materials you need to create a ditty bag, letter carrier, or hammock for between the masts or in your backyard.
Here’s a different kind of bag—it’s round. Sailors often use bags like this, called ditty bags, to store odds and ends such as needles and small tools.
I kept the pattern for this bag on the small side (10 inches by 6 inches) so it can be completely sewn by hand. You can finish the bag fairly quickly. Make it bigger if you would like it to hold bigger objects; make it still bigger to serve as a clothing or laundry bag.
2-foot-square piece of canvas
3 to 4 feet of cotton cord for drawstring
sewing needle and heavy cotton thread
white glue
sharp knife or scissors
ruler
pencil
six ¼-inch (inside diameter) grommets
grommet-inserting tool (optional)
decorative fringe and colored threads
Follow these steps to create a ditty bag:
1  Cut a rectangle from the canvas that’s 11 inches tall and 21 inches long. Cut a circle from the canvas that’s 7 inches in diameter.
2  Fold the canvas rectangle in half lengthwise and sew up the side with a hem of ½ inch (see cutting diagram).
3  On the canvas circle, draw a sewing line ½ inch in from the edge all the way around.
4  With your fingers, crease the material in the circle along the line.
5  On the inside of the tube of canvas, draw another sewing line ½ inch up from the bottom (see photo).
6  Insert the creased circle of material into the tube, matching the two sewing lines. Pin (or baste) and then sew the two pieces together with tight stitches, either by hand or machine (see photo).
7  Turn down a 2-inch hem on the inside of the top of the tube and sew it in place to stay.
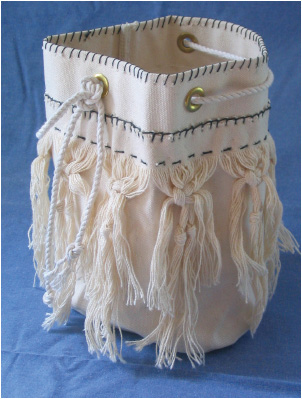
A ditty bag has many uses, both onshore and at sea.
Sewing line drawn on circle and rectangle used to make the round canvas bag.
Follow these steps to insert the drawstring into the ditty bag:
1  Turn the bag right side out and carefully measure where each grommet will sit.
2  Insert the six grommets by cutting out just enough fabric to insert the funnel side of the grommet into the material of the bag. Set the piece of material with the funnel side of the grommet onto the grommet tool.
3  Place the other part of the grommet over the funnel side and press the two sides of the grommet together with the tool. Repeat this process with each of the remaining grommets.
4  Weave the drawstring through the grommets to complete the basic round bag. Knot each end of the drawstring together so the ends don’t come out of the grommets.
5  Your bag is now ready for you to add your own personal creativity with decorative fringe, colorful fabric markers, stitches, beads, or stamps.
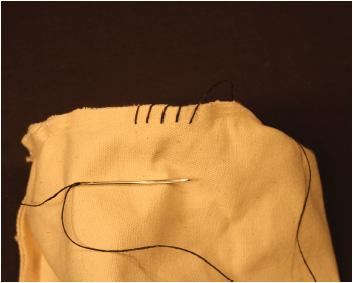
With the project inside out, sew the circle of canvas to the tube end.
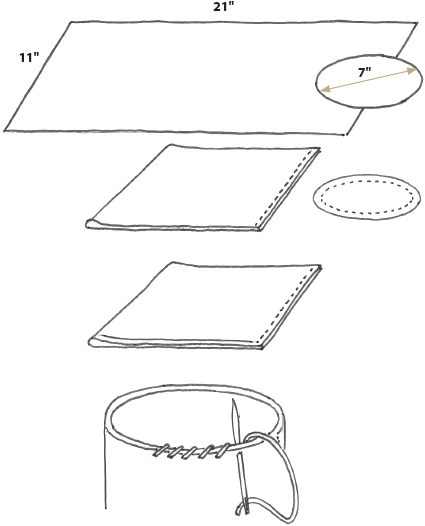
Cutting and sewing pieces for the ditty bag.
This fancy snail-mail pouch is a way to show off your marlinspike skills when you are heading back to the boat from the post office. Or tie it to your favorite lounging chair as a holder for your remote controls.
18-inch by 12-inch piece of canvas
white glue
sewing needle and heavy cotton thread
cord for hanging
scissors
ruler
grommets and decorative flat knots (optional)
Follow these steps to create the canvas letter holder:
1  Pull out horizontal (weft) threads at the bottom
3  inches of the wide side of the canvas (you can pull out as much as 4 ½ inches depending on how you will use the fringe). Cut ½ inch of the vertical threads from the left and right sides of the flap.
2  Fold back the left side of the canvas ½ inch and sew it closed.
3  Fold the piece of canvas lengthwise in half so that its height is now 9 inches.
4  Fold the front piece of the canvas in half again to create a 4 ½-inch flap made of canvas and fringe.
5  Fold back the right side of the canvas ½ inch and sew it closed to make the pouch for the mail.
If you want to use grommets to hold your pouch, then follow these steps:
1  Fold back the top of the canvas ½ inch and sew it to create a neat hem.
2  Insert grommets in the top left and right corners of the pouch.
3  Now you can hang the pouch over hooks.
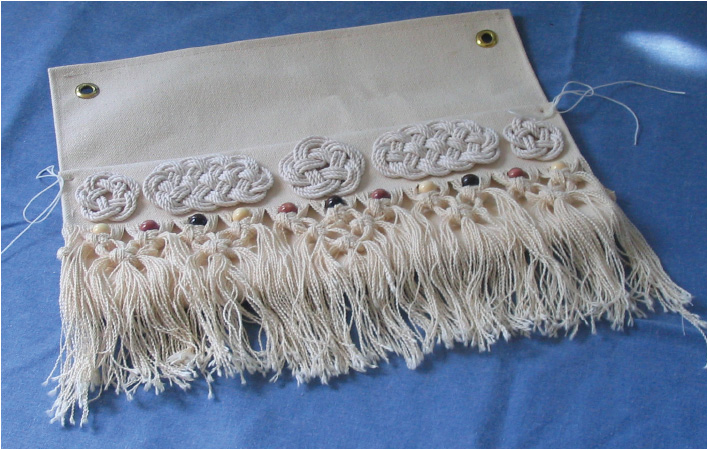
A letter holder can be decorated using a variety of knotting skills. The fringe shown here is alternating square knots.
The fringe has been created and the left side has been sewn for a nice clean edge.
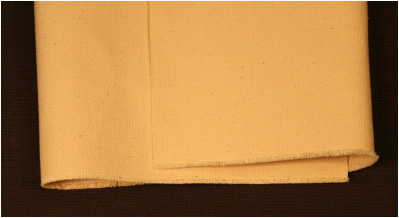
There are many ways to fold the canvas into a pouch. Shown here is a fold made for the pouch with a flap over it.
To make the mail pouch without grommets, follow these steps:
1  Lay the cord along the top of the canvas and fold about 1 inch of canvas over it.
2  Sew a seam along the canvas flap you created to hold the cord in place. Now you can tie the pouch between hooks.
3  In the fringed section you can use macramé. Sailors call it square knotting or McNamara’s lace—as it is called in the navy.
4  Tie or glue other decorative knots to the front of the pouch, such as ocean plat knots (described in Chapter 7).
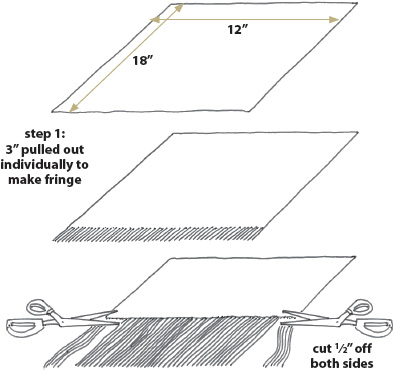
Three inches of weft have been pulled out individually, and ½ inch of the thread from the left and right sides have been removed. Cut ½ inch off both sides, and then fold and sew for a nice finished edge.
There are many ways to fold the canvas into a pouch. Shown here is a fold made for the pouch with a flap over it.
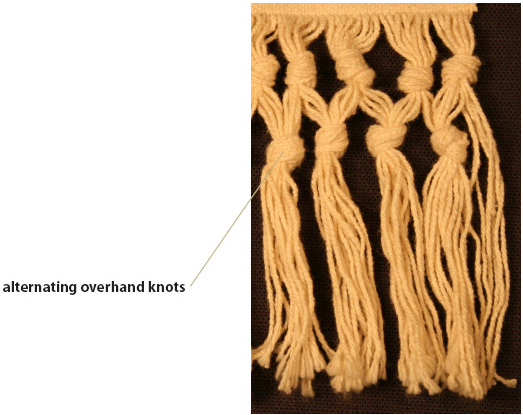
Knotting the fringe with overhand knots.
1,740 feet of ¼-inch cotton rope
two hammock spreader bars
two 3-inch-diameter rope grommets (carefully and correctly tied) or appropriate metal rings
masking tape
shellac (optional)
sharp knife or scissors
ruler
Some people think that a hammock is a piece of furniture. Well, this hammock is a piece of art.
Be warned that there is no fast way to do this project; you’ll have to tie over 400 knots to complete this single-person hammock. Each of the knots must be tied the same size as its neighbor, and the rows of knots must alternate entry and exit points. That said, when you finish the hammock you will have a real masterpiece.
Follow these steps to tie the first hammock clew (the ropes that hold up the hammock):
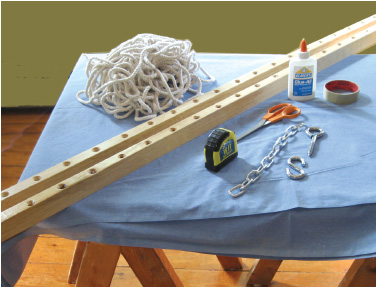
The material supplies you need to make the hammock are minimal—but you will need much time and a good dose of patience. Note that the hammock spreader bar shown here has twice as many holes as you need. You can leave the extra holes empty, or fill the holes with putty.
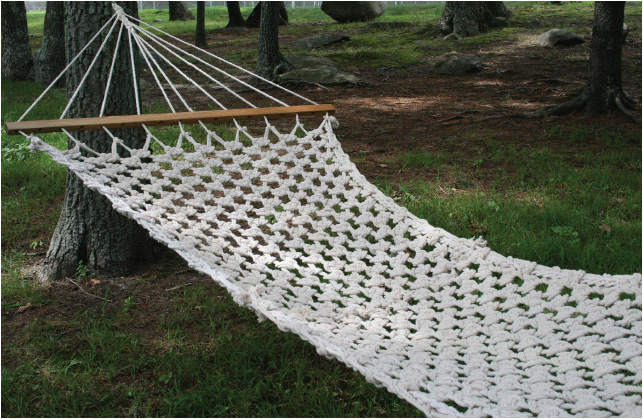
A finished hammock makes a marvelous island oasis in your backyard.
1  Cut five pieces of cotton rope, each 8 feet 6 inches long. Tape the ends or dip the ends in shellac to prevent them from unraveling.
2  Loop each piece of rope through the rope grommet or metal ring, creating ten strands that are each about 4 feet long.
3  Lay the grommet on a table. Pick up the first strand on the left, and in an over-under-over-under process draw this strand across the nine strands and out to the right (see photo and diagram).
4  Now pick up the strand on the right side and weave it over-under-over-under and out to the left (see photo and diagram).
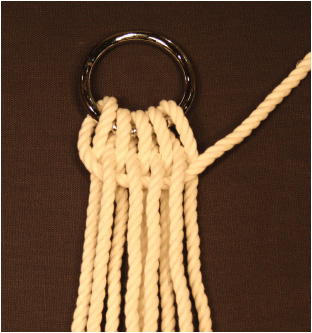
The rope woven across the nine other strands.
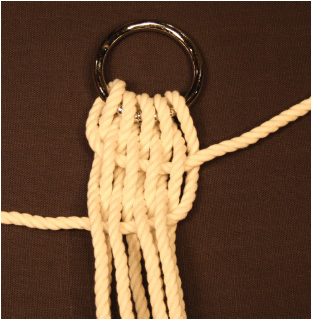
The right strand woven through the other strands.
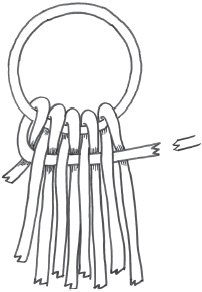
Weaving rope for the hammock clew.
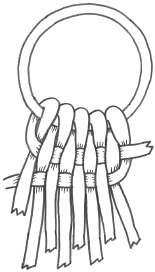
Weaving the right strand over to the left.
Weaving strands to create the hammock clew.
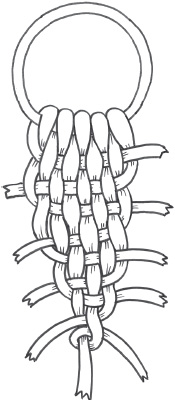
The completed hammock clew.
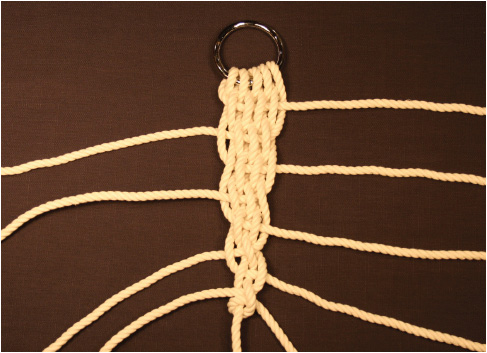
When the clew is finished, you will have ten strands ready to tie to the spreader bar.
5  Continue this weaving process on the left and right sides until just two strands remain. Tie an overhand knot with these two strands. (See diagram and photo.)
6  Lace the ten ends of the clew through the spreader bar. My bar measures 4 feet by 1
 inches by 1 inch, with ten holes drilled through about every 5 inches. (If your pre-purchased spreader bar has more than ten holes, you can fill them with wood putty.) Set your bars aside, but not too far away.
Follow these steps to make the body of the hammock:
1  Cut twenty lengths of cotton cord, each 41 feet long.
2  Find the middle of the first two long cords, and holding these cords in the middle bring the end of the first clew strand that exits the spreader bar to it. Tie a bowline with the clew strand around the middle of the pair of long cords (see diagram).
3  Continue tying the clew ropes to the middled (folded in half) pairs of hammock ropes until all twenty lengths are tied in place.
4  Now tie the first row of carrick bend knots as shown in the diagram (see Chapter 7 to learn how to tie a carrick bend). Note that each knot is tied close to the next one, and the entry and exit points are the same all the way across the row.
5  Tie each carrick bend in the second row close to its neighbor. Make sure that the entry and exit points for the knots in the second row are exactly opposite from those in the row above.
A clew rope attached to the hammock rope below the spreader bar.
6  Continue tying carrick bends in this manner until you have completed 22 rows. The hammock is now half done.
Follow these steps to complete the hammock:
1  Repeat all the steps above to create the second clew. Add the second spreader bar, attach the hammock ropes to the clew ropes, and complete 21 rows of carrick bends in the body of the hammock.
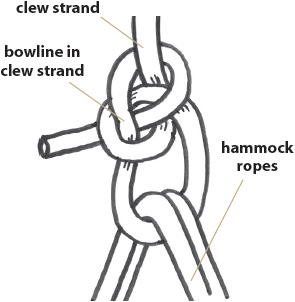
Tie a bowline to attach a rope from the clew to the hammock ropes.
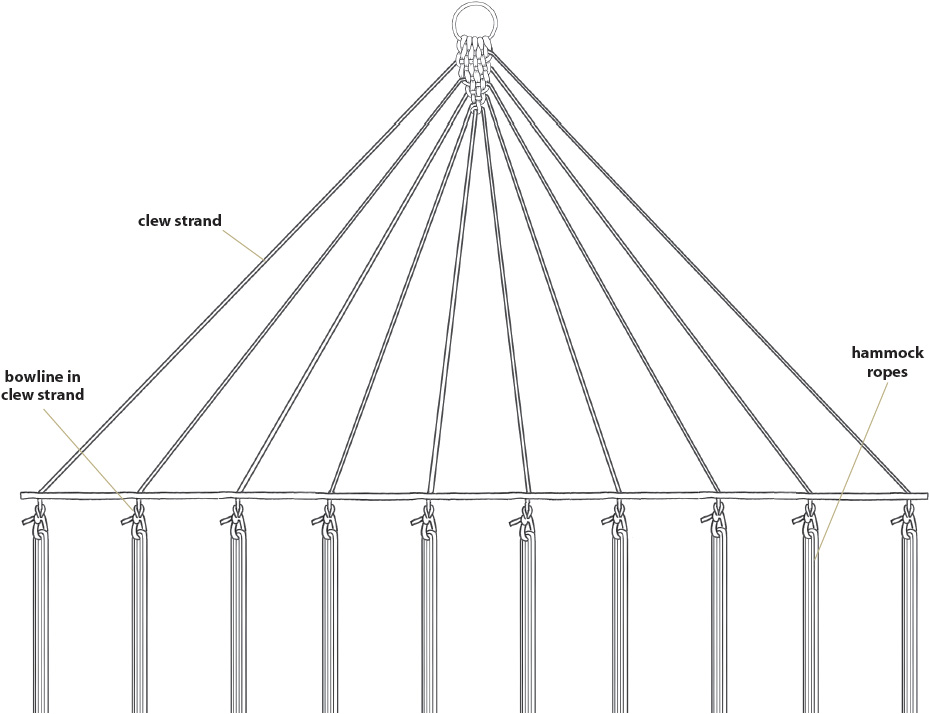
The clew ropes attached to the hammock ropes.
Nine carrick bends tied to create the first row of the hammock. The next line contains ten carrick bends. Alternate rows of nine and ten carrick bends for a full hammock.
2  Now it’s time to connect the two halves of the hammock together. Follow these steps:
3  Leave a tail of about 8 inches at the end of the last row of carrick bends for each half of the hammock (cut off any excess rope).
4  Lay both sides of the hammock on a table so that the ends meet in the middle.
5  Starting with the first pair of carrick bends that meet in the middle, tie the tails together using overhand knots close and tight to the carrick bends to make the seam. The knots are tied so they are on the underside of the hammock.
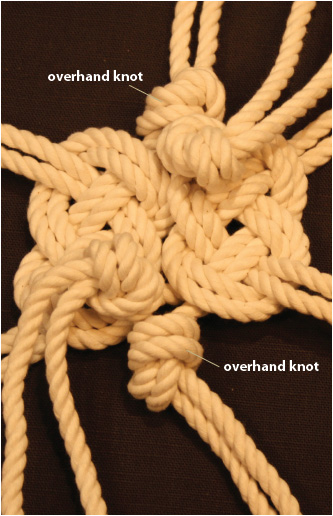
The two completed sides of the hammock lying on a table, with the tails of the carrick bends being tied with overhand knots on the bottom of the hammock. You can see the four-strand sennit (see instructions) being woven into the edge of the hammock in the photo. The close-up shows how closely the overhand knots are tied to the carrick bends.
To complete the hammock, you need to make a strap (four-strand sennit—see Chapter 9) for both long sides of the hammock. This gives the hammock a nice finished edge, and when tensioned a small amount provides a gentle “belly” to the hammock.
1  Take two pieces of ¼-inch cotton rope, each 18 feet long. Middle them (fold them in half) and with the four strands braid a nice sennit 6 feet long. You’ll need to leave tails of about 10 inches to tie off.
2  To install the strap, find the first bowline at the head of the hammock at the left. Untie the bowline and then add the bight and re-tie the bowline so that it holds the first bight of the car-rick bend and the bight of the strap.
3  Weave the strand in and out down the side (see photo).
4  When you reach the foot of the hammock, tie the ends into the corresponding carrick bend bight.
This hammock is designed for one person, whose weight should not exceed 225 pounds. The first time you sit in the hammock, it will stretch as much as 12 inches, so be careful as you sit.
Note that spinning or swinging in the hammock is not recommended. The ropes might loosen, which might result in injury.
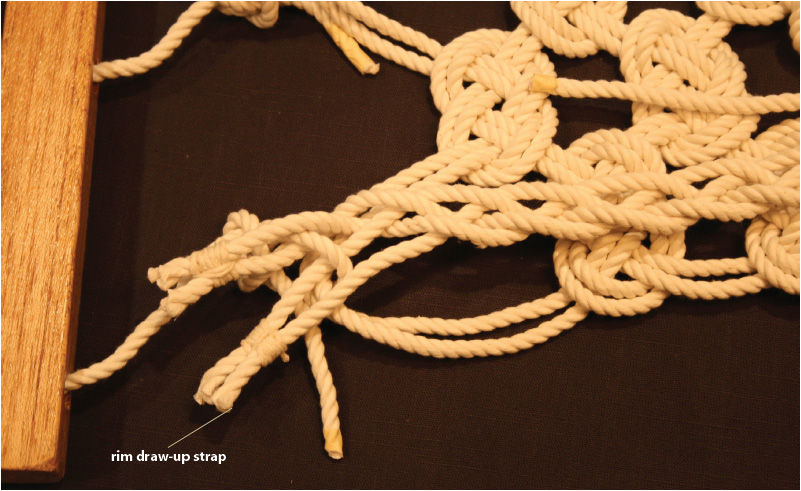
The sennit strap you created for a nice finished edge is shown here getting inserted into the bowline of the clew strand.