Chapter 22: Taking Notes with OneNote
Navigate OneNote
You can digitally use OneNote the same way that you use physical binders, with the added improvement of being able to easily search and share your notes.
In OneNote, you can create notebooks in which you jot down ideas; sketch out plans; compile scraps of information; type, write, and draw your ideas; create tables; and paste in digital images such as a screenshot of a web page or a photograph. You can divide notebooks into sections — represented as tabs — to organize them, and you can group sections containing related information together, as described in Chapter 23. This section introduces you to navigation in OneNote.
Navigate OneNote

 Click
Click  to display a list of notebooks that you can open.
 Click the notebook you want to open.
A OneNote opens the notebook you clicked.
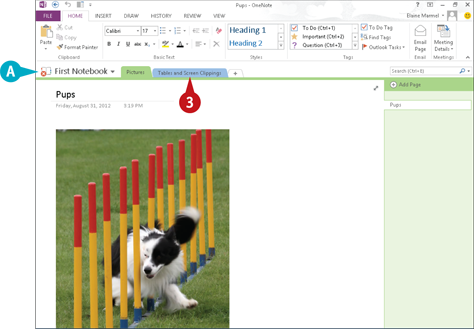
 Click a section tab.
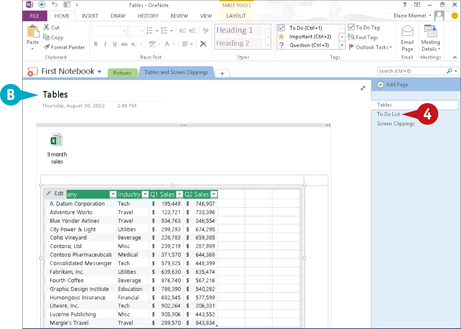
B OneNote displays the section tab you clicked.
 Click a page in the tab.
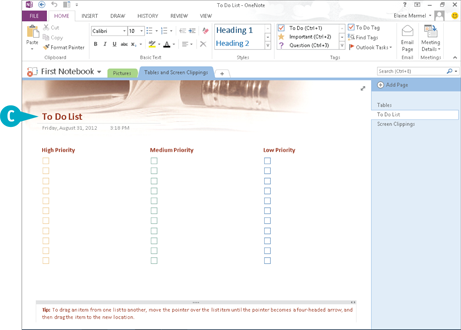
C OneNote displays the page you clicked.
simplify it
Can I keep all my notebooks visible at all times?
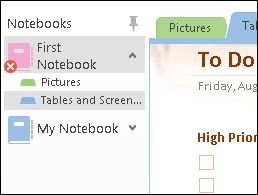
Yes. You can use the OneNote Navigation bar. Click beside your notebook’s name. Then, click the pushpin ( ) to pin the OneNote Navigation bar on the left side of the window. Beside each notebook, the Expand Notebook button (
 ) appears; click it to view the notebook’s sections. Click the Collapse Notebook button (
 ) to collapse the notebook and hide its sections. To hide the Navigation pane, click the pushpin (
 ).
).
Type and Draw Notes
You can jot down ideas in OneNote in a few ways. For example, you can type them using your keyboard. You can then format your text as desired, changing the font, size, and color; applying bold, italics, underline, subscript, or superscript formatting; and more.
Alternatively, you can use OneNote’s drawing tools to sketch drawings, such as a map. And, on touch devices, you can use drawing tools to hand-write notes and then convert them to typewritten notes.
Regardless of the method you use, you can move the notes you create around on the page as desired.
Type and Draw Notes
Type Notes

Click a section and a page on which you want to type a note.
Click the Draw tab.
Click Type.
Click the spot on the page where you want to type.
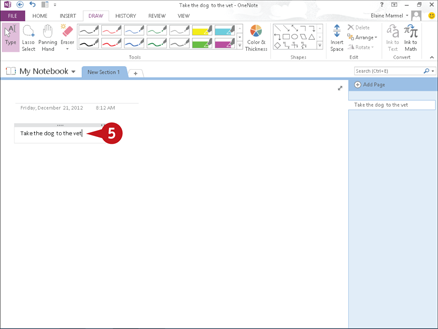
 Type your note.
Note: When you finish, click anywhere outside the box containing the note.
Note: Using the tools on the Home tab, you can change the text font, size, and color, and also apply bold, italics, underline, subscript, or superscript formatting and more.
Draw Notes

Click a section and a page on which you want to draw a note.
Click the Draw tab.
In the Tools group, click a drawing tool.
A You can click  to view all available drawing tools.
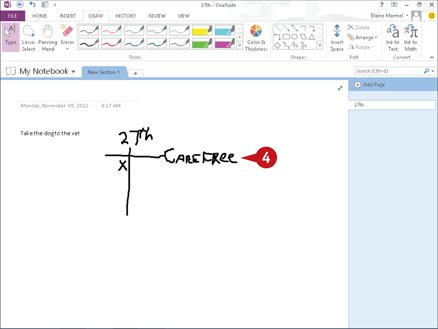
Draw or handwrite your note.
Note: When you finish, click Type to stop drawing.
simplify it
How do I move a note?
Position the mouse over the text; the note container appears. Position the mouse pointer over the container’s top; when  changes to
  , click and drag the container to the desired location. To move a drawing, click the Lasso Select button on the Draw tab and draw a box around the drawing. Then click Type and move the mouse over the drawing ( changes to ); drag the drawing.
Can I convert handwriting to typing?
Yes. Click Type, drag the mouse pointer over the handwriting to select it, and click Ink to Text.
Insert and Format a Table
You can create sophisticated-looking tables in your notes. In addition to inserting and deleting rows in tables as needed, OneNote supports formatting options for cells, including shading them and hiding their borders. You can also align cell information to the left or right edge of the cell or center it within the cell. In addition, you can sort data in your table so you can organize and display information the way you want. You can also convert a table in OneNote to an Excel spreadsheet if you need to perform detailed analysis on the table data.
Insert and Format a Table
Insert a Table
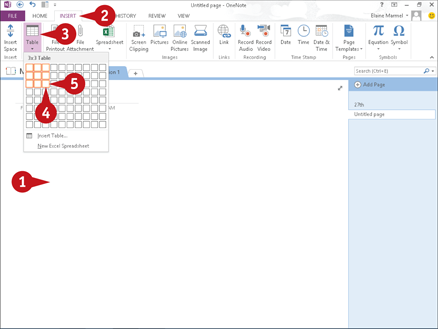
Click in the notebook where you want the table to appear.
Click the Insert tab.
Click Table to display a table grid.
Slide the mouse pointer across the squares that represent the number of rows and columns you want in your table.
Click the square representing the lower-right corner of your table.
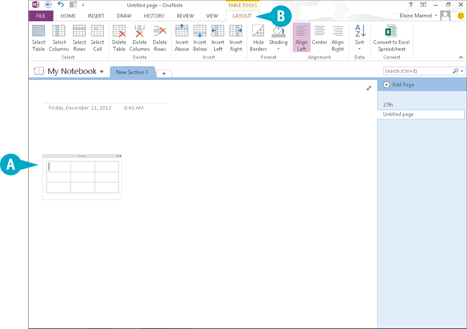
The table appears in the location you selected in Step 1.
A The insertion point appears in the upper-left corner of the table, ready for you to type.
B Table Tools appear on the Ribbon.
Apply Table Formatting

 Click the Layout tab.
C You can select any of these options to format your table.
 Click a cell in the table or select multiple cells.
 Click an option on the Ribbon.
Note: In this example, OneNote applies shading. For shading, you can click the bottom half of the Shading button to display and select from a palette of shading colors.
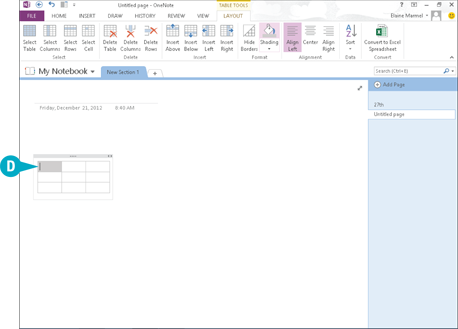
D OneNote applies the option you selected in Step 8 to the cell you selected in Step 7.
simplify it
How do I select more than one cell?
Selecting multiple cells is useful when you want to apply the same option to several table cells. Click in the first cell you want to select and drag either across or down to select adjacent cells. You can select non-adjacent cells if you press and hold  +
+ as you drag across each cell you want to select.
How do I delete a table?
Click in the table, click Layout on the Ribbon, and then click the Delete Table button.
Attach Files to Notes
Sometimes it is helpful to attach a document or other file to a page in OneNote. For example, suppose you have created a spreadsheet for expense account transactions in Microsoft Excel; you can attach that spreadsheet to a OneNote page devoted to work. Likewise, you could attach a PowerPoint presentation to a OneNote page devoted to a business meeting that you plan to attend.
When you attach a file to a note in a OneNote notebook, an icon for that file appears on the note; you can double-click the icon to open the file from within OneNote.
Attach Files to Notes

Click a section and a page on which you want to attach a file.
Click the place on the page where you want the file attachment to appear.
Click the Insert tab.
Click File Attachment.
The Choose a File or a Set of Files to Insert dialog box opens.
Locate and select the file you want to insert.
Click Insert.
OneNote displays the Insert File window.
Click Attach File.
A OneNote inserts an icon for the file.
You can move the shortcut icon as needed by dragging it.
Send Information to OneNote
Suppose that you have composed a letter in Word, created a worksheet in Excel, prepared a PowerPoint presentation, or set up a flyer in Publisher. You can send a copy of your work in a OneNote notebook using the OneNote Clipping Tool.
You can think of using the OneNote Clipping Tool to place information from another program into OneNote as a quick and easy way to copy and paste information. If you have multiple documents open in multiple programs, the OneNote Clipping Tool copies the last document you viewed in another program to OneNote.
Send Information to OneNote
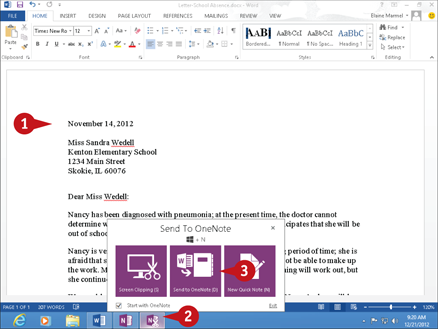
Open any document in any Office program.
This example uses a letter in Word.
On the Windows taskbar, click the Send To OneNote button.
Click Send to OneNote.
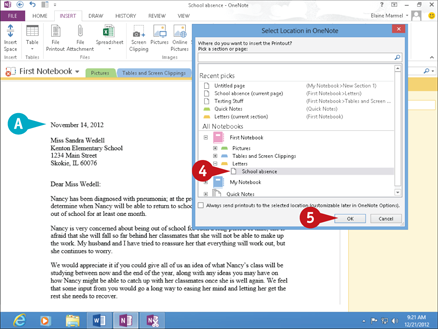
The Select Location in OneNote dialog box appears.
Click a location in the notebook where you want to place the document.
Click OK.
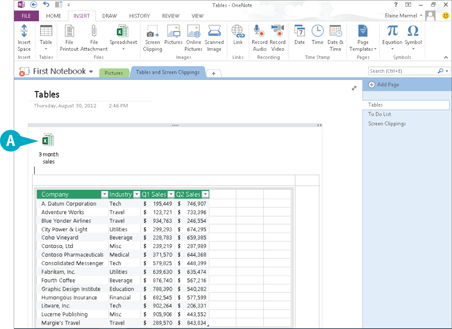
A The document appears in OneNote.
Note: If you use these steps for an Excel workbook, OneNote prompts you to choose between inserting a file attachment icon, a spreadsheet, or a chart or table.
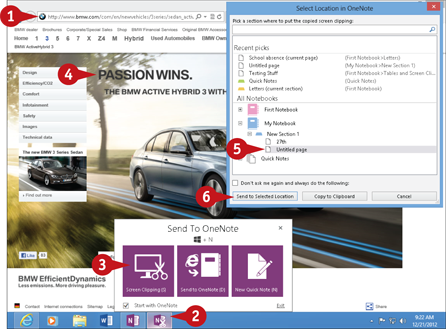
Insert a Screen Clipping
You can use OneNote’s Screen Clipping tool to capture parts of anything you can view on-screen — including documents and web pages — and paste them into OneNote. For example, you might clip an image of a web page devoted to a car you are interested in buying, or a price sheet for a service you are considering using. You can move a screen clipping the same way you move a note. For more information, refer to the tip “How do I move a note?” in the section “Type and Draw Notes” earlier in this chapter. This section demonstrates clipping from a web page.
Insert a Screen Clipping
Open the document or page that contains the item you want to clip.
This example clips a part of a web page.
On the Windows taskbar, click the OneNote Clipping Tool button.
Click Screen Clipping.
The screen dims and  changes to
  .
.
Click and drag from the top-left corner to the bottom-right corner of the area you want to clip.
Note: The part of the screen you select no longer appears dimmed.
In the Select Location in OneNote dialog box, click a location for the clipping.
Click Send to Selected Location.
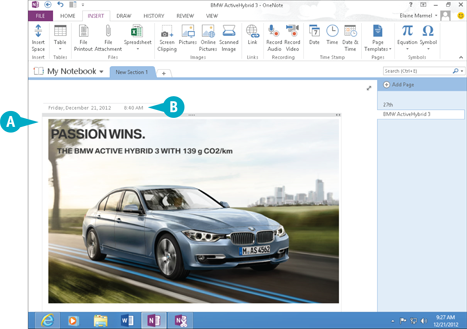
A The clipping appears in OneNote.
B The clipping includes the date and time you created it.
Note: You can move a screen clipping the same way you move a note. For more information, refer to the tip “How do I move a note?” in the section “Type and Draw Notes.”
Create a Quick Note
Even if OneNote is not open, you can create a Quick Note to quickly jot down information. You can think of Quick Notes as electronic, yellow sticky notes. You can position Quick Notes anywhere on your screen and leave them there for as long as you need to refer to them. When you no longer need a particular Quick Note, you can close its window. As soon as you create a Quick Note, OneNote saves it to your OneNote notebook, so you can view it again from OneNote. You can also search and organize Quick Notes the same way you search and organize regular notes.
Create a Quick Note
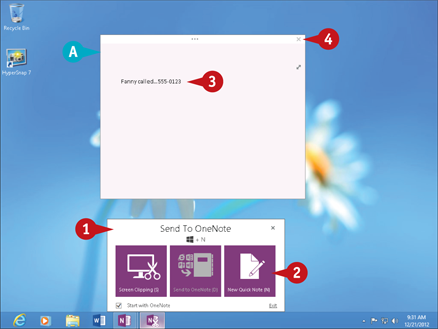
Press  +
+ to display the OneNote Clipping Tool window.
Press or click New Quick Note.
A A Quick Note window appears.
Type your note.
Note: To format note text, select it and use the commands on the Mini toolbar.
Click  to close the note.
You can click in the OneNote Clipping Tool window to hide it.
Launch OneNote.
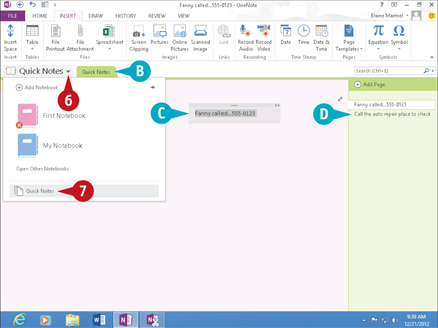
Click .
Click Quick Notes.
B Your Quick Notes section appears.
C OneNote displays the most recent Quick Note you created.
D You can click here to review other Quick Notes.
Record an Audio Note
If you are attending a significant meeting or participating in an important conference call, you can use OneNote to record it and store the recording as part of your notes. As you record, you can type notes into OneNote; when you do, OneNote links the note to the recording, displaying a small icon alongside it. You can then click this icon to listen to the audio that was recorded at the time you typed the note.
To record audio, you must have a microphone. Most laptop and tablet PCs come with microphones built in. (Note: You should always ask permission before recording someone.)
Record an Audio Note

With the page to which you want to attach a file open in OneNote, click the Insert tab.
Click the Record Audio button and begin speaking.

OneNote begins recording.
A A shortcut icon for the audio file appears.
B The Audio & Video Recording tab appears, displaying playback controls.

C You can type a note as you record, and OneNote links the note to the recording.
To stop recording, click the Stop button.

OneNote stops recording.
D To listen to the recording, double-click the Audio Recording icon.
E You can point the mouse at a note you typed during recording to see  beside it, indicating the note is linked to the recording.
simplify it
Why do I care if OneNote links a typed note to an audio recording?
The link gives you another way to play the audio. When you slide the mouse pointer over the note you typed while recording, OneNote displays beside the note; click to listen to the recorded audio.
Can I record video notes?
Yes, if your computer features a webcam. Click the Record Video button on the Insert tab. OneNote displays the Audio & Video Recording tab and launches a video screen in which you can view the footage as it is recorded. To stop recording, click the Stop button on the Ribbon.