Chapter 1
Getting Started
Parts of the Bass
Before you put your hands all over it, you should probably get acquainted with a bass guitar first (at least take it out to dinner!). The image below details the most common features found on electric bass guitars. Each model will likely be slightly different, but they’ll usually have most, if not all, of these features in common.
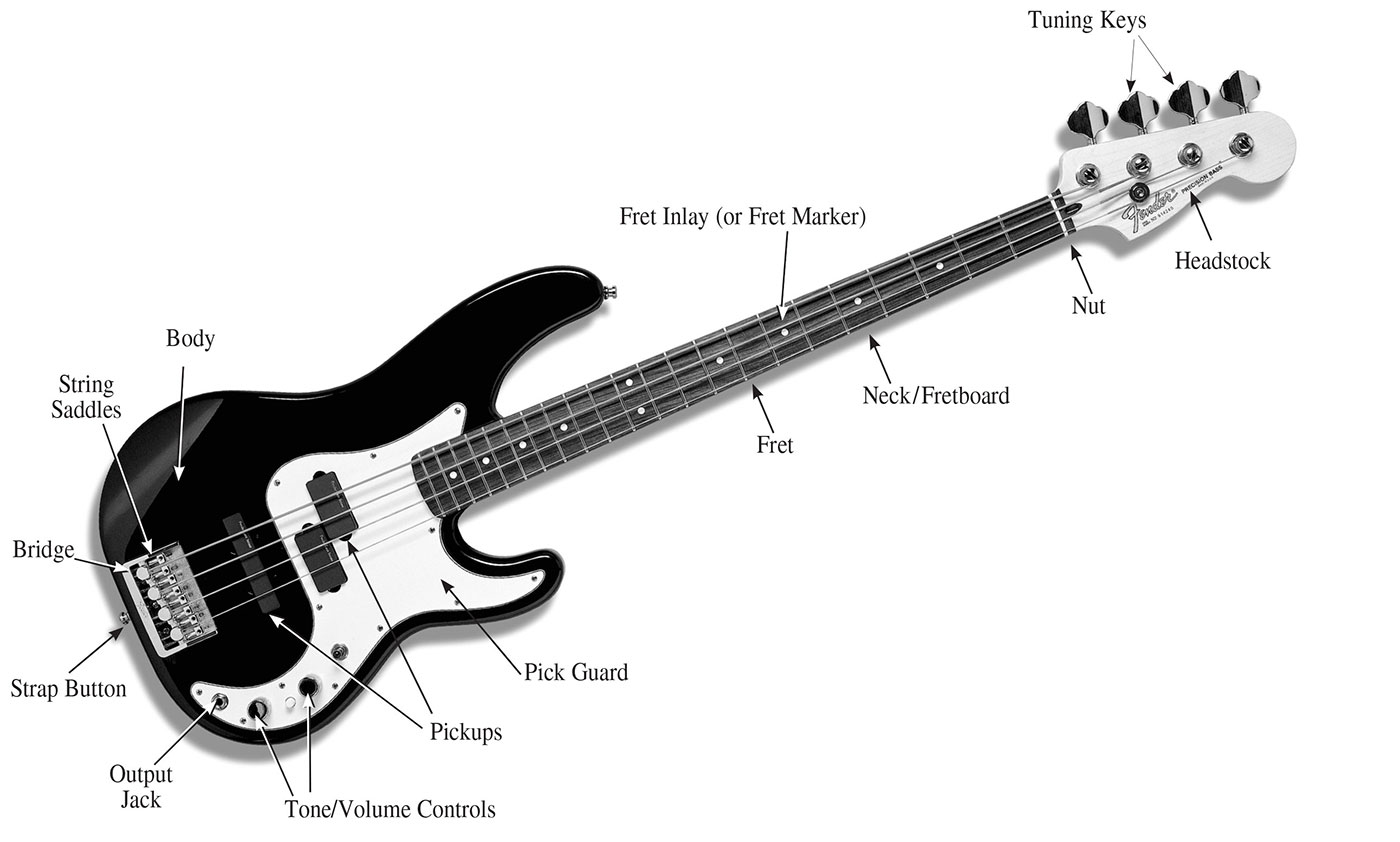
Your bass may have more than one pickup, it may not have a pick guard, or it may have more or fewer volume/tone controls. If that’s that case, don’t sweat it—just be sure to familiarize yourself with the features of your bass.
Fretboard Diagrams
Let’s look closer at the neck of your bass. Those metal strips that run across it—perpendicular to the strings—are called frets. Frets help us produce different, distinct pitches on each string and are numbered, low to high, from fret 1 to fret 20 (or 21 or 22, depending on your bass), with fret 1 being closest to the nut.
We sometimes use fretboard diagrams to depict portions of the neck for the purpose of showing certain notes, scales, etc. You may see these oriented vertically or horizontally, although horizontally is more common for the bass (vertical diagrams are used more often for guitar chords). See below for a description of how they work.
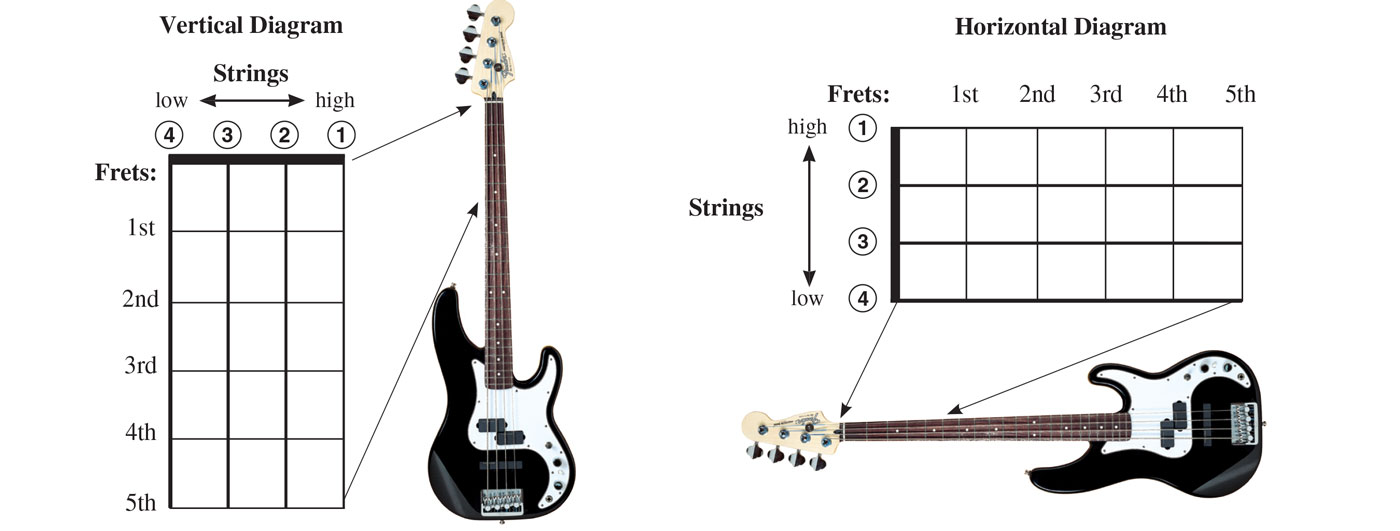
Vertical Diagram
The vertical diagram is like looking at the instrument hanging on a wall. The vertical lines represent the strings, with string 4 (the thickest, lowest pitched) located far left. The horizontal lines represent the frets, with the lowest fret number (often the nut) at the top. Again, though these are more common for guitar, you may see them for bass occasionally.
Horizontal Diagram
The horizontal diagram is the more commonly used fretboard diagram for bass and the one we’ll use in this book. This diagram is closer to a player’s perspective. It’s oriented as if you’d laid the instrument across your lap. The horizontal lines represent the strings, with string 4 (the thickest, lowest pitched) located at the bottom (or nearest your midsection). The vertical lines represent the frets, with the lowest fret number (often the nut) at the left.
Fret-hand Fingers
For simplicity, the fretting hand may be referred to as the “left hand” in this book, and the plucking hand may be referred to as the “right hand.” If you’re a leftie, just reverse these labels whenever you see them. The fingers of the fret hand are numbered as follows:

String Pitches
As mentioned earlier, the strings of the bass are referred to, with regard to high and low, by their music pitches—not their geography. This is a bit confusing at first, and you will certainly hear some people calling string 4 the “high” string because it’s the highest from the floor. However, string 4 is actually called the “low” string because it produces the lowest pitch. When tuned correctly, each string of the bass sounds a specific pitch. From lowest to highest, they are as follows:
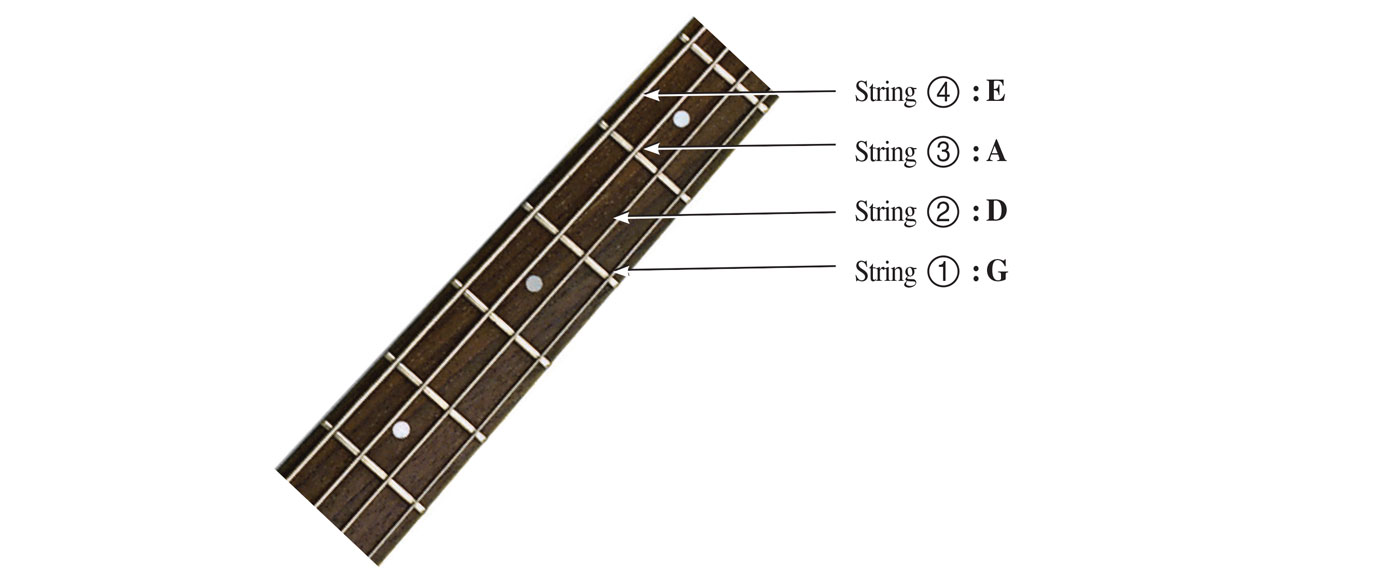
Of course, if you’ve ever seen a bass player play, you know that they don’t just play open strings. We use the frets to play different notes, as well. The lower the fret number (toward the nut), the lower the pitch; the higher the fret number (toward the bridge), the higher the pitch. We’ll discuss this in more detail soon enough.
Left-Hand Technique
In order to produce clean, accurate playing, you need to be mindful of the proper playing techniques for the instrument. Bad technique can not only lead to “sloppy” playing; in the worst cases, it can even lead to injury.
Take this section seriously!
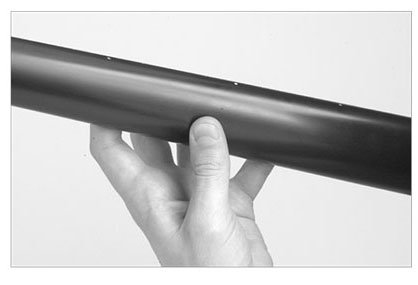
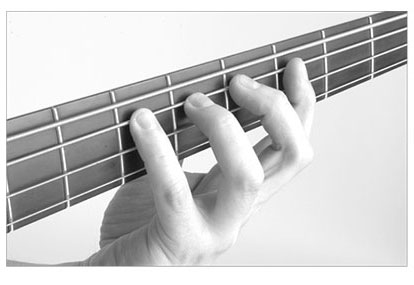
See the photos below for proper left-hand technique.
 |
 |
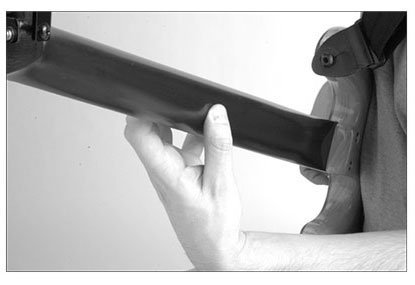 |
Place your thumb on the middle or underside of the bass neck. |
Place your finger just behind the fretwire in order to produce the cleanest-sounding note. |
Don’t let your palm touch the neck of the bass. |
Also remember these important fretting tips:
- Only use as much pressure as necessary. Pushing down too hard can cause the note to go sharp (too high) and lead to finger fatigue.
- If you place your finger too close to the fret or too far back (in the middle of two frets), you could get a buzzing sound. The cleanest tone is produced with your finger directly behind the fret.
Right-Hand Technique
There are two common methods used for plucking strings on a bass: with the fingers or with the pick, or plectrum.
Playing with the Fingers
This is the most common method of playing bass and is used in virtually all styles—from jazz and country to the heaviest of metal. To begin, rest your thumb on the pickup and place your index finger on string 4. Using the pad of the finger (not the tip), and keeping the knuckle closest to the tip straight, push slightly in toward the body of the bass as you pluck the string so that you’re plucking both across and slightly downward.

When plucking a string other than string 4, rest your thumb on string 4. Try plucking string 2 with your index finger. After plucking downward and through the string, let it come to rest against string 3.

Playing with a Pick
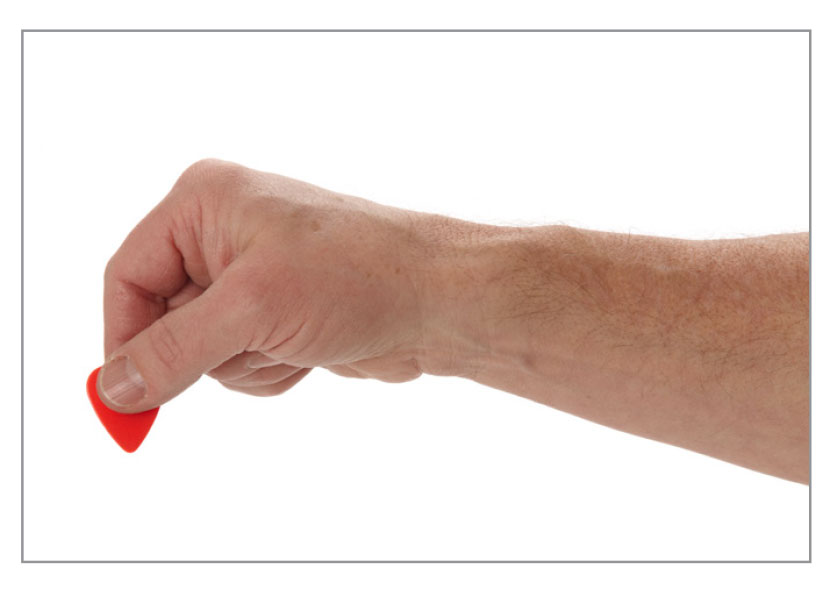
Pick-playing is most common in rock styles. Picks come in all shapes, sizes, and thicknesses, so you’ll probably want to go to a music store, buy one of several different kinds (it will only cost a few dollars), and try them out to see what you prefer. Hold the pick between your index finger and thumb. You don’t need to strangle it, but make sure it doesn’t come loose when you pick the string.
Most people pick from their wrist, though some people move their entire forearm. Try picking string 4 with a downstroke—that is, downward toward the floor. Don’t use too much extraneous motion; the pick should either remain close to string 3 or come to rest against it.

Posture
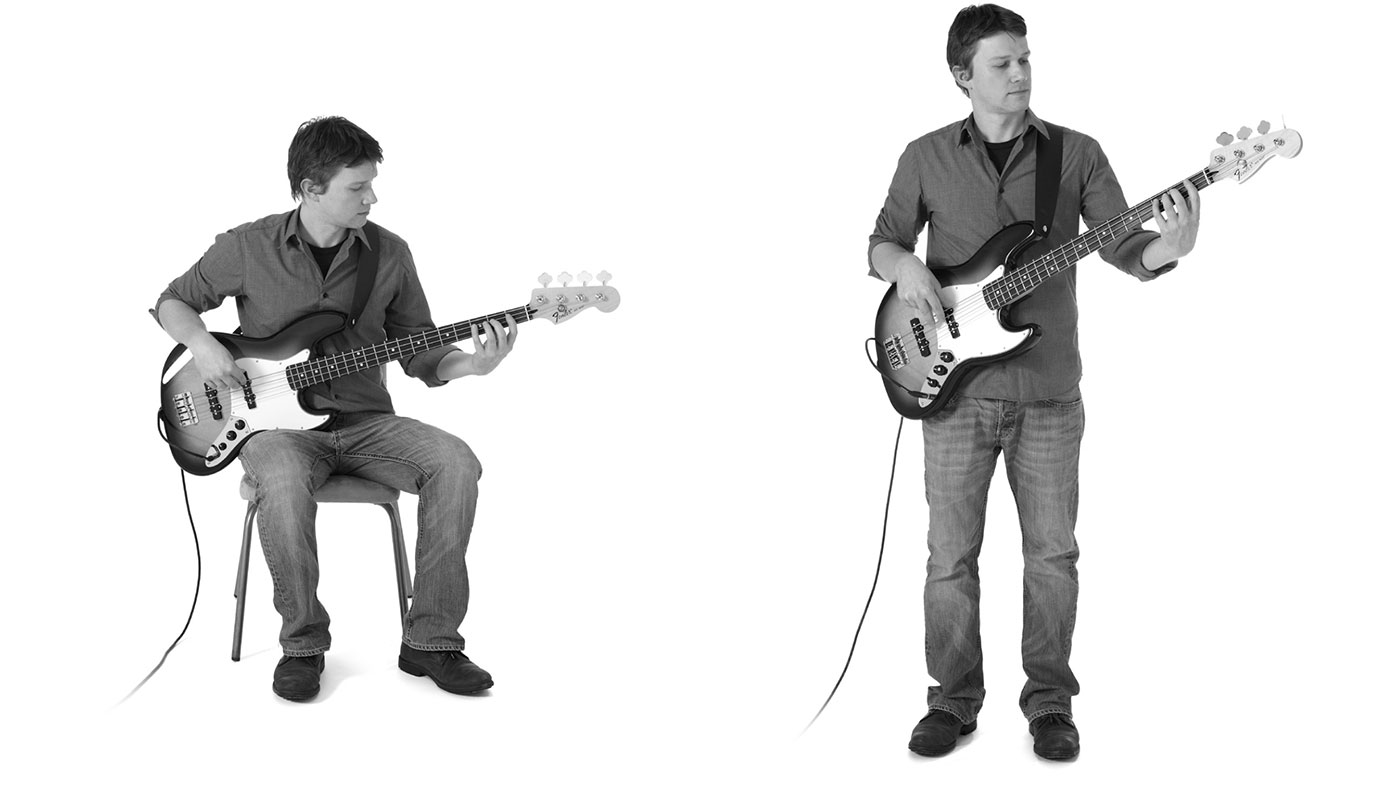
If sitting, don’t slouch and hunch over. Sit up straight and keep your shoulders and wrists relaxed. If standing, don’t wear your bass around your knees! Keep the following tips in mind:
- When sitting, place and balance the bass on your right leg (unless you’re a leftie).
- If you feel tension anywhere in your body, you most likely need to readjust. You should feel comfortable when playing.
- Tip the headstock slightly upward to make it easier for your fret hand to reach the notes.
- Don’t lean the bass toward you to peek at the neck. Besides the fact that your bass will most likely have fret markers along the edge of the fretboard, you’ll eventually want to be able to play without constantly looking at the notes.>
Tuning
Tuning pegs are used to raise or lower the pitch of your bass strings. The image below illustrates which tuning pegs correspond to which strings.
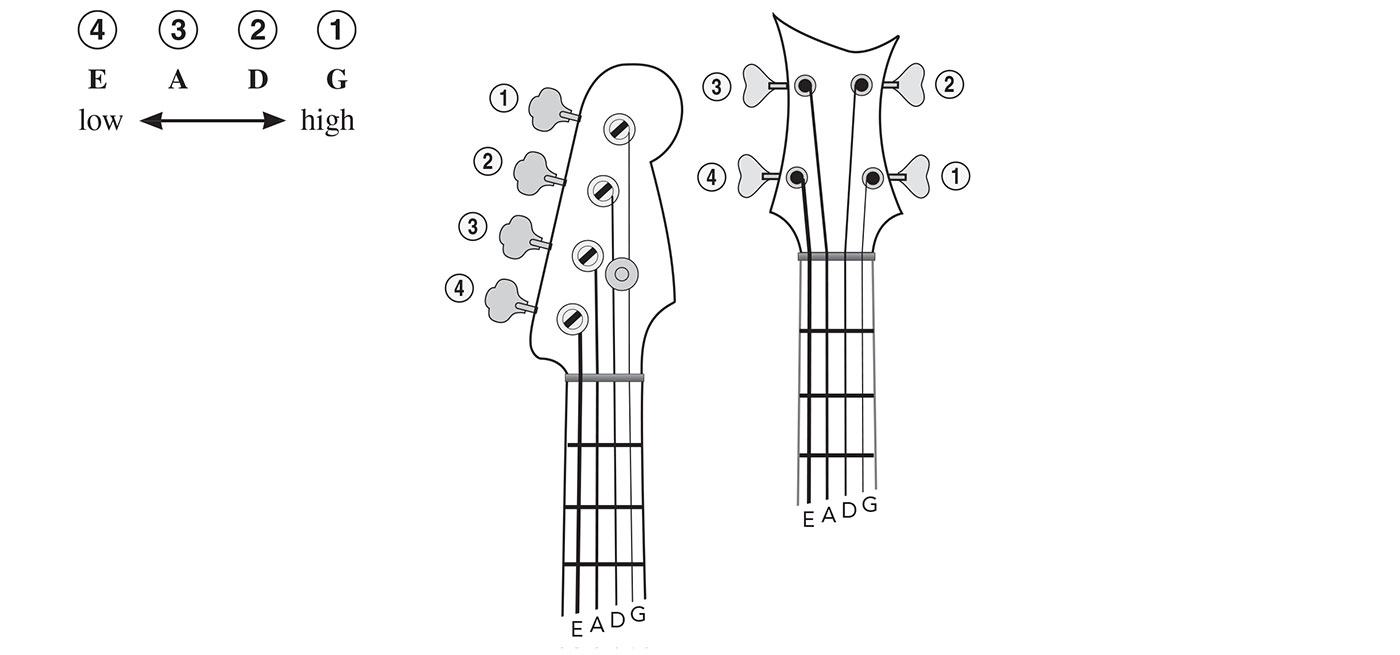
The process of raising or lowering the pitch of your bass guitar’s strings is called tuning. When every string is adjusted properly, your bass is said to be “in tune.”
Tuning pitches
For starters, match the open strings on your bass to the tuning pitches on the audio track. Of course, you won’t always have access to a track of bass tuning pitches, so you’ll need another way to tune your bass. Fortunately, there are several.
Electronic Tuner
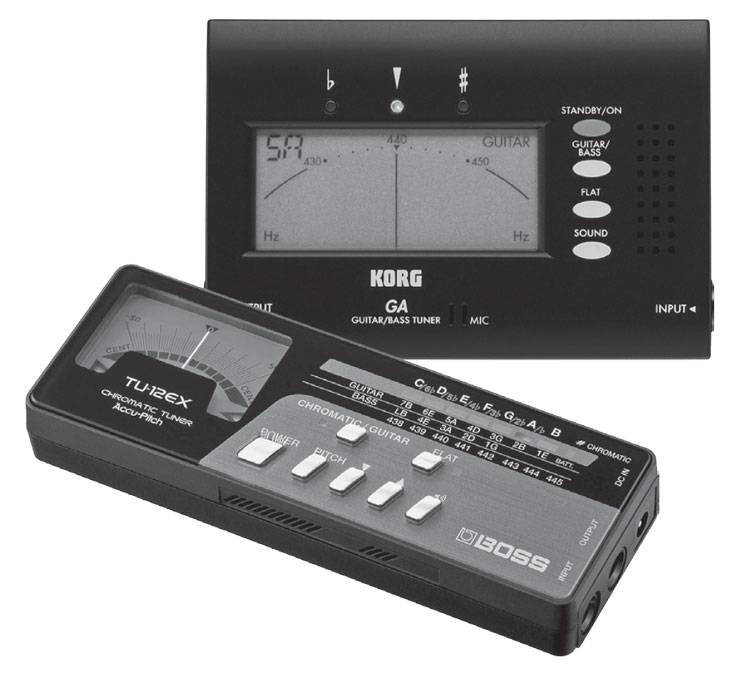
One of the most common methods for tuning is using an electronic tuner. This is a device that can tell you whether your bass strings are sharp (too high) or flat (too low). They come in all shapes and sizes—and range in price from $5 to over $100—but they all do a pretty good job. If you can, try to purchase a chromatic bass tuner, as it will read any pitch—not just those of the open bass strings—and allow you to use it for various other instruments, should you need to do so. (Note that bass tuners are often combined with guitar tuners.)
Piano or Keyboard
If you have access to a piano (that’s in tune!) or a keyboard, you can also use them to tune your bass. See below for the notes on the keyboard that correspond with your bass’s strings.

Relative Tuning
This involves tuning the instrument to itself, basically. It’s an indispensable skill that you’ll surely learn over time and is fabulous for developing your ear (i.e., improving your ability to hear and identify specific pitches). Here’s how it works:

- Tune string 4 to an E note by using a piano, pitch pipe, or any other available reference. If you have no available reference, estimate the pitch to the best of your ability.
- Press string 4 down at the fifth fret and pluck the string. This is the note A. Tune the open third string to match this pitch.
- Press string 3 down at the fifth fret and pluck the string. This is the note D. Tune the open second string to match this pitch.
- Press string 2 down at the fifth fret and pluck the string. This is the note G. Tune the open first string to match this pitch.
Here are some important tuning tips, regardless of the method:
- Turn the pegs slowly at first, until you’re comfortable with hearing the pitches change. You’ll almost certainly need to pluck the string several times when tuning it at first.
- You’ll hear a series of pulses, or waves, when matching a pitch. These are called beats. The closer the beats are together, the more out of tune the string is. As you get the string closer to matching the pitch, the beats get farther apart. When they’ve disappeared altogether, the string is in tune.
- Always tune up to a pitch, rather than down to it. If you start tuning a string and discover that it’s sharp (too high in pitch), begin by lowering it to where it’s flat (too low), and then tune it back up to pitch. This will help thring stay in tune better in the long run.