We are going to see how to perform handwritten digit recognition using the kNN classifier. We will start with a basic script that achieves an acceptable accuracy, and we will modify it to increase its performance.
In these scripts, the training data is composed of handwritten digits. Instead of having many images, OpenCV provides a big image with handwritten digits inside. This image has a size of 2,000 x 1,000 pixels. Each digit is 20 x 20 pixels. Therefore, we have a total of 5,000 digits (100 x 50):

In the knn_handwritten_digits_recognition_introduction.py script, we are going to perform our first approach trying to recognize digits using the kNN classifier. In this first approach, we will use raw pixel values as features. This way, each descriptor will be a size of 400 (20 x 20).
The first step is to load all digits from the big image and to assign the corresponding label for each digit. This is performed with the load_digits_and_labels() function:
digits, labels = load_digits_and_labels('digits.png')
The code for the load_digits_and_labels() function is as follows:
def load_digits_and_labels(big_image):
    """Returns all the digits from the 'big' image and creates the corresponding labels for each image"""

    # Load the 'big' image containing all the digits:
    digits_img = cv2.imread(big_image, 0)

    # Get all the digit images from the 'big' image:
    number_rows = digits_img.shape[1] / SIZE_IMAGE
    rows = np.vsplit(digits_img, digits_img.shape[0] / SIZE_IMAGE)

    digits = []
    for row in rows:
        row_cells = np.hsplit(row, number_rows)
        for digit in row_cells:
            digits.append(digit)
    digits = np.array(digits)

    # Create the labels for each image:
    labels = np.repeat(np.arange(NUMBER_CLASSES), len(digits) / NUMBER_CLASSES)
    return digits, labels
In the previous function, we first load the 'big' image and, afterwards, we get all the digits inside it. The last step of the previous function is to create the labels for each of the digits.
The next step performed in the script is to compute the descriptors for each image. In this case, the raw pixels are the feature descriptors:
# Compute the descriptors for all the images.
# In this case, the raw pixels are the feature descriptors
raw_descriptors = []
for img in digits:
    raw_descriptors.append(np.float32(raw_pixels(img)))
raw_descriptors = np.squeeze(raw_descriptors)
At this point, we split the data into training and testing (50% for each). Therefore, 2,500 digits will be used to train the classifier, and 2,500 digits will be used to test the trained classifier:
partition = int(0.5 * len(raw_descriptors))
raw_descriptors_train, raw_descriptors_test = np.split(raw_descriptors, [partition])
labels_train, labels_test = np.split(labels, [partition])
Now, we can train the kNN model using knn.train() method and test it using get_accuracy() function:
# Train the KNN model:
print('Training KNN model - raw pixels as features')
knn = cv2.ml.KNearest_create()
knn.train(raw_descriptors_train, cv2.ml.ROW_SAMPLE, labels_train)

# Test the created model:
k = 5
ret, result, neighbours, dist = knn.findNearest(raw_descriptors_test, k)

# Compute the accuracy:
acc = get_accuracy(result, labels_test)
print("Accuracy: {}".format(acc))
As we can see, k = 5. We obtain an accuracy of 92.60, but I think it can be improved.
The first thing we can do is to try with different values of k, which is a key parameter in the kNN classifier. This modification is carried out in the knn_handwritten_digits_recognition_k.py script.
In this script, we will create a dictionary to store accuracy when testing different values of k:
results = defaultdict(list)
Note that we have imported defaultdict from collections:
from collections import defaultdict
The next step is to compute the knn.findNearest() method, varying the k parameter (in this case, in the range of (1-9)) and storing the results in the dictionary:
for k in np.arange(1, 10):
    ret, result, neighbours, dist = knn.findNearest(raw_descriptors_test, k)
    acc = get_accuracy(result, labels_test)
    print(" {}".format("%.2f" % acc))
    results['50'].append(acc)
The final step is to plot the result:
# Show all results using matplotlib capabilities:
fig, ax = plt.subplots(1, 1)
ax.set_xlim(0, 10)
dim = np.arange(1, 10)

for key in results:
    ax.plot(dim, results[key], linestyle='--', marker='o', label="50%")

plt.legend(loc='upper left', title="% training")
plt.title('Accuracy of the KNN model varying k')
plt.xlabel("number of k")
plt.ylabel("accuracy")
plt.show()
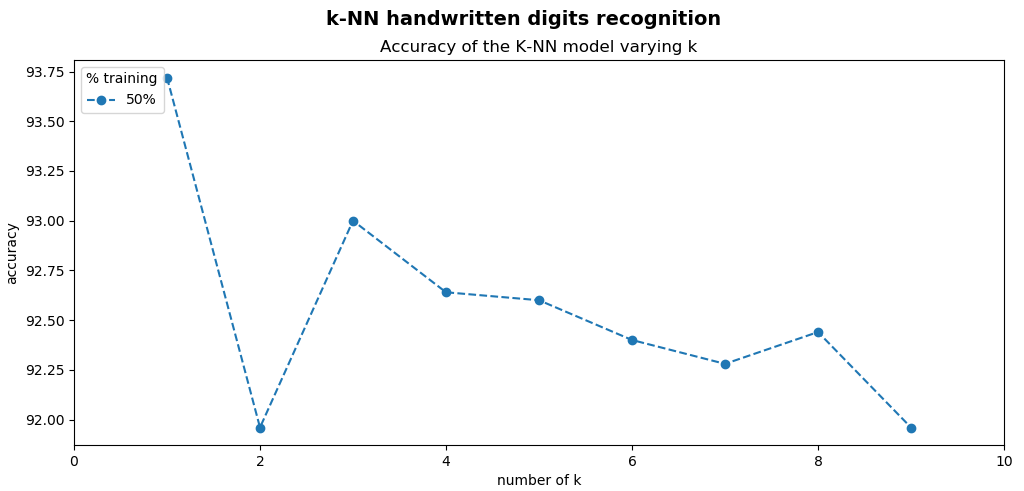
To show the results, we make you of matplotlib capabilities to plot the figure. The output of this script can be seen in the next screenshot:

As you can see in the previous screenshot, the obtained accuracies by varying the k parameter are—k=1—93.72, k=2—91.96, k=3—93.00, k=4—92.64, k=5—92.60, k=6—92.40, k=7—92.28, k=8—92.44, and k=9—91.96.
In these examples, we have been training and testing the model with 2,500 digits each.
In machine learning, training the classifiers with more data is usually a good idea because the classifier can better learn the structure of the features. In connection with the kNN classifier, increasing the number of training digits will also increase the probability to find the correct match of test data in the feature space.
In the knn_handwritten_digits_recognition_k_training_testing.py script, we have modified the percentage of images to train and test the model, as follows:
# Split data into training/testing:
split_values = np.arange(0.1, 1, 0.1)

for split_value in split_values:
    # Split the data into training and testing:
    partition = int(split_value * len(raw_descriptors))
    raw_descriptors_train, raw_descriptors_test = np.split(raw_descriptors, [partition])
    labels_train, labels_test = np.split(labels, [partition])

    # Train KNN model
    print('Training KNN model - raw pixels as features')
    knn.train(raw_descriptors_train, cv2.ml.ROW_SAMPLE, labels_train)

    # Store the accuracy when testing:
    for k in np.arange(1, 10):
        ret, result, neighbours, dist = knn.findNearest(raw_descriptors_test, k)
        acc = get_accuracy(result, labels_test)
        print(" {}".format("%.2f" % acc))
        results[int(split_value * 100)].append(acc)
As can be seen, the percentage of digits to train the algorithm are 10%, 20%, ..., 90%, and the percentage of digits to test the algorithm are 90%, 80%, ..., 10%.
And finally, we plot the results:
# Show all results using matplotlib capabilities:
# Create the dimensions of the figure and set title:
fig = plt.figure(figsize=(12, 5))
plt.suptitle("k-NN handwritten digits recognition", fontsize=14, fontweight='bold')
fig.patch.set_facecolor('silver')

ax = plt.subplot(1, 1, 1)
ax.set_xlim(0, 10)
dim = np.arange(1, 10)

for key in results:
    ax.plot(dim, results[key], linestyle='--', marker='o', label=str(key) + "%")

plt.legend(loc='upper left', title="% training")
plt.title('Accuracy of the KNN model varying both k and the percentage of images to train/test')
plt.xlabel("number of k")
plt.ylabel("accuracy")
plt.show()
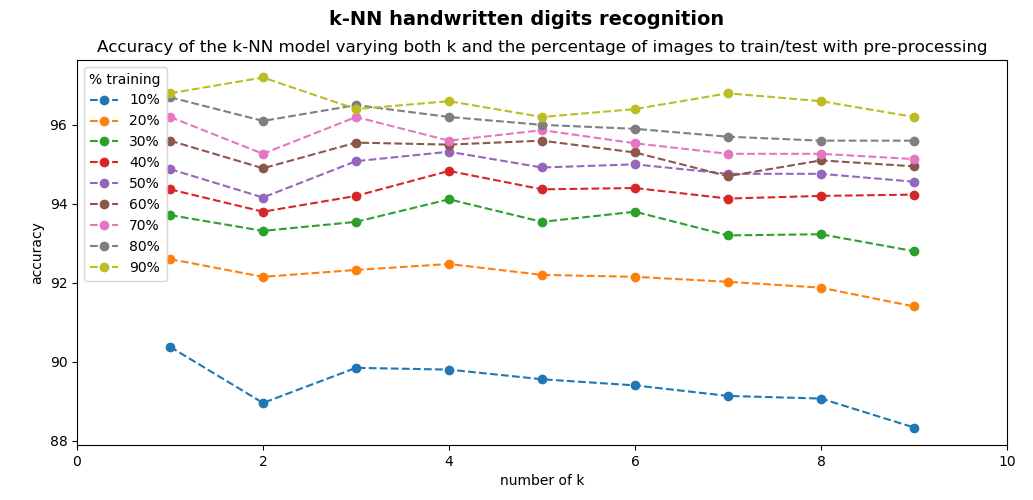
The output of the knn_handwritten_digits_recognition_k_training_testing.py script can be seen in the next screenshot:

As the number of training images increases, the accuracy increases. Additionally, when we are training the classifier with 90% of the digits, we are testing the classifier with the remaining 10% of the digits, which is equivalent to testing the classifier with 500 digits, a significant number for testing.
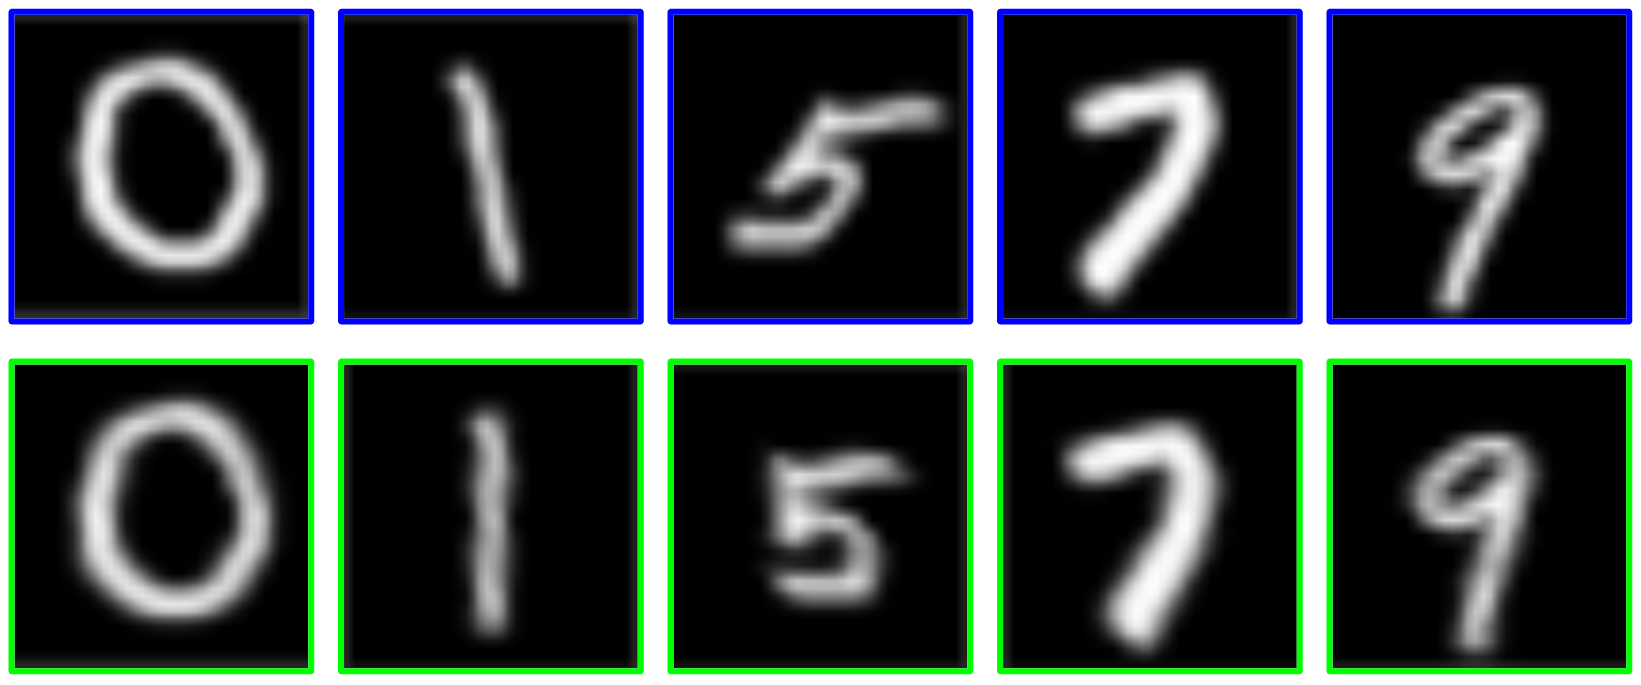
So far, we have been training the classifier with raw pixel values as features. In machine learning, a common procedure before training the classifier is to perform some kind of preprocessing to the input data helping the classifier when training. In the knn_handwritten_digits_recognition_k_training_testing_preprocessing.py script, we are applying a preprocessing in order to reduce the variability in the input digits.
This preprocessing is performed in the deskew() function:
def deskew(img):
    """Pre-processing of the images"""

    m = cv2.moments(img)
    if abs(m['mu02']) < 1e-2:
        return img.copy()
    skew = m['mu11'] / m['mu02']
    M = np.float32([[1, skew, -0.5 * SIZE_IMAGE * skew], [0, 1, 0]])
    img = cv2.warpAffine(img, M, (SIZE_IMAGE, SIZE_IMAGE), flags=cv2.WARP_INVERSE_MAP | cv2.INTER_LINEAR)
    return img
The deskew() function de-skews the digit by using its second-order moments. More specifically, a measure of the skew can be calculated by the ratio of the two central moments (mu11/mu02). The calculated skew is used in calculating an affine transformation, which de-skews the digits. See the next screenshot to appreciate the effect of this preprocessing. In the top part of the screenshot, the original digits (blue border) are shown, while in the bottom part of the screenshot, the preprocessed digits (green border) are shown:

By applying this preprocessing, the recognition rate is increased, as can be seen in the next screenshot, where the recognition rates are plotted:

If you compare the accuracy obtained in this script, which performs a preprocessing in the input data and the previous script, which does not carry out any preprocessing, you can see that the overall accuracy has been increased.
In all of these scripts, we have been using the raw pixel values as feature descriptors. In machine learning, a common approach is to use more advanced descriptors. Histogram of Oriented Gradients (HOG) is a popular image descriptor.
HOG is a popular feature descriptor used in computer vision, which was first used for human detection in static images. In the knn_handwritten_digits_recognition_k_training_testing_preprocessing_hog.py script, we will use HOG features instead of raw pixel values.
We have defined the get_hog() function, which gets the HOG descriptor:
def get_hog():
    """Get hog descriptor"""

    # cv2.HOGDescriptor(winSize, blockSize, blockStride, cellSize, nbins, derivAperture, winSigma, histogramNormType,
    # L2HysThreshold, gammaCorrection, nlevels, signedGradient)
    hog = cv2.HOGDescriptor((SIZE_IMAGE, SIZE_IMAGE), (8, 8), (4, 4), (8, 8), 9, 1, -1, 0, 0.2, 1, 64, True)
    print("hog descriptor size: '{}'".format(hog.getDescriptorSize()))
    return hog
In this case, the feature descriptor for every image is size 144. In order to compute the HOG descriptor to every image, we must perform the following:
# Compute the descriptors for all the images.
# In this case, the HoG descriptor is calculated
hog_descriptors = []
for img in digits:
    hog_descriptors.append(hog.compute(deskew(img)))
hog_descriptors = np.squeeze(hog_descriptors)
As you can see, we apply hog.compute() to every de-skewed digit.
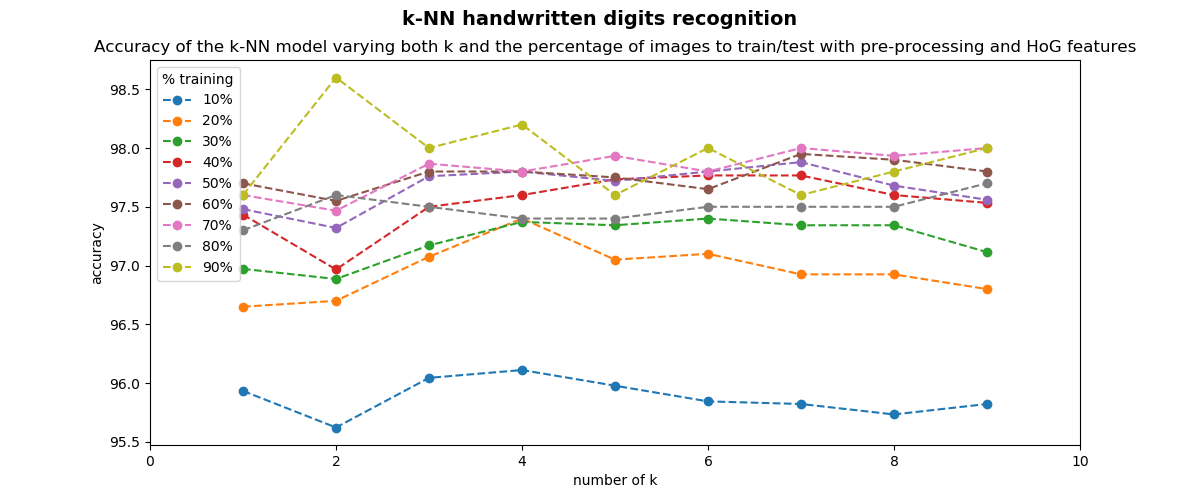
The results can be seen in the next screenshot:

An accuracy of 98.60% is achieved when k=2 and 90% of the digits are used for training and 10% of the digits are used for testing. Therefore, we have increased the recognition rate from 92.60% (obtained in the first script of this subsection) to 98.60% (obtained in the previous script).