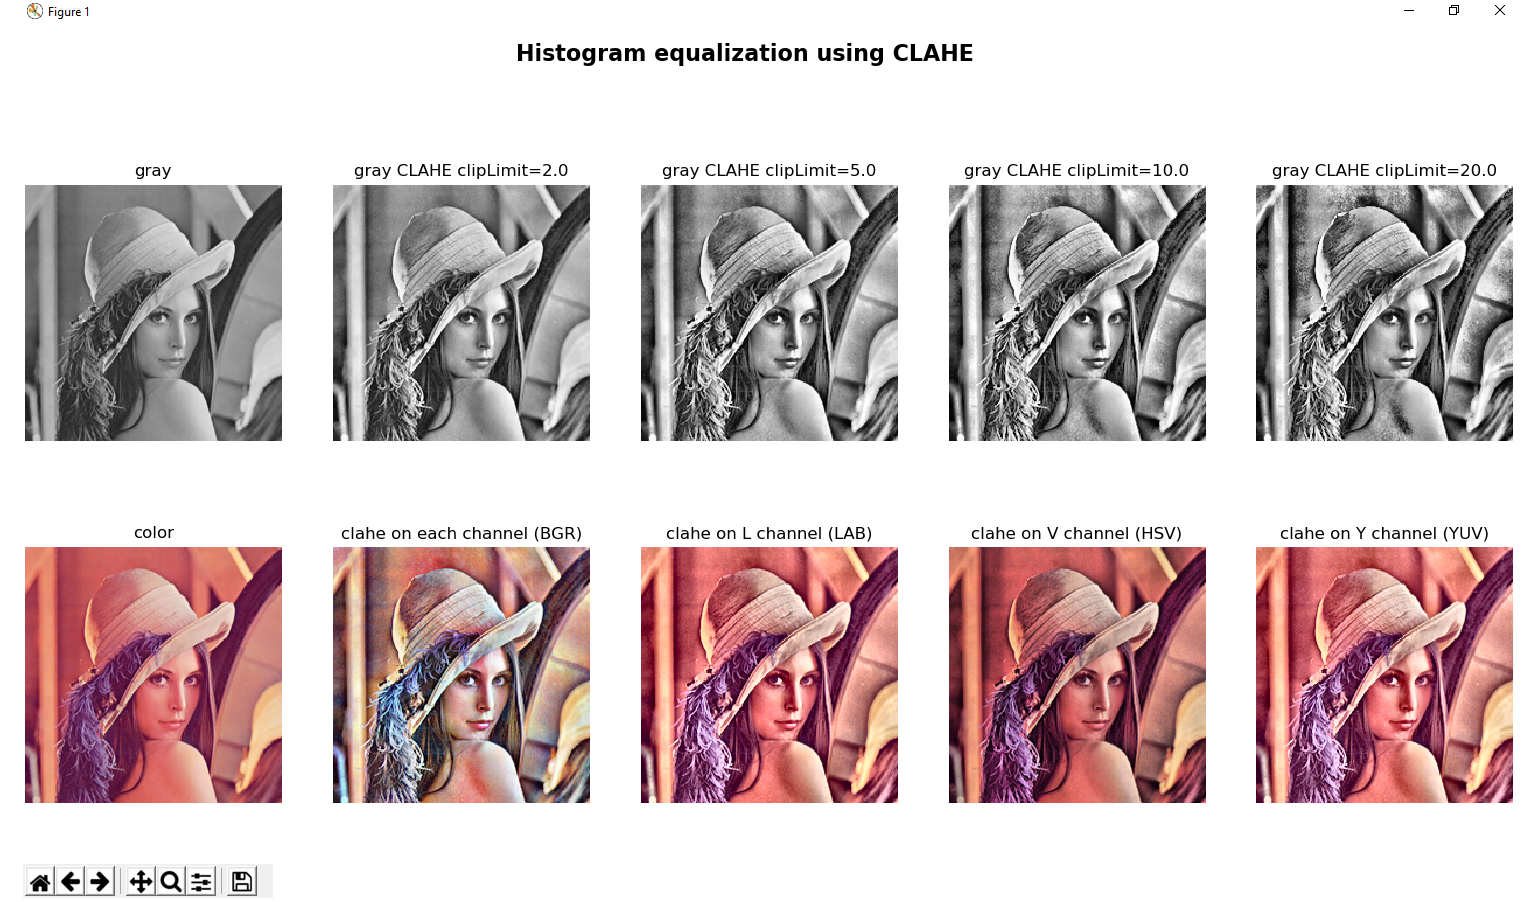
In this section, we are going to see how to apply contrast limited adaptive histogram equalization (CLAHE) to equalize images, which is a variant of adaptive histogram equalization (AHE), in which contrast amplification is limited. The noise in relatively homogeneous regions of the image is overamplified by AHE, while CLAHE tackles this problem by limiting the contrast amplification. This algorithm can be applied to improve the contrast of images. This algorithm works by creating several histograms of the original image, and uses all of these histograms to redistribute the lightness of the image.
In the clahe_histogram_equalization.py script, we are applying CLAHE to both grayscale and color images. When applying CLAHE, there are two parameters to tune. The first one is clipLimit, which sets the threshold for contrast limiting. The default value is 40. The second one is tileGridSize, which sets the number of tiles in the row and column. When applying CLAHE, the image is divided into small blocks called tiles (8 x 8 by default) in order to perform its calculations.
To apply CLAHE to a grayscale image, we must perform the following:
clahe = cv2.createCLAHE(clipLimit=2.0)
gray_image_clahe = clahe.apply(gray_image)
Additionally, we can also apply CLAHE to color images, very similar to the approach commented in the previous section for the contrast equalization of color images, where the results after equalizing only the luminance channel of an HSV image are much better than equalizing all the channels of the BGR image.
In this section, we are going to create four functions in order to equalize the color images by using CLAHE only on the luminance channel of different color spaces:
def equalize_clahe_color_hsv(img):
    """Equalize the image splitting after conversion to HSV and applying CLAHE
    to the V channel and merging the channels and convert back to BGR
    """

    cla = cv2.createCLAHE(clipLimit=4.0)
    H, S, V = cv2.split(cv2.cvtColor(img, cv2.COLOR_BGR2HSV))
    eq_V = cla.apply(V)
    eq_image = cv2.cvtColor(cv2.merge([H, S, eq_V]), cv2.COLOR_HSV2BGR)
    return eq_image


def equalize_clahe_color_lab(img):
    """Equalize the image splitting after conversion to LAB and applying CLAHE
    to the L channel and merging the channels and convert back to BGR
    """

    cla = cv2.createCLAHE(clipLimit=4.0)
    L, a, b = cv2.split(cv2.cvtColor(img, cv2.COLOR_BGR2Lab))
    eq_L = cla.apply(L)
    eq_image = cv2.cvtColor(cv2.merge([eq_L, a, b]), cv2.COLOR_Lab2BGR)
    return eq_image


def equalize_clahe_color_yuv(img):
    """Equalize the image splitting after conversion to YUV and applying CLAHE
    to the Y channel and merging the channels and convert back to BGR
    """

    cla = cv2.createCLAHE(clipLimit=4.0)
    Y, U, V = cv2.split(cv2.cvtColor(img, cv2.COLOR_BGR2YUV))
    eq_Y = cla.apply(Y)
    eq_image = cv2.cvtColor(cv2.merge([eq_Y, U, V]), cv2.COLOR_YUV2BGR)
    return eq_image


def equalize_clahe_color(img):
    """Equalize the image splitting the image applying CLAHE to each channel and merging the results"""

    cla = cv2.createCLAHE(clipLimit=4.0)
    channels = cv2.split(img)
    eq_channels = []
    for ch in channels:
        eq_channels.append(cla.apply(ch))

    eq_image = cv2.merge(eq_channels)
    return eq_image
The output for this script can be seen in the next screenshot, where we compare the result after applying all these functions to a test image:

In the previous screenshot, we can see the result after applying CLAHE on a test image by varying the clipLimit parameter. Additionally, we can see the different results after applying CLAHE on the luminance channel in different color spaces (LAB, HSV, and YUV). Finally, we can see the wrong approach of applying CLAHE on the three channels of the BGR image.